Data lookups
Use the Data lookup page to create and manage data lookups, which can be used to retrieve data from third-party services.
After you create the data lookup, you can use the Data lookup form control or External data variables on your form to display data from third-party services.
When you configure the Data lookup form control in forms or use the external data variables, your third-party service data will be accessible to form designers and participants (end-users).
With data lookup permissions, you can manage access for other users to use, edit, and delete data lookups. For more information, see Assign data lookup permissions.
Jump to:
You can create data lookups for:
Access the Data lookup page
-
Go to Workflows > Data lookups.
Create a connection for your data lookup
You need to add a connection in your Nintex Workflow tenant to configure a data lookup. You can use an existing connection to create a data lookup or if you want to use a new connection you must create the connection before you start configuring a data lookupn. For more information about creating a connection for your data lookup, see Connectors.
Caution: Deleting a connection will impact all data lookups and forms (with Data lookup form control) using that connection.
Create a data lookup
Note: As a designer, you should either have Owners or Users permission for the required connection in order to use it to create a data lookup. For information about connection permissions, see Assign User and Owner permissions to connections. By default, users with administrator role will have the same rights as Owners of a connection.
- Go to Workflows > Data lookups.
- Click Add data lookup.
- In the Add data lookup section, do the following:
- Enter a name and description for the data lookup.
- Select a Connector and the corresponding Operation. For example:
- Connector: Google Directory
- Operation: Get groups
- Select a Connection.
- Configure the data lookup fields depending on the selected connection. For information about a specific connection, see Connectors.
Note: Any of the optional inputs in this section that are unpopulated will be configurable in the Nintex Forms designer Data lookup form control.
- Click Save data lookup.
- In the permissions dialog, you can do the following:
- In the Data lookup owners field, type the name of the user, and select from the list.
- In the Data lookup users field, type the name of the user, and select from the list.
For information on user permissions, see Assign data lookup permissions.
- Click Save permissions.
Note: The name must not include any of the following characters: < > " ' ` \ / { } [ ] % $ # * ^ ! @ ~ ? = , ;
Note: Once the data lookup is saved, the Connector and Operation fields cannot be edited.
The permissions dialog is displayed.
The newly added data lookup is listed in the Data lookup page. You can now use a Data lookup form control to display a list of input values from the connected third-party service.
Assign data lookup permissions
Permissions enable you to manage access for other users to use, edit, and delete data lookups.
| Use |
Edit |
Delete |
Assign |
|
|---|---|---|---|---|
|
Connection owners |
✔ | ✔ | ✔ | ✔ |
|
Data lookup editors |
✔ | ✔ | ✔ | ✘ |
| Data lookup users | ✔ | ✘ | ✘ | ✘ |
Note: By default, users with administrator role will have the same rights as a Connection owner.
Follow these steps to assign data lookup permissions from the Data lookups page:
- Go to Workflows > Data lookups.
- To the right of the Data lookup to which you want to assign permission, click
 .
. - Select Permissions.
- To assign permissions:
- In the Data lookup editors field, type the name of the user, and select from the list.
- In the Data lookup users field, type the name of the user, and select from the list.
The corresponding data lookup permissions window is displayed.
- Click Save Permissions.
Data lookups columns, fields, and selections
| Section | Field or selection | Description | ||||||||||||
|---|---|---|---|---|---|---|---|---|---|---|---|---|---|---|
| Data lookups | Name | Name specified when the data lookup is added. Example: Google Directory - Get groups | ||||||||||||
| Description | Description to identify the purpose of the data lookup. | |||||||||||||
| Connector | Connector specified when the data lookup is added. Example: Google Directory. | |||||||||||||
| Connection | Connection used to create the data lookup is added. Example: GoogleDirectoryConnection. | |||||||||||||
| Date created | Date and time when the data lookup is added. | |||||||||||||
| Created by | Name of the data lookup creator. | |||||||||||||
| Date modified | Date and time when the data lookup is edited. | |||||||||||||
| Modified by | Name of the user that last edit the data lookup. | |||||||||||||
Options ( ) ) |
Lists the following options for the selected data lookup:
|
|||||||||||||
| Add new | Data lookup name | Name of the data lookup to be created. | ||||||||||||
| Description | Description to identify the purpose of the data lookup. | |||||||||||||
| Connector | Lists the available connectors. | |||||||||||||
| Operation | Displays the operation available for the selected Connector. For more information, see Connectors and Xtensions. | |||||||||||||
| Save data lookup | Adds the data lookup in the Data lookups page. | |||||||||||||
| Cancel | Closes the Add new section. |
Manage data lookups
Editing data lookups that are used in Data lookup form controls may impact the forms with the associated Data lookup form control.
You may encounter an error when editing a data lookup due to one of the following reasons:
-
It's an old data lookup and the operation for the data lookup may not exist or may have been updated.
-
The output of the Azure Active Directory - Query users action has been updated to include a collection variable named Users to store the properties of the users returned by the query. Existing Azure Active Directory data lookups created before the output of the action was updated will work but you may see an error if you try to edit existing Azure Active Directory data lookup. If you want to leverage the new functionality in your data lookup you must create a new data lookup. If you want to use a new Azure Active Directory data lookup or if you encounter an error when you edit an existing Azure Active Directory data lookup:
-
Delete the existing Azure Active Directory data lookup.
-
Create a new Azure Active Directory data lookup.
-
If you have any Data lookup form controls using the old Azure Active Directory data lookup, reconnect it to the new data lookup.
-
You can edit a data lookup, if you:
- are the creator of the data lookup.
- have Data lookup owners permission.
- are the owner of the connection that is used in the data lookup. For more information, see Assign data lookup permissions.
By default, users with administrator role will have the same rights as an owner of a connection.
By default, if you are the owner of the connection that is used in the data lookup, you can edit data lookup permissions. For more information, see Assign data lookup permissions.
By default, users with administrator role will have the same rights as an owner of a connection.
-
Any changes made to a data lookup will impact the forms with the associated Data lookup form control.
- You cannot edit the Connector and Operation fields. Instead, you can add a new data lookup with the required connector and operation. For field information, see Data lookups columns, fields, and selections.
- Go to Workflows > Data lookups.
- To the right of the data lookup that you want to edit, click
 .
. - Click Edit.
- The Edit data lookup section appears.
- Update the configuration as required.
- Click Save data lookup.
Once the data lookup is saved, you can configure the Data lookup form control to add a drop-down field to display a list of input values from the connected third-party service.
You can delete, if you:
- are the creator of the data lookup.
- have Data lookup owners permissions.
- are the owner of the connection that is used in the data lookup. For more information, see Assign data lookup permissions.
By default, users with administrator role will have the same rights as an owner of a connection.
- Go to Workflows > Data lookups.
- To the right of the data lookup that you want to delete, click
 .
. - Click Delete.
- The Delete data lookup dialog appears.
-
Click Save data lookup.
Note: Deleting a data lookup will impact the associated forms containing the related Data lookup form control.
The data lookup is removed from the Data lookups page.
Example: Using a data lookup
In this example we will guide you on how to create a SharePoint Online data lookup to retrieve data from existing SharePoint Online lists.
Let's say you are creating a job application form that lets the applicants:
- Choose the following field values from a drop-down:
- Job Location
- Job Type
- Job Title
The field selections will filter down the list of jobs available in another drop-down to select.
- Add applicant details
- Submit the form
In this example, we will also set conditions so that when a job applicant selects the Job Location, the Job Type drop-down displays the type that is only available for the selected location and subsequently the Job Title.
Assuming that we have the following:
-
 Connection to access the SharePoint Online list
Create a SharePoint Online connection to access the relevant SharePoint Online Tenant URL. For configuration details for the specific connector, see Connectors.
For this example, we will need to create data lookups to retrieve:
- Go to Workflows > Data lookups.
- Click Add data lookup.
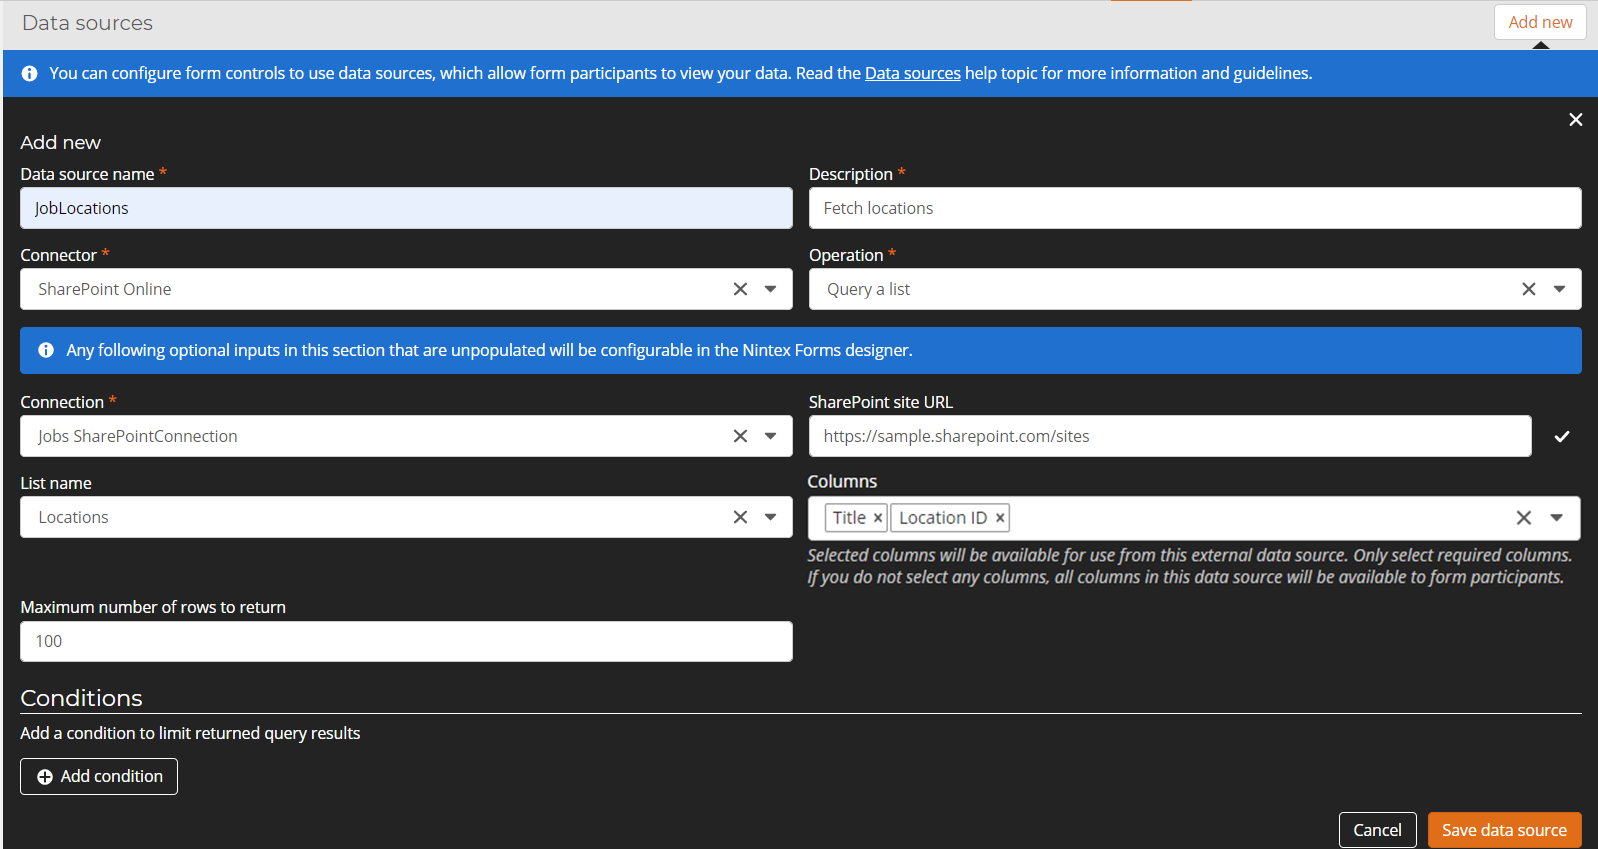
- For Data lookup name, type "JobLocations".
- For Description, type "Fetch locations".
- For Connector, select SharePoint Online.
- For Operation, select Query a list.
- For Connection, select the SharePoint Online connection created for the data lookup.
- Type the SharePoint site URL and click Retrieve lists.
- For List name, select the Locations list from the drop-down.
- For Columns, select Title and Location ID.
- For Item limit, type the maximum number of rows to fetch from the list.
- Click Save data lookup.
- Go to Workflows > Data lookups.
- Click Add data lookup.
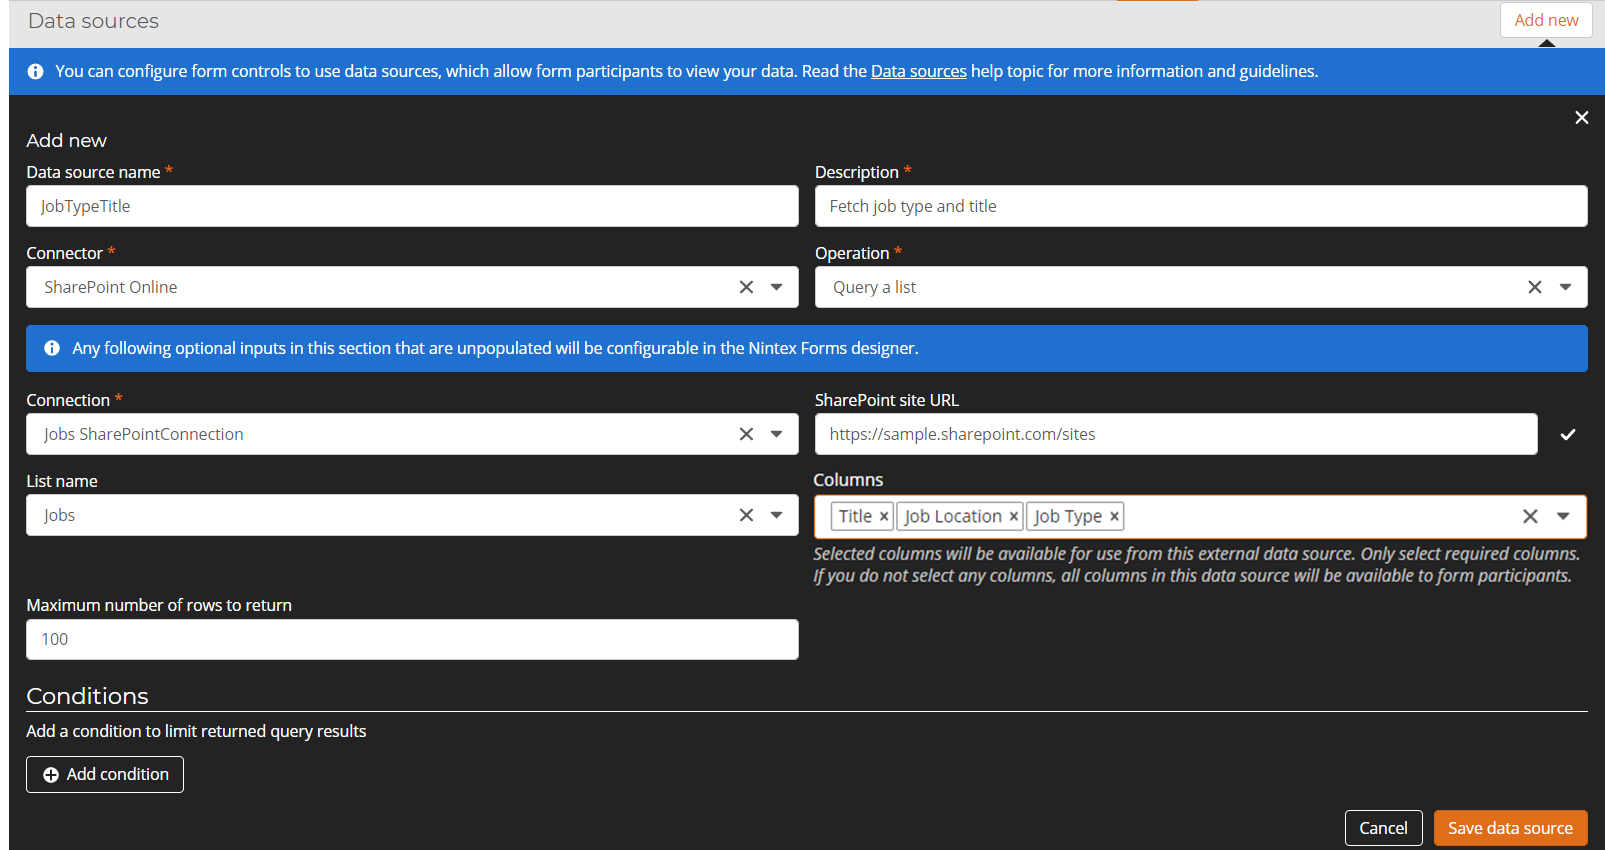
- For Data lookup name, type "JobTypeTitle".
- For Description, type "Fetch job type and title".
- For Connector, select SharePoint Online.
- For Operation, select Query a list.
- For Connection, select the SharePoint Online connection created for the data lookupe.
- Type the SharePoint site URL and click Retrieve lists.
- For List name, select the Jobs list from the drop-down.
- For Columns, select Title, Job Location, and Job Type.
- For Item limit, type the maximum number of rows to fetch from the list.
- Click Save data lookup.
- Go to Workflows > All workflows.
- Click Create workflow to open the Workflow designer.
- Click the Start event to open the configuration.
- Select Form in the Start from field.
- Select to make the form available in:
- URL
- Nintex Mobile and My Nintex
- Click Design Form.
The form designer opens.
In the forms designer:
-
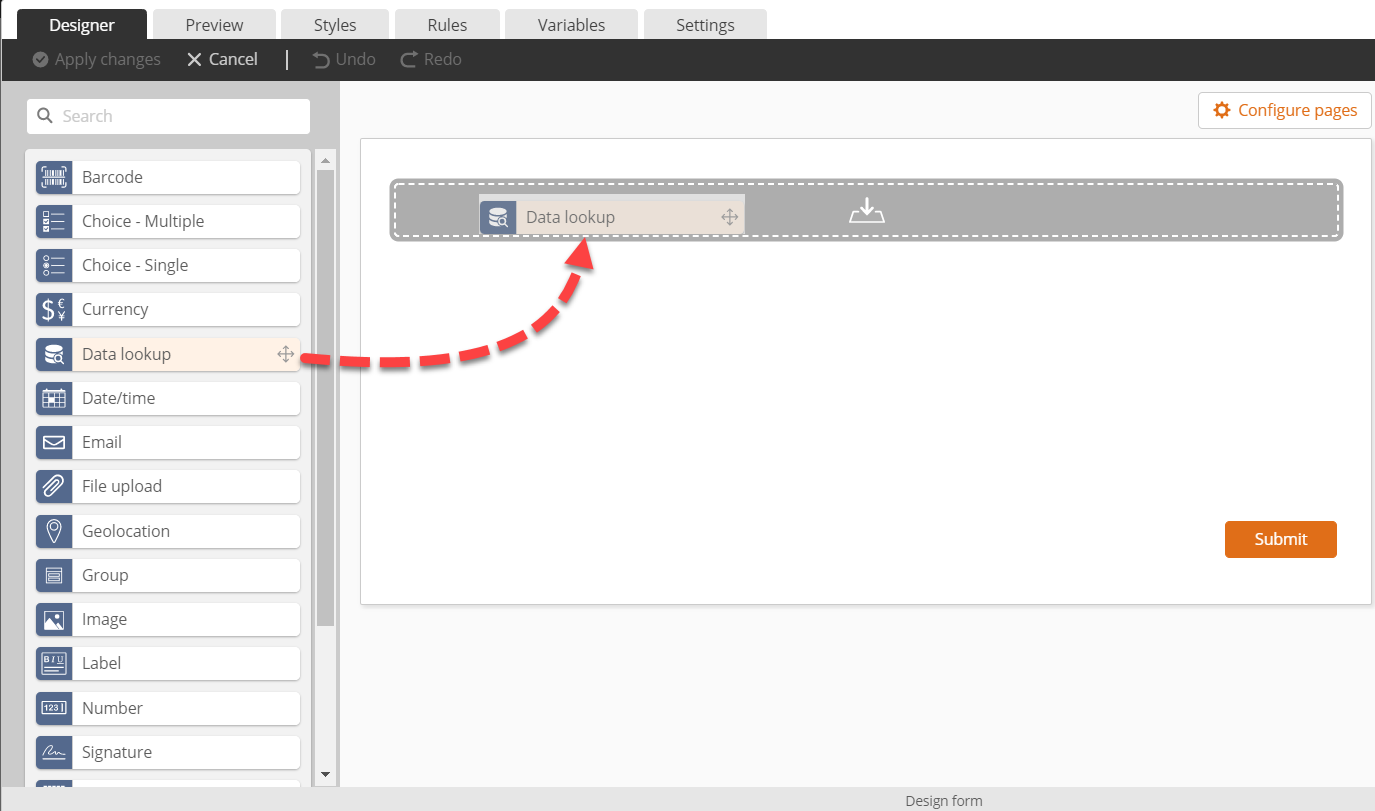
Drag a Data lookup form control onto the form designer canvas.
- To create data lookup for Job Location: Click on the data lookup form control to open the configuration panel.
- For the Title, type "Job Location".
- Click Data lookup configuration and do the following:
- Select JobLocations for the data lookup.
- Click Back to complete configuration.
- For Option label, select Title.
- For Option value, select Title.
- To create a data lookup for Job Type:
- Drag and drop a Data lookup form control onto the form designer canvas.
- Click on the data lookup form control to open the configuration panel.
- For the Title, type Job Type.
- Click Data lookup configuration and do the following:
- Select JobTypeTitle for the data lookup.
- Click Add condition and do the following:
- For When, select Job Location.
- For Operator, select equals (ignore case).
- For Value, click + Variable > Form controls.
- Hover over the Job Location variable and then click
 .
. - Click Save condition.
- Click Back to complete configuration.
- For Option label, choose Job Type.
- For Option value, choose Job Type.
- To create a data lookup for Job Title:
- Drag and drop a Data lookup form control onto the form designer canvas.
- Click on the Data lookup form control to open the configuration panel.
- For the Title, type Job Title.
- Click Data lookup configuration and do the following:
- Select JobTypeTitle for the data lookup.
- Click Add condition and do the following:
- For When, select Job Location.
- For Operator, select equals (ignore case).
- For Value, click + Variable, click Form controls.
- Hover over Job Location variable and then click
 .
. - Click Save condition.
- Click Add condition and do the following:
- For When, select Job Type.
- For Operator, select equals (ignore case).
- For Value, click + Variable, click Form controls.
- Hover over Job Type variable and then click
 .
. - Click Save condition.
- Click Back to complete configuration.
- For Option label, select Title.
- For Option value, select Title.

- Add form controls for the applicant details:
- Drag a Text - Short control onto the form designer canvas.
- Click on the Text - Short control to open the configuration panel.
- Type First name in the Title field.
- Drag a Text - Short control onto the form designer canvas.
- Click on the Text - Short control to open the configuration panel.
- Type Last name in the Title field.
- Drag an Email control onto the form designer canvas.
- Click on the Email control to open the configuration panel.
- Type Email in the Title field.

- Drag a Text - Short control onto the form designer canvas.
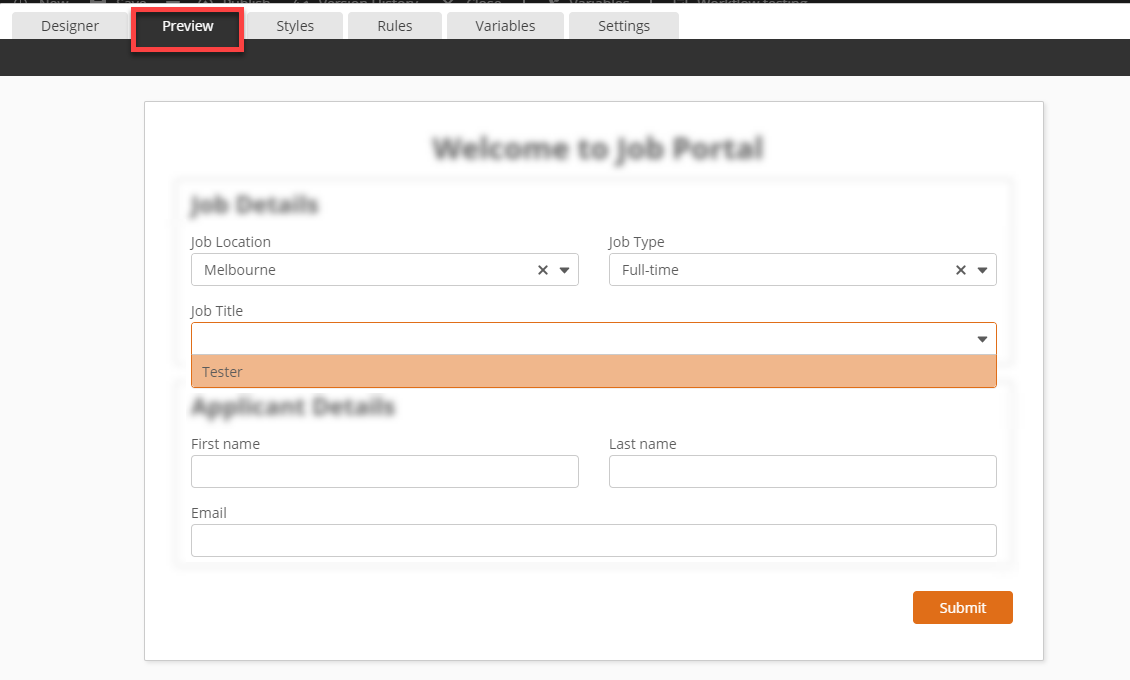
- Click the Preview tab.
- Click Job Location.
A preview version of the form is displayed.
List of all the locations is displayed.
- Select a location and click on Job Type.
The job types for the selected location is displayed.
- Select a job type and click on Job Title.
The job title(s) available for the selected location and type is displayed.
- Click the Designer tab and click Apply changes.
You have now successfully created a form with the Data lookup form controls.
Troubleshooting
If you receive a publish error that states that you do not have permissions for data lookups used in the workflow or that data lookups used in the workflow have been deleted, attempt to resolve the error with these troubleshooting tips:
-
Verify that the relevant data lookups have been created on the tenant where the workflow has been imported. If needed, Create a data lookup in the correct tenant.
Note: Importing custom Xtensions is not currently supported.
-
Contact your administrator to Assign data lookup permissions.
-
Update the actions and forms where the data lookup has been used and replace it with the new data lookup. If needed, Create a data lookup.


