Microsoft Exchange Online
Microsoft Exchange Online is a hosted messaging solution for Office 365 and Microsoft 365, that delivers the capabilities of Microsoft Exchange Server as a cloud-based service. It gives users access to email, calendar, contacts, and tasks from any cloud-connected device. For more information on Microsoft Exchange Online, see the company website.
In the context of Nintex Workflow Microsoft Exchange Online is a connector A software component that allows seamless integration with third-party services, business applications, and content stores. Examples include Salesforce, Box, and Microsoft SharePoint. Connectors are used to create connections required for workflow actions and start events.. The Microsoft Exchange Online connector is used to create connections for Microsoft Exchange Online actions A workflow action that interacts with a third-party application to perform a basic operation, such as adding a record or retrieving a file from Salesforce or Box.. Use Microsoft Exchange Online actions to work with calendar items in Microsoft Exchange Online. You can also use the Microsoft Exchange Online connector to send emails through your own exchange instead of Nintex Workflow, which uses SendGrid.
Nintex Workflow supports connections to Microsoft Exchange Online Commercial and FedRAMP-compliant Microsoft Exchange Online GCC environments. See Microsoft Exchange Online below.
Jump to:
Create a Microsoft Exchange Online connection
Note: Your browser-stored credentials are accessed to create connections. Either clear credentials from browser memory or make sure the stored credentials are for the intended environment.
Create a connection from the connections page or from the action configuration panel when configuring the action. You can use the Microsoft Exchange Online connector to create connections to both Microsoft Exchange Online Commercial and FedRAMP-compliant Microsoft Exchange Online GCC environments.
For information about creating connections and assigning permissions, see Manage connections.
Admin approval to create a Microsoft Exchange Online connection
Nintex Workflow uses the Nintex Connector - Exchange Online app to connect to Microsoft Exchange Online. A global administrator must grant permission for the app when creating a connection.
- Global administrator grants permissions in Microsoft Exchange Online
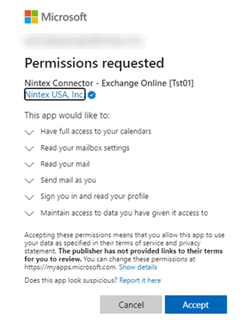
If you're a global admin, you can review, and grant consent to the app on behalf of all users.
The following message appears when a global administrator creates the connection. Review the permissions requested by the app, if you agree with the permissions, click Accept to grant consent and create a connection to Microsoft Exchange Online.
- Non-global admin requests permissions via Nintex Workflow
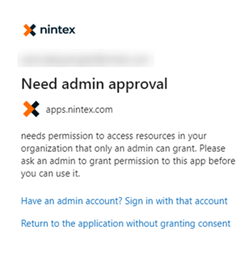
A user with non-global administrator role is required to ask the global administrator to grant permission to connect to Microsoft Exchange Online.
The following message is displayed when a non-global administrator tries to connect:
Create a Microsoft Exchange Online data lookup
Use the Microsoft Exchange Onlinedata lookup to create a drop-down list of calendar items. Each data lookup is configured for a specific project base. You can create as many data lookups as you need.
For more information on creating a data lookup and assigning permissions to it, see Data lookups.
For example, to allow users to select a specific calendar item, add a drop-down list of calendar items to the form using a Data lookup control A form control that allow users to select from a drop-down list that has values sourced from a third-party service.. The Data lookup form control uses a Microsoft Exchange Online - Get calendar items data lookupto list the calendar items available in a Microsoft Exchange Online in the drop-down.
You can create an Microsoft Exchange Online data lookup to perform the following actions using the operations available:
- Get calendar items: list all the calendar items in from a Microsoft Exchange Online account.
Microsoft Exchange Online data lookup fields
When you create the Microsoft Exchange Online data lookup, you can configure some additional fields for the operations to retrieve specific data.
To access the Microsoft Exchange Online data lookup fields, in the Data lookups page, click Add data lookup, select Microsoft Exchange Online as the Connector, and then select the Operation.
The following configuration fields are displayed depending on the operation selected.
|
Operation |
Field or selection |
Description |
|---|---|---|
| Get calendar items | Connection | The connection to use for the data lookup. |
| Conditions |
|