Process Overview Report
The Process Overview Report displays all deployed workflows.
- This report is used to display detailed information for every single workflow instance ever executed (or currently being executed) in a K2 environment.
- Each displayed report has drill-down functionality to view the next layer of data and can be accessed by clicking on the provided link.
- Drill-down all the way from a process definition to the individual events in a specific instance of a workflow.
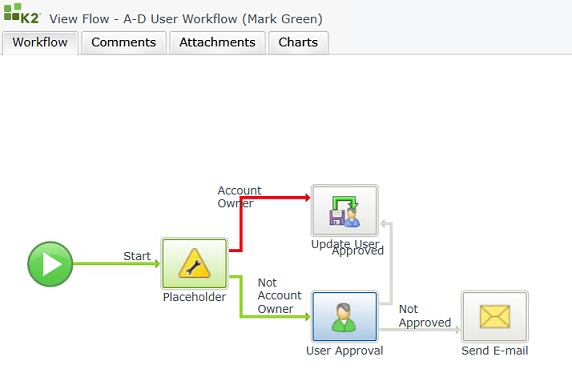
- From the drill-down view launch the View Flow report to display the workflow execution path with additional information.
- Make use of Filters and Settings to display required data in the report.
Example of where to use this report:
- Most useful for development, testing, support and administration tasks.
- To expose workflow history and audit data for all workflow instances executed in a K2 environment.
- To audit specific instances of a workflow.
- To determine exact dates when something happened in the workflow.
- Use during debugging and troubleshooting to determine where a workflow might be failing.
- To determine (on active activities) who owns tasks that needs to be completed.
- To determine (on completed activities) who competed tasks, when it was completed and what the Action was.
The Standard Reports have a level of security to ensure that the data is seen by authorized individuals within a corporation. Permissions are based on the workflow rights assigned to the workflow in Management Console:
- Users with Admin or View permissions will be able to see all instances of that workflow in the Standard Reports.
- Users with View Participate permissions will be permitted to view the workflow instances of that workflow, in the Standard Report but only from where the user actually participated in that workflow.

Permissions need to be assigned for each separate workflow by the System Administrator. Permissions can be assigned to a group and user within the groups will be able to view the Standard Reports.
The Report Configuration screen provides an interface where Filters, Parameters and Settings can be applied before running reports. Each displayed report has drill-down functionality to view the next layer of data and can be utilized by clicking on the provided link. The Configuration button is available on all of these layers.
Click the Configure button and select the Filters tab. Report filters can be added to only view specific activities according to the specified criteria.
Click the Add button.
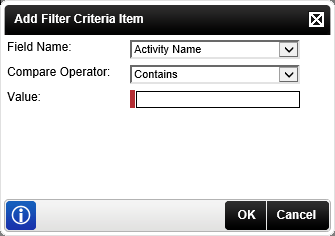
Define the criteria using available fields and filter types. The table below explains the available fields:
| Field | Description | Sample Value |
|---|---|---|
| Field Name | A specific field can be selected from the list for the Filter being added. Keep in mind that the available options in this list will differ depending on the process you have selected to filter on. | From the list select the required field to filter on. |
| Compare Operator | Select an operator to compare the Field Name with the Value. Keep in mind that the available options in this list will differ depending on the process you have selected to filter on. | From the list select the required operator to apply as a filter. |
| Value | This is the value used in conjunction with the Field Name and the Compare Operator to filter the report. This is a required field and has to contain a value. | Type in a value to filter on. |
There are four filter types to filter a report, namely Text, Duration, Date and Lookup. The table below explains the available filters:
| Filters | Description | Sample Value |
|---|---|---|
| Text filters |
Use text type filters for specific text related queries. Available Compare Operators:
|
Select the field name from the list. Select a Compare Operators and enter the required text value in the Value field. Example: Exclude a specific activity name from the report. Use the Not Contains or Not Equals Compare Operator, enter the text to exclude in the Value field. |
| Duration filters |
Use the duration type filters for time related queries. Available Compare Operators:
|
Select the field name from the list. Select a Compare Operators and enter the required text value in the Value field. Example: Display activities in the report were the duration is more than 10 minutes. Use the Greater than Compare Operator, enter the required duration in the Value field. Remember: Field format 00:00:00:00 (Days:Hours:Minutes:Seconds) The duration interval is measured from when the activity is started (assigned to a user for user tasks) until the activity completes. Note that it is not measured form the time a user actually opens the task. |
Click OK to set the filter.
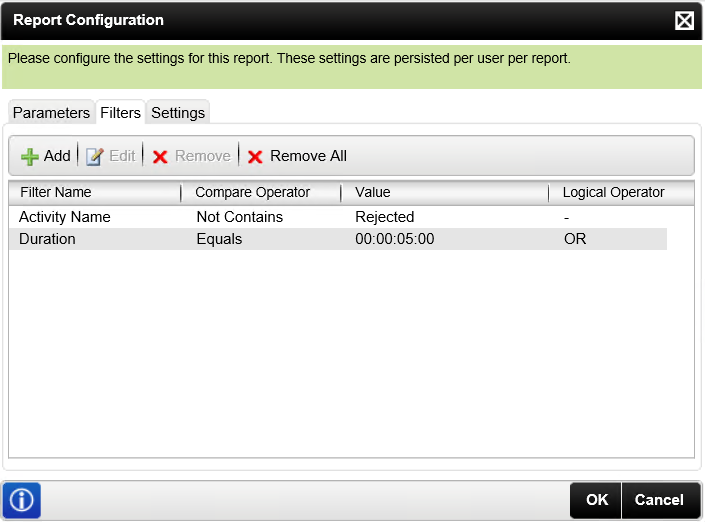
Filters can only be added to view specific activities, according to the specified criteria. Multiple filters can be added by using the Logical Operator (AND / OR). Edit or Remove existing filters added. Use the Remove All option to clear all existing filters. Filters are applied per level of the Activity Statistic Report.
Click OK to apply the filter to the report.
Multiple filters
Multiple filters can be added to create more defined filtering on the report.
Use the Logical Operator AND / OR to differentiate between filters, or combine filters.
Follow the same steps to create individual filters to add additional filters.
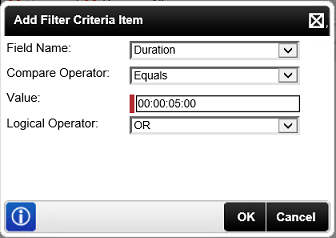
Click OK to add filter.
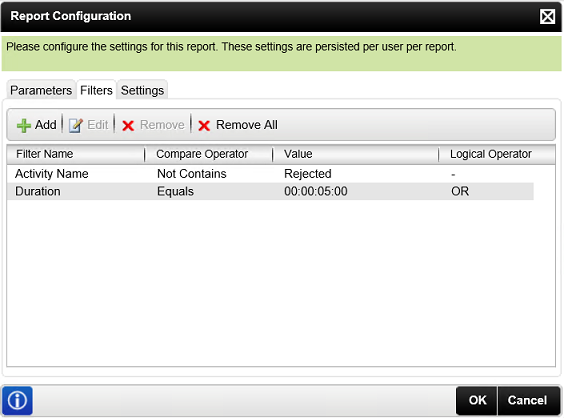
Click OK to apply the multiple filters to the report.
Parameters are not applicable to the Process Overview Report and its' drill down layers.
Click the Configure button and select the Settings tab.
Report Settings define whether deleted process instances should be included.
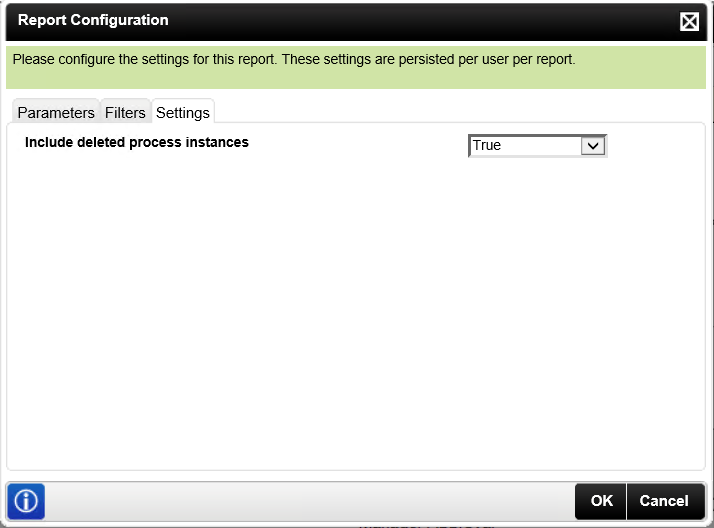
The table below explains the available fields:
| Field | Description | Sample Value |
|---|---|---|
| Use Default Value | The Default Value can be set globally, which will apply to all reports. The default value is True. Select this item if all the reports should be treated the same. | Select this item from the list. |
| True | Select this item if deleted process instances should be included in the report. | Select this item from the list |
| False | Select this item if deleted process instances should NOT be included in the report. | Select this item from the list |
The Global Default Value is set to True. Should you wish to change the Default Value go to C:\Program Files\K2 blackpearl\WorkSpace\Site And C:\Program Files\Common Files\Microsoft Sharedweb server extensions\12\TEMPLATE\LAYOUTS\K2\Tasklist, open the OOBReports.xml file and change the Value of "IncludeDeletedStatus". To disable the user setting, in other words disabling the users capability to adjust the setting via the User Interface, change the "DisableUserSetting="False" to True. If the default values are changed, it is applied globally.
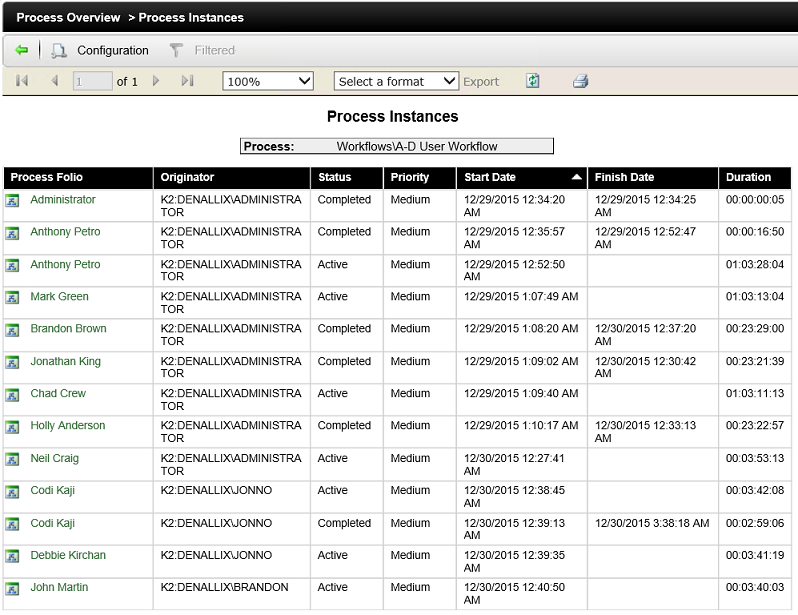
Process Overview Report - Process Instances drill-down layer:
Process Overview Report - View Flow report layer:
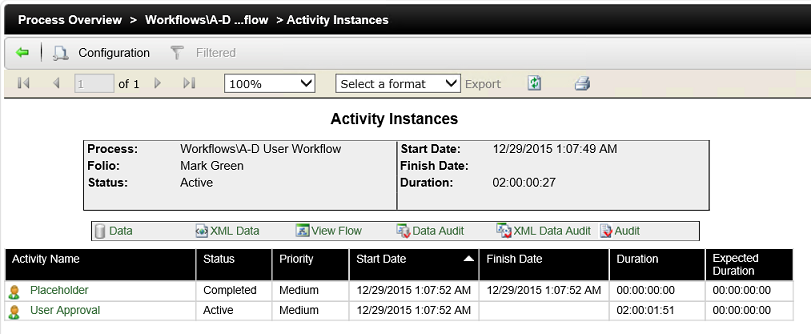
Process Overview Report - Activity Instances drill-down layer:
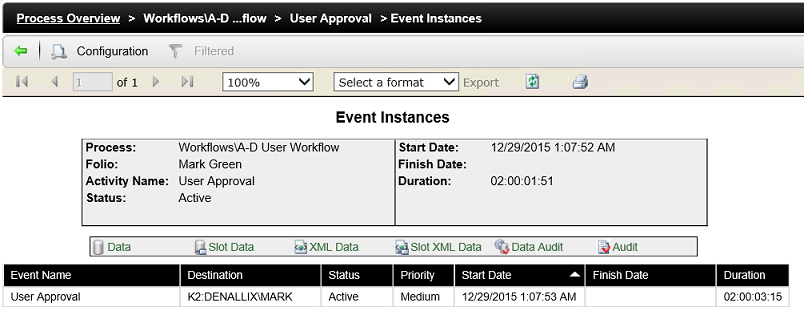
Process Overview Report - Event Instances drill-down layer:
- From K2 Workspace locate the Reports section and click on the Process Overview Report link.
- The screen is divided into sections, the table below explains the available features:
- Select the required Workflow, from the Report Data area, to run the report on.
- Click the Configuration button to set required Filters and Settings.
- Each displayed report has drill-down functionality to view the next layer of data and can be utilized by clicking on the provided Process Name link. The available drill-down layers are:
- Example of Runtime Report.
- Click the back arrow to navigate back to previous report layers.
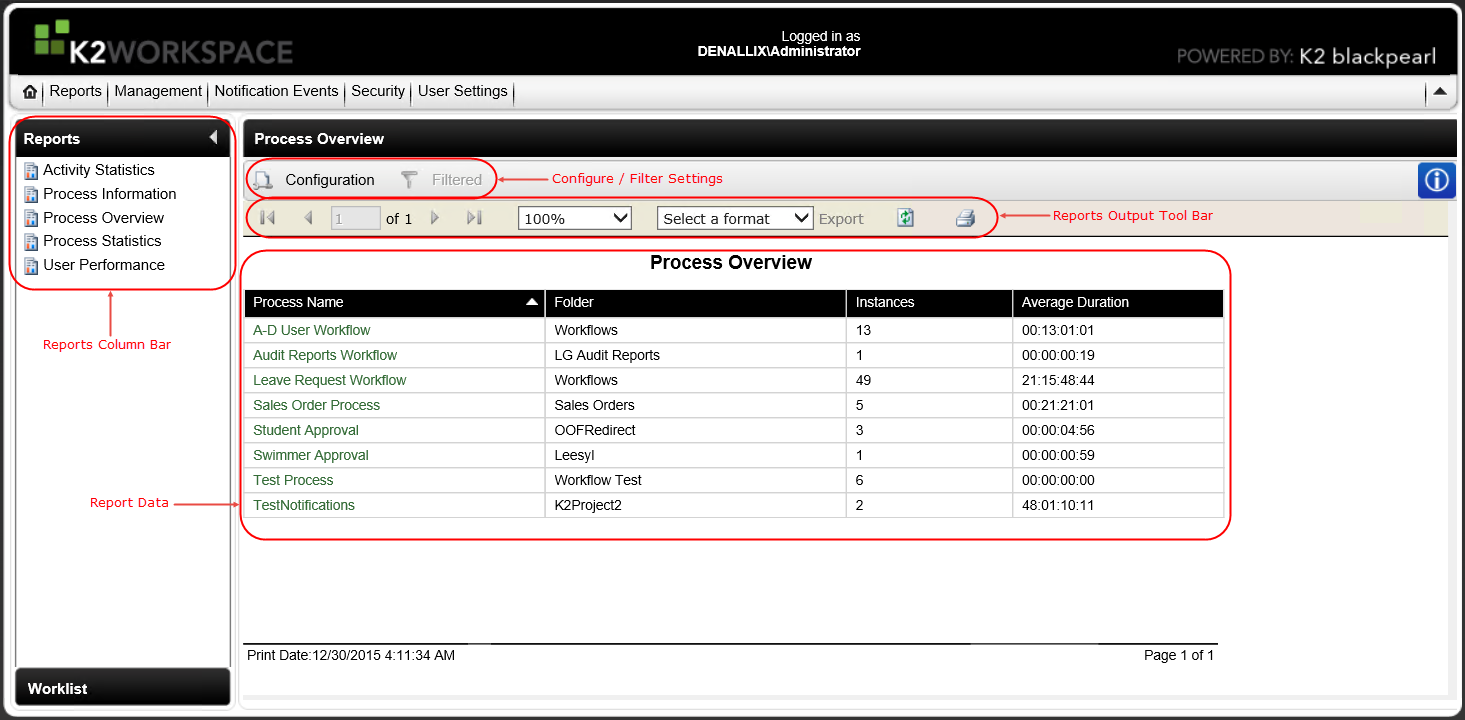
| Feature | Description | Sample Value |
|---|---|---|
| Reports Column Bar | The Column Bar contains all available workspace standard reports. | Click on a report to select it. This will change the display area according to the selected report. |
| Report Data | This area will display all available workflow results of the selected report. | View displayed report here. Click on links to drill-down and view additional data. |
| Configuration | Use this to configure Parameters, Filters and Settings for the report. | Click on the Configuration button and select the applicable filters and settings . |
| Filtered | This option indicates if a filter is created. | If this option is active, click it to change filter settings. |
| Report Output Tool Bar | Use this to navigate between report pages, adjust report size, select an export format, refresh report and print report. | Select required report output methods. |
| Process Name Column | Displays the Workflow Process Name as defined within the K2 product. | Items with this column will contain a link and enable you to drill down into any of the selected workflows in order to view more information. |
| Folder Column | Displays the Product folder name where the workflow was created within the K2 product. | Use the information from this column to troubleshoot. |
| Instances Column | Displays the number of started instances for a specific workflow. | Use this as a high-level indication of the number of instances currently running in the environment. |
| Average Duration | Displays the average duration, measured in time, as well as the activities within the workflow. The time displayed in this column is measured from the start until the current time. | Use this as a high-level indication of the time spent on specific workflows, currently active within the environment. |
Access the Process Instance Report from the Process Overview Report Main Page and click on the required Process Name. Each Process Instance has drill-down function to view the next layer.

The screen is divided into sections, the table below explains the available features:
| Feature | Description | Sample Value |
|---|---|---|
| Configuration | Use this to configure Filters and Settings for the report. | Click on the Configuration button and select the applicable filters and settings . |
| Report Output Tool Bar | Use this to navigate between report pages, adjust report size, select a export format, refresh report and print report | Select required report output methods. |
| Process Folio | Displays the unique identifier for each instance of a workflow. | Click to display additional information for selected instance. |
| Originator | Displays the workflow participant who initiated the instance. | View only. |
| Status | Displays the status of the status of the workflow instance e.g. completed, active or error. | View only. |
| Priority | Displays the priority of the workflow instance. | View only. |
| Start Date | Displays the date when and instance of the workflow was started. | View only. |
| Finish Date | Displays the date when an instance of the workflow was completed. | View only. |
| Duration | Displays the actual duration of the workflow instance from start until the present or until completed. | View only. |
Click the back arrow to return to the Process Overview Report.
Access the Activity Instances Report from the Process Folio. Each displayed Activity Instance has drill-down functionality to view the next layer of data and can be utilized by clicking on the provided link.
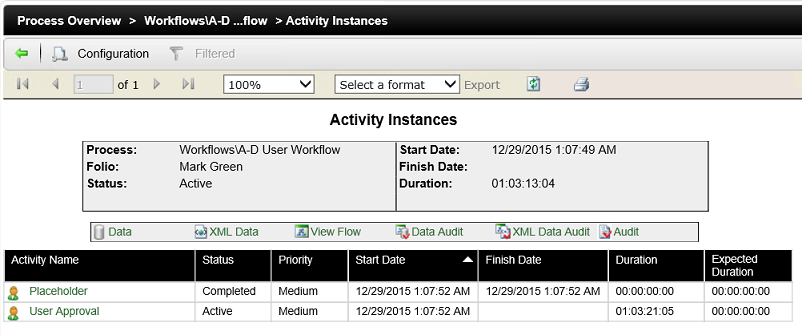
The screen is divided into three sections, the tables below explains the available fields:
1. Format / Export / Process Data
| Feature | Description | Sample Value |
|---|---|---|
| Configuration | Use this to configure Filters and Settings for the report. | Click on the Configuration button and select the applicable filters and settings . |
| Report Output Tool Bar | Use this to navigate between report pages, adjust report size, select a export format, refresh report and print report. | Select required report output methods. |
| Process | This is the ProjectFolder\Process Name as defined within the K2 product. | View only. |
| Folio | This is the unique identifier that is used to identify each instance of a workflow. | View only. |
| Status | This is the status of the workflow instance e.g. completed, active or error. | View only. |
| Start Date | This is the date an instance of the workflow was started. | View only. |
| Finish Date | This is the date an instance of the workflow was completed | View only. |
| Duration | This is the actual duration of the workflow instance from the start until the present or until completed. | View only. |
2. Process Instance Links
| Feature | Description | Sample Value |
|---|---|---|
| Data | Displays a list of data fields used in the workflow instance and the last value for the data field. | Click on the link to view more information. |
| XML Data | Displays a list of XML fields used in the workflow instance and the last value for the XML field. | Click on the link to view more information. |
| View Flow | Displays an graphical representation of the whole workflow, all steps and its current state. | Click on the link to view more information. |
| Data Audit | Shows a list of data fields used during the workflow and how the data changed during the course of the workflow instance. | Click on the link to view more information. |
| XML Data Audit | Shows a list of XML fields used during the process and how the data changed during the course of the workflow instance. | Click on the link to view more information. |
| Audit | Shows relevant audit information pertaining to the relevant workflow instance e.g. who started it when. | Click on the link to view more information. |
3. Report Data
| Feature | Description | Sample Value |
|---|---|---|
| Activity Name | This is the Activity Name as defined in the Process within the K2 product suite. | Click on the Activity Name to view more information on the drill-down layer. |
| Activity Instance Destinations | The Activity Instance Destinations icon is located to the left of the Activity Name. This displays the list of workflow participants associated with the Activity Instance. | Click the icon for the required Activity Name to view the drill-down layer. |
| Status | Displays the status of the Activity instance e.g. completed or active. | View only. |
| Priority | Displays the priority of the Activity instance. | View only. |
| Start Date | Displays the date when an Activity instance of the workflow was started. | View only. |
| Finish Date | Displays the date when an Activity instance of the workflow was completed. | View only. |
| Duration | Displays the actual duration of the Activity instance from start until the present or until completed. | View only. |
| Expected Duration | Display the expectation of how long an Activity instance will take to complete, which is defined in the Activity of the process in K2 for Visual Studio. | View only. |
Click the back arrow to return to the Process Instance Report.
Access the Event Instances Report from the Activity Instances Report by clicking on the specific Activity Name. Each displayed Event Instance has a drill-down functionality to view the next layer of data and can be utilized by clicking on the provided links.
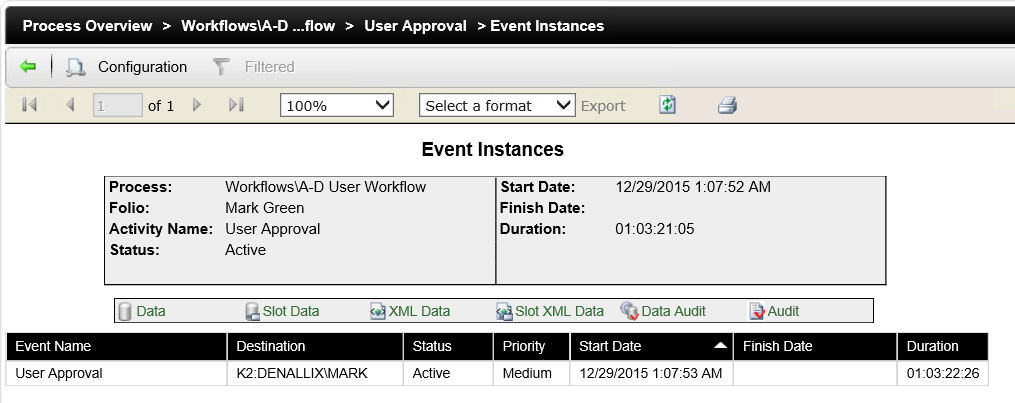
The screen is divided into three sections, the tables below explains the available fields:
1. Format / Export / Process Data
| Feature | Description | Sample Value |
|---|---|---|
| Configuration | Use this to configure Filters and Settings for the report. | Click on the Configuration button and select the applicable filters and settings . |
| Report Output Tool Bar | Use this to navigate between report pages, adjust report size, select an export format, refresh report and print report. | Select required report output methods. |
| Process | This is the ProjectFolder\Process Name as defined within the K2 product. | View only. |
| Folio | This is the unique identifier that is used to identify each instance of a workflow. | View only. |
| Status | This is the status of the workflow instance e.g. completed, active or error. | View only. |
| Start Date | The date an instance of the workflow was started. | View only. |
| Finish Date | The date an instance of the workflow was completed | View only. |
| Duration | This is the actual duration of the workflow instance from the start until the present or until completed. | View only. |
2. Process Instance Links
| Feature | Description | Sample Value |
|---|---|---|
| Data | Displays a list of data fields used in the Activity instance and the last value for the data field. | Click on the link to view more information. |
| Slot Data | Displays a list of data fields used in the Activity instance and the last value for the data field as well as to which user it was sent. | Click on the link to view more information. |
| XML Data | Displays a list of XML fields used in the Activity instance and the last value for the XML field. | Click on the link to view more information. |
| Slot XML Data | Displays a list of XML fields used in the Activity instance and the last value for the XML fields as well as to which user it was sent. | Click on the link to view more information. |
| Data Audit | Shows a list of data fields used during the Activity and shows how its data changed during the course of the Activity instance. | Click on the link to view more information. |
| Audit | Shows relevant audit information pertaining to the relevant Activity instance e.g. who started it when. | Click on the link to view more information. |
3. Report Data
| Feature | Description | Sample Value |
|---|---|---|
| Event Name | This is the Event Name as defined in the process within the K2 product. | View only. |
| Destinations | The users to whom it was sent as defined in the process within the K2 product. | View only. |
| Status | Displays the status of the Event instance e.g. completed or active. | View only. |
| Priority | Displays the priority of the Event instance. | View only. |
| Start Date | Displays the date when and Event instance of the workflow was started. | View only. |
| Finish Date | Displays the date when an Event instance of the workflow was completed. | View only. |
| Duration | Displays the actual duration of the Event instance from start until the present or until completed. | View only. |
Click the back arrow to return to the Activity Instance Report.

- If no data displays in the report, remember to check the report Configuration. Filters and Settings. Each displayed report has drill-down functionality to view the next layer of data and can be utilized by clicking on the provided link. The Configuration button is available on all of these layers.
- If no Filter is specified, all workflows are reflected. Parameters are not applicable to the Process Overview Report and its' drill down layers.
-
Microsoft Report Viewer 2008 redistributable is required in order to view the K2 reports. The K2 installer installs the redistributable during installation. For more information and the download see: https://www.microsoft.com/en-us/download/details.aspx?id=6576.
- The SmartObject Filter feature can be applied to SmartObjects to reduce the number of records returned when dealing with large volumes.
- When using a Date type filter and any of the Last x days filter options is selected, the current date will not be included in the result. Consider the following example: The current date is set to 10/08/2015, and the Date filter is set as the Last 7 Days, then the data result will be displayed for 03/08/2015 - 09/08/2015.
- With reference to Report Configuration Settings: The Global Default Value is set to True. Should you wish to change the Default Value go to C:\Program Files\K2 blackpearl\WorkSpace\Site And C:\Program Files\Common Files\Microsoft Sharedweb server extensions\12\TEMPLATE\LAYOUTS\K2\Tasklist, open the OOBReports.xml file and change the Value of "IncludeDeletedStatus". To disable the user setting, in other words disabling the user's capability to adjust the setting via the User Interface, change the "DisableUserSetting="False" to True. If the default values are changed, it is applied globally.
- Deleted process instance settings are applied per user per report.