Create new DocGen Packages with the DocGen Package Wizard
Once you have successfully deployed Nintex Drawloop DocGen® for Salesforce, you can begin defining relationships for your Salesforce data, creating templates to generate documents based on the data, and determining where and how output documents will be delivered. You store all of this data in a DocGen Package.
Some elements of a DocGen Package include:
-
DocGen Package Files - Which template files will be used. One or several documents can be included in one DocGen Package. Example: A quote DocGen Package can contain Product Descriptions + Quote Template + Terms and Conditions + Exhibits.
-
Delivery Options - Methods for sending files returned to you by a DocGen Package. Some options include Salesforce Email, storing your document back to Salesforce, or downloading your files.
-
Relationships - Which object data will be used inside of your template files.
-
Insert-Updates - Which records will be updated every time a DocGen Package is processed. Example: You can update the Opportunity Stage field to Proposal Sent every time you send a Proposal DocGen Package.
-
Form Fields - Fields that users can leverage in order to merge information that is not persisted in Salesforce
-
Security - Which users will be able to run a DocGen Package. You can use Salesforce Profiles, Roles, Permission Sets, and User Groups to restrict which users can run DocGen Packages.
Create a new DocGen Package using the DocGen Package Wizard
To begin, navigate to DocGen Packages and select the New button on the DocGen Packages list view.
Creating a new DocGen Package will initiate the DocGen Package Wizard.
Note: The DocGen Package Wizard is only visible when creating NEW DocGen Packages. It will not be seen when editing DocGen Packages. Also, it is important to note that the DocGen Package Wizard excludes features that you can configure when editing DocGen Packages on the DocGen Package Detail Page. For example, you can filter Relationships, add multiple fields to an Insert-Update, and identify whether output from some templates should be included in output.
Basics
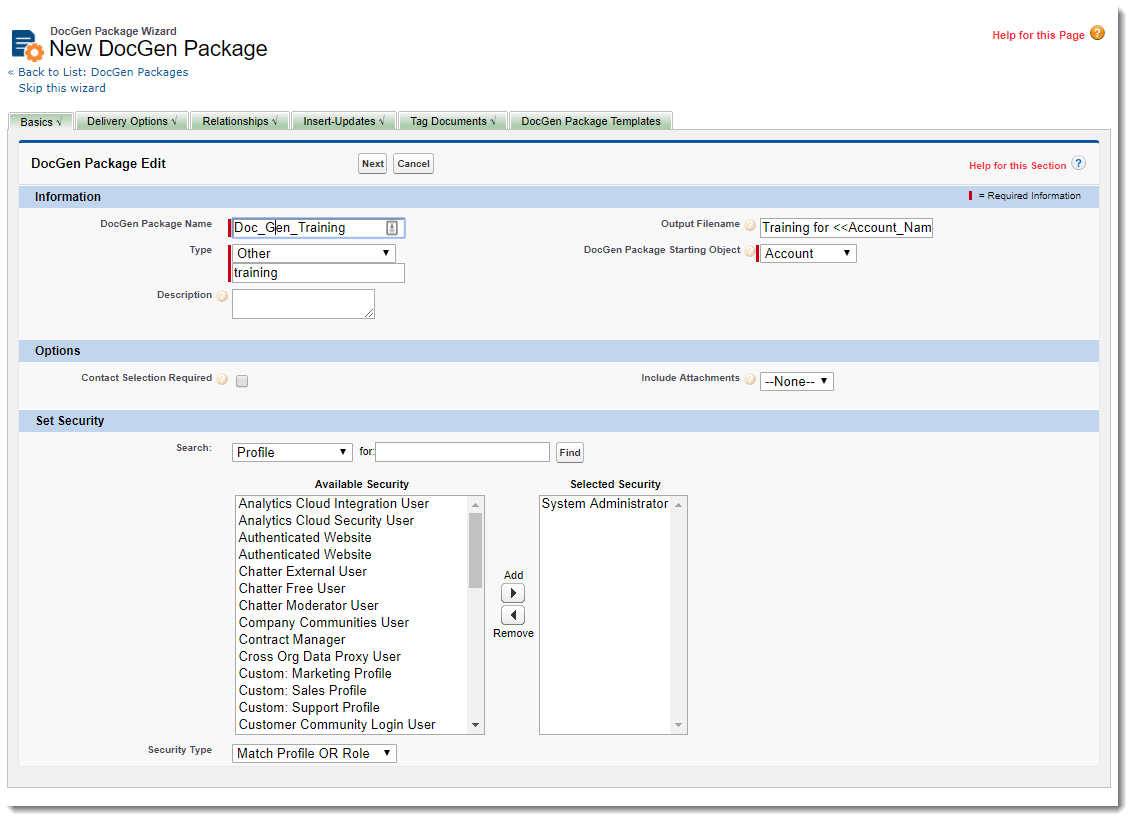
The Basics tab controls general information about the DocGen Package: what the name will be, which object it will be deployed from, and which profiles will be able to run the DocGen Package.

Fill in all relevant fields to your use case.
|
Section name |
Field name |
Description |
|---|---|---|
| Information | DocGen Package Name |
This is the DocGen Package Display Name. It is for internal use and is how the DocGen Package will be identified in Section 2 of the run DocGen Package page. |
|
|
Type |
Specifies what you will use this DocGen Package for. Nintex collects this information. |
| Description |
For internal use in your organization. You can search for a DocGen Package by its description text using the Advanced Search feature in Salesforce. |
|
|
|
Output Filename |
This is the name of the final output. It can be dynamically named by using a field from the Tag Documents tab within the DocGen Package Wizard. |
|
|
DocGen PackageStarting Object |
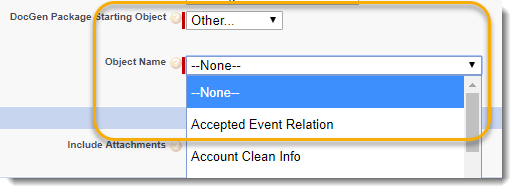
This selection relates a DocGen Package to a Salesforce object. Once the object is selected, DocGen Users must navigate to records on the chosen object to access the new DocGen Package. Details on how to select a custom object can be found in the next section. |
|
|
Object Name |
Only available if you select Other from DocGen PackageStarting Object. Specifies the custom object to use as the DocGen PackageStarting Object.
For more information, see Add a button that generates documents in Classic Experience . |
|
Options |
Contact Selection Required |
Select this option if contact data is needed in the DocGen Package or you plan to email your DocGen Package to a contact. |
|
|
Include Attachments |
Allow or require users to select documents attached to the DocGen Package Object and other top level objects. |
|
Set Security |
Search |
Select the type of security principal you want to use to limit access to the DocGen Package. |
|
|
For |
(Optional) Type a search item and then click Find. |
|
|
Available Security |
These are the available items associated with the security principal you selected in Search. |
|
|
Selected Security |
These the security principals that have access to this DocGen Package. |
|
|
Add |
Select an item in Available Security and move it to Selected Security. This provides access permissions to the DocGen Package. |
|
|
Remove |
Select an item in Selected Securityand move it to Available Security. This denies access permissions to the DocGen Package. |
Delivery Options
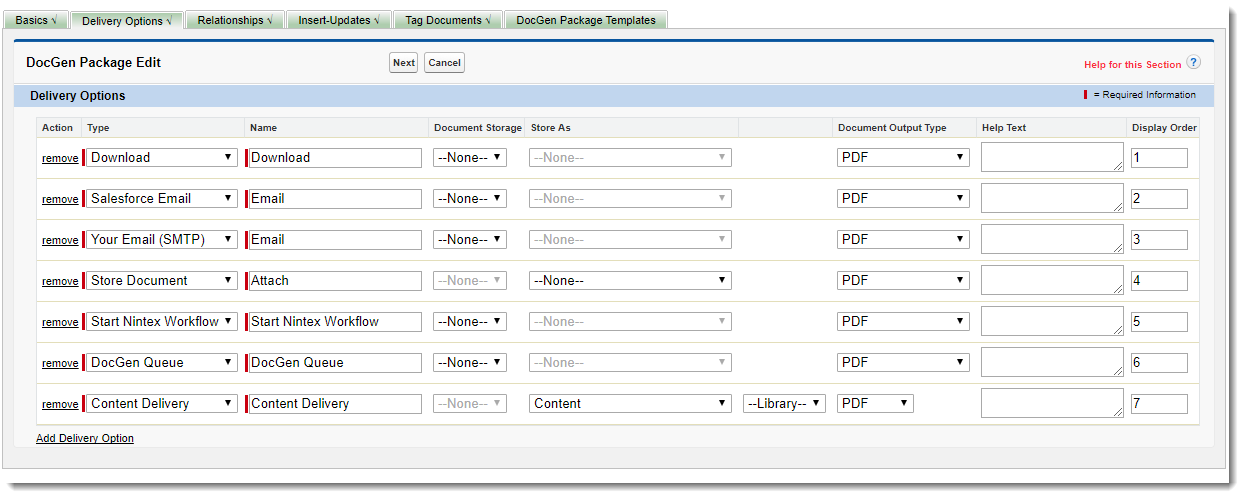
A critical element to DocGen Packages is the choice of Delivery Options. These deliveries become optional methods for sending the final output file. You may assign one or several Delivery Options to a DocGen Package. For more information, see Delivery Options.
-
Download - Provides a link to the document(s) for easy download to your computer. Your users can download documents locally, and then distribute them as needed. For more information, see Download.
-
Salesforce Email - Use Salesforce email to deliver output documents to other Salesforce users. For more information, see Salesforce email.
Note: Salesforce Email is Email in the Delivery Options related list in the app.
-
Your Email (SMTP) - Send output files through email (not Salesforce email) bypassing Salesforce email and its limitations such as file size and number of emails per day. For more information, see SMTP Service.
Note: Your Email (SMTP) is SMTP in the Delivery Options related list in the app.
-
Store Document - Provides storage for output files. You can attach output files to Salesforce records or store them using third-party storage solutions. For more information, see Store Document (Attach).
Note: Store Document is Attach in the Delivery Options related list in the app.
-
DocuSign - Electronic signing service. For more information, see DocuSign.
-
Adobe Sign - Electronic signing service. For more information, see Adobe Sign.
-
OneSpan Sign - Electronic signing service. For more information, see OneSpan Sign.
-
Sertifi - Electronic signing service. For more information, see Sertifi.
-
SignNow - Electronic signing service. For more information, see SignNow.
-
DocGen Queue - Send output files to a temporary queue to be downloaded or combined. For more information, see DocGen Queue.
-
Content Delivery - Add output files to Salesforce CRM Content Delivery. For more information, see Salesforce CRM Content.
You can add Delivery Options by selecting the Add Delivery Option link below all of your added Delivery Options.
When adding Delivery Options to a DocGen Package with the Wizard, you must satisfy all relevant sections of each Delivery Option.
Note: You are required to have at least one Delivery Option.

|
Section name |
Field name |
Description |
|---|---|---|
| Delivery Options | Action | Click the Remove link to remove Delivery Options from the DocGen Package. |
| Type | Choose a delivery type in this column. A description of standard delivery types can be found above the image. | |
|
|
Name |
Give the Delivery Option a title. This is what the user will see as a Delivery Option on the run DocGen Package page. |
|
|
Document Storage |
If you want to simultaneously store the DocGen Package output to one of your storage solutions whenever the Delivery Option is selected, you can specify that here.
|
|
|
Store As |
Choose which storage solution you would like to use for your DocGen Package outputs. |
|
|
Content Folder |
If you choose Content as a storage solution, you can specify which library the DocGen Package output gets saved in here. |
|
|
Document Output Type |
This determines the format in which your documents are returned to you.
|
Relationships
You use relationships to determine what Salesforce data will be used for your template files. For example, if you have an object related to your Accounts that displays a list of call records and you want to merge the list of call records into your document, then you will need to add a relationship between your Call object and the Account object. For more information, see Relationships.

|
Field name |
Description |
|---|---|
| Action |
You can remove relationships from the DocGen Package by selecting the Remove link. |
| Related By | Choose either the object on which you based your DocGen Package or choose Top Level to create a relationship based on one of the top level objects. |
|
Relationship |
Select which object you want to relate here. |
|
Related By |
Choose the object that is already related to your DocGen Package here. |
|
Order By |
If you are bringing in a related list, you can specify which field you want to use to order the list here. |
|
Descending |
As a standard, the app imports a list of records in ascending order. Select the checkbox if you want to change it to descending order. |
|
Copy Type |
If you are merging a list of child records into your template files, choose whether you want a new Row or Table of data to appear for each child record being merged into your document. |
Insert-Update
Insert-Update allow you to make changes to your Salesforce data. For more information, see Insert-Update.
Different types of Insert-Update include:
-
Task - This will insert a new task into your Salesforce system and relate it to the record you ran the DocGen Package from.
-
Chatter Post - You can create a Chatter post on the feed for a user, group, or Salesforce record and include the output file along with the subject of the Chatter post.
-
Field Update - You can update one or several fields on your related objects.

|
Field name |
Description |
|---|---|
| Action | You can remove Insert-Update by selecting the Remove link. |
| Type | Choose which type of Insert-Update you would like to include here. A description of each type of Insert-Update can be found above the image. |
| Options |
Edit some of the Insert-Update options to control what will be created or updated in Salesforce when the DocGen Package is processed. |
Tag Documents
At this point, you must map your template files with Field Tags that are available in the Tag Documents tab of the DocGen Package Wizard.

To get the appropriate Field Tag, you must select the appropriate values in the following fields:
|
Section name |
Field name |
Description |
|---|---|---|
| Options | Main Object | Select the object the desired field is located in. |
| Document Type | Select the type of document you will be tagging. | |
| Field | Select the field that is located in your object here. | |
|
Lookup Data |
Lookup Object |
Use the Lookup to select a record for the object in Main Object. If the record has a value for a particular tag, the value will be displayed in Value. |
|
Field Tags |
Label |
This is the label for this field in Salesforce. |
|
|
Tag |
Copy the field tag that is located in this box and paste it into your document where you want the field to show up. A single click in the box will select the entire tag for copying. |
|
|
Value |
Specifies the value for the field on the record selected in Lookup Object. |
DocGen Package Templates
After your templates are fully mapped with Field Tags, you must upload them to the DocGen Package Wizard in the DocGen Package Templates tab.
Click Save once you are ready to save the DocGen Package.
You can select a document for your DocGen Package from Documents object, Content Library, or your computer. For more information, see Adding template files to DocGen Packages.

|
Field name |
Description |
|---|---|
| Action | Eliminate DocGen Package Files by selecting the Remove link. |
| Location | Specify folder or library. |
| Folder/Library | If you wish to use an existing document from Salesforce, choose which Document Folder or Content Library you want to import your document from. |
|
Existing Document |
You should see a list of all documents available in the folder selected in the "Folder/Library" field here |
|
Upload from Desktop/Choose File |
Select to upload a document from your computer. |
|
Optional |
Select this box if you want to have the document be optionally included. Users will be able to decide whether this document should be included or not. |
|
Order |
You can control the order in which your template files appear by entering a number here. |
|
Add file |
Select this to add another file to the DocGen Package. |

