SharePoint Online
With the SharePoint Online feature, you have the capability to integrate advanced commands and dynamic advanced commands (DAC) into SharePoint Online. This integration enables various actions such as saving files directly to your SharePoint Online library, checking the existence of folders, deleting files, and more. This feature is an additional option to the standard Local File System.
SharePoint Online is available for these commands:
Prerequisites
-
Nintex Studio
-
SharePoint Online
Use SharePoint Online in your command
To integrate SharePoint Online with your advanced commands and dynamic advanced commands:
-
Open the Nintex Studio.
-
Create a new wizard, or edit an existing one.
-
Right-click on a wizard and select Open editor. Or, select a wizard and click EDIT WIZARD.
-
Click Switch to Advanced Commands view to edit your wizard.
-
Drag and drop an advanced command or DAC into your wizard.
To use the SharePoint Online feature, only select a command from the preceding list. -
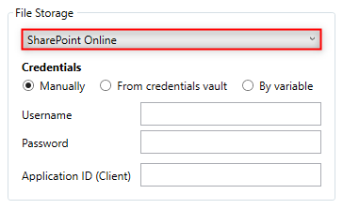
Select SharePoint Online as the File Storage.
-
Select from the available options to obtain credentials: manual entry, credentials vault, or variable-based retrieval.
-
Manually: Complete the fields with your SharePoint Online information.
-
Username
-
Password
-
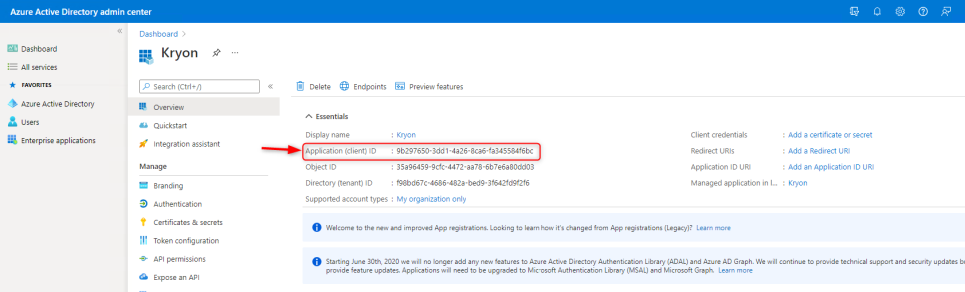
Application ID (Client): The Application ID can be obtained from the SharePoint administrator or found within the Azure platform.
-
-
From credentials vault: Select a credential from the list.
-
By variable: Enter a variable to retrieve the credentials.
-
-
Complete the remaining required fields, which will vary depending on the selected command, and click Next.
For specific details about the fields, refer to the selected command and follow the instructions provided on how to complete the fields for Local File System.Expand the Error handling option to provide instructions to the wizard on how to manage encountered errors. For more information on error handling, see Error handling.