Step 2: Add the review stages
- Step 1: Open designer to create workflow
- Step 2: Add the review stages
- Step 3: Assign task to Team A to review the document
- Step 4: Team A approves and sends the document to the next state
- Step 5: Team A rejects document and sends email to initiator
- Step 6: Assign a task to Team B to review document
- Step 7: Team B rejects and sends document to Team A
- Step 8: Team B gives final approval and sends email to initiator
- Step 9: Configure start options
- Step 10: Publish and test the workflow
The next step is to add the State machine action to create the review stages. The State machine action splits the review process into several states. At each state, the document is sent to a reviewer or author who assesses the document, and their response determines whether the workflow progresses to the next state, returns to the previous state, or exits the review.
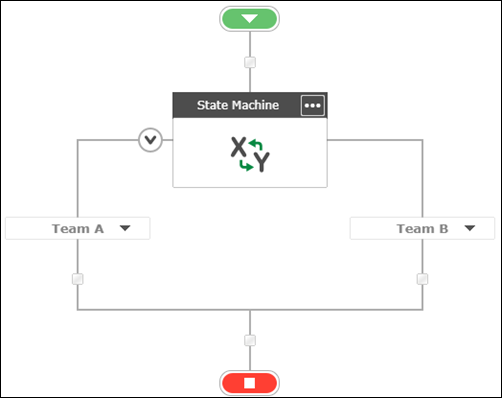
In this solution we split the review process into two states. One state for Team A and another state for Team B and we set the State machine to start from Team A. The workflow which is configured to start when a new document is added to the Document library, will start the review process from Team A and will execute the actions inside the Team A state first.
States structure your workflow into repeatable paths that you can switch between at any point, creating back-and-forth interaction in workflows. The workflow progresses through each state according to the actions configured within its branch. Actions below the state machine do not execute until the state machine is exited. The states can be made to run in any order, and conditions determine when to switch from one state to another, allowing workflows to return to earlier states, or move to the next state.
You can define state branches within a workflow for two or more states. Using the State machine action, you can add, rename, and delete states.
When you are designing a workflow:
- The State machine action creates the stages of the workflow.
- The Set next state action controls when one state changes to another and allows you to run a different state within a branch or to exit the state machine to execute actions below the state machine.
|
1 |
Add the State machine action and open the Action configuration window |
- Click the Logic and Flow category in the action toolbox, select the State machine action and drag it to the designer canvas.
-
Do one of the following to open the Action configuration window.
- Double-click the action.
- Click
 on the action and then click Configure.
|
2 |
Configure the State machine action to add review stages |
-
Under Enter the possible state for the this state machine do the following:
- In the State 1 field, type Team A.
- In the State 2 field, type Team B.
-
In Choose the state that this state machine will start in field, select Team A.
- Click Save.
- You can update this workflow solution to create as many states in the review process as you need. Just add + Add state in the State machine configuration to add another state.
- You'll notice the Set next state actions have been added to each state. We're going to delete them for now because we're going to add them to task-related actions instead. This will be explained in our step-by-step solution.
- To delete an action, click
 on the action you want to delete and then click Delete.
- To delete an action, click
For more information about the State machine action and how it's used, see State machine.
|
Follow along This is what your workflow looks like at this point in the solution: |

|
Next step:
Step 3: Assign task to Team A to review the document