Creating Views
A wizard assists the user in configuring the layout, controls and rules that need to be configured. The following wizard screens detail the specific steps involved.
This screen captures the general details and the type of View. Selecting a View Type of List View, shows an additional option: List Method (see second image)
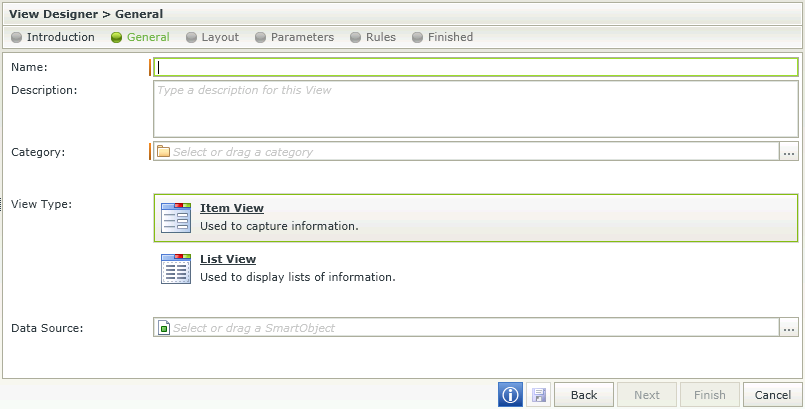
| Feature | Description | How to use it |
|---|---|---|
| Name | The Name of the View | Type the name of the View |
| Description | The Description of the View | Type a brief description of the View |
| Category | The Category where the View should be saved | Select the category by clicking on the ellipsis |
| View Type |
The type of View:
|
Select the type to be used |
| Data Source | The data source to be used for creating the View. A SmartObject can be used to create the View. | Select the data source by clicking on the ellipsis button |

| Feature | Description | How to use it |
|---|---|---|
| List method | The List method to use | Select the method in the drop down menu |
| Call this method when the form loads | Indicates whether the List method should be executed when the Form loads | Check to enable |
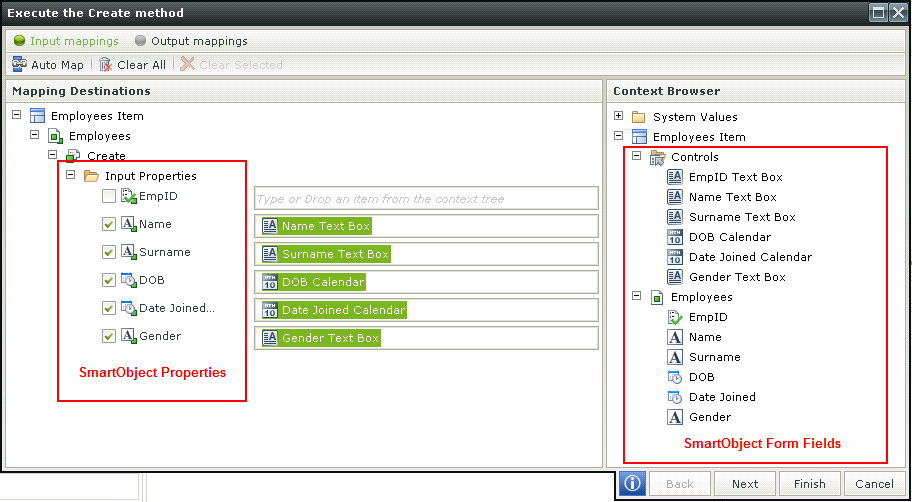
When binding a SmartObject as a data source to a View on the General screen of the View Designer, each of the SmartObject properties are created as local SmartForms fields. When SmartObject methods are called, the SmartForms fields are automatically mapped to the SmartObject properties. However, the mapping screen gives the user the ability to override the default mapping and exclude specific fields.
SmartObject fields don’t necessarily have to be used as controls on the View. Controls can be bound to a SmartObject field or it can be unbound which means that the control is not linked to any data source. When dragging a SmartObject field onto the view canvas, a control is bound to that SmartObject field.
In the scenario where a SmartObject contains an ID which is of type Autonumber, the designer of the View might not want to use this field as a control, yet it should still be available as a SmartObject field for further use in execution of Rules etc. A Name or Surname could be used as a control on the View as it can be populated by the user in runtime.
Below is an example of the different fields when using the Rule Designer to map fields:
See the following topics for more information on the use of the different types of Views on the Layout screen:
- Item View - Creates a View that will be used to capture information
- List View - Creates a View that will be used to display lists of information
- Editable List View - Creates a View that will be used to edit lists of information
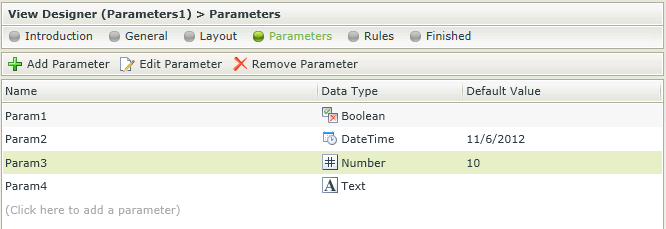
This screen captures specific parameters when required and is an optional step in the View Designer wizard. Parameters are used to pass data from one View to another or from a View to a subform. View Parameters are writable, in other words it can be used as a variable to store values into and retrieve them again. View Parameters can be of type Boolean, DateTime, Number or Text. Parameters can have a default value or can be set by using Rules. Parameter values can also be read by using the Expression Builder.
| Feature | Description | How to use it |
|---|---|---|
| Name | A unique identifier for the parameter (see Considerations) | Type the name of the Parameter |
| Data Type |
The Data Type of the Parameter. It is important to have consistent data types where data mappings etc. are done. The following types are available:
|
Select the Data Type from the drop down list |
| Default Value | The Default Value to be used when running the View with Parameters. Validation is performed on the input values | Type a value if a default value should be used. This field is not compulsory |
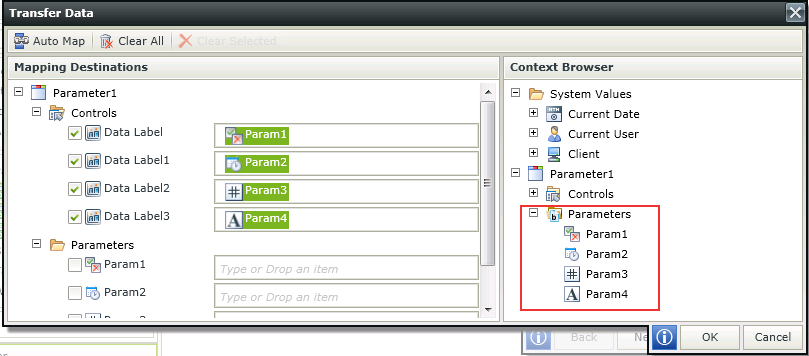
Another mechanism for setting the value of a parameter is to use the Transfer Data action within a Rule. The Mapping Destinations have been extended to include the Parameters so that they can be set. They also appear in the Context Browser so that these parameters can be Read in Rule Actions as well. Values such as System Values, Tokens, Text and Context can be dragged from the Context Browser into the Parameters Mapping Destinations.
For an example on how to use Rules to set View Parameters, see the following KB article:
KB001359 - How to use View Parameters to transfer data to a subview
Parameter values can be read by using the Expression Builder in the Context Browser.
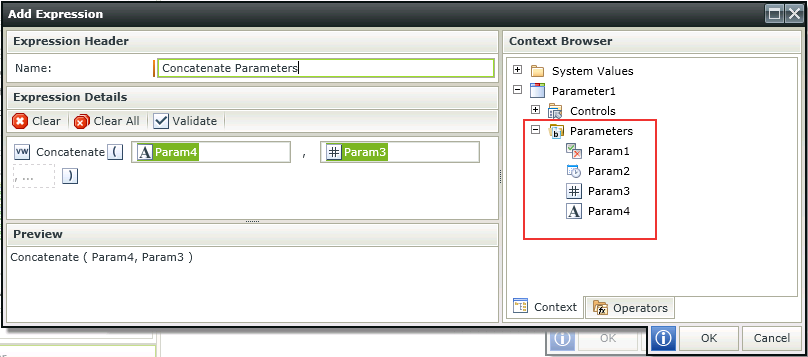
The Finished screen of the View Designer has been extended to include the Run with Parameters option. When selecting to Run with Parameters, a screen will open in runtime requesting the parameter before opening the View. The user can specify the parameters in order to test/run the View. An example is:
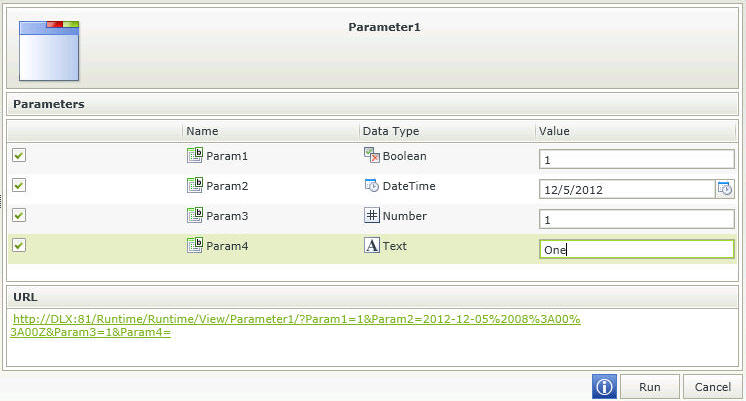
Select the Parameter, provide the value and click Run. The View will open. The View can also be viewed by accessing the URL at the bottom of the screen
- Values such as System Values, Tokens, Text and Context can be dragged from the Context Browser into the Parameters Mapping Destinations when using Rules to set Parameters.
- Boolean values cannot be blank and will therefore default to False. Values accepted are:
- 1 or 0
- true or false
- yes or no
- The following HTML values are not allowed in the Parameters Name:
- <
- >
- &
- "
- '
- When selecting to Run with Parameters, and parameters of type Number and Boolean have been used, a default value is required.
- When using the DateTime parameter, the value cannot be typed and should be selected from the Calendar control.
- When editing the parameter, the user can double click the parameter to edit it as well.
When selecting the View Rules tab in the Properties menu of the View Designer, or clicking Add on the Rules screen of the wizard, the Rule Wizard Configuration screen opens. This wizard can be used to configure Rules, Conditions and Actions for the View. For more information on the Rule Wizard Configuration, see the Rule Designer.
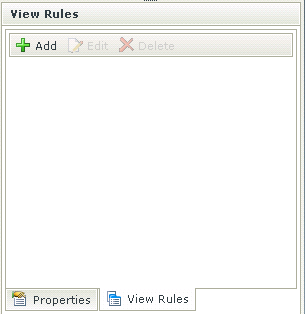
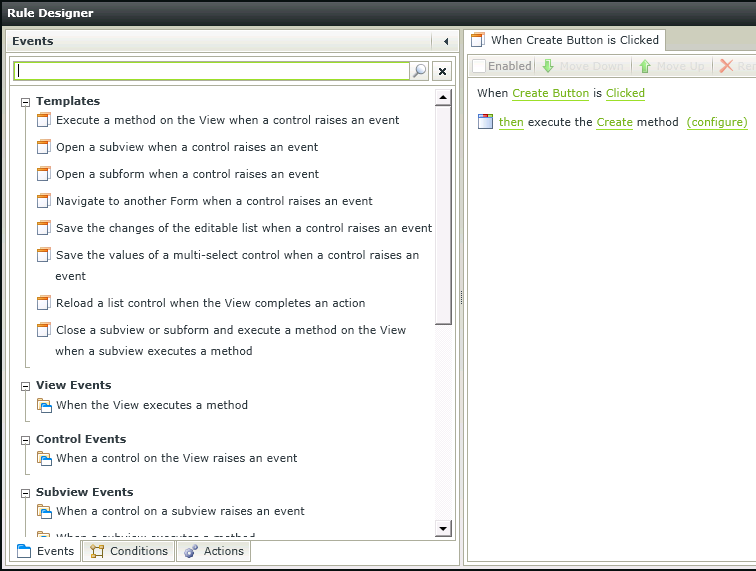
View Rules can be set up to execute independently from Form Rules, but they can also be used to add on to the rules in a Form. If a View Rule is created in the View Designer, this rule is available for editing in the Form Designer's rules section. When the View rule is changed on the Form, it does not modify the rule on the View. However, if the rule is changed in the View Designer for the rule that was previously overwritten in the Form, the change to the View rule will apply to the rule on the Form. The Form rule therefore inherits the View Rule and will see the changes made, but will still apply the previous change made to the View Rule on the Form as well.
A Rule Definition that was created in the View Designer can be enabled or disabled in the Form, but cannot be removed from the Rule. Only Rule Definitions that belong to the specific designer can be removed in that designer.
This screen indicates the end of the wizard and the successful creation of the View. A new Form can be created from here or the current View can be edited, deleted or re-used. The View can also be checked in and run.
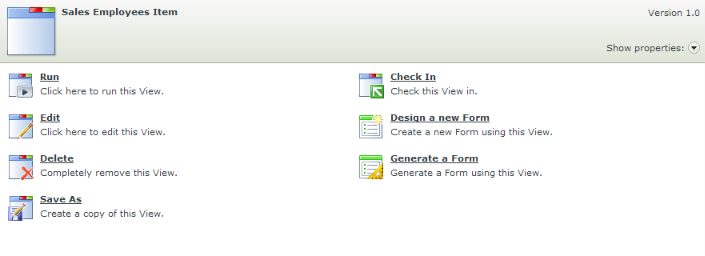
| Feature | Description | How to use it |
|---|---|---|
| Run | Opens the View in runtime | Click on Run |
| Run with Parameters | Requires the parameter in runtime before opening the View. The user can specify the parameters in order to test/run the View. | Click on Run with Parameters, then specify a parameter to open the View |
| Edit | Opens the View Designer wizard for editing purposes | Click on Edit |
| Delete | Deletes the View | Click on Delete |
| Save As | Creates a copy of the View | Click on Save As, then type a new name on the Save As screen |
| Check In | Makes the View available to other people | Click on Check In |
| Cancel Check Out | Cancels the check out action, in other words reverts the View back to its previous state | Click on Cancel Check Out |
| Design a new Form | Opens the Form Designer with the information of the View pre-populated | Click on Design a new Form |
| Generate a Form | Opens the Generates Form screen | Click on Generate a Form |
If a "Runtime Only" license is used, only the Run option will be available. To identify the type of license, go to Workspace >Management Console > License Management > Licensing and check what type of license is used for SmartForms.
Clicking on the Show Properties arrow on the right of the canvas will open the specific properties of the View as shown below:
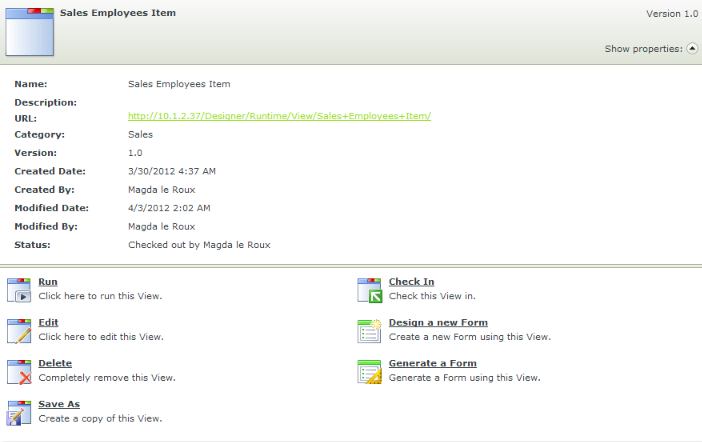
A View needs to be checked out in order to make any changes to the View. As soon as the View is checked out, it is not available for editing by other users and needs to be checked back in for other users to see the changes made.
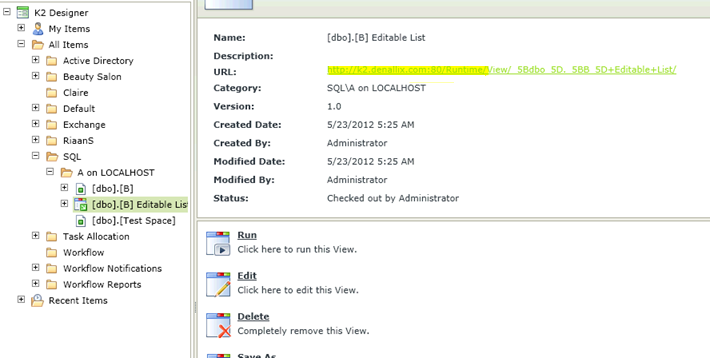
The URL is built by code and is not stored anywhere. It is called the Vanity URL and represents the full actual URL. The first part is stored in the K2 Environment Library in K2 Studio or K2 Designer for Visual Studio as the default runtime URL The second part is built from an URL pattern and the View/Form’s name. An HTTP Module in the SmartForms web site checks all requests reaching the Internet Information Services(IIS) Server for specific URL patterns. Checks for any URL containing “/View/{ViewName}/” or “/Form/{FormName}/” are performed and the module remaps the request to the actual URL.
http://K2DEV2SP:81/Runtime/Runtime/View.aspx?_name={ViewName}
http://K2DEV2SP:81/Runtime/Form.aspx?_name={FormName}
ProtocolWebSiteWebApplicationWebPageQueryParameters
Custom URLs can be build that will automatically be remapped to the correct actual runtime URL.
For example:
The View name is “TaskList2”
If the following URLs are entered in the browser's address bar:
http://K2DEV2SP:81/Runtime/View/TaskList2/
http://K2DEV2SP:81/Runtime/Runtime/View/TaskList2/
http://K2DEV2SP:81/Runtime/R/A/N/D/O/M/View/TaskList2/
http://K2DEV2SP:81/Runtime/HR/Employee/OnboardingView/TaskList2/
They will all be mapped to the same URL:
http://K2DEV2SP:81/Runtime/Runtime/View.aspx?_name=TaskList2
The part is fixed and can be changed in IIS and DNS
The part is the pattern matched by the HTTP Module
The part is the actual aspx page that services the request
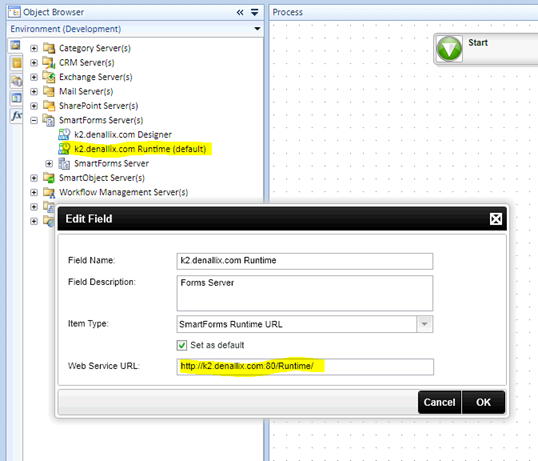
The duplicate /Runtime/Runtime/ is not required, it can be edited in the K2 Environment Library in K2 Studio or K2 Designer for Visual Studio as shown below to have a single /Runtime/.
Forms support the following:
- Vanity URL: http://dlx/SmartForms/Runtime/Form/test+form/
- By ID: http://dlx/SmartForms/Runtime/Form.aspx?id=b73caa60-ea6c-4948-a77e-18e05987a2ff
- By name: http://dlx/SmartForms/Runtime/Form.aspx?name=test form
When clicking on the Save As option, the Save As screen opens. On this screen, a new name can be entered for the new View, a description can be provided and a category can be selected where the new View should be saved. In addition, the option to check the View in for other people to be able to use it, can be selected. By selecting the Save As feature, the details of the current View are used to create a duplicate View, but saving it under another name. This provides the ability to create multiple Views that are more or less similar in design, but without duplicating the effort.
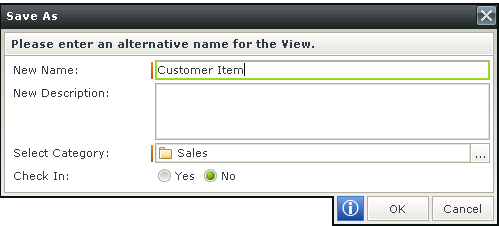
| Feature | Description | How to use it |
|---|---|---|
| New Name | Represents the new name given to the duplicate of the current View | Type a new name |
| New Description | Represents the new description given to the duplicate of the current View | Type a new description |
| Select Category | List of categories available where the new View can be saved | Select a category from the list or click on the ellipsis next to the category to create a new category |
| Check In | Option to select whether the View should be checked in when saved. By selecting Yes, the View will be checked in when saved and will be available for use by other users. If No is selected, the View is still available for editing by the owner, but other users won't have the ability to use it yet | Select Yes if the View should be checked in and be available for use by other users |
When clicking on the Generate a Form option, the Generate Form screen opens. On this screen, the specifications of the Form can be provided.

| Feature | Description | How to use it |
|---|---|---|
| Category | Represents the Category where the Form will be created | No action is required if the selected Category is correct. If another Category is required where the Form should be created, click on the ellipsis and select the required Category |
| Form Name | Specifies the name of the Form to be created | Type a new name if required |
| Save the Form | Saves the Form | Select the option |
| Save and edit the Form | Saves the Form and opens the Form Designer to enable editing | Select the option |
| Save and view the Form | Saves the Form and opens the Form to view | Select the option |
| Form Behavior | Determines the behavior of the Form | Select the options as required |