Tasks
![]() A participant role is required. For more information, see User roles.
A participant role is required. For more information, see User roles.
A task is a job assigned to a person. The workflow pauses until the assignee responds to the task. In Nintex Workflow, the types of tasks are Express approval and Form-based. For more information on task types, see Assign a task to multiple users.
The My Nintex Tasks page displays all the tasks that are assigned to you and draft forms in separate sections. On this page, you can:
- View tasks that are assigned to you.
- View, edit, or delete draft forms.
- View completed tasks.
- Delegate tasks to another user
- Complete tasks by providing the appropriate response.
The following sections are displayed:
-
Draft task forms: A list of all the task forms you saved. The Draft task forms section is available only when you have saved a task form. Task forms that you have saved, but not yet submitted, are draft forms.
-
Tasks: A list of all the tasks assigned to you.
-
You can save a maximum of 100 draft forms per task form. Each time you open a new task form and save it, a new draft form is saved in My Nintex. To avoid confusion, in the future, participants will only be able to save a maximum of one draft per task form.
-
A draft form expires 30 days after the day it is first saved. Expired draft forms are deleted automatically.
Jump to:
Access the Tasks page
- Go to My Nintex.
- Click Tasks.
The tasks assigned to you are displayed. The status shown in the Status column indicates if the task is active or complete. For more information on the tasks columns and selections, see Tasks page columns and selections.
Filter tasks by status
In the Status drop-down, select the status you want to filter by. For a description of status types, see Tasks page columns and selections.
View activity feed for a task
Find the task that you want and click to open it.
The activity feed is displayed.
-
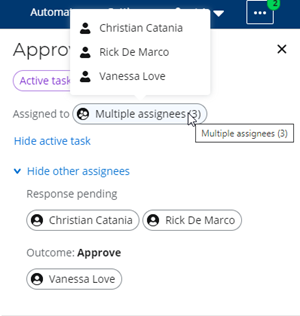
Task details: The task details at the top of the activity feed displays the status of the task, the name of the user the task is assigned to and the time the task is initiated, and a link to view/hide the active task. This section shows the part of the task that is relevant to you.
Note:-
The link to view the active task is enabled only for participants that the task is assigned to and for other users depending on the settings set through My Nintex settings for the workflow. For more information, My Nintex settings.
-
If the task has multiple assignees you can see who the other assignees are by clicking on Multiple assignees.
-
-
Form submission details or start details: This section shows the start details of the task. What's displayed depends on what the start event is.
-
Form submission details: If the task is started by a form, form submission details that include the user who submitted the form and a link to view the form are displayed.
-
Start details: When the task is started by anything event other than a form submission, the start details are displayed showing details of the event that started the task. For example, if a task is started by a Salesforce event or a new list item in SharePoint Online, a link is shown to view start data.
-
-
Task history: A timeline of the task history is displayed in this section.
Note: The task history is available depending on the settings selected for the View all task outcome summary card in My Nintex settings.
Delegate tasks
In My Nintex, task assignees can delegate active tasks to another user to respond on their behalf.
Note:
-
Manual delegation is available for Task assignees and Business owners. For information about business owners manually delegating tasks, see Delegate tasks.
-
Manual delegation is available only if the workflow owner has enabled Delegate tasks for that workflow in My Nintex settings. To update the setting, open the My Nintex settings for the workflow and select or clear the Delegate tasks check box in the Task assignees and Business owners section. For more information, see My Nintex settings.
-
Manual delegation is only available for tasks created with the Assign a task to multiple users action.
- Find the task that you want to delegate and click to open the task.
The activity feed for the task is displayed.
- Click
 , on the Active tasks section.
Important: The
menu is displayed only when the task is Active and when the assignee or the user the task is escalated to is viewing the task.
- On the menu that opens, click Delegate task.
The Delegate task section is displayed.
- In the Assignees field, enter the user you want to delegate the task to. As you type, the list of matching users is displayed. Note:
You can delegate the task to a maximum of ten users. Use semicolons to separate multiple email addresses.
If you delegate the task to multiple assignees, the first response is taken as the response to the task.
You can remove the current assignee and add additional assignees or keep the current assignee and add more assignees.
-
(Optional) Enter a Message to add to the task message that is sent to the new assignees.
-
Click Delegate.
The task delegation request is submitted.
Respond to tasks
Note: Although not part of My Nintex, you can also set the outcome of tasks through the normal channels (email for Express approval and form submission for Form-based).
- Find the active task that you want to respond to and click on it. The task responses and the task activity feed are displayed side-by-side to allow you to view the history of the task before providing a response.
Note: Depending on the settings selected in My Nintex settings, the activity feed includes a link to view the other assignees if the task has multiple assignees and the task history which includes the summary of the tasks and the responses of the other assignees.
- If the task type is:
- Form-based: Select a response and click Submit to complete the task. After submitting the form, the task is completed and the status is shown as Completed in the Tasks page.
- Express approval: Select a Task outcome. After setting the outcome, the task is completed and the status is shown as Completed in the Tasks page.
Use this response method to quickly reply to tasks with an outcome and/or to submit information requested in a form.
Note: Sensitivity labels in email messages are not supported and will result in an invalid response to the task.
-
In your email inbox, open the email for the task to which you want to respond.
-
If the email contains a link to a form, click the form URL, complete the form, and click Submit.
-
If the email requests that you send an outcome response, click Reply.
-
Read the task footer for possible task outcomes (for example, "Approved" or "Rejected") and type your outcome response in the body of the email.
-
(Optional) If you want to add a comment with the outcome, add a comma after the outcome response and then type the comment. All text after the comma is stored as a comment. Adding comments is only available for Express approval task types created using the Assign a task to multiple users action.
Note:The task outcome and comments must be on the same line and no more than 500 characters. See the format below:
[Task outcome], [Comment]
Example:
Rejected, Tax invoices required before expenses can be approved.
- Click Send.
The response is submitted and stored using this format: User (Task outcome) Date Time - Comment
Resubmit a form
You can resubmit a submitted form. The form is resubmitted with the same data. Only Forms with Completed, Failed, or Terminated status can be resubmitted. If a form has been submitted more than once you can resubmit only the latest submission of the form.
After the form is resubmitted the activity feed shows details of the original submitter as well as the user that resubmitted the form.
For more information about resubmitting workflows, see Resubmit workflows.
-
In My Nintex, open the Tasks page.
-
Click a form to open the activity feed.
-
Click Show form to open the submitted form.
-
Click Resubmit form.
Note: The Resubmit form option is enabled only on the latest submission of a form.
The form is resubmitted with the same data. After it's resubmitted, the activity feed shows details of the original submitter as well as the user that resubmitted the form.
|
Column or selection |
Description |
|---|---|
| Task | The Name specified for the task in the workflow configuration. |
| Workflow | The name of the workflow that initiates the task. |
| Status |
Current task status. A task can have many task assignments under it. Possible task statuses include:
A task assignment is assigned to the user. The My Nintex Tasks page contains a view of all task assignments. Possible task assignment statuses include:
|
|
Assigned |
Date the task was initiated. |
|
Completed |
The date the task is completed. If the task is still active, this column is blank. |
| Completed by |
Name of the user who responded to and completed the task. If the task is still active, this column is blank. |
| Status drop-down |
Filter the tasks displayed by status. |