How to: Use a SmartForm reference to conditionally start a workflow
This topic shows you how to use a SmartForm reference to configure a rule which determines if a workflow should start. You use a conditional start rule to define this logic, and the data comes from the SmartForm using the automatically-created reference. You configure the Conditional Start Rule on the Start step and build it using the Rules Designer.
Using a conditional start rule to prevent a workflow from starting during the last two weeks of the year
Scenario
Your company uses a Leave Request workflow to manage employee leave submissions. As part of your leave policy, employees are not permitted to take leave in the last two weeks of December. Any leave submitted during this period should not start the Leave Request workflow. You need a condition to evaluate the form when it is submitted to check if the Leave Start Date falls within the last two weeks of December. If it does, the workflow should not start. If it is any other date, the workflow should start.
Steps
In this scenario, you begin by building a SmartBox SmartObject to store your leave request details when you save them. Next, create an Item view and a form based on the SmartObject. Create a workflow and configure the Conditional Start Rule to determine if the workflow starts. In this case, the workflow should not start if the leave start date occurs in the last two weeks of the year.
Setup Steps
The following steps set up the scenario from start to finish. If you want to skip the setup steps and view the topic step, go to Create a workflow and configure the Conditional Start Rule.
- Create a SmartObject that contains employee and leave details properties (such as name, employee number, leave start and end dates, leave type).
- Create a new SmartObject in the Designer. Name the SmartObject
Leave Request SmartObject.
Select the SmartBox option. This option creates a table in the K2 database. Click Create.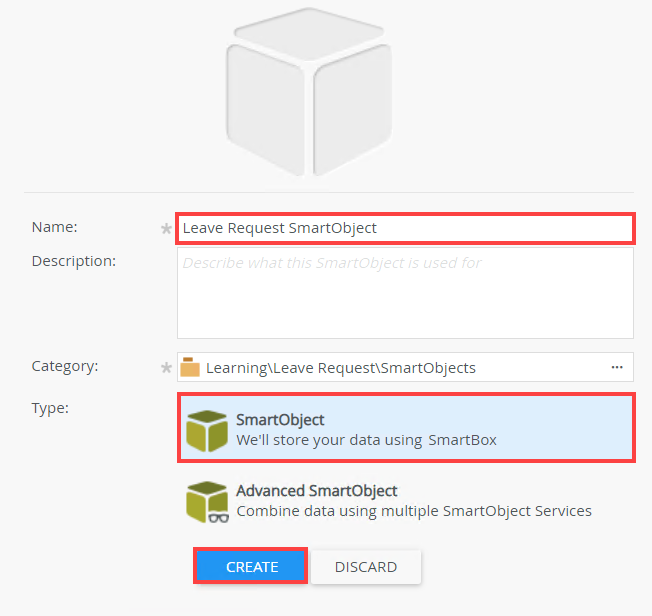
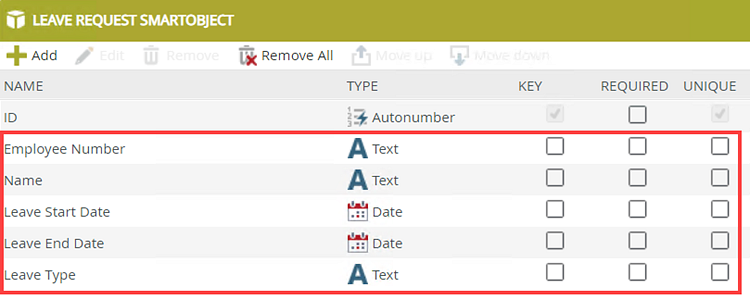
- Click Add to add the properties shown in the image below. Make sure to change the data type where necessary. Click OK to return to the SmartObject properties. Click Finish to save and exit the SmartObject .
For more information on creating SmartObjects, see How To: Create A SmartBox SmartObject.
- Create a new SmartObject in the Designer. Name the SmartObject
- Generate an item view from your SmartObject.
- Create a view from the SmartObject. Right-click the Leave Request SmartObject, then select Generate Views.
- On the Generate Options screen, check the Item box to create an item view. Rename the view
Leave Request Details
then click OK to save your settings.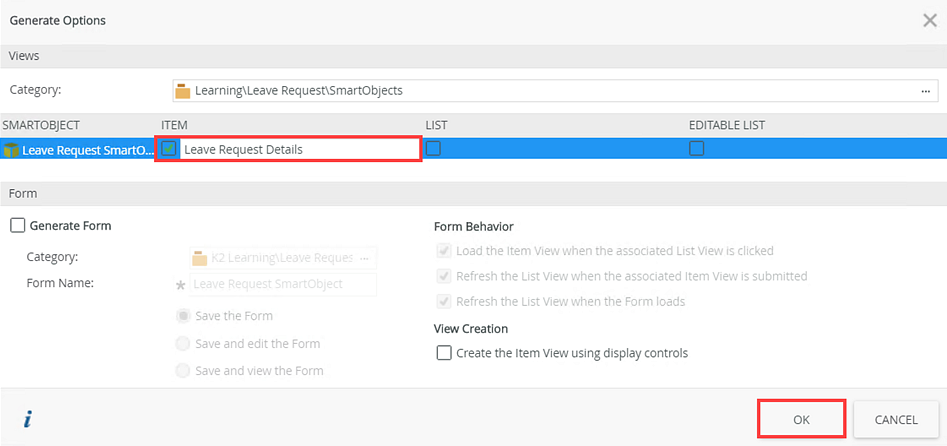
For more information on creating views, see How To: Create an Item View and a List View.
- Generate and customize a form from the item view.
- Create a form from the view. Right-click the Leave Request Details view, then select Generate Forms.
- On the Generate Form screen, rename the view
Leave Request
then click OK to save your settings.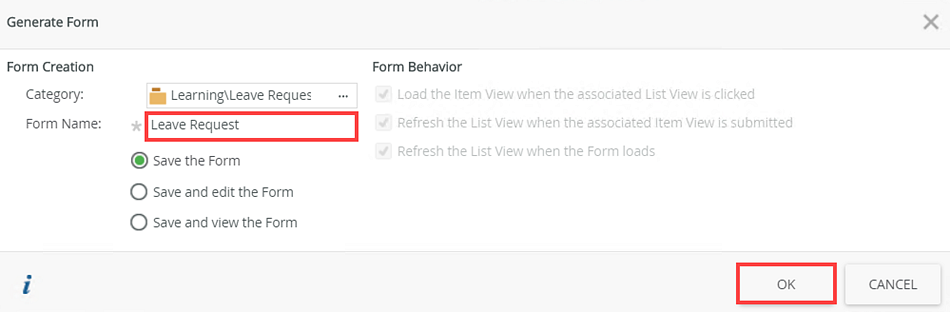
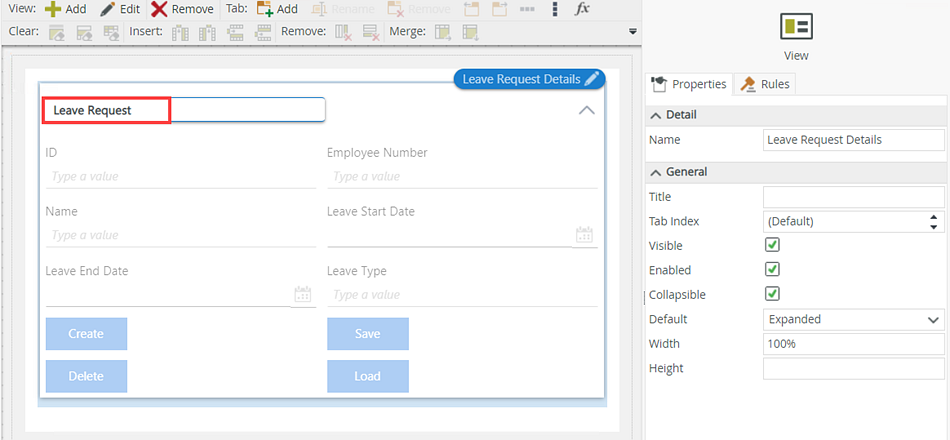
- Locate the Leave Request form and select Edit. On the Layout tab, change the view title to Leave Request. Your form may look different depending on the theme you use and the product version. Click Finish to save and exit the form.
For more information on creating forms, see How To: Create a Form.
- Create a form from the view. Right-click the Leave Request Details view, then select Generate Forms.
Create a workflow and configure the Conditional Start Rule
The following step describes how to create a workflow and configure the Conditional Start Rule on the Start step. In this step, you create and configure a workflow called Leave Request. In this scenario, employees cannot submit leave in the last two weeks of the year. You need to configure the conditional start rule to check the Leave Start Date value and, if this value falls within the last two weeks of the year, the workflow should not start. Any leave submitted outside of this specified date condition starts a workflow when the Leave Request form is submitted.
-
Create a workflow and configure the Conditional Start Rule
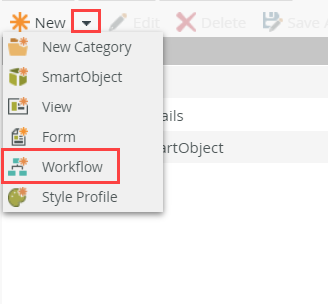
- From the Designer click New and select Workflow
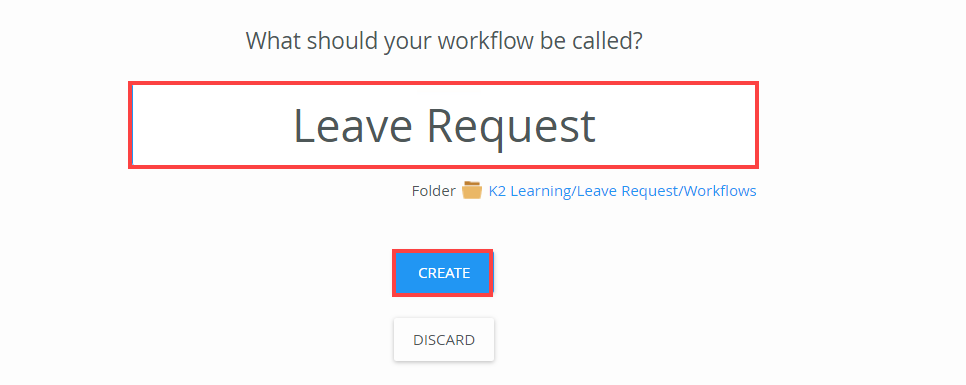
- Name this workflow Leave Request and click Create.
- Select the Start step and click the toggle to expand the Configuration Panel. You can also double click the step to expand the panel. Select the Start with a Form option.
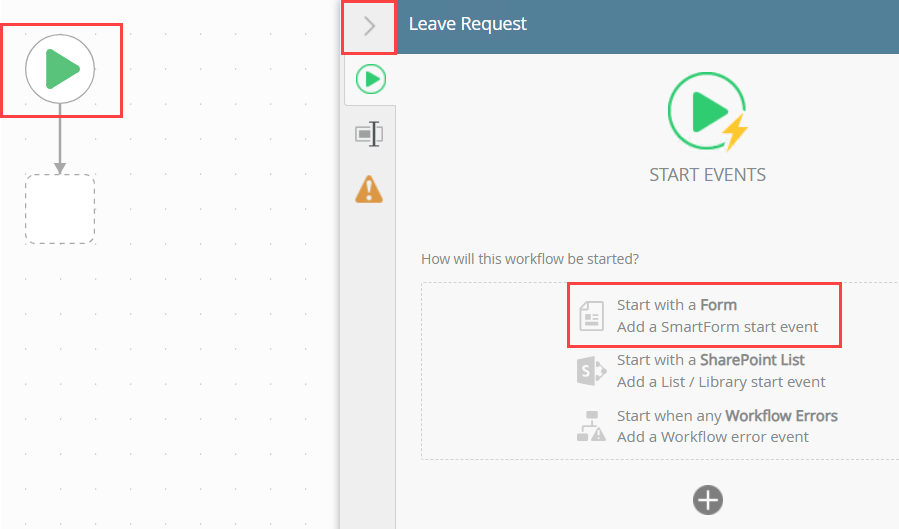
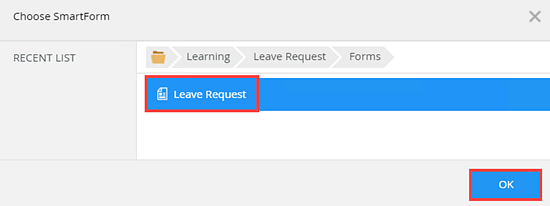
- Browse and select the Leave Request form. Click OK.
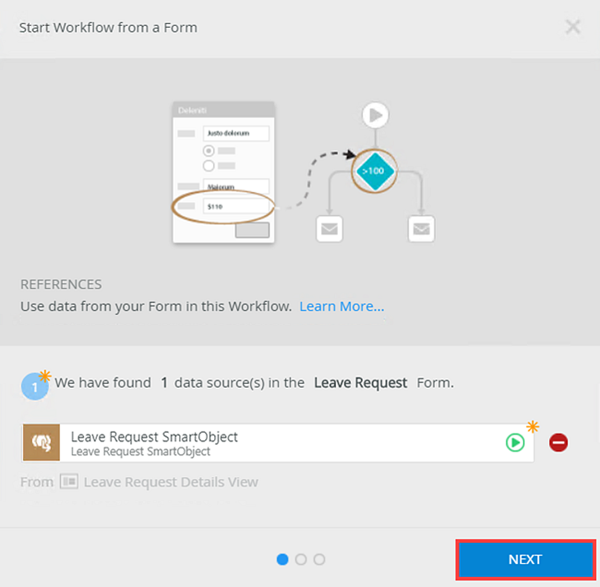
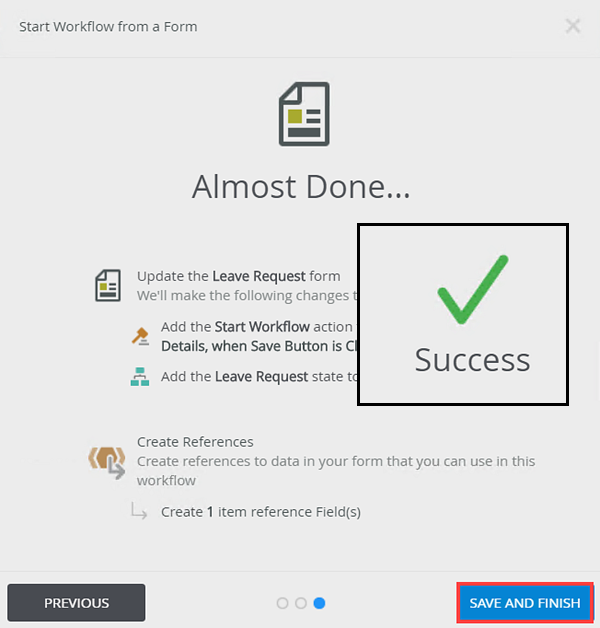
- The Start Workflow from a Form page shows. Click Next.
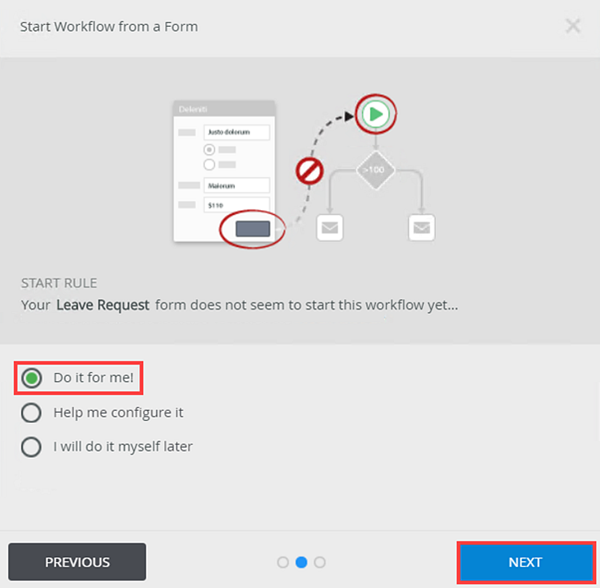
- In the Start Rule section, select the Do it for me! option and click Next.
- On the summary screen, review the changes made to the Leave Request form, then click Save and Finish. When you see the success check, click OK to exit the wizard.
- The start rule is configured. Starting the workflow with a form creates a reference in the context browser.
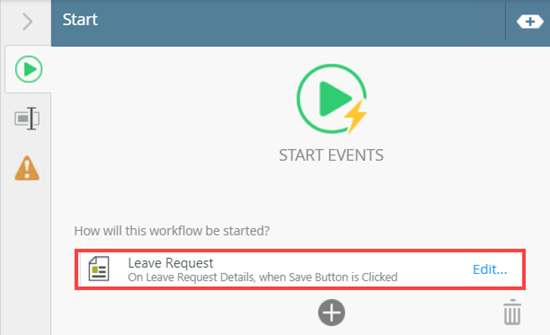
- To view the reference, open the Context Browser and expand Leave Request SmartObject in the References section. You use this reference to configure the condition for the start rule.

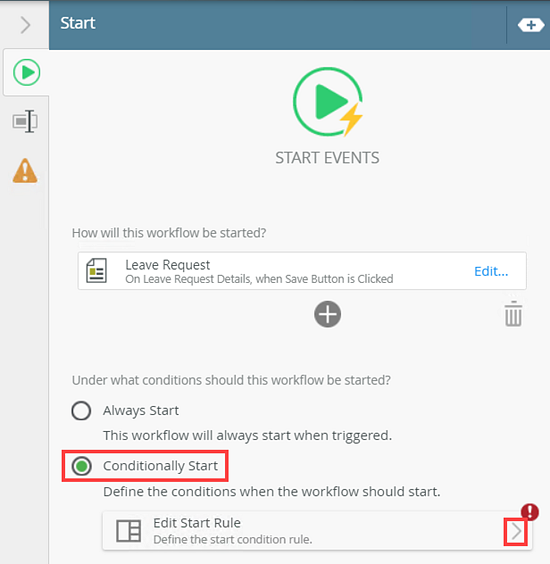
- To configure the condition for the start rule, select Conditionally Start and click Edit Start Rule.
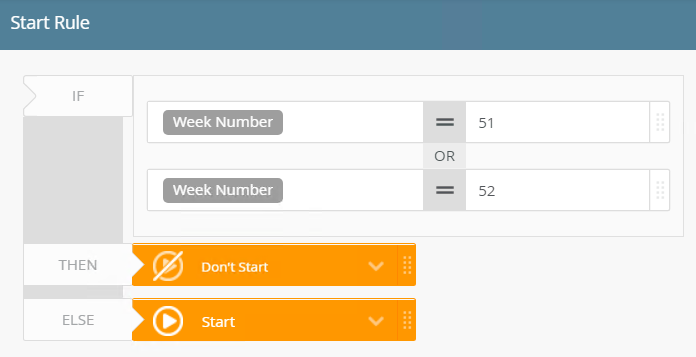
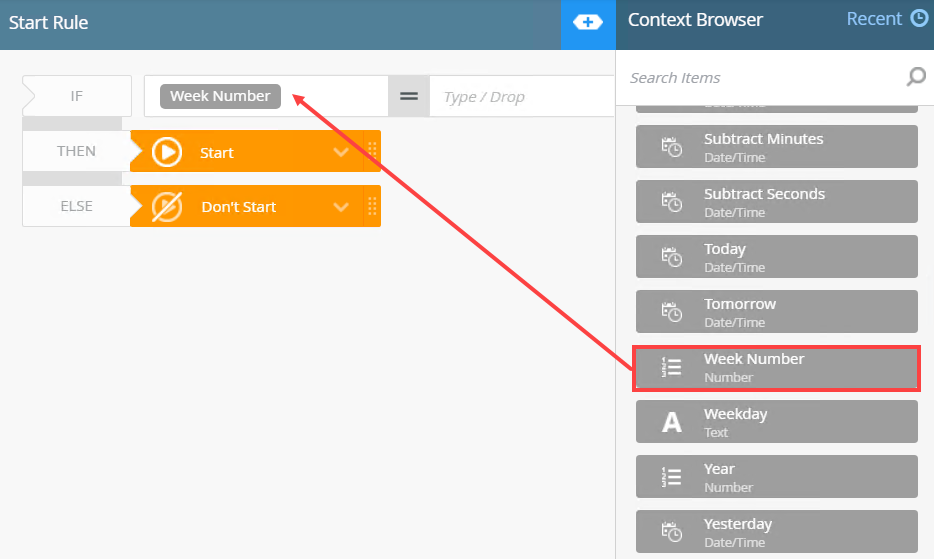
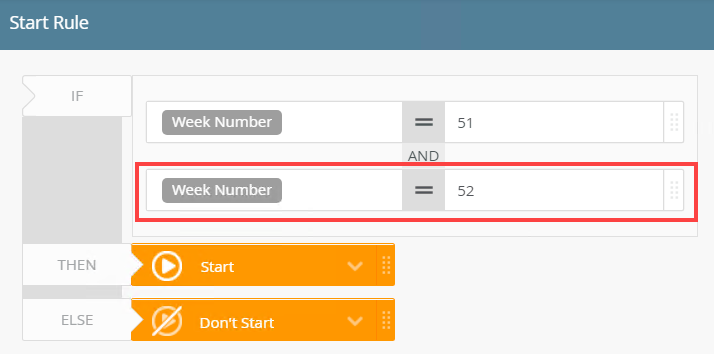
- In this scenario, you need to specify that, if the Leave Start Date falls within the last two weeks of the year, the workflow should not start. To do this you use the Week Number function to specify weeks 51 and 52 which are the last two weeks of the year. From the Context Browser select Functions and expand the Date and Time section.
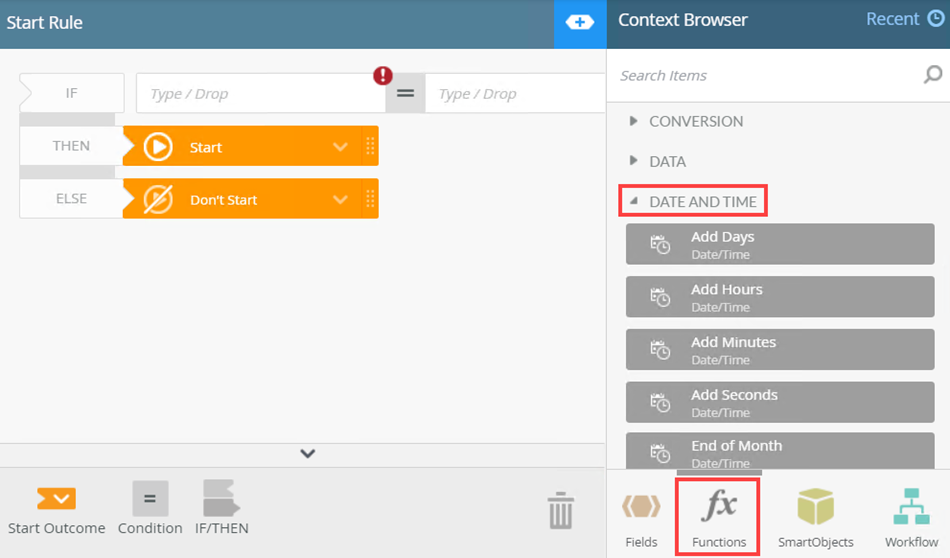
- Locate the Week Number function and drag it into the condition.
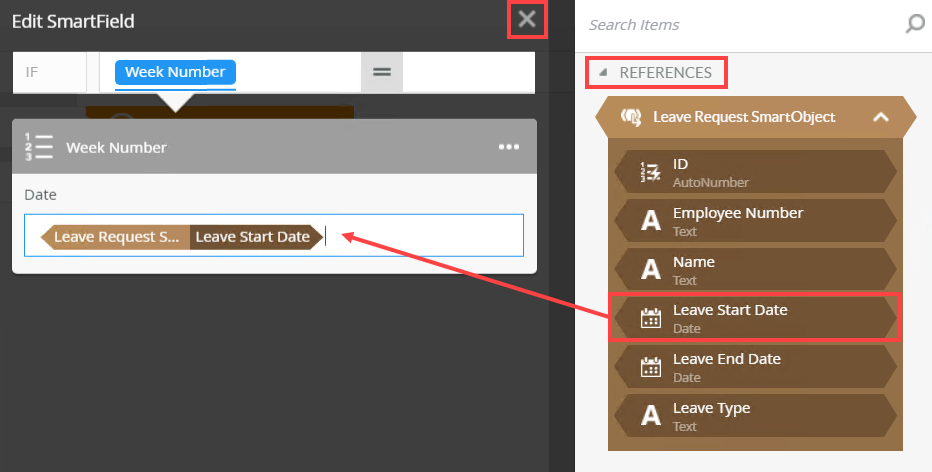
- In the Smartfield Composer, drag the Leave Start Date reference into the Date field. Click X to close the Smartfield Composer.
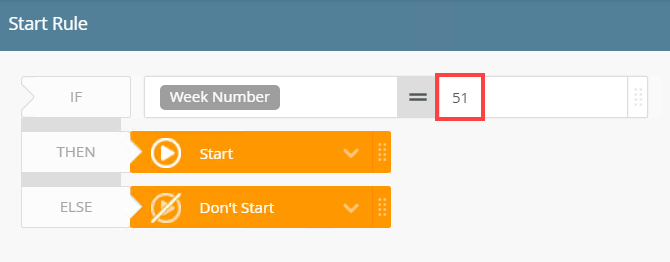
- Type 51 as the value.
- From the Rules Toolbar click and drag a Condition into the IF block.
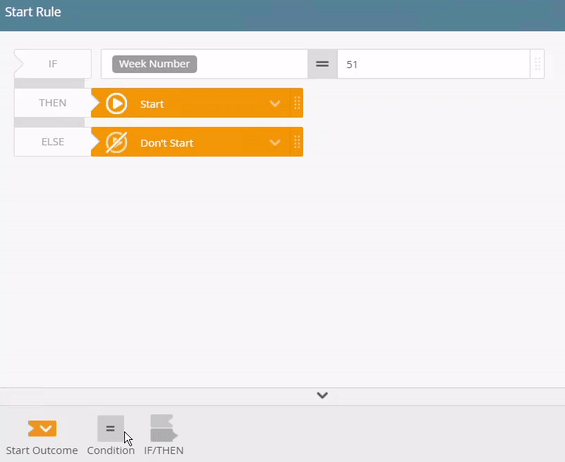
- Repeat steps n to p to configure the second condition as Week Number 52.
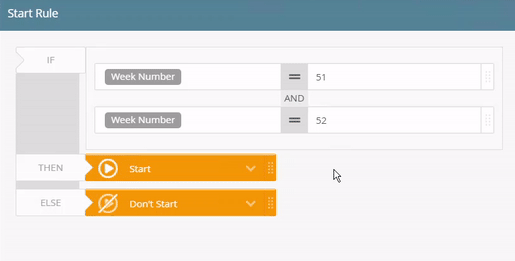
- In the condition block click AND and from the menu select OR. Changing the AND to OR makes sure that either weeks 51 and 52 are evaluated.
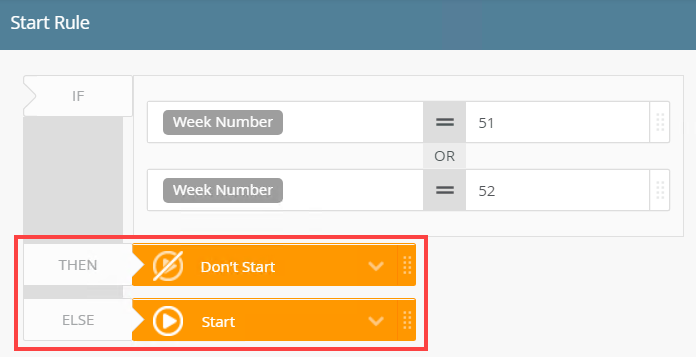
- For the THEN option select Don't Start. If the Leave Start Date occurs in weeks 51 or 52, the workflow won't start. For the ELSE option select Start.
- From the Designer click New and select Workflow
- Configure and complete the rest of the workflow. In this step you also deploy the workflow.
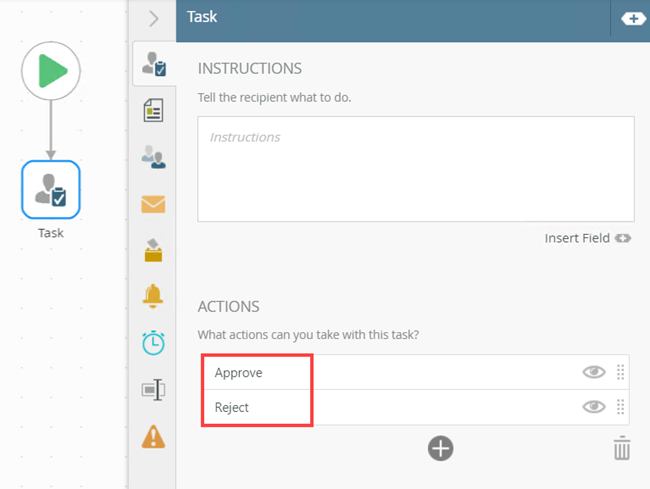
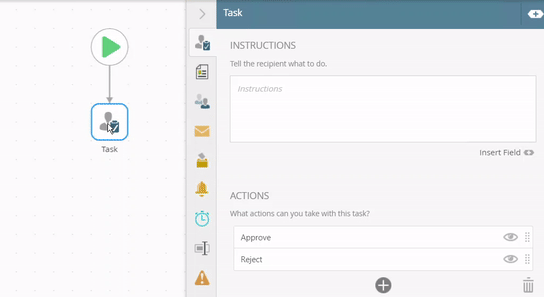
- From the Toolbox, click the Basic category and drag the Task step onto the canvas. In this step you add the required Task Actions. Select Approve and Reject. No further configuration needed for this step.
For more information on the Task step, see Task step.
- From the Task step, click and drag a line to create a Placeholder step. Click this placeholder to create the Decision step.
For more information on the Decision step, see Decision step.
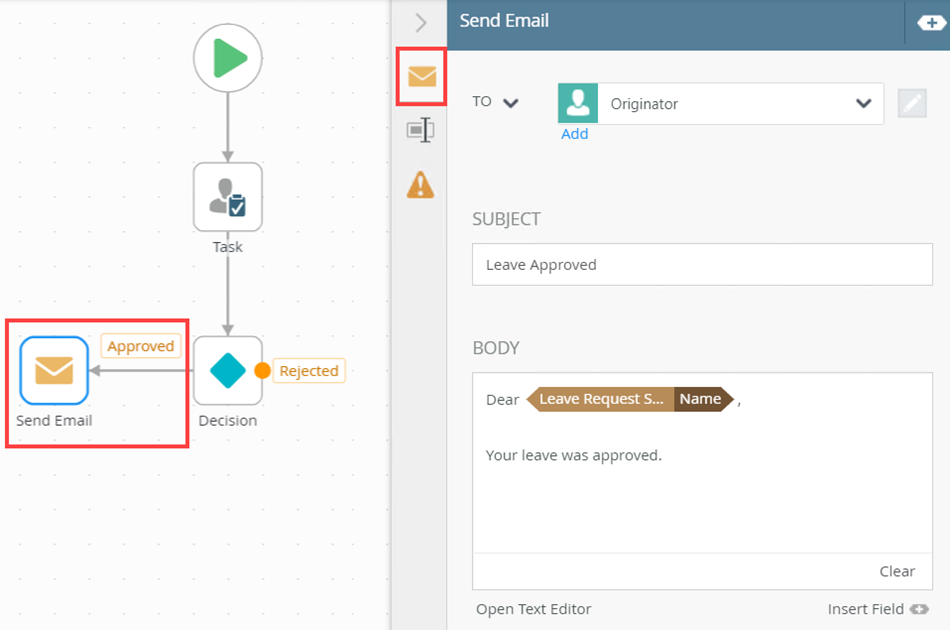
- From the Toolbox, click the Basic category and drag the Send Email step onto the canvas. Connect the step to the Approved task action. Configure the email as shown below.
- Drag another Send Email step onto the canvas and connect it to the Rejected task action. Configure the step as shown below.
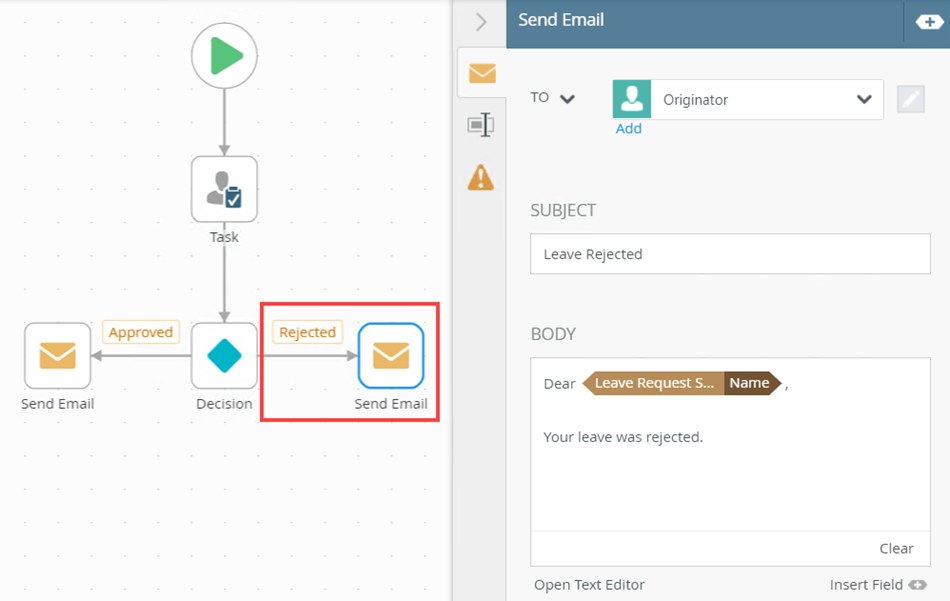
For more information on the Send Email step, see Send Email step.
- From the Toolbox, click the Logic category and drag the End step onto the canvas. Connect the step to both Send Email steps.
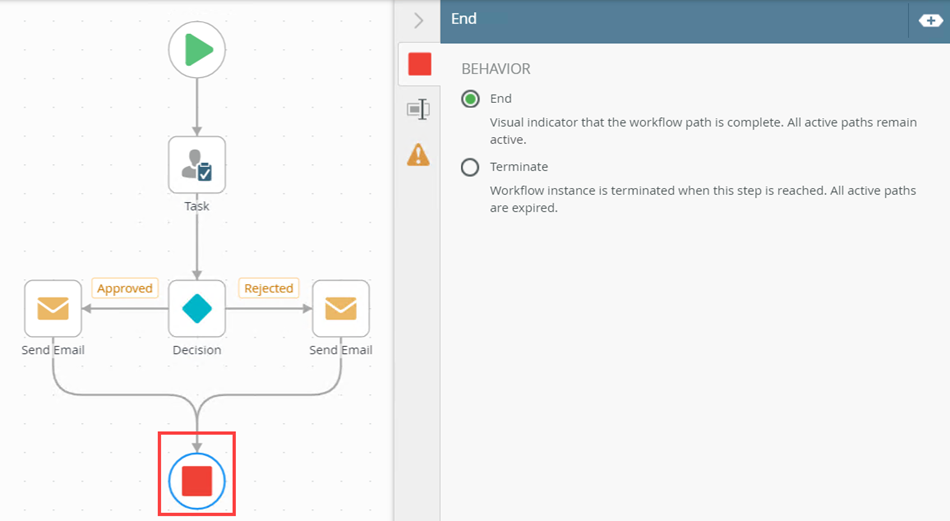
For more information on the End step, see End step.
- Before you can use the workflow, you must deploy it. Deploying a workflow publishes it to the server and makes it available for use. If you make any changes to the workflow, you must deploy it again so that the server can register the changes. Click File > Deploy. When you see the success dialog, click File > Close to return to the Designer.
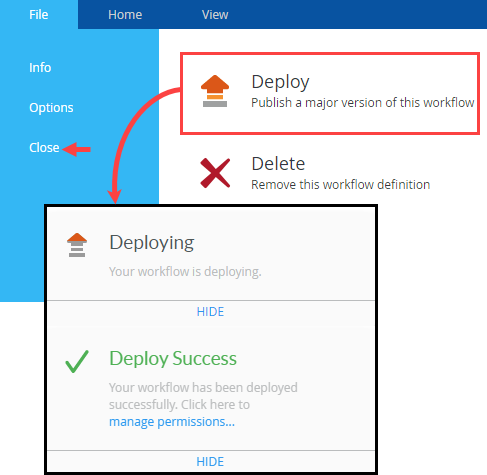
For more information on deploying a workflow, see Deploy a Workflow.
- From the Toolbox, click the Basic category and drag the Task step onto the canvas. In this step you add the required Task Actions. Select Approve and Reject. No further configuration needed for this step.
- Test the solution. In this step you run and complete the Leave Request form. The Conditional Start Rule evaluates the value you entered for the Leave Start Date. If the value falls within the conditional parameter (last two weeks of the year) the workflow does not start. If the value is outside of the condition the workflow starts.
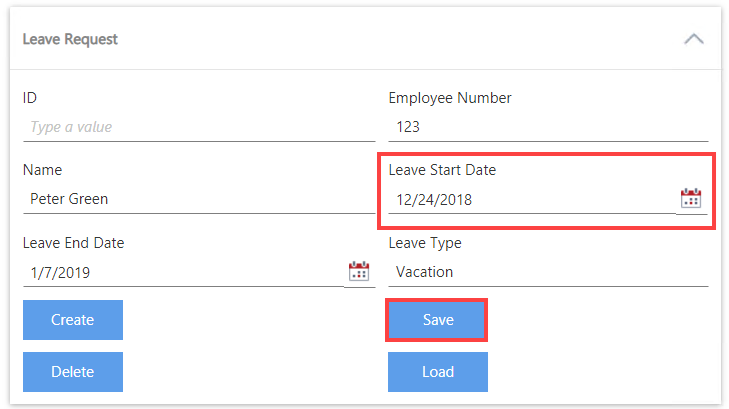
- For the first test, run the Leave Request form and enter the leave details as shown below. Make sure to select the Leave Start Date as the 24th of December. Click Save to submit the form.
- The conditional start rule evaluates the value you entered in the Leave Start Date field. Because this date falls within the last two weeks of the year, the workflow does not start. An error message shows the workflow could not be started.
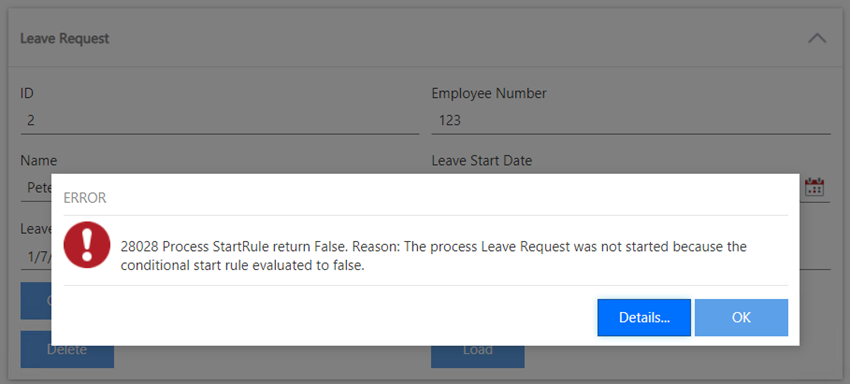
To show a more friendly error message, you can use the Error Event and Method in your form rule. For more information, see How To: Use The Error Event And Method.
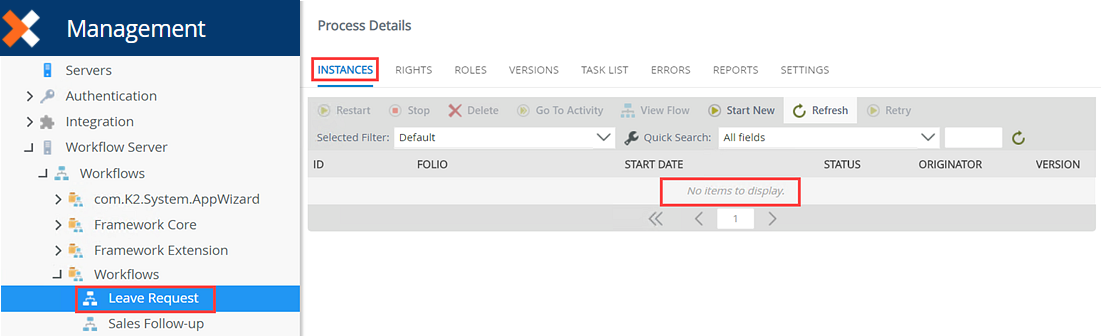
- From Management, locate the Leave Request workflow and select the Instances tab. Notice that no workflow instance started.
- For the second test, run the Leave Request form and enter the leave details as shown below. Make sure to select the Leave Start Date as the 3rd of December. Click Save to submit the form.
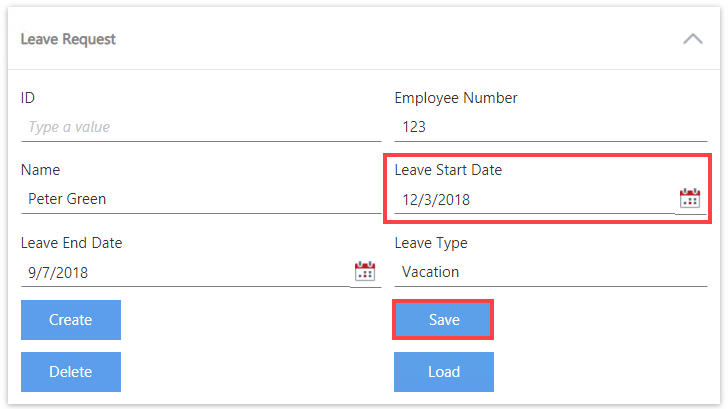
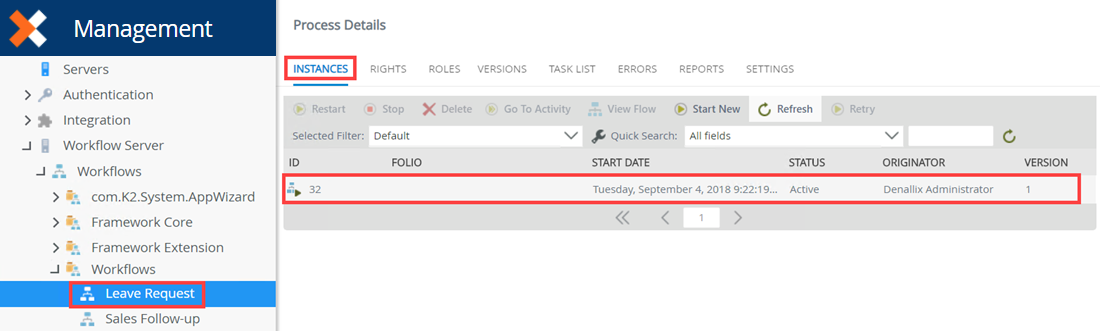
- The conditional start rule evaluates the value you entered in the Leave Start Date field. Because this date falls outside of the last two weeks of the year, the workflow starts. From Management, locate the Leave Request workflow and select the Instances tab. Notice that the workflow started.
- For the first test, run the Leave Request form and enter the leave details as shown below. Make sure to select the Leave Start Date as the 24th of December. Click Save to submit the form.
Review
The Conditional Start Rule is logic that evaluates your data outside of the workflow and according to the outcome either starts the workflow or not. For more information see Conditional Start Rule.