Step 6: Result notification email
- Step 1: Create the list and columns in SharePoint
- Step 2: Design, configure, and publish the Leave Request form
- Step 3: Open the Workflow Gallery
- Step 4: Send acknowledgment email
- Step 5: Get the response for the leave request
- Step 6: Result notification email
- Step 7: Configure start options
- Step 8: Publish and test the workflow
After we get the manager's response to the task, a notification email is sent to the initiator. Follow the steps below:
|
1 |
Configure Send an email action to send the leave approval email. |
- Click the User Interaction action group in the action toolbox and find the Send an Email action.
- Insert the action to the Approved branch of the Assign a task action and do one of the following to open the Action Configuration window.
- Double-click the action.
- Click
 on the action and then click Configure.
or
Type Send an Email in the Search field at the top of the action toolbox.
- Add the recipient of the email in the To field:
- Click
 and in the Equals section that appears select Workflow Context in the first drop-down.
 - Expand the second drop-down and select Initiator.
- Click Insert.
[%Workflow Context:InitiatorUserId%] displays in the To field.
- Click
- In the Subject field enter the following:
- Click inside the field. The Insert Reference pane opens on the right,
- Expand the Item Properties section and double-click on Leave Type.
- In the Body enter the following:
- Click Save.
Your {Current Item:Leave type} has been approved.
{Current Item:Leave type} is a reference which you can select from the Insert References pane. To insert a reference do the following:
Your manager has approved your {Current Item:Leave type}.
{Current Item:Leave type} is a reference which you can select from the Insert References pane. See step 4 for instructions on how to insert a reference.
|
2 |
Configure Send an email action to send the leave rejection email. |
- Click the User Interaction action group in the action toolbox and find the Send an Email action.
- Insert the action to the Rejected branch of the Assign a task action do one of the following to open the Action Configuration window.
- Double-click the action.
- Click on the action and then click Configure.
- Add the recipient of the email in the To field:
- Click and in the Equals section that appears select Workflow Context in the first drop-down.
- Expand the second drop-down and select Initiator.
- Click Insert.
[%Workflow Context:InitiatorUserId%] displays in the To field.
- Click
- In the Subject field enter the following:
- Click inside the field. The Insert Reference pane opens on the right,
- Expand the Item Properties section and double-click on Leave Type.
- In the Body enter the following:
or
Type Send an Email in the Search field at the top of the action toolbox.
Your {Current Item:Leave type} has been rejected.
{Current Item:Leave type} is a reference which you can select from the Insert References pane. To insert a reference do the following:
Your manager has rejected your {Current Item:Leave type}.
{Current Item:Leave type} is a reference which you can select from the Insert References pane. See step 4 for instructions on how to insert a reference.
|
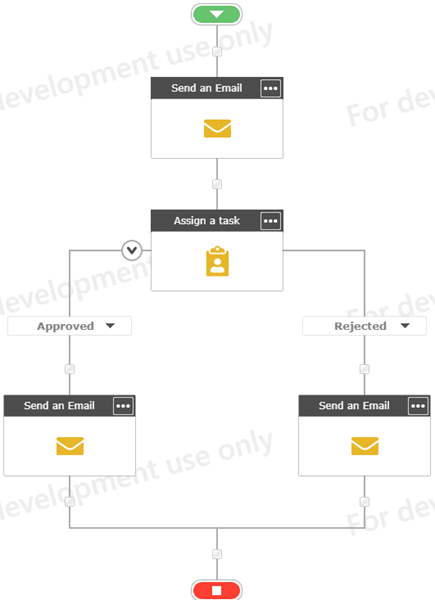
Follow along This is what your workflow looks like at this point in the solution: |
|
|
Previous step: |
Next step: |