Step 2: Design, configure, and publish the Leave Request form
- Step 1: Create the list and columns in SharePoint
- Step 2: Design, configure, and publish the Leave Request form
- Step 3: Open the Workflow Gallery
- Step 4: Send acknowledgment email
- Step 5: Get the response for the leave request
- Step 6: Result notification email
- Step 7: Configure start options
- Step 8: Publish and test the workflow
After we create the list and the columns, we can design the form that can be used to submit leave requests and add new items to the list.
|
1 |
Open Nintex Forms |
- On the Leave Request SharePoint list, click Nintex Forms on the top ribbon. A page opens prompting you to select a Forms designer.
-
Select New Responsive Designer. The Forms designer is displayed. The Form designer automatically displays form fields for the equivalent SharePoint columns in the Leave Request list.
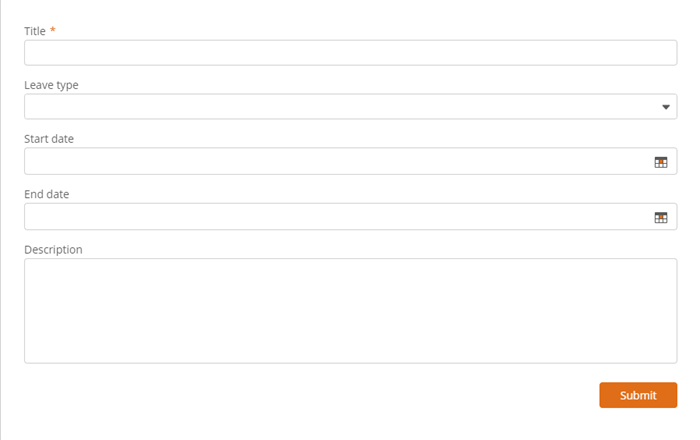
This is what the form looks like when we first open it:
|
2 |
Change the control settings |
You can change the settings of the controls if required. For this solution we change the name of the control named Title.
- Click the Text control named Title and in the configuration panel that opens type, "Name" in the Title field.
Note: The Connected to field shows which column in the SharePoint list the control is connected to. When a control is connected to a column, data entered via that field in the form is entered in the selected SharePoint column.
|
3 |
Apply styles to the form |
You can change the color scheme, font and color of input text as required. For this solution, we change the font of the form field labels and the background color of the form and Submit button.
- Click the Styles tab at the top of the Form designer.
- To change the font for the field names, follow these steps:
- In the Form styles configuration panel, click the drop-down list below Font.
- In the list that appears, select the font style you want. For this solution let's select Lato.
- To change the color of the Submit button, follow these steps:
- In the Form styles configuration panel, click Advanced settings.
- Click the color picker next to Primary button.
- In the color picker that appears, select the color you want or type the Hex code for the color in the field provided. Let's change the submit button color to blue with the Hex code #09008a.
- To change the form background color, follow these steps:
- In the Form styles configuration panel, click the color picker next to Form background.
- In the color picker that appears, select the color you want or type the Hex code for the color in the field provided. Let's change the color to grey with the Hex code #d6d6d6.
- From the toolbar, click Apply styles.
|
4 |
Preview the form |
Click the Preview tab at the top of the Forms designer. With the form preview, you can see how your form will actually appear and behave in a web browser, preview the styles, and test the fields you defined in the Designer tab.
|
5 |
Publish the form |
When you publish the form it is available to users of the SharePoint list we created. After you create a form for a list and publish it, if you click +New to add an item to the list, the form will be displayed. Submitting the form adds a new item to the list.
- In the Designer tab of the Forms designer ribbon, click Publish.
During the publish process, a progress indicator displays. When the publish operation is complete, the message "Form published successfully" appears. The published form overwrites any previously published form.
|
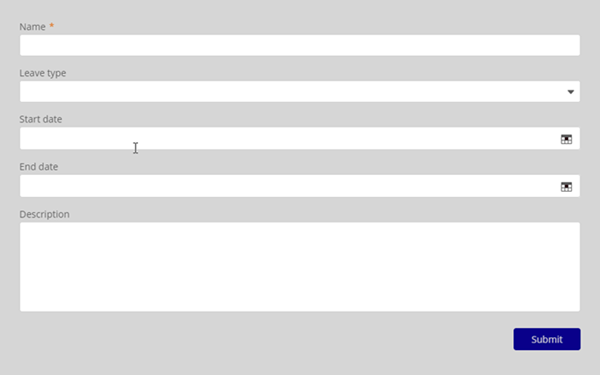
Follow along The Form we designed looks like this: |
|
|
Previous step: |
Next step: |