Deleting References
You create references to items such as documents, subsites, list items, forms, and SmartObject results, and then reuse that information anywhere within the workflow. In many cases, references are created automatically for you, but you also have the option to create your own. You can create multiple references and reuse them throughout the same workflow. References are created when you:
- integrate with a form
- configure the Create Reference step
- configure a SmartObject Method step
- create references to your SharePoint list, list items, libraries and subsites
- configure the CRM Entity Item References step
In some cases, you might need to delete a reference from your workflow. It is very important to do some investigating about the reference first, before you delete it, as you might be using the reference in various workflow steps. Use caution and make sure that deleting a reference does not affect any other areas of your workflow.
Let's look a few scenarios for deleting references in your workflow.
The scenario below shows what happens when you delete a reference used in the workflow.
At your company, all new employees attend an induction course. Part of the process requires dietary information for catering purposes. To do this, an email is sent to the employee. This scenario uses a SharePoint list called New Employee Induction Program. The list captures new employee details such as Title, Employee Name, Email, Attending and Dietary Requirements. The list is integrated with K2 for SharePoint and starts a new workflow when a new item (employee details) is added. Information captured on the SharePoint list is used in throughout the workflow.
The workflow sends a task to the HR representative who can either Approve or Reject the task. In the task instructions, the representative can see the new employee's name and whether or not they are attending. The Employee Name and Attending references are used to populate the task instructions. If the employee is attending, HR selects the Approve action. This sends an email to the new employee confirming their dietary requirement. The Dietary Requirements reference is used to populate the email body.
This scenario shows what happens to workflow steps when you delete a reference. Follow the steps to set up the scenario:
- Create the New Employee Induction Program list in SharePoint as shown below. This list stores employee details.

- Create a workflow called Induction Catering. In this example, you configure the Start step in the workflow to start when an item is added to the SharePoint list. Step through the wizard and select the New Employee Induction Program list and Do it for me! option. This automatically creates the references. You can integrate the list with K2 for SharePoint to start the workflow, but in this example you set it up from the K2 Workflow Designer side.
- Drag the Task step onto the canvas. Add Approve and Reject as the task actions. From the Context Browser panel, expand the New Employee Induction Program references. Locate Employee Name and Attending properties from the reference and configure the Instructions as shown below.

- Add a Decision step onto the canvas and configure the Approved and Rejected paths.
- Drag a Send Email step onto the canvas as the outcome to the approved path. Use the New Employee Induction Program reference to configure the To email address and the Body of the email as shown below.

- Drag two End steps onto the canvas and connect them to the Send Email step and the Rejected task action. This allows you to deploy the workflow.

- Deploy your workflow.
- In SharePoint, add a new item to the New Employee Induction Program list.

- Adding the new item starts the Induction Catering workflow and a task is sent to the HR representative. In this case it was sent to the Administrator. As Administrator, open K2 Workspace (Desktop) to view the task. Notice the instructions are populated with the employee name and attendance detail. In this case the employee is Bob Maggio and he will be attending. From the Action menu select Approve and click Submit.

- An email is sent to Bob to confirm his dietary requirements. Log in as Bob and open the email. Notice the email body populated with the employee name and dietary requirement. In this case Bob requested a vegan meal.

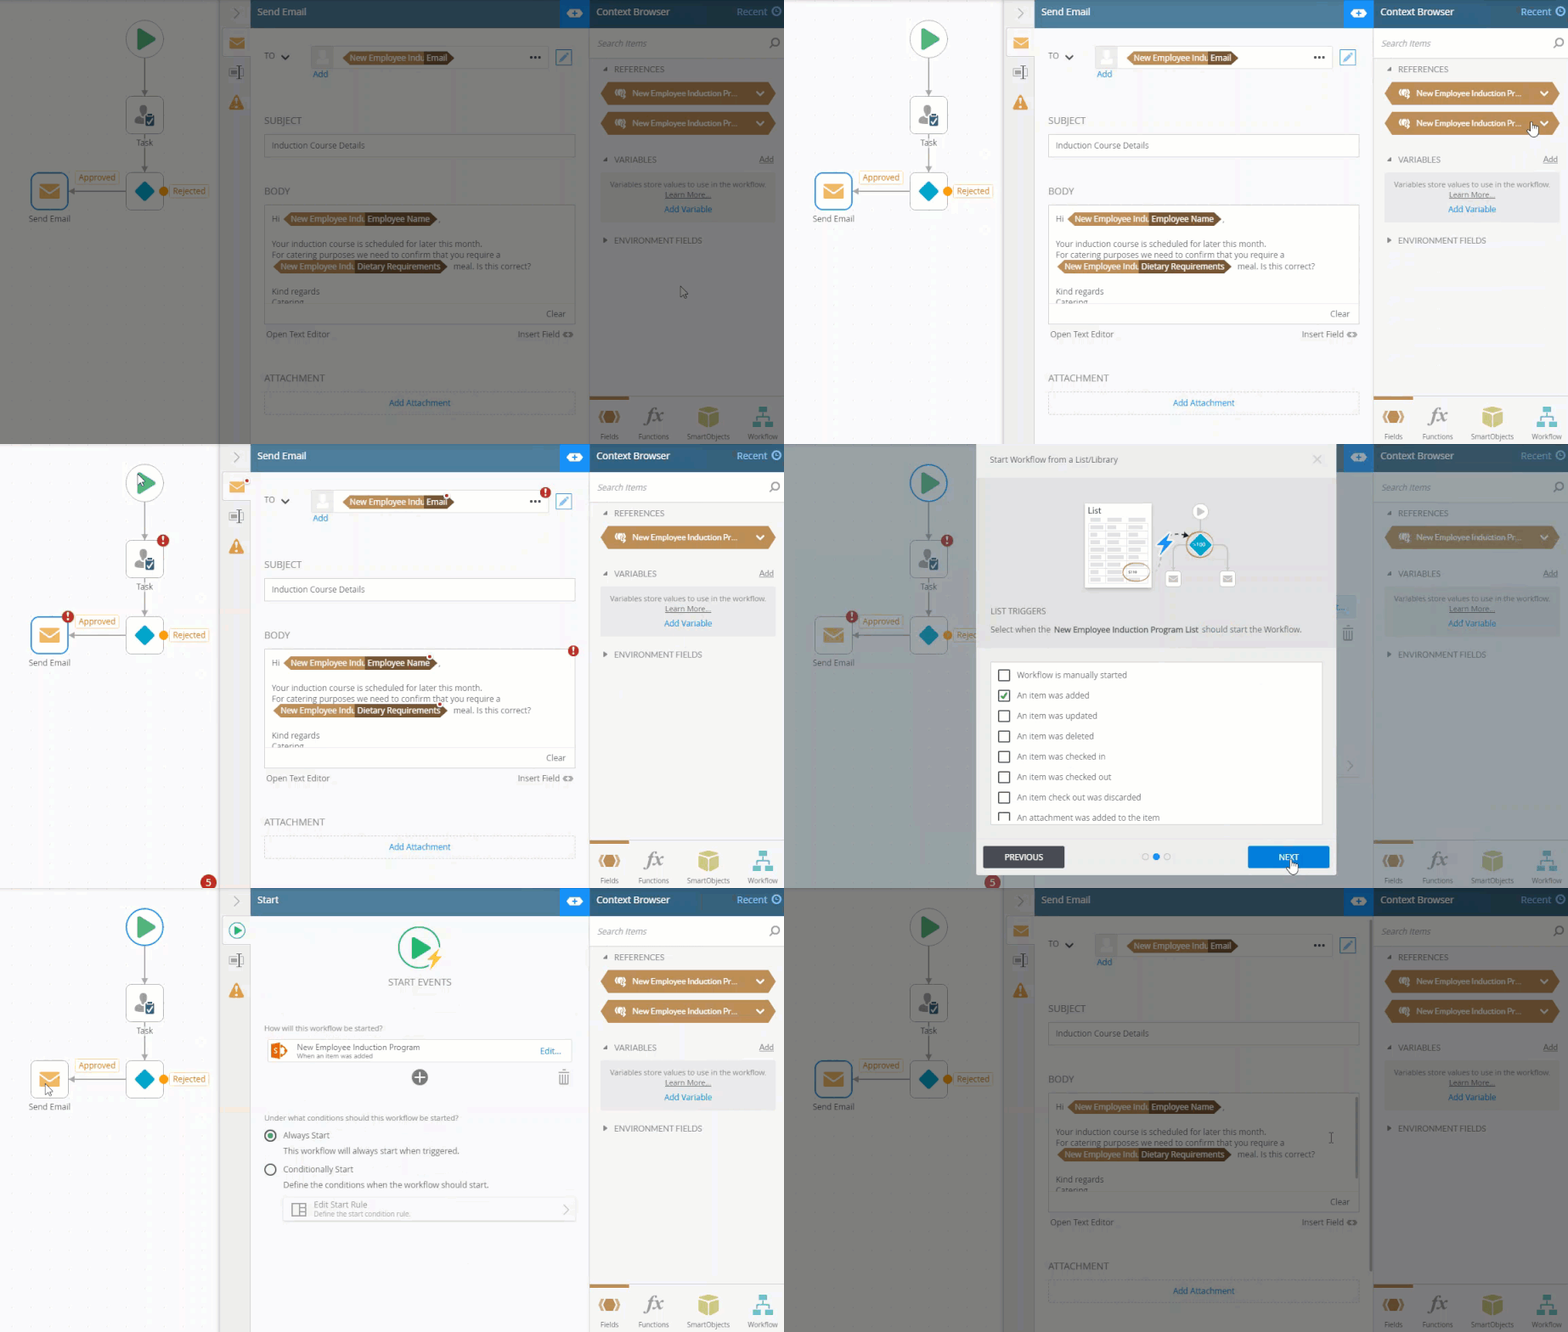
- To show what happens when you delete the reference, from K2 Designer locate the Induction Catering workflow and click Edit.
- From the Context Browser, right click the reference and select Delete.

- Notice the red indicators on step and configuration level. This indicates that the items are missing some configuration.

For more information on the indicators see Error Console and Indicators. - Click on the red error indicator located at the bottom right of the canvas. It shows the number of errors.

- The error console opens. In here you find a description of the errors and on which step they occur. In this example, the Employee Name property in the Send Email step has a removed reference field.

- Note that you cannot deploy this workflow until you've resolved the error messages.

- To resolve this, you need to recreate the reference. In this example, edit the event on the Start step. Run through the wizard to recreate the reference.

- Run through the wizard to recreate the reference. After recreating the reference, the referenced properties automatically reconfigures in both the Task and Send Email step.
The steps below show how to delete a reference from the Context Browser.
Deleting a reference can cause other areas of your workflow to go into an error state. This prevents you from deploying your workflow. When you delete a reference that you used in other areas of your workflow (email customizations, client event, or the Loop step) you'll notice red indicators on the Configuration Panel and Canvas.
Open the Context Browser and find the reference you want to delete. In this scenario, the Sales Order reference was created when you configured the Create Reference
To delete, right click the reference and select Delete.
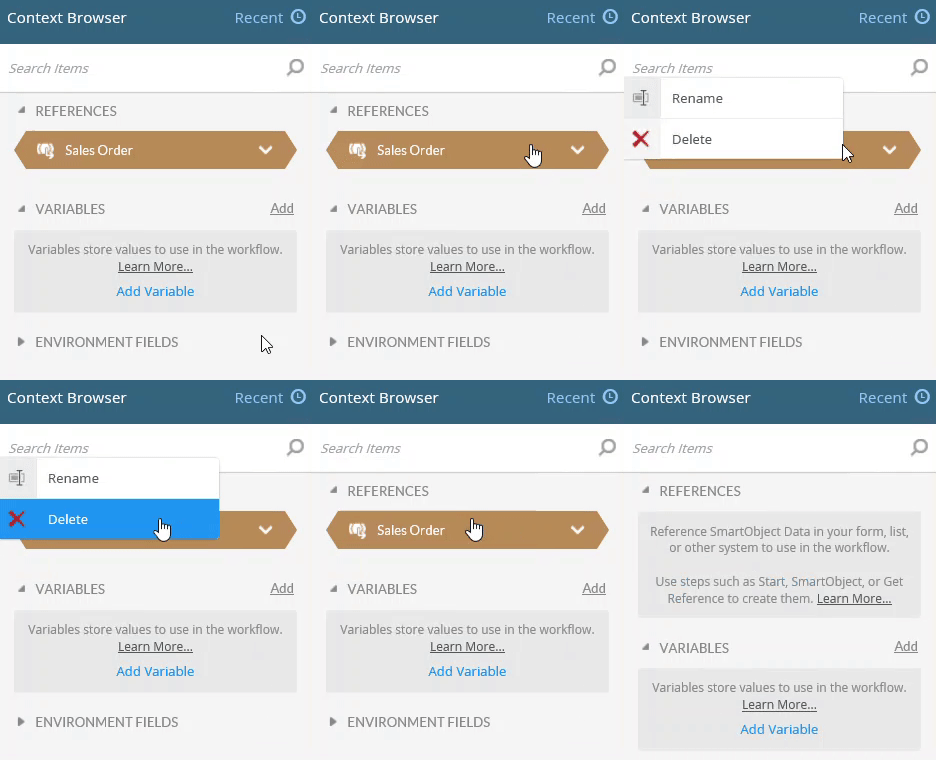
Notice that the Sales Order reference no longer shows in the References section.

To recreate the reference, click the Create link in the Output Mappings section in the Configuration Panel of the Create Reference step.
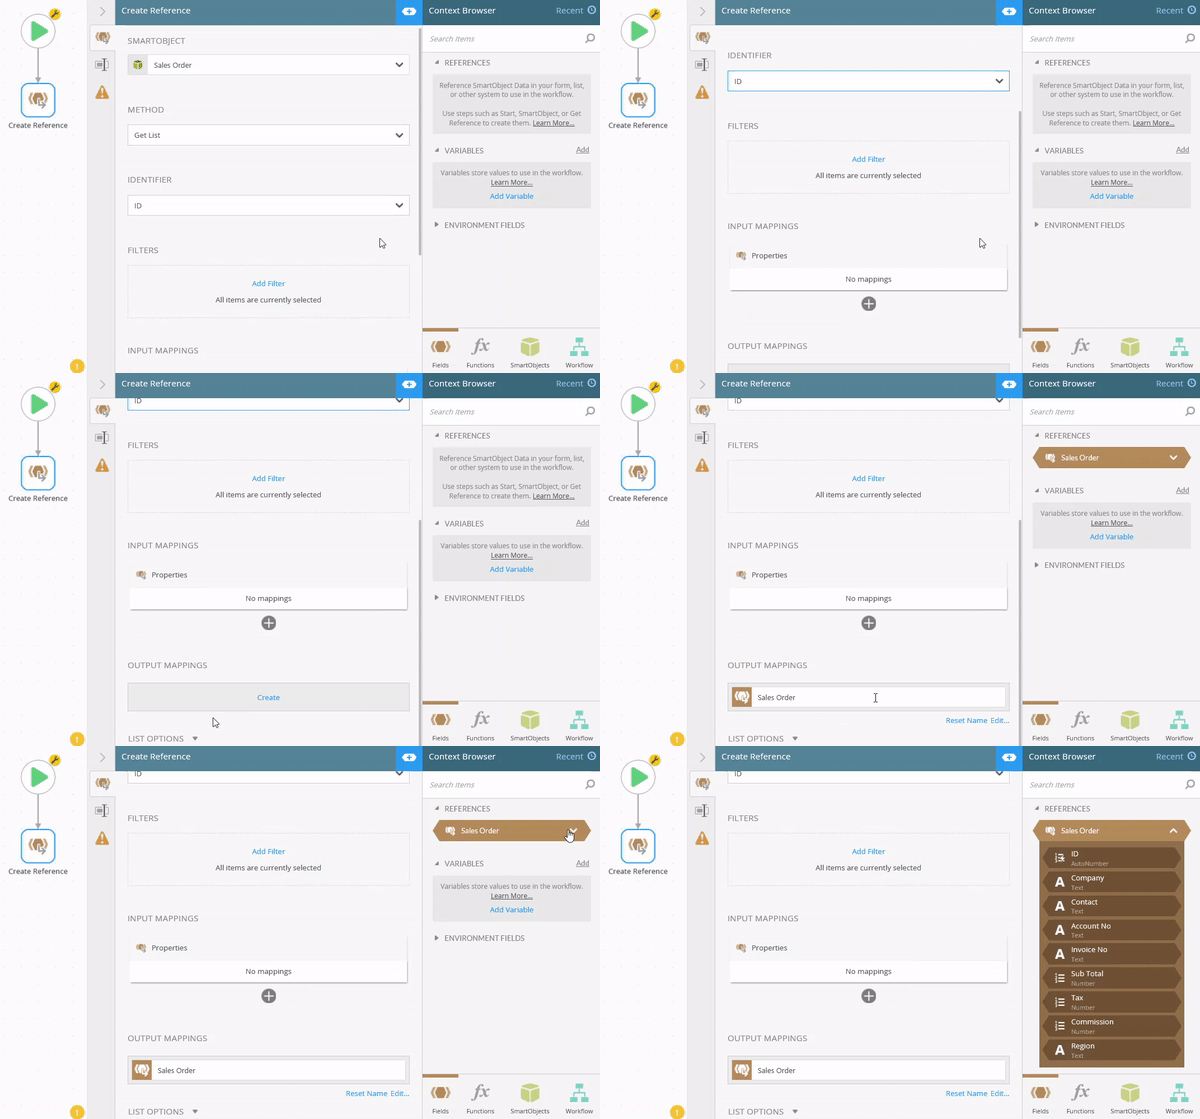
You use the Create Reference step to create references to a SmartObject item. You do this by selecting a SmartObject and selecting the method and identifier which then creates the reference. When you delete the Create Reference step from the canvas, you also delete the associated reference.
In this example, you add a Create Reference step to your workflow and configure the Sales Order SmartObject Get List method.

On the Configuration Panel in the Output Mappings section, click the Create link to create the Sales Order reference.
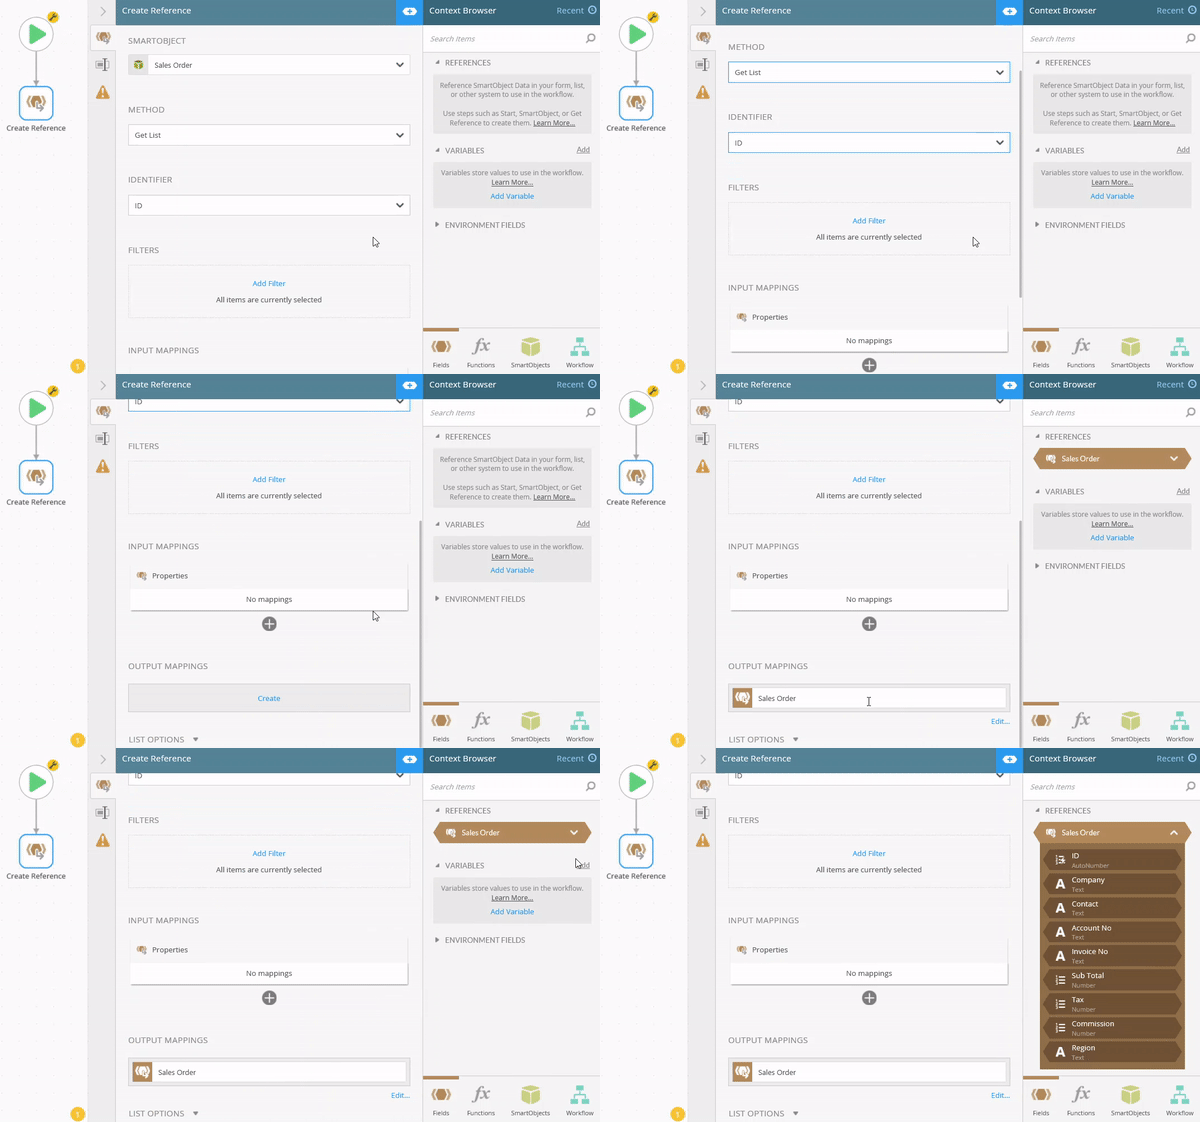
On the canvas, select the Create Reference step and delete it. Use the Delete key on your keyboard. Notice the Sales Order reference no longer shows in the References section.
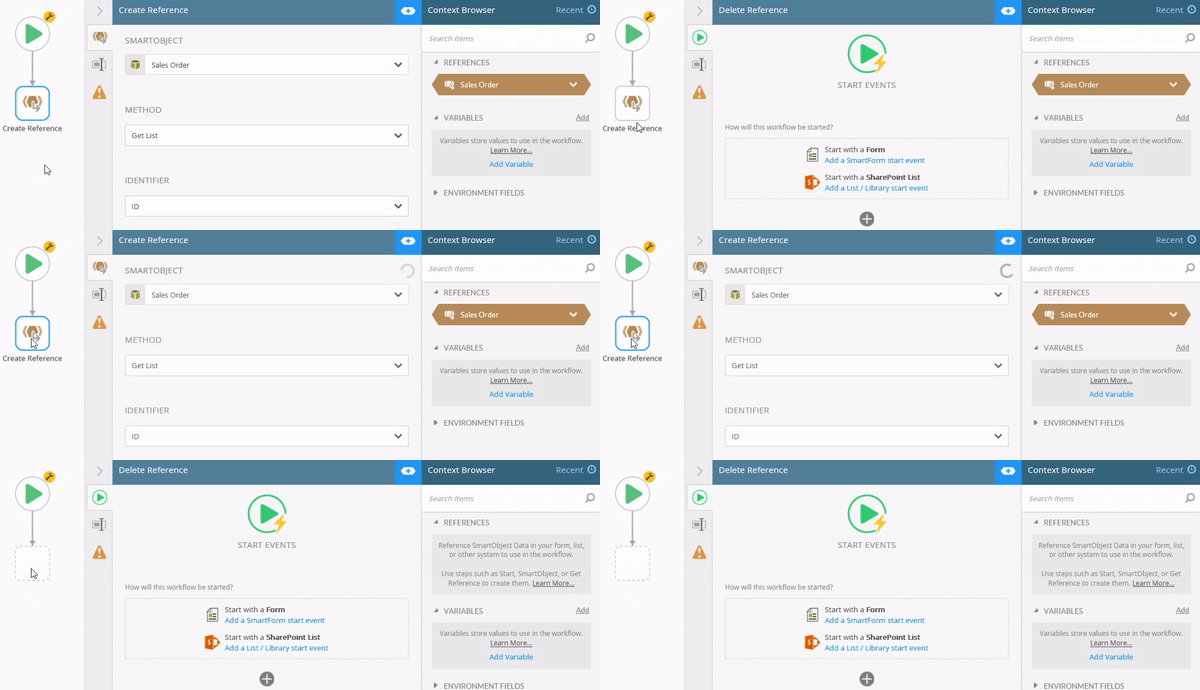
To recreate the reference you have to drag the Create Reference step from the Toolbox onto the canvas and configure it.
You use the SmartObject Method step to generate dynamic references to a SmartObject item. You do this by selecting a SmartObject and selecting the method and identifier which then creates the corresponding reference. When you delete the SmartObject Method step from the canvas, you also delete the associated reference.
In this example, you add a SmartObject Method step to your workflow and configure the Stock Details SmartObject Get List method.

On the Configuration Panel in the Output Mappings section, click the Create link to create the Sales Order reference.
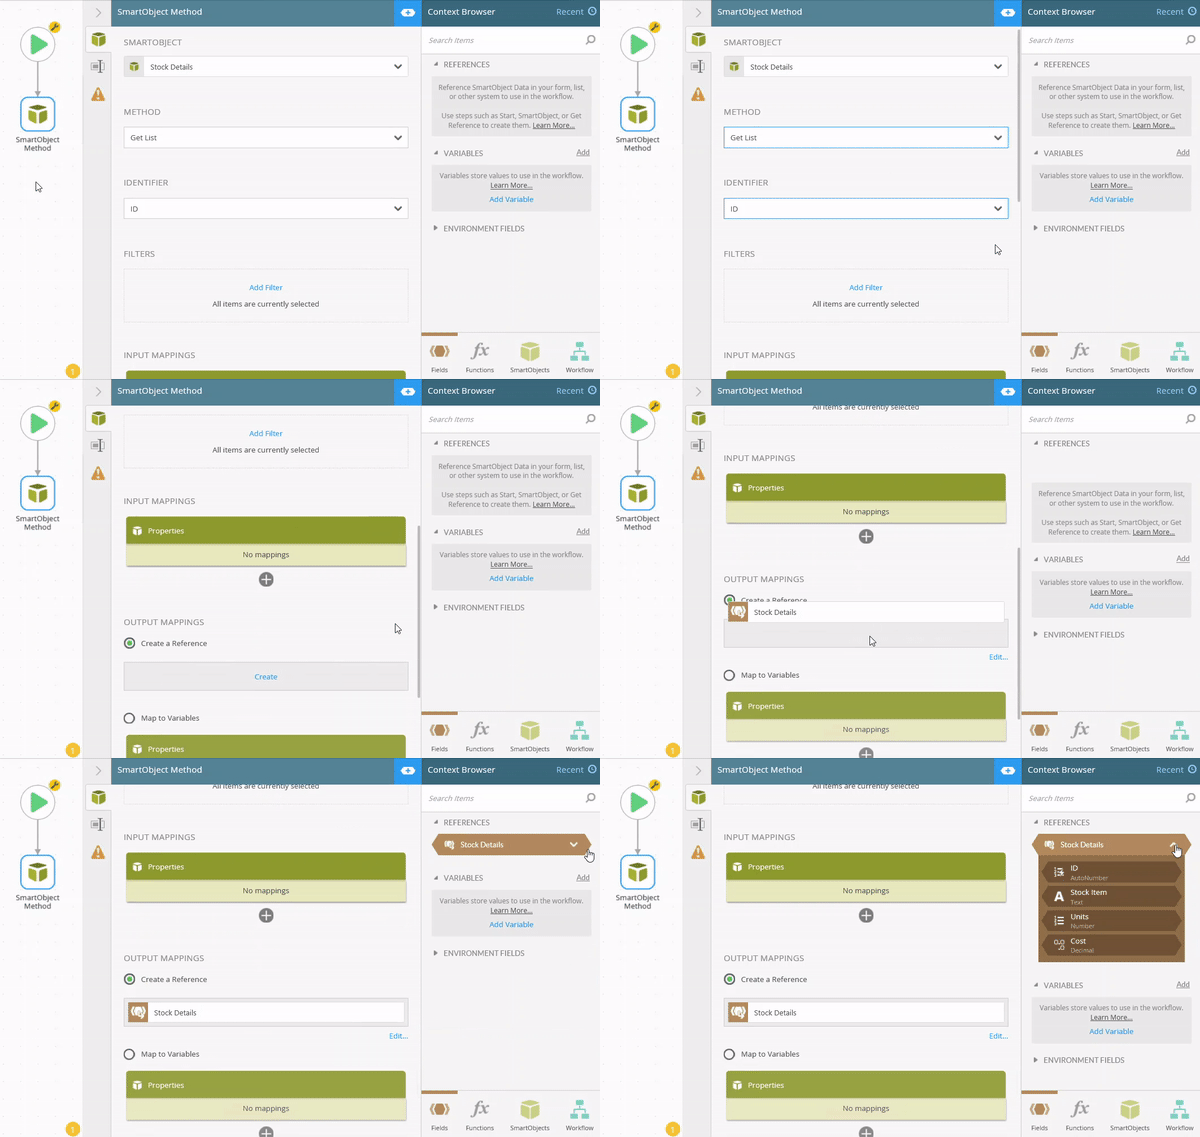
On the canvas, select the SmartObject Method step and delete it. Use the Delete key on your keyboard. Notice the Stock Details reference no longer shows in the References section.
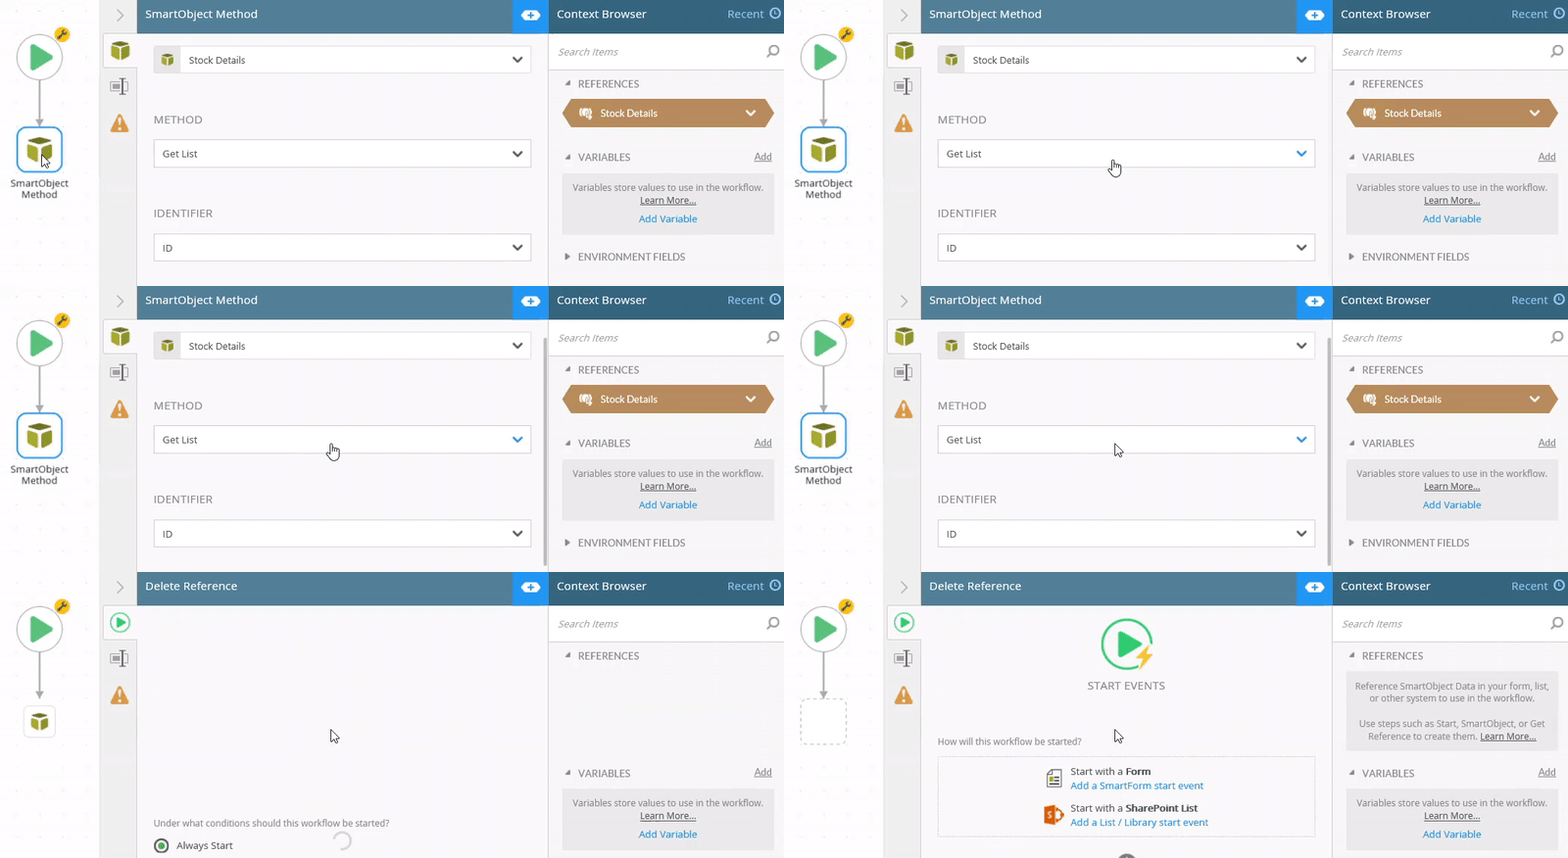
To recreate the reference you have to drag the SmartObject Method step from the Toolbox onto the canvas and configure it.
You can start workflows designed in the K2 Workflow Designer by configuring a view or form rule. You can, for example, use a form to capture and retrieve data, and when the form is submitted, a workflow starts. For more information on starting a workflow with a form, see Start a Workflow with a Form.
In this example you use a form to start a workflow when the Savebutton is clicked. When you configure the Start step, the Travel Expense Claim reference is created.

On the Configuration Panel, select the Travel Expense Claim form and click the Trash bin icon.

This removes the integration on the start step, which means the workflow no longer starts when the Save button is clicked. This also deletes the form reference.
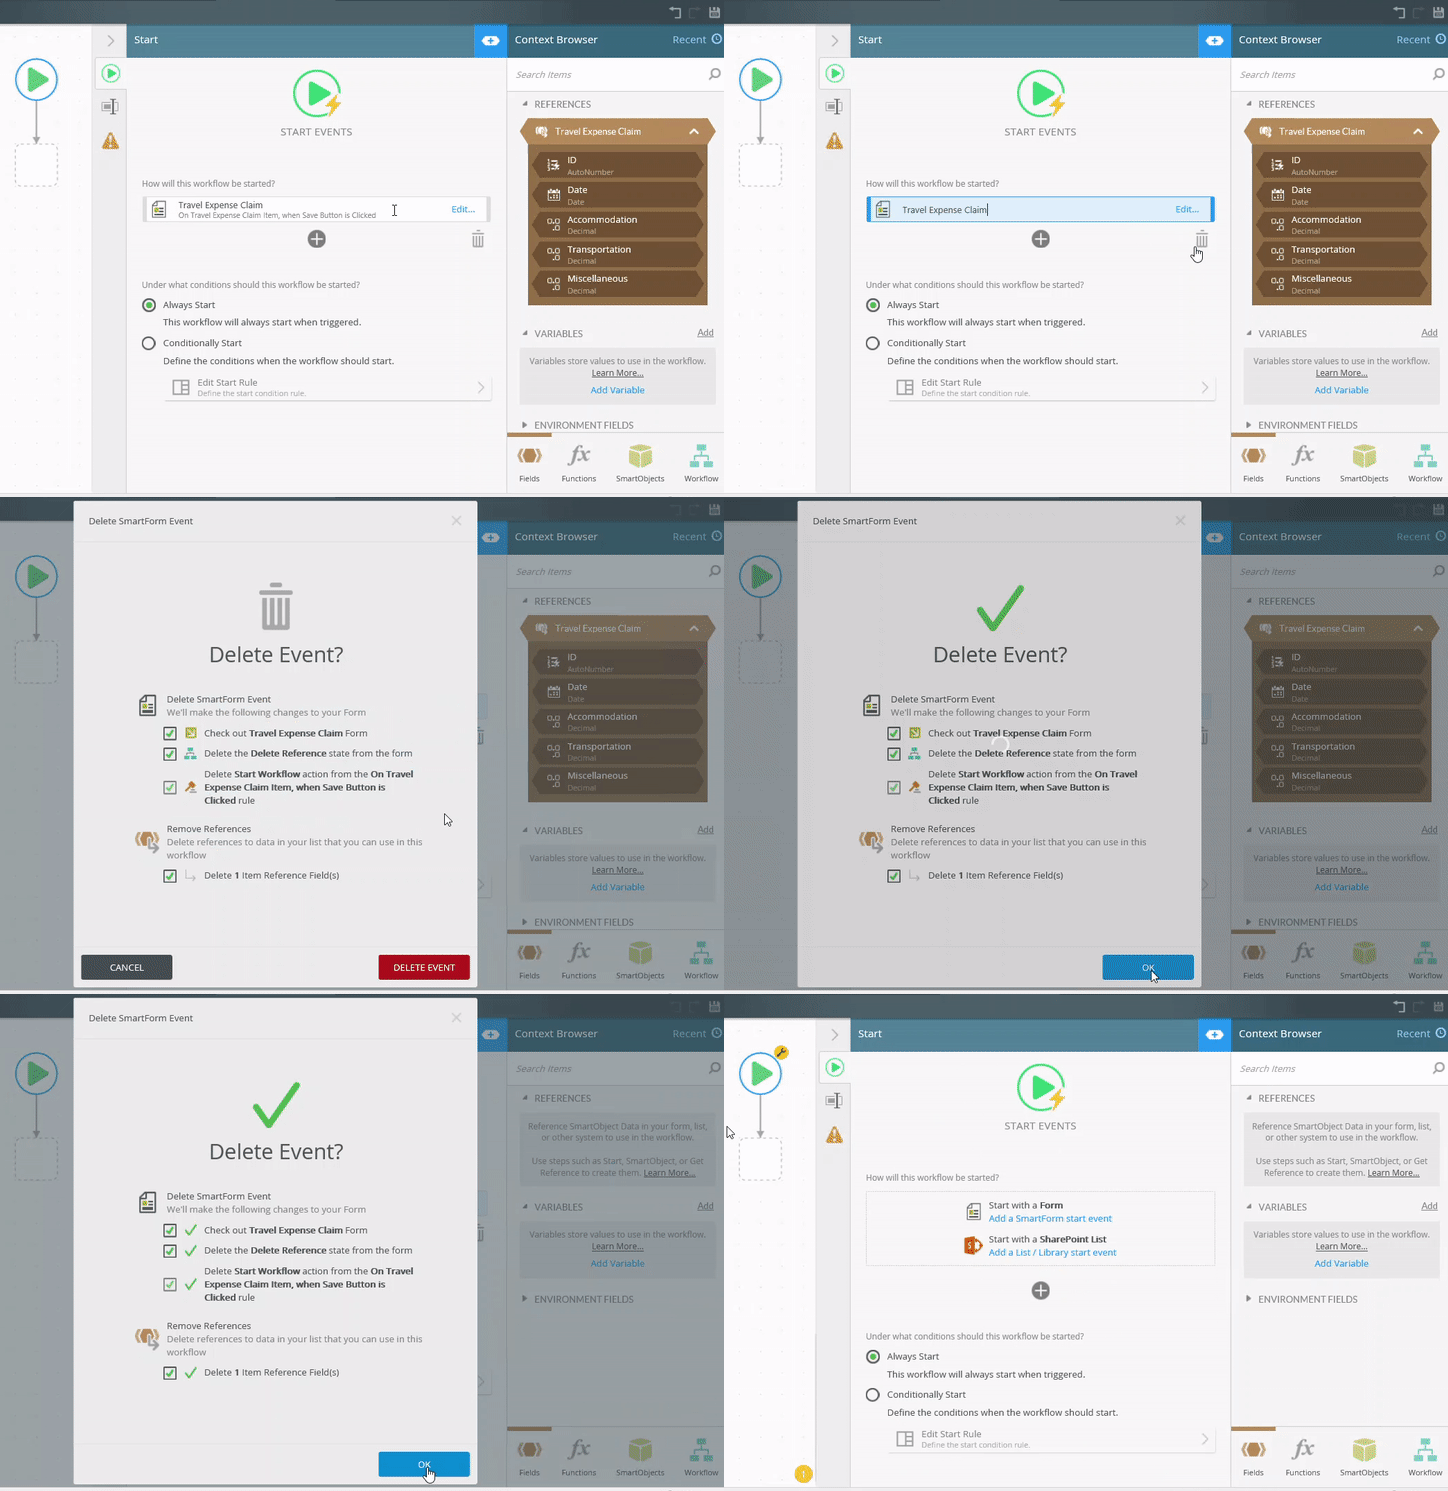
To recreate the reference, reconfigure the Start with a Form event on the Start step.
References are automatically created when a SharePoint list is integrated with K2 for SharePoint. The same happens when you select a SharePoint list to start the workflow with. For more information on how to start a workflow with a SharePoint event, see Start a Workflow with a SharePoint event.
In this example you integrated the New Employee Induction Program SharePoint list with K2 for SharePoint. The workflow starts when you add a new item to the list. The New Employee Induction Program reference is automatically created.

On the Configuration Panel, select the New Employee Induction Program SharePoint event and click the Trash bin icon.

This removes the integration on the Start step, which means the workflow no longer starts when a new item is added to the SharePoint list. This also deletes the SharePoint references.
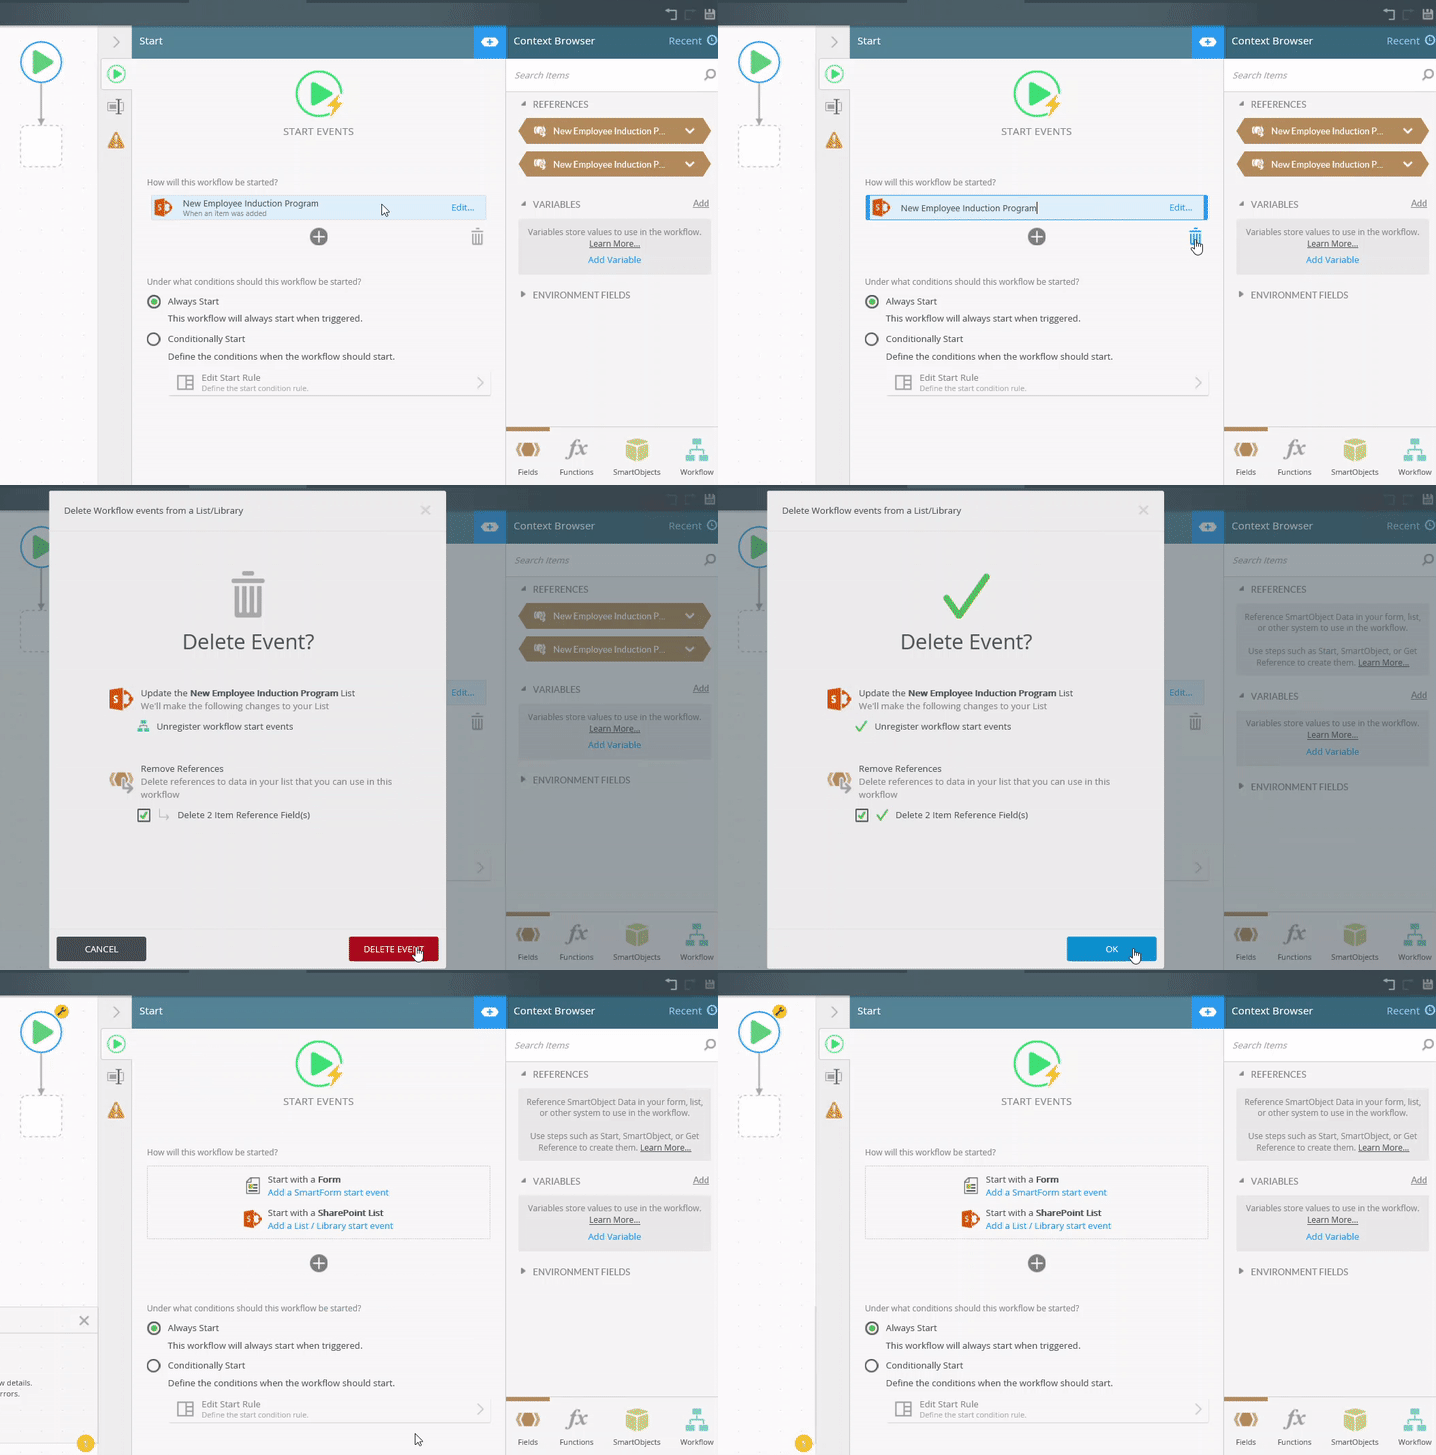
To recreate the reference, reconfigure the New Employee Induction Program SharePoint list event on the Start step.