Nintex CE Platform (Beta)
- Nintex CE Platform is currently in beta. For more information, see the Nintex Beta terms document.
-
The changes described in this topic are only available in tenants that have switched to the Nintex CE Platformexperience. See, Opt in to the new Nintex CE Platform.
Nintex CE Platform is a unified and cohesive experience that brings together core automation capabilities under a single interface. This includes updated branding, a redesigned navigation structure, and improved access to tools across the platform.
Jump to:
Overview of Nintex CE Platform
Nintex CE Platform is a unified platform that provides a set of core capabilities for building, executing, and managing end-to-end business processes.
It is composed of capabilities that support different aspects of process automation and application design.
Note: Availability of Orchestrations, Agents, Solutions, and Application lifecycle management depends on your license.
-
Workflows: Define and automate business processes through configurable workflow logic and actions
-
Solutions: Package, deploy, and manage your implementations
-
Tables list: Provides structured data storage
-
Documents: Enables content generation
-
Apps: Build applications and connect to services
-
Orchestrations: Enables building processes centered around a case
-
Agents: Build agentflows to automate complex processes and manage decision-based logic
By using these capabilities together, you can create integrated solutions that streamline business processes, centralize data, and improve efficiency across your organization.
Getting started
The Home page serves as the primary entry point to Nintex CE Platform. It provides access to:
-
Main navigation menu
-
Recent work
-
Started solutions
-
Help and support resources
-
Feature tiles displayed at the top of the Home page provide direct access to platform capabilities
The availability of features is determined by the user’s assigned license and role permissions.
For details and features available for your license, reach out to your Nintex Account Manager.
What's changed
During the beta period:
-
Navigation labels and structure may be refined
-
Feature locations may continue to evolve
Nintex CE Platform introduces a redesigned navigation structure to improve scalability, clarity, and future feature expansion. While core functionality remains the same, how you access some features has changed.
Key updates include:
-
Rebranding from Nintex Workflow to Nintex CE Platform
-
A more unified platform experience with improved access to all tools and capabilities
-
A redesigned collapsible and expandable main navigation menu for clearer structure and scalability
-
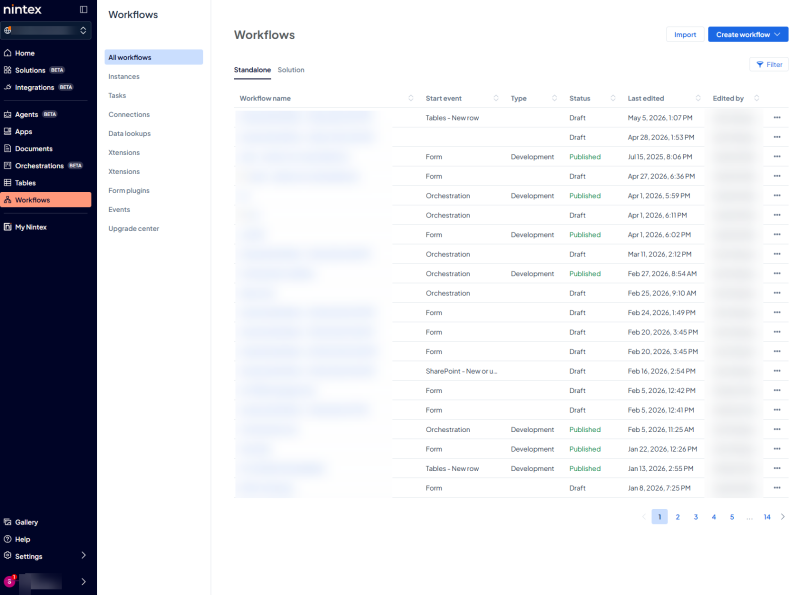
Introduction of a sub menu panel for grouped feature access. For example, selecting Workflows opens a sub menu panel containing all workflow-related options.
-
Additional selection steps for certain actions; for example, creating a workflow
-
Data renamed to Tables
-
Environment selector to help you easily switch between environments
-
Tables forms are now directly available through the left navigation
Collapse and expand navigation panel
The main navigation menu can be collapsed to provide more workspace on the screen.
When expanded, the full navigation structure is visible. When collapsed, the menu is hidden to maximise the workspace.
To collapse and expand the navigation panel:
-
To collapse/hide, click
 in the top-left of the navigation panel.
 -
To expand, click

When you first sign in to Nintex CE Platform, the navigation panel is collapsed by default. This means the navigation panel is hidden initially to maximize workspace visibility.
Forms
Table forms can now be accessed directly from the main navigation, providing a centralized entry point for creating, managing, and accessing forms linked to a table.
-
All existing capabilities remain unchanged and this update is purely a navigation restructuring.
-
Only table forms are currently available on this page. To create and access start forms, go to the Workflows section.
Forms page
-
Displays all table forms in one consolidated view
-
Use the Standalone and Solution tabs to view:
-
Standalone table forms
-
Table forms that are part of a Solution
-
-
You can select an existing form to edit or proceed to create a new one.
Data lookup and Form plugins
-
Data lookups and Form plugins have moved and are now available as sub-items under the Forms menu.
Create form
Create form option is available in the Forms page to create table forms.
-
From the navigation panel, select Forms.
-
Click Create form. A drop-down menu is displayed.
-
Select:
-
Add to a solution: Create the form as part of a solution.
-
Create as standalone: Create a standalone table form.
-
-
Create the table to store the data that is submitted from the form.
The table is created and displayed.
-
Click Form to generate the table form.
-
Customize the table form.
-
Publish the form.
Data Lookups and Forms Plugins
Data lookups and Form plugins have moved and are now available as sub-items under the Forms menu.
For information, see Data lookups and Form plugins.
Solutions
Note: Solutions and Packages and Application lifecycle management is available only after you switch to the Nintex CE Platform and depends on your license.
Solutions organize related assets that work together to solve a business problem. A solution can include workflows, apps, document packages, tables, table forms, and orchestrations.
Use solutions to manage assets, collaborate with other users, and deploy changes across environments.
For information, see Solutions.
Packages and application lifecycle management
Packages are deployable versions of solutions. They support application lifecycle management (ALM) by enabling validated changes to be moved between environments.
A typical ALM process involves building and testing assets in a non-production environment before deploying them to production.
Environments
Environments separate development, testing, and production activities. Use separate environments to build and validate changes before making them available to end users.
The environment selector is available at the top of the main navigation panel.
Use it to quickly switch between environments such as development, test, and production without leaving the Home page.
Updated navigation structure with sub menu
Previously, navigation panel items expanded inline, displaying sub menu options directly beneath each item. In the updated experience, selecting a navigation panel item that has sub items opens a sub menu. Sub menu options are now displayed within this panel rather than inline. This change improves clarity and provides a more scalable structure for organizing additional features.
For example, selecting Workflows opens a sub menu panel containing all workflow-related options as shown in the image below.
Connections moved to Integrations
Connections are now managed under Integrations in the left navigation menu instead of under Workflows. This update provides a centralized location to manage connections used across workflows and apps.
When you open Integrations, the following tabs are available:
-
Workflow: Displays connections used in workflows.
-
Apps: Displays connections used in apps.
Use these tabs to view, create, and manage connections for each experience separately.
Data renamed to Tables
Data has been renamed to Tables to better reflect its purpose as table based data storage. See, Tables
Create Apps and Workflows in Solutions or as standalone
With the introduction of Solutions, you can now create Apps and Workflows either:
-
As standalone items
-
As part of a solution
Example: Create a workflow
-
From the navigation panel, select Workflows.
-
Click Create workflow. A drop-down menu is displayed.
-
Select:
-
Add to a solution: Create the workflow as part of a solution.
-
Create as standalone: Create as a standalone workflow.
-

For more information, see Create a workflow.
Example: Create an App
-
From the navigation panel, select Apps.
-
Click Create app.
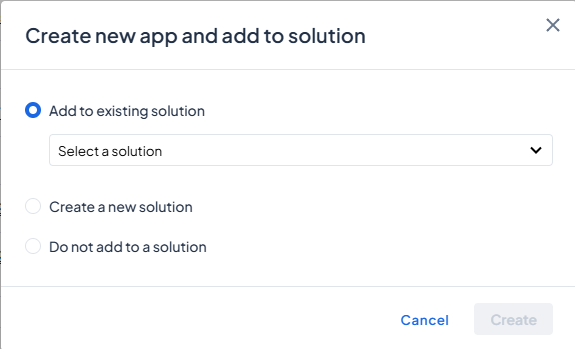
A dialog box is displayed.
-
Select one of the following options:
-
Add to existing solution: Add the app to an existing solution.
-
Create a new solution: Create a new solution and add the app to it.
-
Do not add to a solution: Create the app as a standalone app.
-
For more information, see Create and customize apps