Nintex - Component workflow
Use the Nintex - Component workflow start event An event that triggers a workflow to run when it occurs. An example is Box - New file, which triggers the workflow to run when a new file is uploaded to the specified folder. to start your workflow from another workflow or from an HTTP-capable service or application.
You can start a Component workflow using:
-
Another workflow in your Nintex Workflow tenancy, by using the Call a web service action.
-
A workflow in another Nintex Workflow product, by using the Call a workflow action in Nintex Workflow (sends an HTTP Post request).
-
Any HTTP-capable application, by sending an HTTP Post request.
The workflow or external application that starts the Component workflow A workflow that can be started from outside the tenancy; the workflow uses the "Component workflow" start event. must provide the start variables A variable associated with the start event. Often referenced by actions in the workflow. For example, a start event variable might capture input in a form field. defined by the Component workflow start event, including any required files.
Configure the start event
By selecting Nintex Component workflow, you are defining that this individual workflow can be started by authorized applications or workflows. Credentials used to obtain authorization are made available after you publish the component workflow.
-
Open the Workflow designer. For more information, see Access the Workflow designer.
-
Click Start event.
The Start event configuration panel is displayed.
- For Start from, select Component workflow.
- Create variables that can be passed as parameters in the HTTP call that will start the component workflow.
 Create start variables for your component workflow
On the designer canvas, click Start event.
From the Start from drop-down list, select Component workflow.
- Click Create variable.
- If you have previously created a variable, click Create.
- Type a user-friendly Name for the new variable.
Select the variable Type you want.
Data types of variablesVariable type
Usage
Text String value, such as John. Decimal Decimal value, such as 1.2. Integer
Integer value, such as 1.
Boolean
Boolean value (Yes or No).
DateTime
Date or date and time value.
Collection
Set of files or array of values.
File
File.
Click Create.
Tip: Click Reorder to reorder the list of variables.
Design and publish your workflow
Tip: If you want to refer to the workflow identifier within the workflow itself, (for example, adding it to an email to identify which workflow sent that email), use the "Workflow ID" variable.
- In the designer canvas, design your component workflow. For guidance on how to use the canvas, see Workflow designer.
- Select the data that your component workflow should return when complete.
Designate output variables for your workflow
From the toolbar at the top of the Designer page, click Variables.
Click the Workflow tab.
For each variable that you want to be an output, select the Output check box, which is shown for Component workflows only.
Variables set as output variables are passed to the parent workflow when the component workflow is completed.
- After designing your workflow, publish your component workflow.
Publish your component workflow
From the toolbar at the top of the Designer page, click Publish.
In the dialog box that appears, fill in the fields.
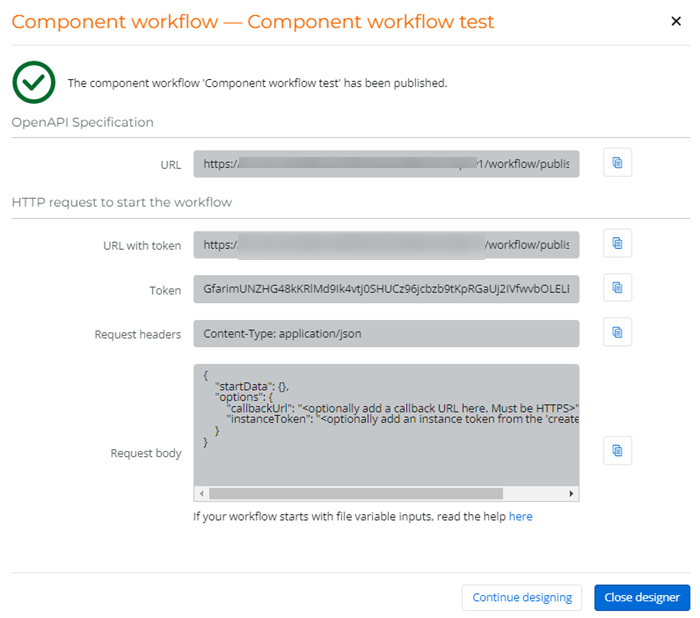
Click Publish. A new window appears showing the authorization credentials used to call the component workflow.
You must use the component workflow's credentials in your external applications or workflow to obtain authorization to successfully call the component workflow.
If you want to view the credentials later on, you can do the following:
View API endpoints of the Component workflow via Settings pageOn the top navigation bar, click Settings.
From the left menu, click Component workflow tokens.
On the right of the name of the component workflow, click
 and then select API endpoints.
In the new window that appears, to the right of the credential you want to copy, click Copy.
View API endpoints of the Component workflow via Workflows pageOn the top navigation bar, click Workflows.
- From the left menu, click Workflows.
On the right of the name of the component workflow, click
and then select API endpoints.In the new window that appears, to the right of the credential you want to copy, click Copy.
A window is displayed with details when a component workflow is successfully published.
Regenerate component workflow tokens
Component workflow tokens expire after one (1) year. The tokens of component workflows that are close to expiring or have already expired must be regenerated. Component workflows that are close to expiring will have a warning icon and workflows that have already expired will have a red error icon appearing against the workflow name to make them easily identifiable.
If your component workflows have either of these icons, you can refresh the token on the Settings > Component workflow tokens page if you are a user with an administrator role or via the Workflows list in the Workflows > Workflows page if you are the workflow owner.
For information about refreshing and revoking component workflow tokens, see View, revoke, refresh, regenerate, and delete component workflow tokens.
Caution: Regenerating a token replaces the current active token, which will be invalid in 24 hours. Regenerating a token that is revoked or expired will make the component workflow become available for external start again. Ensure to update the external workflows or applications that call the component workflow with the new token, or else they will fail.
- This option is available only for users with an administrator role.
- Workflows that use the Call a workflowaction A tool for building the processes, logic, and direction within workflows. Actions are the steps the workflow performs to complete a process. to call a Component workflow are not impacted by the workflow tokens.
- Go to Settings > Tenant.
- Click Component Workflow Tokens. Component workflows that are close to expiring will have a warning icon and workflows that have already expired will have a red error icon appearing against the workflow name to make them easily identifiable.
- Click next to the component workflow, and then select {.} API endpoints. The Component workflow dialog is displayed. Note: Alternately, you can open the component workflow dialog from the Workflows page. Click (Options) next to the name of the component workflow, and then select {.} API endpoints.
- Click
 next to the Token field and select Regenerate from the menu.
 - Click Regenerate to confirm.
The token becomes regenerated and the component workflow is valid for external start again.
- Update the new regenerated token in your application to complete the process.
Caution: Regenerating a token replaces the current active token, which will be invalid in 24 hours. Regenerating a token that is revoked or expired will make the component workflow become available for external start again. After the token is regenerated, you must update the external workflows or applications that call the component workflow with the new token.
- This option is available only for the Workflow owner and users with an administrator role.
- Workflows that use the Call a workflow action A tool for building the processes, logic, and direction within workflows. Actions are the steps the workflow performs to complete a process. to call a Component workflow are not impacted by the workflow tokens.
-
On the Workflows page, on the right of the workflow that has the expired or warning icon, click
and then select API endpoints. - Click next to the Token field and select Regenerate from the menu.
- Click Regenerate to confirm.
The token is regenerated and the component workflow is valid for external start again.
Start your Component workflow
A component workflow can be triggered to start by calling it via Nintex Workflow or from another Nintex platform such as Nintex for Office 365 or Nintex for SharePoint. Another method is calling it from an external service or application.
Note: The workflow that calls the component workflow is referred to as the parent workflow.
- Open the Nintex Workflow product of choice.
- Design the parent workflow that will call your Component workflow.
- In the Workflow designer of the parent workflow, add the appropriate action:
For this product...
Use this action:
Nintex Workflow Call a workflow (same tenancy)
Call a web service (different tenancy)
Nintex for SharePoint (2016 or 2013) Start workflow in Nintex Workflow Nintex for Office 365
- Configure the URL of the action to use the Component workflow's URL.
-
On the top navigation bar, click Settings.
-
From the left menu, click Component workflow tokens.
On the right of the name of the component workflow, click
and then select API endpoints. -
In the new window that appears, to the right of the credential you want to copy, click Copy.
-
On the top navigation bar, click Workflows.
- From the left menu, click Workflows.
-
On the right of the name of the component workflow, click
and then select API endpoints. -
In the new window that appears, to the right of the credential you want to copy, click Copy.
- Configure the start variables.
-
Publish the parent workflow.
The component workflow runs when called by the parent workflow during execution.
You can start your Component workflow from any service or application that can:
- Make POST calls to HTTPS endpoints.
- Send a request payload in the body with a content-type of application/json.
Note: If your application or service can consume OpenAPI Specifications, you can import the specification of the Component workflow using the OpenAPI Specification URL. Go to Settings > Component workflow tokens and click next to the Component workflow to find the OpenAPI Specification URL.
- Find the Component workflow's API endpoints window.
-
On the top navigation bar, click Settings.
-
From the left menu, click Component workflow tokens.
On the right of the name of the component workflow, click
and then select API endpoints. -
In the new window that appears, to the right of the credential you want to copy, click Copy.
-
On the top navigation bar, click Workflows.
- From the left menu, click Workflows.
-
On the right of the name of the component workflow, click
and then select API endpoints. -
In the new window that appears, to the right of the credential you want to copy, click Copy.
- Copy the URL with token and configure your application to make a POST request using this URL.
- Copy the Request body to copy the Component workflow request payload template. Configure your application to submit a JSON request body with the start variables.
- If you want the Component workflow to call another endpoint when the workflow completes, configure the callbackURL field in the request payload.
All callback URLs are sent as HTTPS POST.
Note: The Component workflow endpoint returns only the workflow ID of the called workflow. If you want to retrieve data from the completed workflow, you must accept it via a callback URL.
This request includes two start variables (first name and last name) and a callback URL.
{
  "startData": {
    "se_firstname_11": "John",
    "se_secondname_21": "Smith",
  },
  "options": {
    "callbackUrl": "https://callbackurl.com"
  }
}The request sent to the callback URL includes:
- Workflow information
- Start variables (prefixed with se)
- Workflow variables that were designated as 'output' variables in the workflow design (prefixed with c).
{
  "returnData":{
    "c_status":"Review",
    "se_firstname_11":"John",
    "se_secondname_21":"Smith"
  },
  "workflow": {
    "id":"a58a5b90-eda6-41af-8acb-00fe299c68a6",
    "name":"Sample workflow",
    "publishedId":"3cace836-0323-4f79-b56f-5480bf79aab7"
  }
}Note: To upload files to your workflow, you must have created a collection start variable in the Component workflow to hold the uploaded files.
To start a workflow that requires a file upload, you must make three sequential API calls:
- Create a paused instance of the Component workflow.
Nintex Workflow returns an instance token to identify the paused instance.
- Upload each required file using the instance token.
Nintex Workflow returns a file upload token to identify the uploaded file.
- Start the paused instance using the instance token and file upload tokens.

Note: The instance token and file upload tokens are separate from the authentication token, which allows you to make the call to the specific workflow. Each API call must also include the authentication token in the query: https://<TenantName>.workflowcloud.com/api/v1/workflow/published/<WorkflowID>?token=<Token>
To start a workflow with files:
-
Find the base URL and token for your Component workflow endpoints
In Nintex Workflow:
- Find the API endpoints of the Component workflow:
-
On the top navigation bar, click Settings.
-
From the left menu, click Component workflow tokens.
On the right of the name of the component workflow, click
and then select API endpoints. -
In the new window that appears, to the right of the credential you want to copy, click Copy.
-
On the top navigation bar, click Workflows.
- From the left menu, click Workflows.
-
On the right of the name of the component workflow, click
and then select API endpoints. -
In the new window that appears, to the right of the credential you want to copy, click Copy.
- In the Component workflow dialog box, to the right of URL with token, click Copy.
- Use the URL from the https:// to /instances as the base URL.
https://<TenantName>.workflowcloud-test.com/api/v1/workflow/published/xxxxxxxx-xxxx-xxxx-xxxx-xxxxxxxxxxxx/instances?token=vvvvv - Use everything after token= as the authentication token.
https://<TenantName>.workflowcloud-test.com/api/v1/workflow/published/xxxxxxxx-xxxx-xxxx-xxxx-xxxxxxxxxxxx/instances?token=vvvvv
View API endpoints of the Component workflow via Settings page
View API endpoints of the Component workflow via Workflows page
- Send a POST request with the content-type of application/json to /create.
https://<TenantName>.workflowcloud.com/api/v1/workflow/published/<WorkflowID>/instances/create?token=<Token> - Store the instance token that is returned.
- For each file:
- Send a POST request with a single file, filename and the instance token to /uploads.
https://<TenantName>.workflowcloud.com/api/v1/workflow/published/<WorkflowID>/instances/uploads?token=<Token>Note: Nintex Workflow does not support requests that contain both a Content-Length header and a Transfer-Encoding: chunked header. Requests that contain these headers together will be rejected with a 400 Bad Request response.
cURL example:curl -s -w '\n' -i -X POST \
'https://<TenantName>.workflowcloud.com/api/v1/workflow/published/<WorkflowID>/instances/uploads?token=<Token>'\
-H 'Content-Type: multipart/form-data' \
-H 'Transfer-Encoding: chunked' \
-F 'File-Name=<UploadedFileName>' \
-F 'Instance-Token=<InstanceToken>' \
-F 'File=@<PathToFile>'C# exampleusing (var client = new ExternalHttpClient()) { client.DefaultRequestHeaders.TransferEncoding.Add(new System.Net.Http.Headers.TransferCodingHeaderValue("chunked")); client.DefaultRequestHeaders.TransferEncodingChunked = true; foreach (var file in files) { using (var content = new MultipartFormDataContent("Upload----" + DateTime.Now.ToString(CultureInfo.InvariantCulture))) { content.Add(new StringContent(instanceToken), "Instance-Token"); content.Add(new StringContent(file.Key), "File-Name"); content.Add(new StreamContent(new FileStream(file.Value, FileMode.Open, FileAccess.Read)), "File", file.Key); using (var response = client.PostAsync(endpoint, content).Result) { //Store the file upload token from the response. } } } } - Store the file upload token that is returned.
- Send a POST request with a single file, filename and the instance token to /uploads.
- When all files have been uploaded, send a POST request with the workflow start payload as a JSON object, including the instance token and all file tokens, to the base URL.
https://<TenantName>.workflowcloud.com/api/v1/workflow/published/<WorkflowID>/instances?token=<Token>Note: The Component workflow endpoint returns only the workflow ID of the called workflow. If you want to retrieve data from the completed workflow, you must include a callback URL in the request payload.
cURL example:curl -s -w '\n' -i -X POST \
'https://<TenantName>.workflowcloud.com/api/v1/workflow/published/<WorkflowID>/instances?token=<Token>' -H 'Content-Type: application/json' \ -d '{"startData": {"se_files1": "<FileUploadUrl>"}, "options": {"instanceToken": "<InstanceToken>"}}'
curl -s -w '\n' -i -X POST \
'https://<TenantName>.workflowcloud.com/api/v1/workflow/published/<WorkflowID>/instances/create?token=<Token>'The base URL of all Component workflow endpoints is the same:
https://<TenantName>.workflowcloud.com/api/v1/workflow/published/<WorkflowID>Where:
<TenantName>is the name of your tenancy, for example acmehttps://acme.workflowcloud.com<WorkflowID>is the unique identifier of the Component workflow.
Note: Each API call must include the authentication token:
https://<Tenantname>.workflowcloud.com/api/v1/workflow/published/<WorkflowID>?token=<Token>Create and start a workflow instance. If an instance token for a paused instance is supplied, start that paused instance.
|
Payload
|
JSON object in request body containing:
|
| Response | Workflow ID of the started workflow. |
Note: The Component workflow endpoint returns only the workflow ID of the called workflow. If you want to retrieve data from the completed workflow, you must include a callback URL in the request payload.
Create a paused workflow instance to upload files to.
| Payload | None. |
| Response | Instance token to identify the instance in future calls. |
Upload a file to a paused workflow instance. If you have multiple files to upload, this endpoint must be called once for each file. You cannot upload multiple files in a single call.
|
Payload
|
JSON request body containing:
|
| Response | File upload URL to identify the uploaded file. |
|
HTTP status code |
Description |
|---|---|
| 200 | OK (workflow start successful) |
|
202 |
Accepted (callback successful) |
| 400 | Bad Request |
|
404 |
Not Found |
|
429 |
Too Many Requests |
|
503 |
Service Unavailable - Overloaded |