Nintex Insights- Beginning Beacon
Use the Nintex Insights - Beginning Beacon action A tool for building the processes, logic, and direction within workflows. Actions are the steps the workflow performs to complete a process. to log the start of a process stage A particular portion in a workflow containing actions with a specific purpose to send data to Nintex Insights. A process stage is always identified by a start (Nintex Insights - Beginning beacon action) and an end (Nintex Insights - Ending beacon) point. in your workflow. By using variables, you can also add beacons Used to capture specific data in your workflow and pass to Nintex Insights for analytic purposes. and pass to Nintex Insights for analytic purposes.
For example, you have a workflow that aims to collect results of a hospital survey, and the workflow is triggered to start when a user submits an online Nintex - Form .
In designing the workflow:
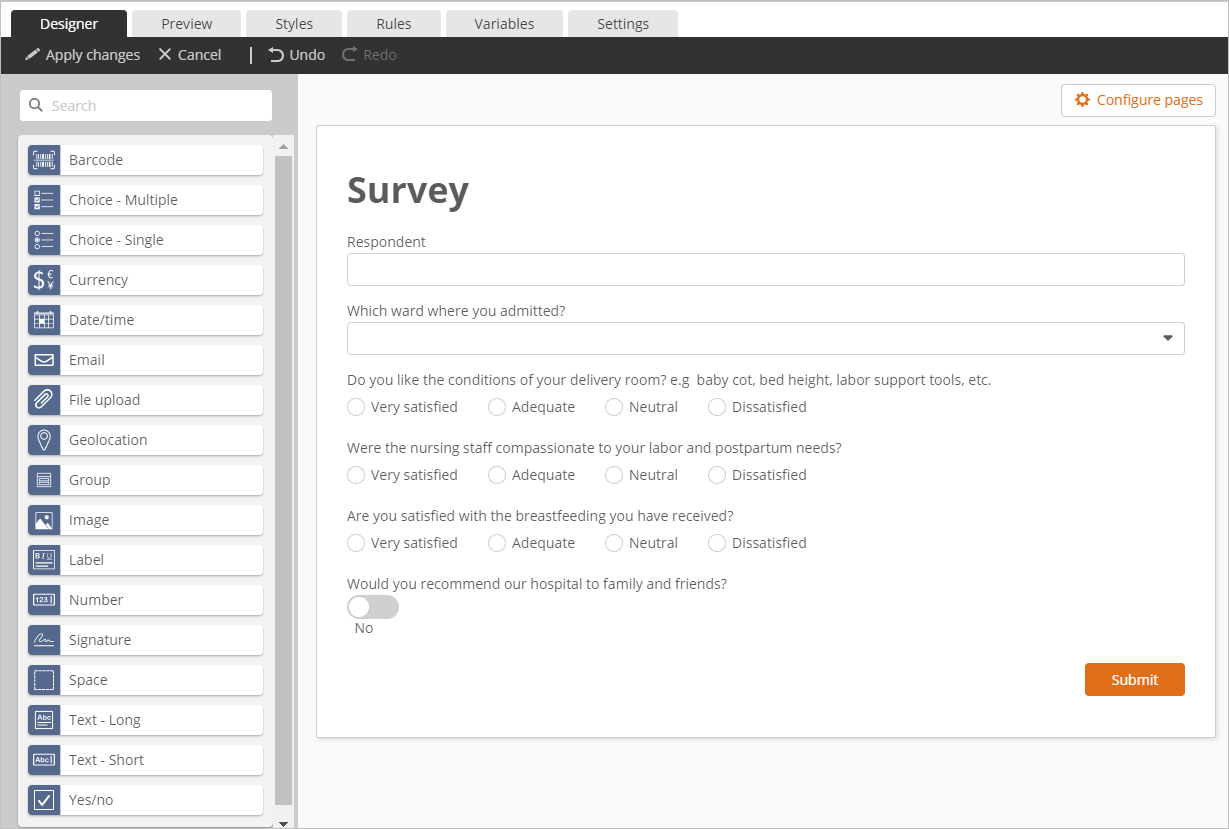
- You select Nintex - Form as the start event. You design a form and name it "Survey for hospital patients". The response to each question is captured and stored in variables which we will use as beacons.
- You define a particular process stage in the workflow. You use the Nintex Insights - Beginning Beacon action as the start point and the Nintex Insights - Ending Beacon as the end point of the process stage.
- In the process stage, you assign a beacon for each survey response. For example, the configurations of the first beacon are as follows:
- Name: Name of respondent
- Value: Respondent
This is a variable that holds the data entered by a user in the Patient's Name field of the online form.
For more information about this example, see: Example: Configure the Nintex Insights actions in Nintex Workflow and add a data connection in Nintex Insights.
To identify the start and end of a process stage, you must use these two actions together:
- Nintex Insights - Beginning beacon action: Logs the start time.
- Nintex Insights - Ending beacon action: Logs the end time.
For more information about the Nintex Insights connector, go to Nintex Insights.
Before you begin:
In the context of Nintex Insights, you use beacons to capture specific data in your workflow and pass to Nintex Insights for analytic purposes.
A process stage is a particular portion in a workflow containing actions with a specific purpose to send data to Nintex Insights. The process stage is always identified by start (Nintex Insights - Beginning beacon action) and end (Nintex Insights - Ending beacon) points.
-
Understand Variables
-
Learn about Handling files in your workflow
Jump to:
Configure the Nintex Insights - Beginning beacon action
-
Add the action to the workflow and open the action configuration panel. For more information, see Add an action to the workflow.
- Type a Stage Name for your process stage.
- Type a Name and Value for a beacon.
- Click Add beacon to add more beacons.
- Specify an Expected Duration (in minutes) for the process stage to run.
Nintex Insights - Beginning beacon action fields and selections
| Section |
Field |
Description |
Variable types |
||||||||
|---|---|---|---|---|---|---|---|---|---|---|---|
| Stage Name |
A name to identify a process stage within the workflow. Every process stage is defined by a start and end point, the former specified by the Nintex Insights- Beginning Beacon action and the latter by the Nintex Insights - Ending Beacon action. You must use the same Stage Name for each action. |
n/a | |||||||||
| Beacons | Name | Name of a beacon to use for passing data from the workflow to Nintex Insights. | Text, Decimal, Integer, Boolean, DateTime, Collection | ||||||||
| Value | Value of the beacon. | Text, Decimal, Integer, Boolean, DateTime, Collection | |||||||||
| Add beacon |
Click to add more beacons in the process stage.
|
n/a | |||||||||
| Expected Duration (in minutes) | Expected duration for the process stage to run. This number is measured against the actual duration that takes the process to complete. For example, you expect this process stage to complete within 1 minute and you can test that number in the report in Nintex Insights. | Integer |
Caution: If a file/folder that's used in a workflow is moved, renamed, or deleted, any workflows that use that file/folder will not start or will fail. Make sure you keep the paths in your workflow configurations up to date.
This example will show how a workflow in Nintex Workflow collects survey results, and how to create a data connection to Nintex Workflow in Nintex Insights.
In the Designer page of your Nintex Workflow tenant:
- Click Start event.
- In the configuration panel that appears, select Form. Additional fields appear.
- Click Design form. The form designer appears.
-
 Design the "Survey for hospital patients" form
Drag the following controls in this specific order, and set values for each control:
- Text - short:
- Title: Respondent
- Choice - Single
- Title: Which ward where you admitted?
- Display type: Drop-down list
- Options: Maternity, Cardiology, Intensive care unit
- Choice - Single
- Title: Do you like the conditions of your delivery room? e.g baby cot, bed height, labor support tools, etc.
- Display type: Radio buttons
- Options: Very satisfied, Adequate, Neutral, Dissatisfied
- Alignment: Horizontal
- Choice - Single
- Title: Were the nursing staff compassionate to your labor and postpartum needs?
- Display type: Radio buttons
- Options: Very satisfied, Adequate, Neutral, Dissatisfied
- Alignment: Horizontal
- Choice - Single
- Title: Are you satisfied with the breastfeeding you have received?
- Display type: Radio buttons
- Options: Very satisfied, Adequate, Neutral, Dissatisfied
- Alignment: Horizontal
- Yes/No
- Title: Would you recommend our hospital to family and friends?
- Display type: Toggle
- Alignment: Vertical
Your form should look like the following:
- Text - short:
-
 Configure that the response we collect should come only from maternity ward patients
- From the action toolbox on the left, search for the Branch by condition action.
- Click the Branch by condition action to open its configuration panel.
- Click Add condition.
- Complete the following fields with the following values:
- When: Which ward were you admitted
- Operator: equals (=)
- Value: Maternity
- Click Add condition.
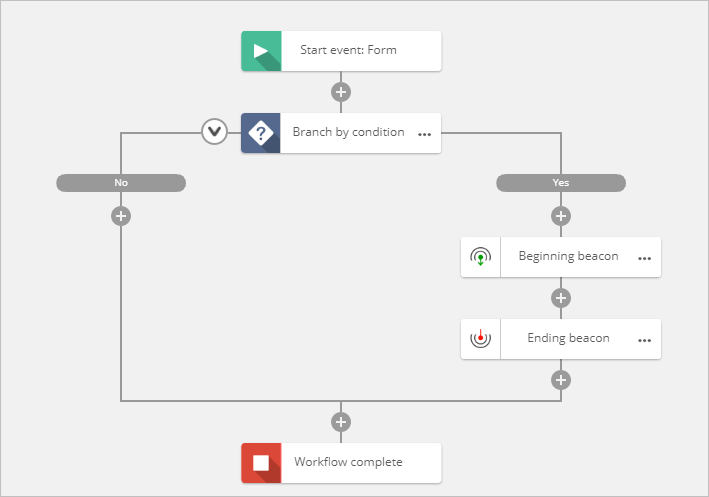
- In the Yes branch of the Branch by condition action, drag the following actions:
- Nintex Insights - Beginning beacon
- Nintex Insights - Ending beacon
-
 Configure the Nintex Insights - Beginning beacon action.
- Click the Nintex Insights - Beginning beacon action to open its configuration panel.
- In Stage Name, write "Survey results for patients in Maternity ward."
- In Beacons section, write "Respondent" for Name.
- For Value, follow these steps:
- Click Variable that uppers on the upper right corner of the Value field.
- In the pane that appears, go to the Start event tab.
- Click Insert next to Respondent.
- Let's add more beacons! Click Add beacons three times. In the new fields that appear, enter beacon name and values.
For Name, simply type the text provided in the following table. For Value, follow the previous steps in inserting a variable.
Name Value 1st Do you like the conditions of your delivery room Do you like the conditions of your delivery room eg baby cot bed length etc 2nd Were the nursing staff compassionate to your labor and postpartum needs? Were the nursing staff compassionate to your labor and postpartum needs 3rd Are you satisfied with the breastfeeding you have received? Are you satisfied with the breastfeeding you have received - Type "5" for Expected duration in minutes.
Your configuration panel should look like the following:
-
 Configure the Nintex Insights - Ending beacon action.
- Click the Nintex Insights - Ending beacon action to open its configuration panel.
- In Stage Name, select Survey results for patients in Maternity ward.
- In Beacons section, write "Would you recommend our hospital to family and friends" for Name.
- For Value, follow these steps:
- Click Variable on the upper right corner of the Value field.
- In the pane that appears, go to the Start event tab.
- Click Insert next to Would you recommend our hospital to family and friends.
- Type "3" for Expected duration in minutes.
- From the toolbar, click Publish.
- In the dialog window that appears, fill the following fields:
- Workflow name: Survey for hospital patients
- Description: A workflow to send beacon values to Nintex Insights.
Leave the other fields unchanged.
- Click Publish.
Your workflow should look like the following:
We're finished creating the workflow! To keep things simple for this tutorial, we only collected survey responses from maternity ward patients, thus configuring only the Yes branch of the Branch by condition action. Of course, in actual scenarios, we must configure the No branch where you can capture responses from ICU patients, for example. To test the workflow and analyze data in Nintex Insights, let's move on to the next steps!
Log on to your Nintex Insights portal to begin seeing your workflow analytics. You can add data connections for all of your Nintex capabilities to display a full view of your Nintex platform data in the dashboard.
In your Nintex Insights tenant:
- On the Home page, click Add connection. The Data connections page is displayed.
- Click Add new data connection.
-
Select Nintex Workflow for the Data connection type.
-
Click Connect.
Note: You must have the administrator role in Nintex Workflow to add a data connection for Nintex Workflow. See, User management.
-
The Nintex Workflow sign in window is displayed. Sign in to Nintex Workflow.
-
Type your Email.
-
Type your Password.
-
Click Sign In.
If multiple Microsoft credentials exist on your browser, you are asked to pick one.
-
-
Select a Microsoft account.
-
Click Continue.
The data connection is created and displays in the Data connections page of Nintex Insights. Nintex Workflow data will display in your Nintex Insights Dashboard.
 Delete

