Nintex RPA Server Installation Overview
This topic shows an overview of the installation steps with links to each one.
-
If you want to perform an Express Install; to install with the default parameters, select it here. Otherwise, continue to the next step.
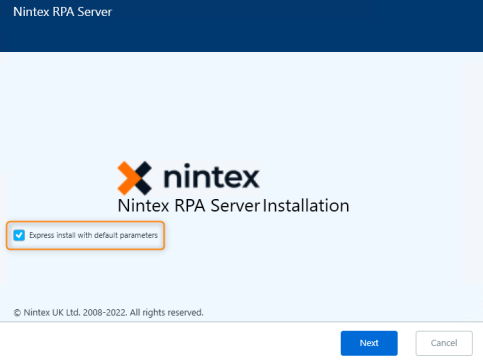
Checking the Express install with default parameters box automatically takes you to the Components to Install screen.
-
Select the installation type: single-machine or high-availability.
-
Providing servers FDQNs for high-availability.
-
-
Select the supported languages for the RPA clients (Robots).
-
Select the connection security (SSL/TLS).
-
Generate or provide CA and certificates.
-
-
Configure Centralized Log Repository (Seq).
-
Installing SEQ locally or connecting to remote Seq.
-
-
Select how users or Robots log into the application: Single Sign-on (Kerberos) or Username & Password.
-
Configure the service credentials of the user who runs the RPA server.
-
Select a user to run authentication services on the RPA server.
-
Configuring communication and authentication with Active Directories, Active Directory Groups, and Platform Security (these steps are relevant only to Single-Sign-on user authentication type).
-
Configure the connection to the database: install SQL locally or configure the connection to a remote database.
-
Set the RPA authentication database schema and log in details.
-
Review the authentication platform (Keycloak) users credentials created by the installer.
-
The install executes, server reboots, and installation finishes.