How To: Use the Workflow Error Event
This topic shows you how to configure and use the Workflow Error Event to start a workflow when another workflow encounters an error. The Start when an Workflow Errors event can start a new workflow instance when a workflow in your environment goes into an error state. Typically, you would start a workflow to handle errors, or to notify someone about the errors so that they can address or repair them. You configure the Workflow Error Event on the Start step.
For detailed information about the Workflow Error Event, see the Start a workflow with the Start when any workflow errors event topic.
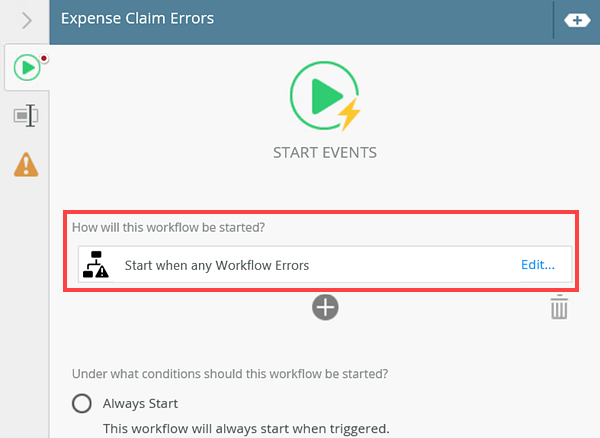
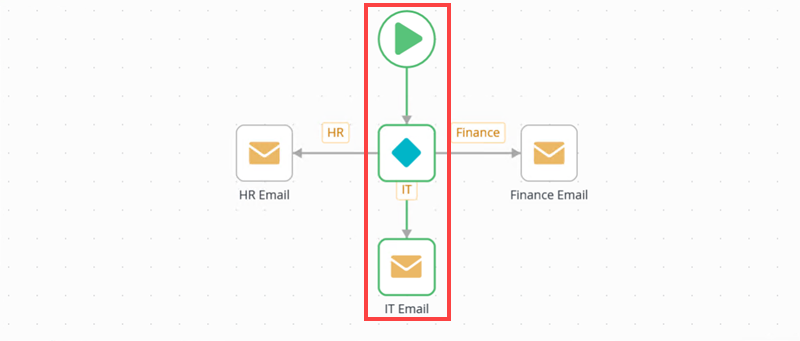
Configured Workflow Error Event on the Start step
Scenario
Your company has an internal expense claim application where employees can submit expense claims to various departments such as the HR department, IT department, and Finance department. It is important that these claims are captured and processed in the expected time frame, since errors during the expense claim process can impact service delivery. This scenario uses the Workflow Error Event to capture errors during the expense claim process and inform heads of departments that claims from their department are in error .
Steps
Begin by building a Expense Claim SmartObject to store your claim details. Next, create an item view based on the SmartObject, and then a form based on the item view. Finally, create two workflows, one based on the Expense Claim form and another configured with the Workflow Error Event to capture any Expense Claim submissions that go in to error state.
Setup Steps
The following steps set up the scenario from start to finish. If you want to skip the setup steps and view the topic step, go to Create the Expense Claim Errors Workflow and Configure the Workflow Error Start Event.
-
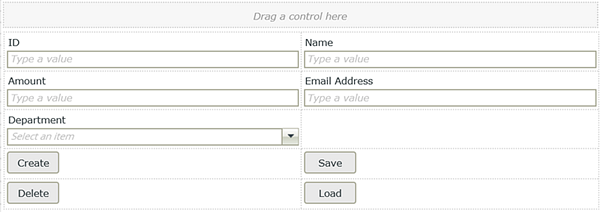
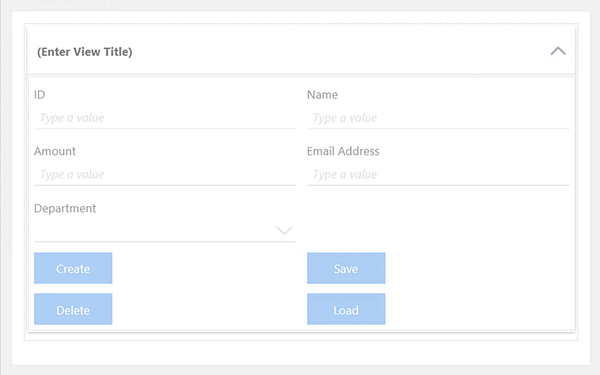
Create the Expense Claim SmartObject that contains claim details properties (such as Name, Amount, Email Address, Department)
- Create a new category folder called Expense Claim.
- Create a SmartObject called Expense Claim with the following properties:

Property Type Key Required Unique ID Autonumber Yes No Yes Name Text No No No Amount Decimal No No No Email Address Text No No No Department Text No No No
For more information on creating SmartObjects, see How To: Create A SmartBox SmartObject.
-
Generate the Expense Claim Item View from the SmartObject
- Generate an Expense Claim Item view based on the Expense Claim SmartObject.
For more information on creating views, see How To: Create an Item View and a List View.
- Generate an Expense Claim Item view based on the Expense Claim SmartObject.
-
Configure the Department control
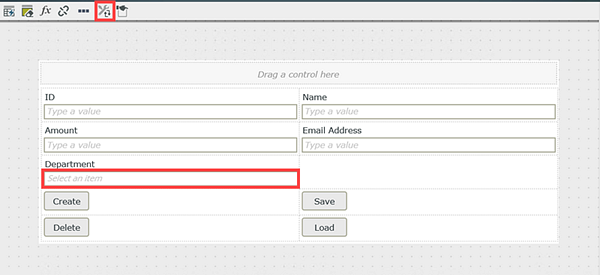
- Select the Department text box control and click the Change Control option.
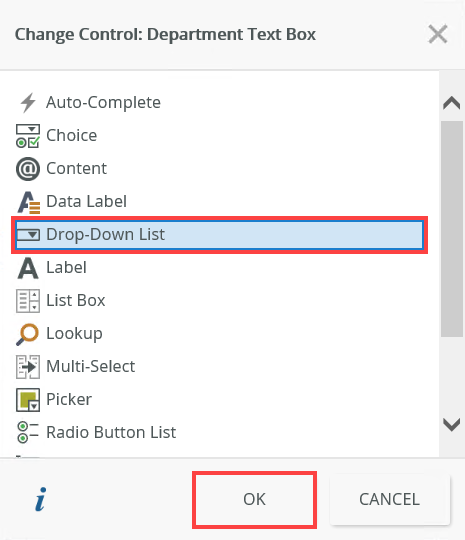
- On the Change Control: Department Text Box page, select the Drop-Down List option and click OK.
- In the Data Source section click the ellipsis (...)on the Type option.
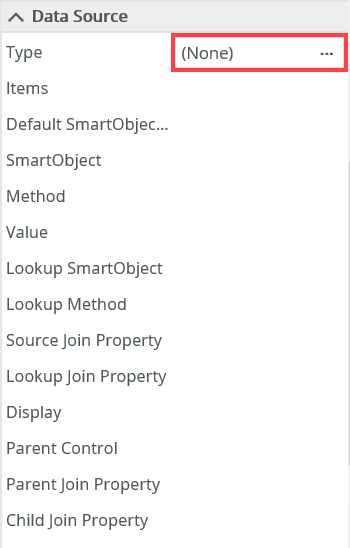
- On the Configure Data Source page, select the Use a static list of values in the control option and click the ellipsis (...) option.
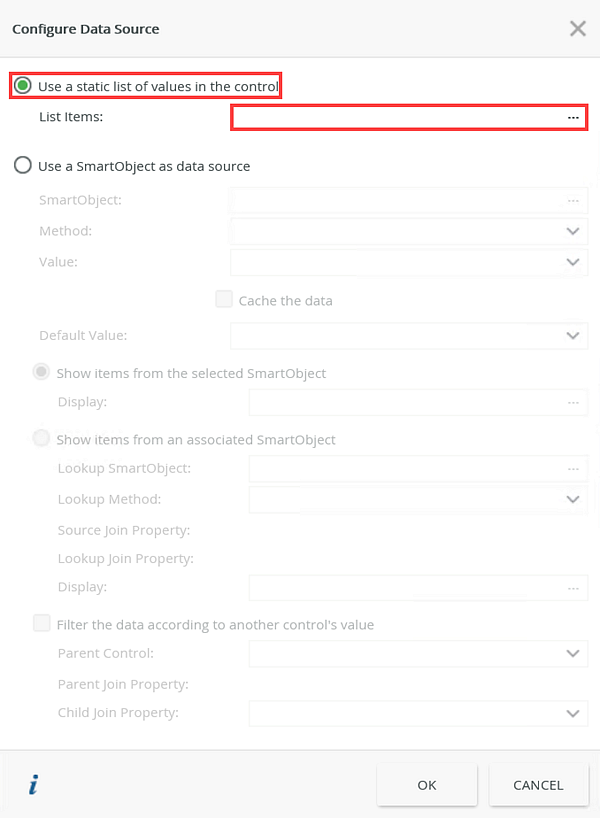
- On the Fixed List Configuration page, click Add and add the following values:
- HR
- Finance
- IT
 Ensure you enter values in the Display section, otherwise the static list of values will not display at runtime
 - Click OK and OK again.
- Click Finish and check in the Expense Claim item view.
- Select the Department text box control and click the Change Control option.
-
Generate the Expense Claim form
- Generate a Expense Claim form based on the Expense Claim Item view.
- Click Finish and check in the form.
- Generate a Expense Claim form based on the Expense Claim Item view.
-
Create the Expense Claim workflow and configure the Start step
- Create a workflow based on the Expense Claim form.
- Name the workflow Expense Claim
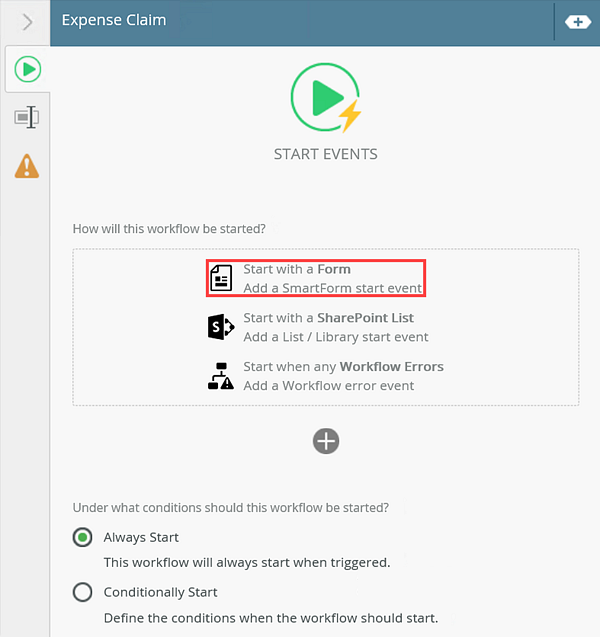
- Select the Start event and click the Start with a Form option.
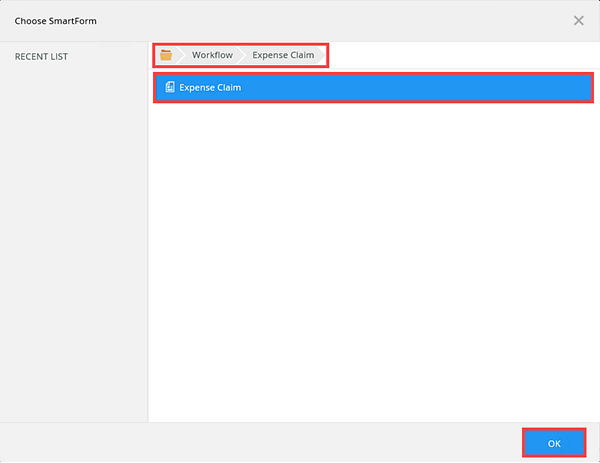
- On the Choose SmartForm page, search for and select the Expense Claim form and click OK.
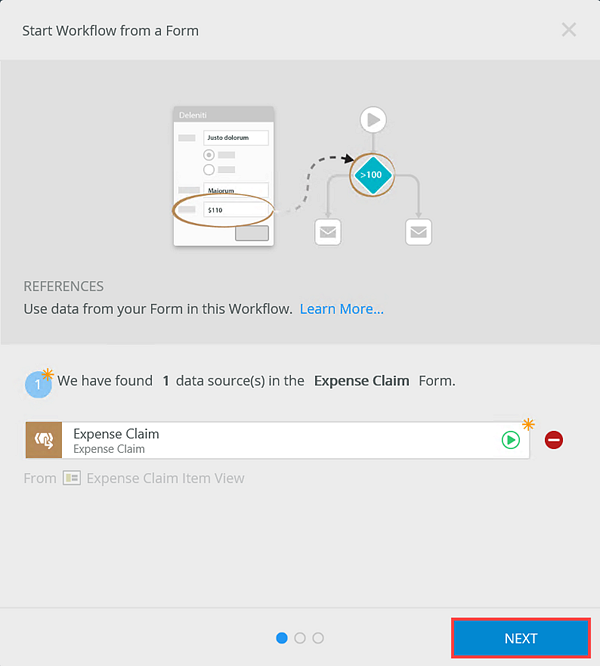
- On the Start a Workflow from a Form page, click Next.
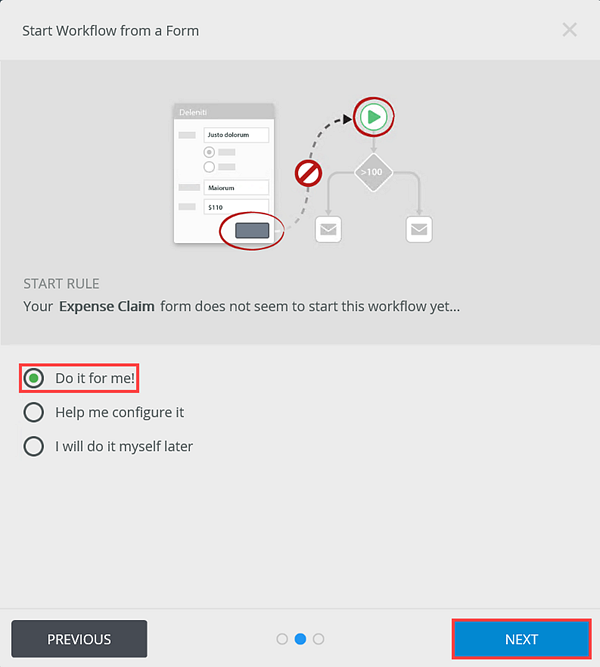
- Select the Do it for me! option. Click Next.
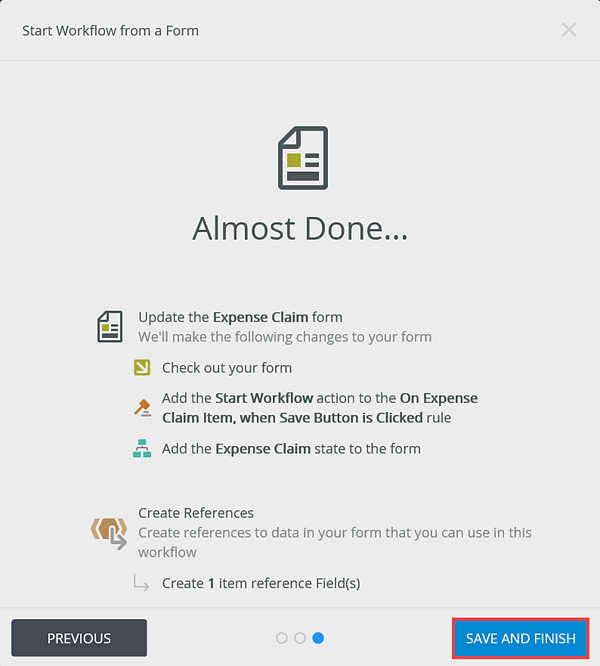
- Click Save and Finish.
-
Add and configure the Set Folio step
- Open the Toolbox and add a Set Folio step to the canvas.
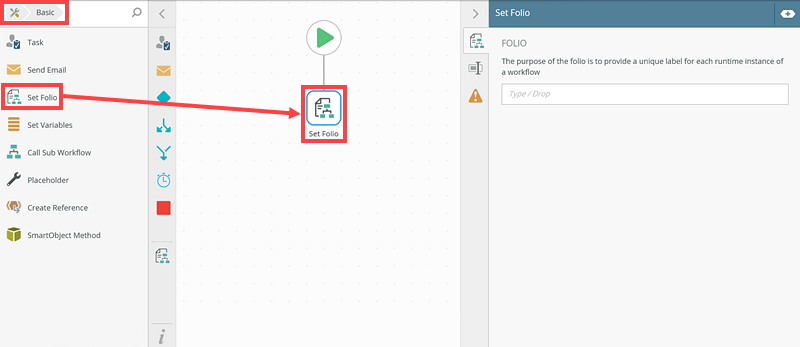
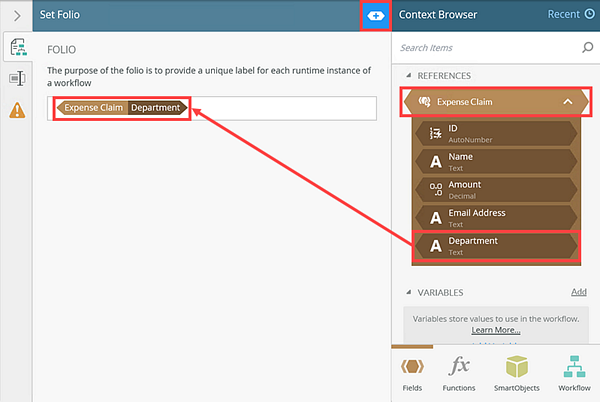
- On the Set Folio page, expand the Context Browser, expand the Expense Claim reference and drag the Expense Claim Department reference to the Folio section.
For more information on the Folio step see Set Folio step.
- Open the Toolbox and add a Set Folio step to the canvas.
-
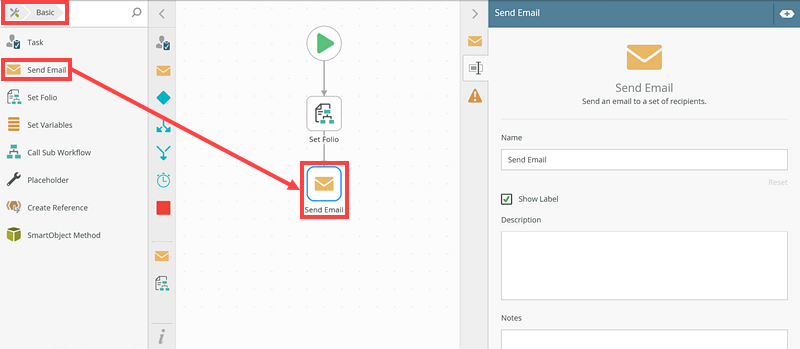
Add and configure the Send Email step
- Open the Toolbox and add a Send Email step to the canvas.
- On the Send Email page select the drop-down in the To section click Type/Construct my own.
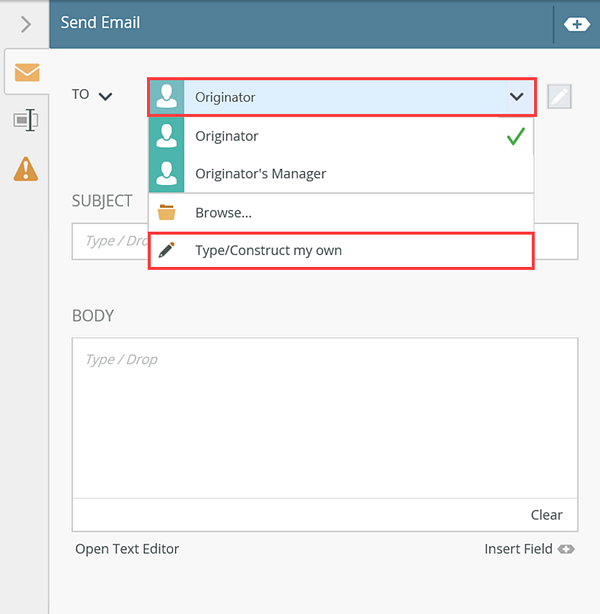
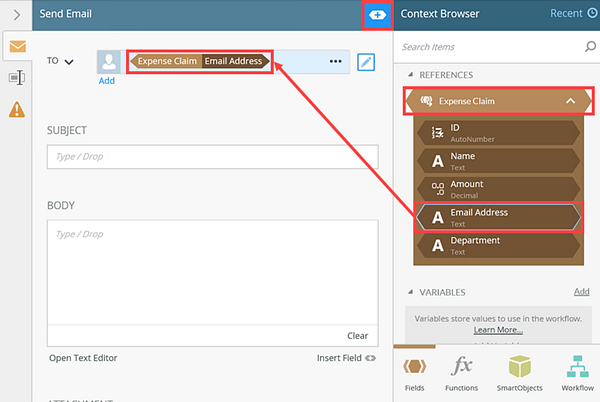
- Remove the Originator Email option, expand the Context Browser and drag the Email Address reference to the To section.
- On the Subject section add Your Claim: [Expense Claim| Email Address] has been submitted.
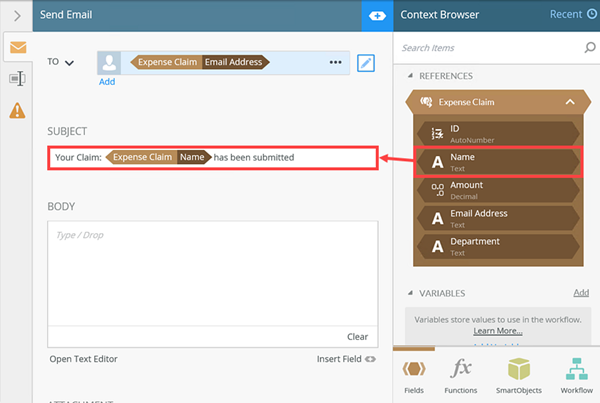
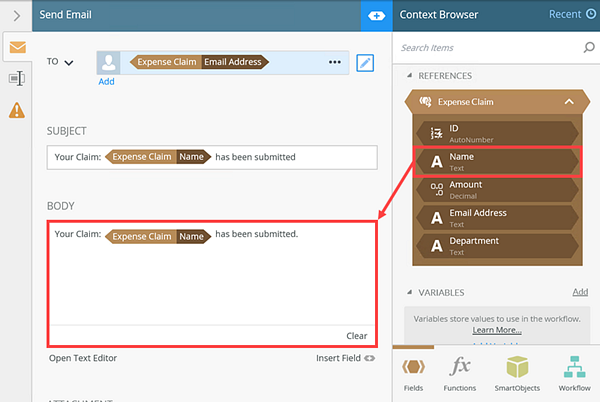
- In the Body section add Your Claim: [Expense Claim|Name] has been submitted..
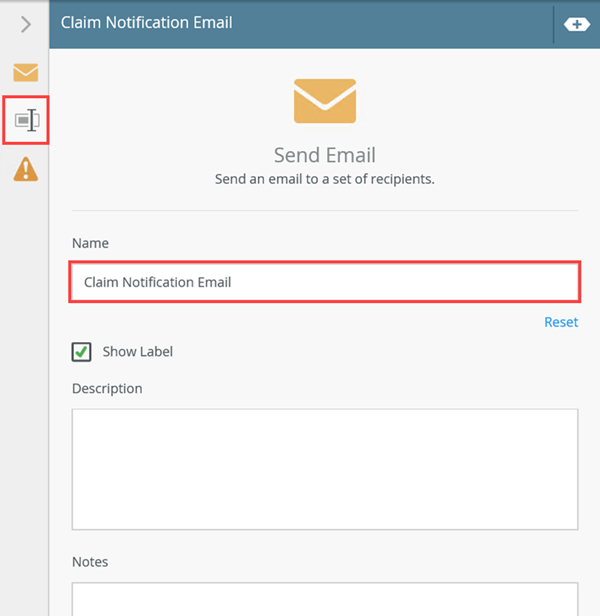
- Rename the Send Email step to Claim Notification Email.
- Deploy the Expense Claim Workflow.
For more information on the Send-Email step see Send-Email step.
- Open the Toolbox and add a Send Email step to the canvas.
Create the Expense Claim Errors Workflow and Configure the Workflow Error Start Event.
This step explains how to configure the Expense Claims Error workflow with the Workflow Error Event. This workflow is configured to capture any Expense Claim workflows that go in to error state, and depending on which department (using the folio) has submitted a claim that has gone in to error, then sends a notification email to the captured department informing them there is an error with their claim.
-
Create a new workflow and configure the Work Error Start Event
- Create a new workflow called Expense Claim Errors
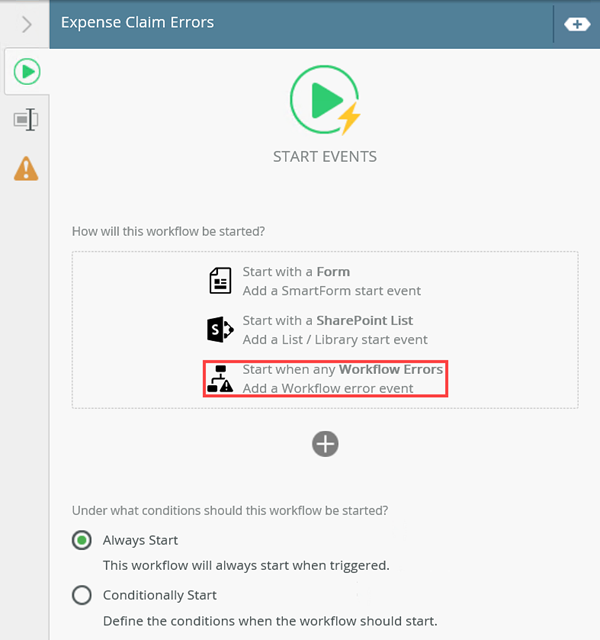
- Select the Start step and click the Start when any Workflow Errors in the How will this workflow be started? section.
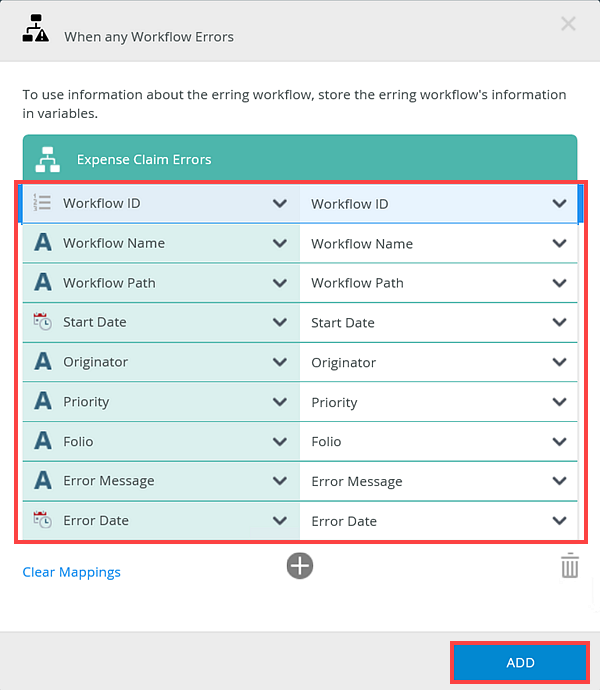
- On the When any Workflow Errors page, click Create variables for me. This step creates the variables you will use to configure the Expense Claim Errors workflow.
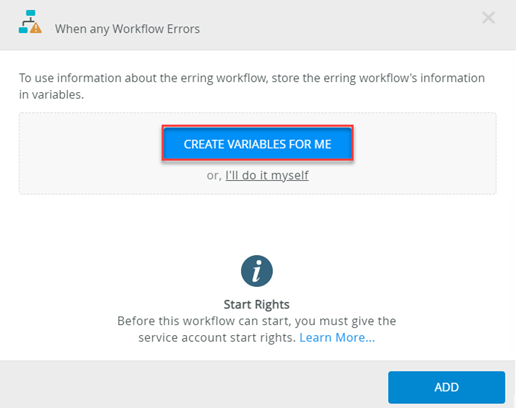
- The Expense Claim Errors variables are created, click Add to continue.
-
Configure a Conditional Start rule
- On the Start Events page, select the Conditionally Start option and click Edit Start Rule.

- On the Start Rule page, expand the Context Browser and add the Workflow Name variable to the IF section.
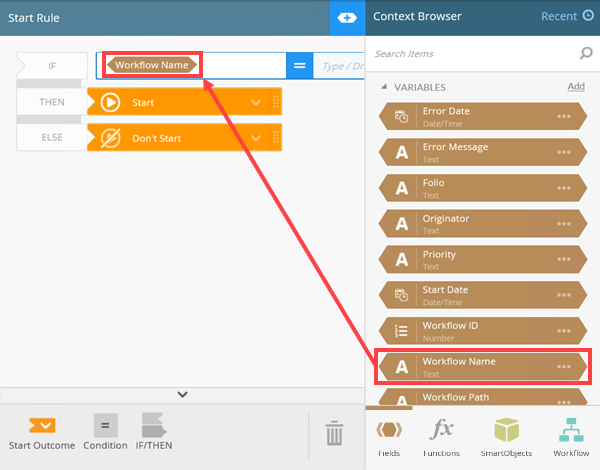
- In the IF section of the rule type Expense Claim.
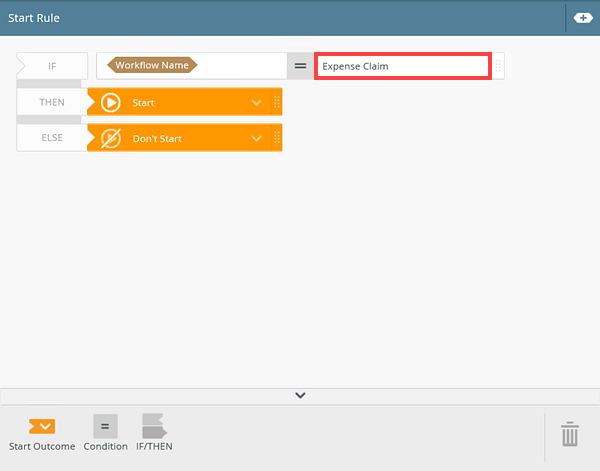
The conditional start rule checks whether a workflow called Expense Claim has started and has running instances. If there are instances running, the conditional start rule will start the Expense Claim Errors workflow, which checks whether there are errors in the Expense Claim workflow instances.
- On the Start Events page, select the Conditionally Start option and click Edit Start Rule.
-
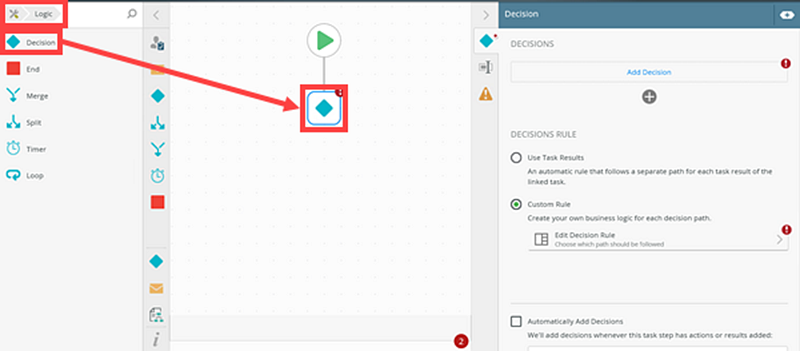
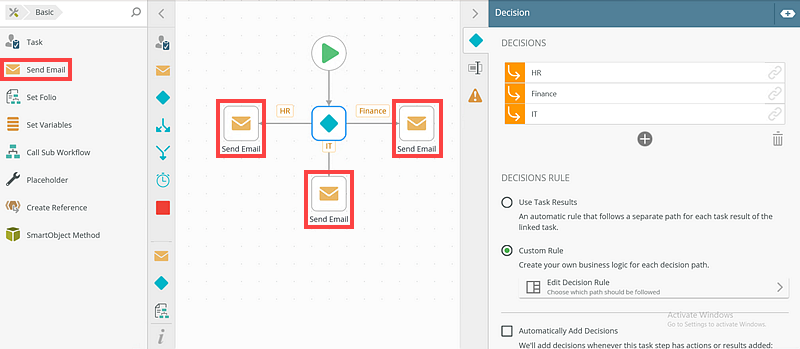
Add and configure a Decision step
- Open the Toolbox and add a Decision step to the canvas.
- On the Decision page add three decisions, HR, Finance and IT.
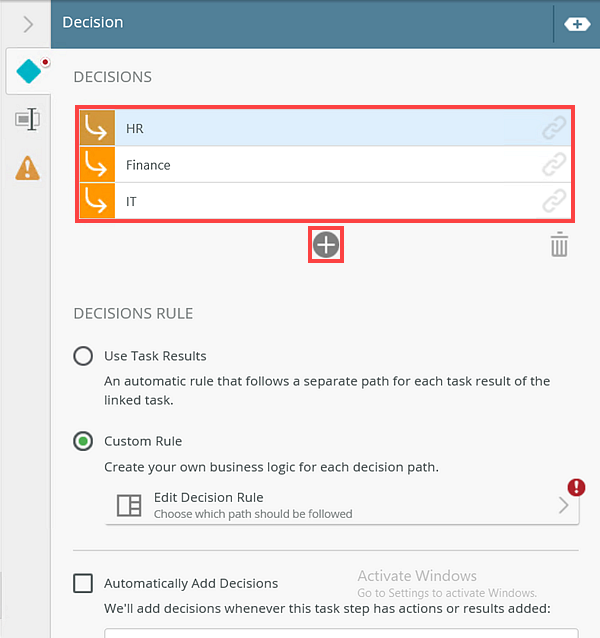
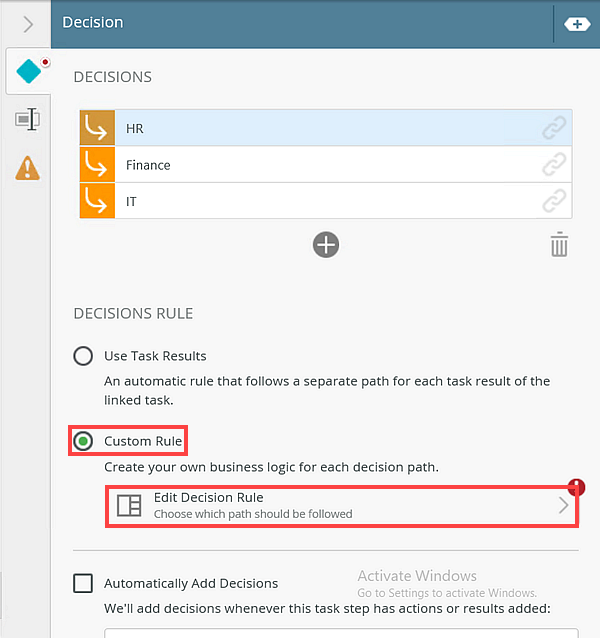
- Click Edit Decision Rule in the Custom Rule option.
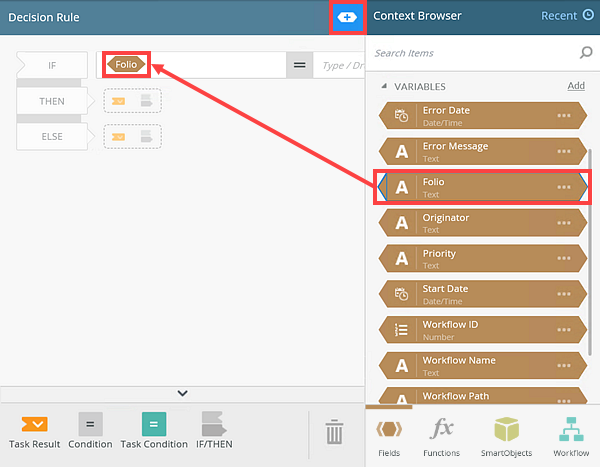
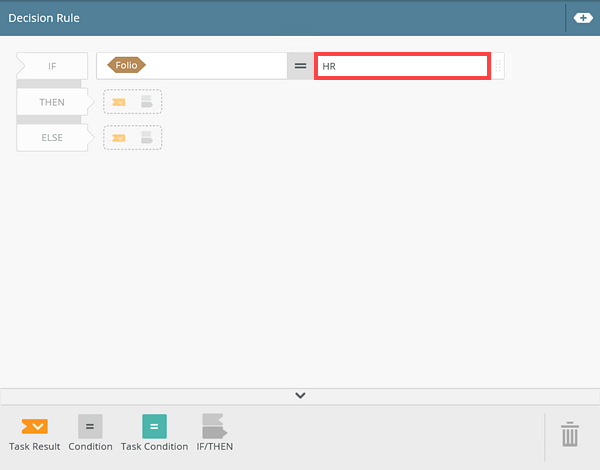
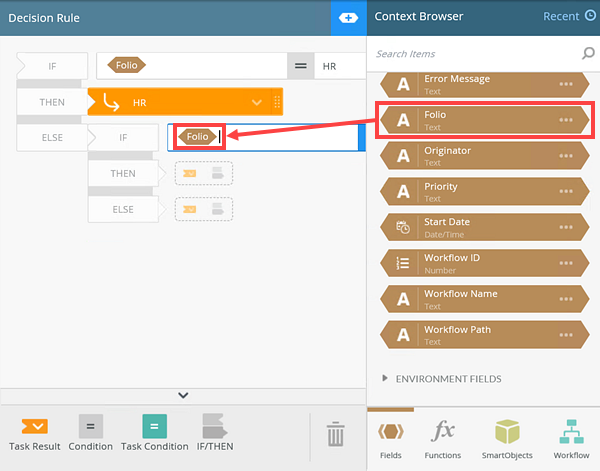
- On the Decision Rule page expand the Context Browser and add the Folio variable to the IF section of the rule.
- Type HR in to the IF section.
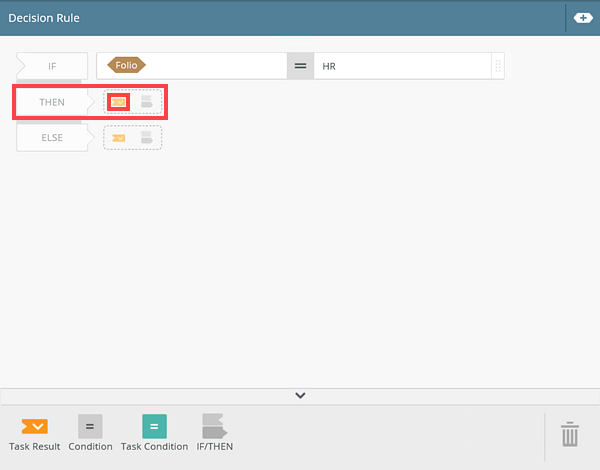
- On the THEN section of the rule click the Task Result option.
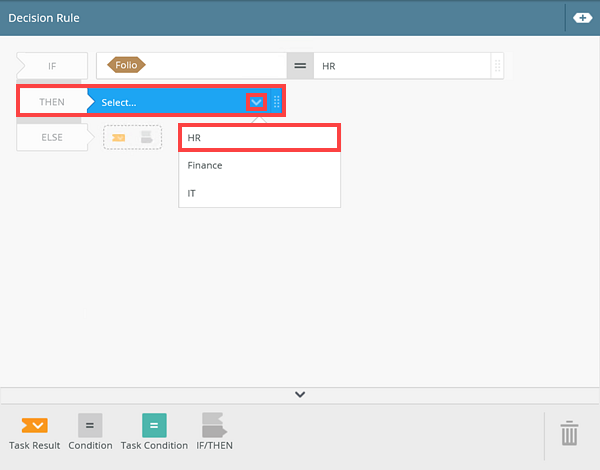
- On the THEN section of the rule, click the drop-down on the Task Result option and select HR.
- Drag the IF/THEN block to the ELSE section of the rule.
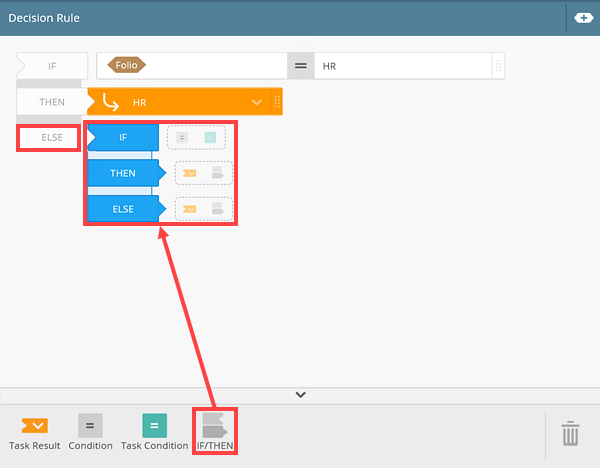
- In the IF/ THEN / ELSE block of the ELSE section of the rule click the Operator option.

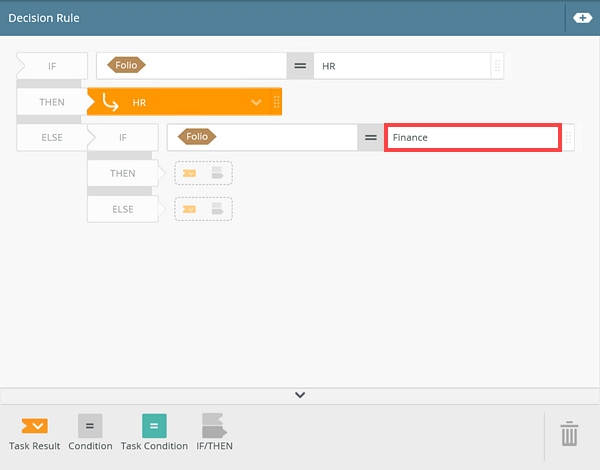
- Expand the Context Browser and add the Folio variable to the IF section of the IF / THEN / THEN block.
- Type Finance in the IF section of the IF / THEN / THEN block.
- In the IF/ THEN / ELSE block of the ELSE section of the rule, click the Outcomes option in the THEN section.
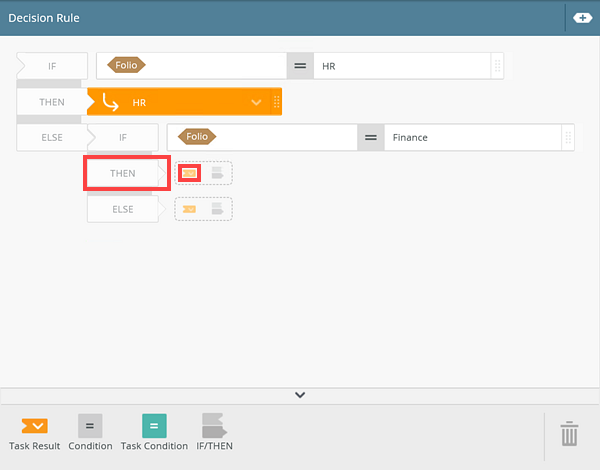
- In THEN section of the IF / THEN / ELSE block, click the Drop-down and select Finance.
- On the ELSE section of the IF / THEN / ELSE block, click the Outcomes option.
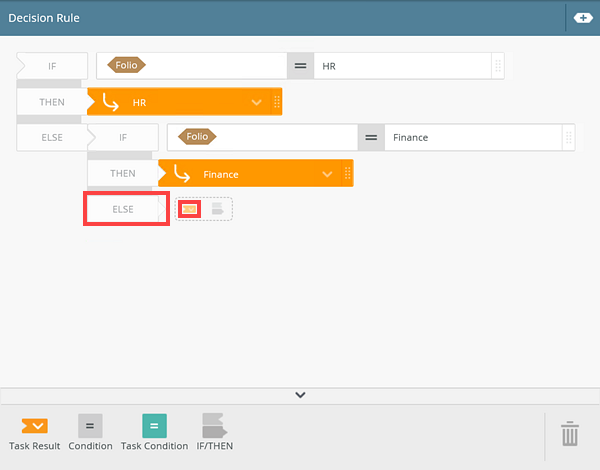
- In the ELSE section, click the Drop-down on the Outcomes option and select IT.
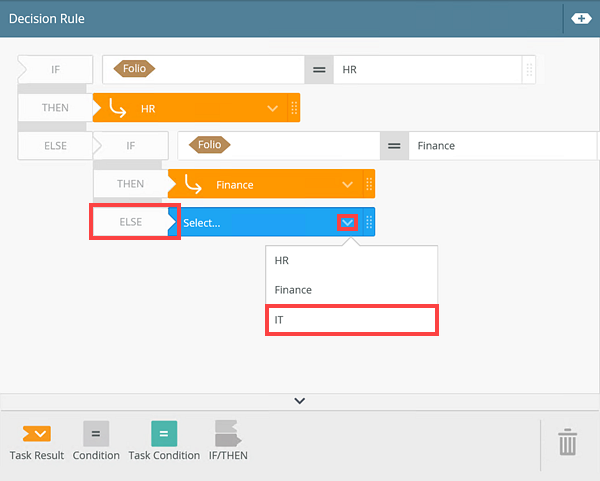
The Decision step checks which department (using the folio) has instances in error, and then follows the configured decision steps (send an email to the required department).
- Open the Toolbox and add a Decision step to the canvas.
-
Add and configure Send-Email steps
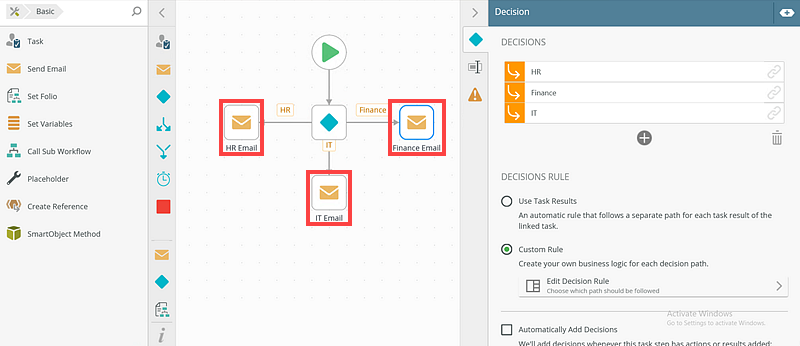
- Add three Send-Email steps to the HR, Finance and IT decision steps.
- Rename the three Send-Email steps to HR Email, IT Email and Finance Email.
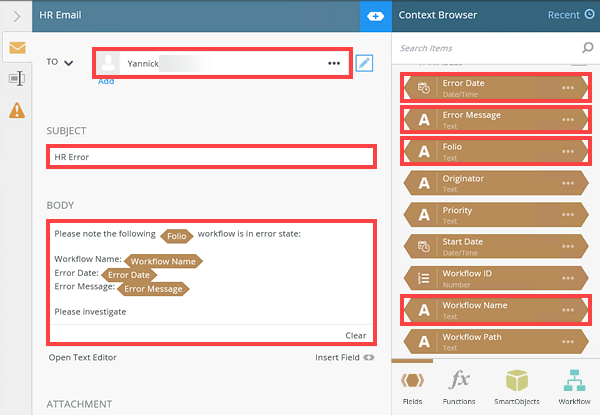
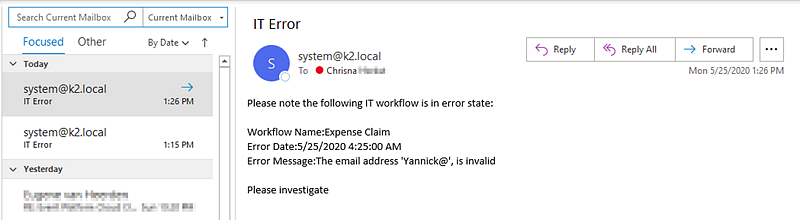
- Select the HR Email step, remove the Originator email option from the To section and enter the required recipients email address. Type HR Error in the Subject. Configure the Body as shown below:
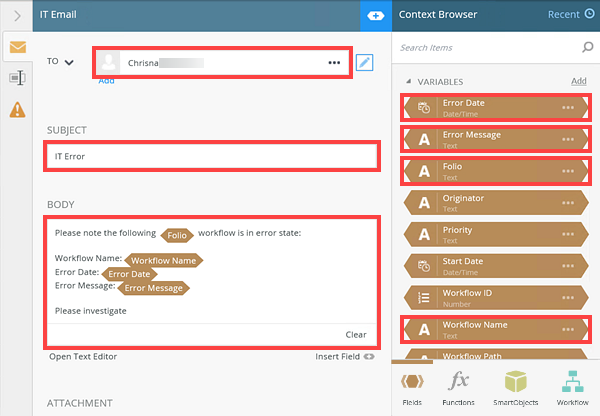
- Select the IT Email step, remove the Originator email option from the To section and enter the required recipients email address. Type IT Error in the Subject. Configure the Body as shown below:
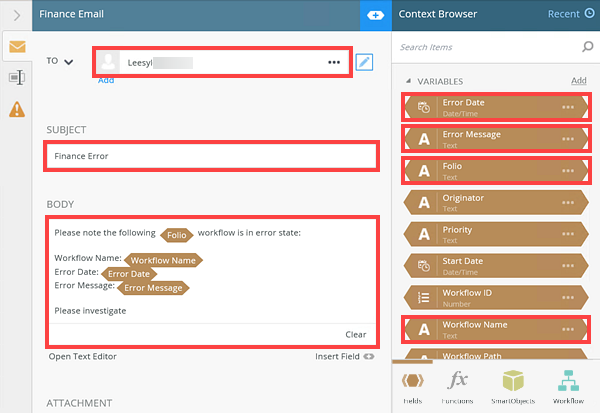
- Select the Finance Email step, remove the Originator email option from the To section and enter the required recipients email address. Type Finance Error in the Subject. Configure the Body as shown below:
- Deploy the Expense Claim ErrorsWorkflow.
The Send-Email steps send emails to the required department depending on which decision outcome executes and informs them there is an error in their claims submission.
- Add three Send-Email steps to the HR, Finance and IT decision steps.
-
Assign Start rights to the Service Account
- Open Management and browse to your workflow in the category tree. Select the Rights tab.
- Click the Add icon and add the service account, in this example it is K2SQL:K2Service, select K2SQL under the Label dropdown and type K2Service in the Search field.
- Click on the K2Service and click Add.
- Click Next.
- Select the START check box and click Finish.
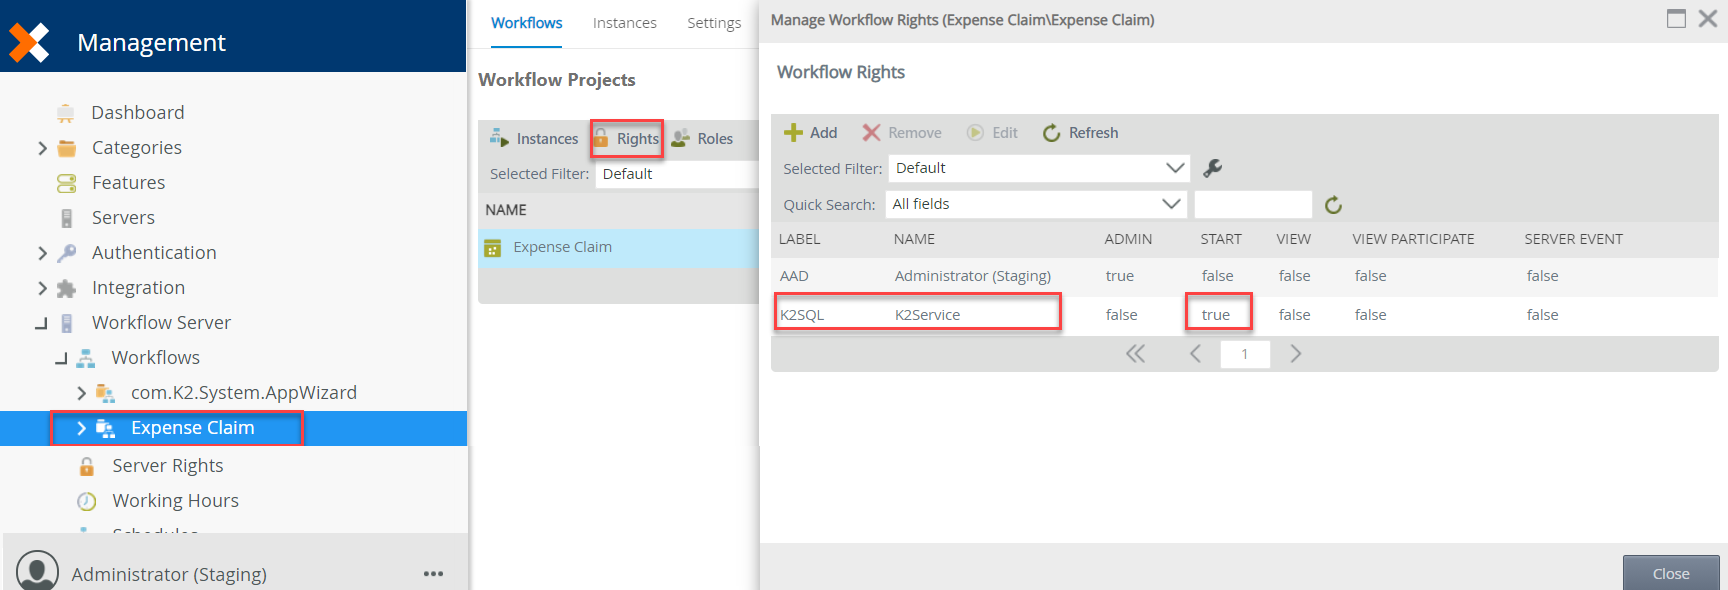
The Service Account needs Start rights on the error handling workflow. After you deploy the error handling workflow, you must manually assign the service account Start rights on the workflow rights screen in Management.
-
Test the Scenario
In this step, you run and complete the Expense Claim form which starts the Expense Claim workflow. Make sure to select the IT department and enter an incorrect email address in the Email Address field on the form. In the Expense Claim workflow, the Folio step sets the folio using the Department name (HR, Finance, or IT) from the completed form. Entering an incorrect email forces the Expense Claim workflow to go into an error state when you submit the form.
The conditional start rule (configured on the Expense Claim Errors error handling workflow) evaluates workflows in an error state. If the Workflow name equals Expense Claim, the condition is met and the Expense Claim Errors error handling workflow starts.
When you configure the Start when any Workflow Errors event, workflow properties from the erring workflow populate as variables in the error handling workflow. In this scenario, Folio data from the Expense Claim workflow populates to a variable (Folio) in the Claim Expense Errors error handling workflow. The Decision rule in the Claim Expense Errors error handling workflow determines who receives the notification email. In this test, the IT department receives the email.
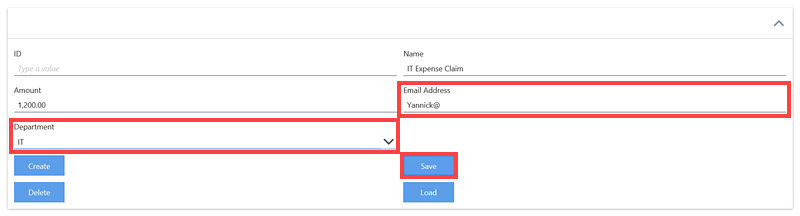
- Open the Expense Claim form and enter values for the claim. In the Email Address text box, enter an incorrect email address. In the Department drop-down control, select IT. Click Save.
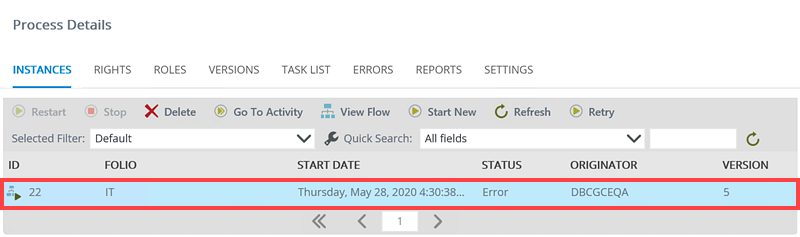
- The Expense Claim workflow instance errors and captured in Management.
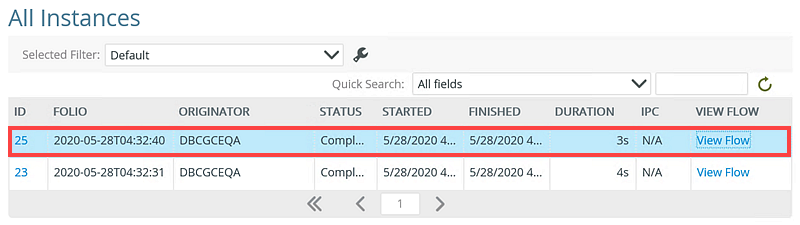
- The Expense Claim Errors workflow instance starts and searches for instances with errors using the name Expense Claim and completes.
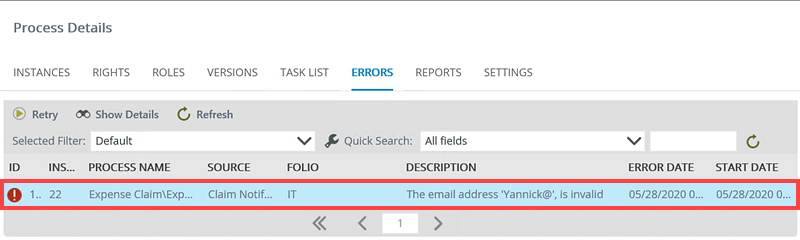
- When an error is detected (incorrect email address), the Expense Claim Errors workflow uses the folio (Department) captured in the Expense Claim workflow instance, in this example the IT department is the captured folio and sends an error email to the right recipient.
- Open the Expense Claim form and enter values for the claim. In the Email Address text box, enter an incorrect email address. In the Department drop-down control, select IT. Click Save.
Review
In this how to you created an Expense Claim application which allows employees in certain departments to submit claims. You then created a workflow which contains a Workflow Error Event which checks claims submissions and depending on the department, if these submissions go in error, then sends an email to the department with an error in their claim.