How To: Link a SharePoint application's workflow to a secondary list or library
-
This content uses the legacy Nintex K2 for SharePoint app. For more information about using the Nintex K2 Cloud (SPFx) app, see Add the app.
You can reuse artifacts with other lists and libraries as long as those other lists and libraries match the primary list or library's structure. To reuse a K2 for SharePoint application's workflow that starts with a SharePoint event, execute the SmartObject methods shown in this article to link a secondary list or library to a primary list or library.
Note: The approach described here is only for workflows started with an event in SharePoint, such as an item was added or a document was added. See Reuse workflows for information on linking workflows that start with a form.
In this topic, a utility workflow containing the sequence of Create Reference and SmartObject Method steps you call in order to link a secondary list or library's workflow to a primary list or library's workflow illustrates the recommended approach.

Scenario
You have regional staff employee lists (Employees_US, Employees_EU, and Employees_APAC) in SharePoint, the data structure of the lists is the same, and they are on the same SharePoint web application. You appify a primary list (Employees_US) with SmartObjects, SmartForms, and a workflow, and then reuse the SmartForms and workflow with your secondary lists (Employees_EU and Employees_APAC). The same workflow starts when an item is added to any of these lists.
Steps
You first create your SharePoint matching lists, then create a K2 application using the primary list, creating SmartForms and a workflow. You then execute system SmartObject methods in sequence, in a utility workflow, to create the links between the workflow and your secondary list.
Setup Steps
The following steps set up the scenario from start to finish. If you want to skip the setup steps and view the topic step, go to Create a workflow to perform the linking SmartObject method executions.
- Create two matching SharePoint lists.
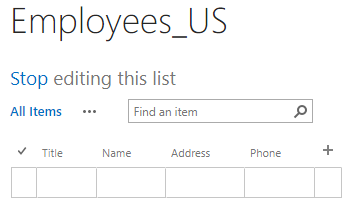
- In SharePoint, create a custom list for the Employees of the USA region.
- Name the List Employees_US.
- Create the following columns:
- Title, using column type Text.
- Name, using column type Text.
- Address, using column type Text.
- Phone, using column type Number.
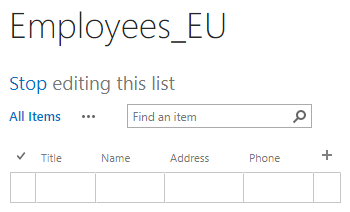
- Create another custom list for employees of the European Union region.
- Name the List Employees_EU.
- Create the same columns as you did in the Employees_US list.
- Appify your primary list. Create SmartForms and a workflow.
- For your Employees_US list, select the K2 Application icon from the list menu bar.
- Select the Create SmartForms option on the Create K2 Application page.
- Keep the default selection of Use K2 smartforms as the New, Edit, and Display forms for this list/library option.
- Select the Create Workflow option.
- Select the When the following events occur > An Item was added option.
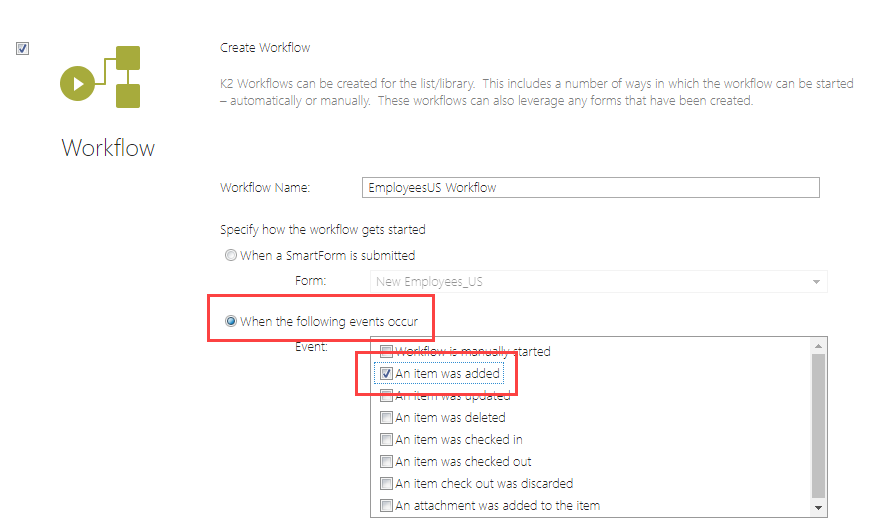
- Click OK to finish creating the K2 application.
- The system creates SmartObjects, views, and forms for the list, then opens the Designer for you to design your workflow.
- Add a Send Email step and deploy your workflow.
- Drag a Send Email step onto the design canvas.
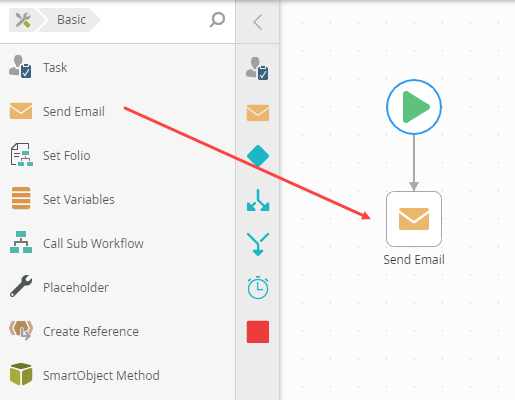
- Specify the subject and body as shown below:

- Deploy the workflow.
- Drag a Send Email step onto the design canvas.
Create a workflow to perform the linking SmartObject method executions
To reuse your SharePoint workflow, create links between the workflow and your secondary list or library by executing system SmartObject methods. You can do this by creating a workflow that takes the Site URL and List IDs of your primary and secondary SharePoint lists or libraries and executes the SmartObject methods in sequence. You could do this manually but it's easier to create a utility workflow with a SmartForm and use this for linking secondary lists or libraries.
- Create a SmartObject for the SmartForm input properties. The primary and secondary Site URLs and Site IDs.
- In the Designer, create a SmartObject named WF_Linking_SmO. See the How To: Create A SmartBox SmartObject article of the How To: Build a Simple Application series for steps on creating a SmartObject.
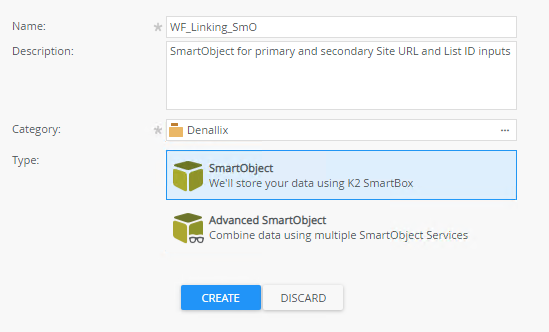
- Add Primary Site URL, Secondary Site URL, Primary List ID and Secondary List ID text properties.

- Click Finish to create the SmartObject.
- In the Designer, create a SmartObject named WF_Linking_SmO. See the How To: Create A SmartBox SmartObject article of the How To: Build a Simple Application series for steps on creating a SmartObject.
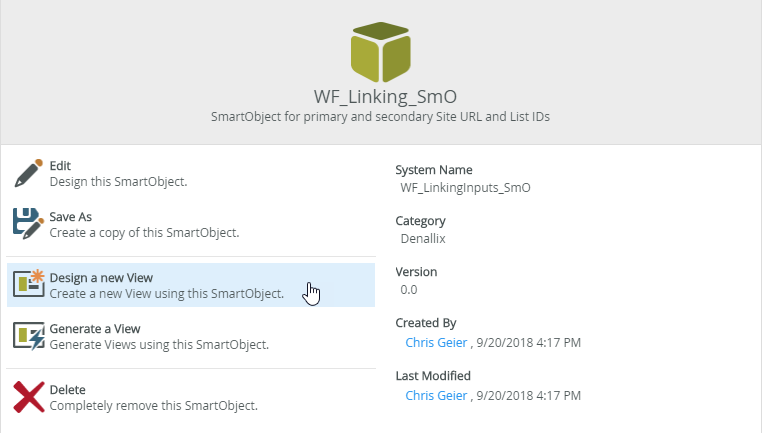
- Create the input View from the SmartObject.
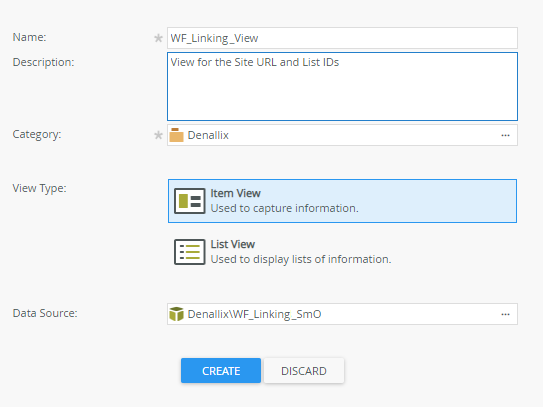
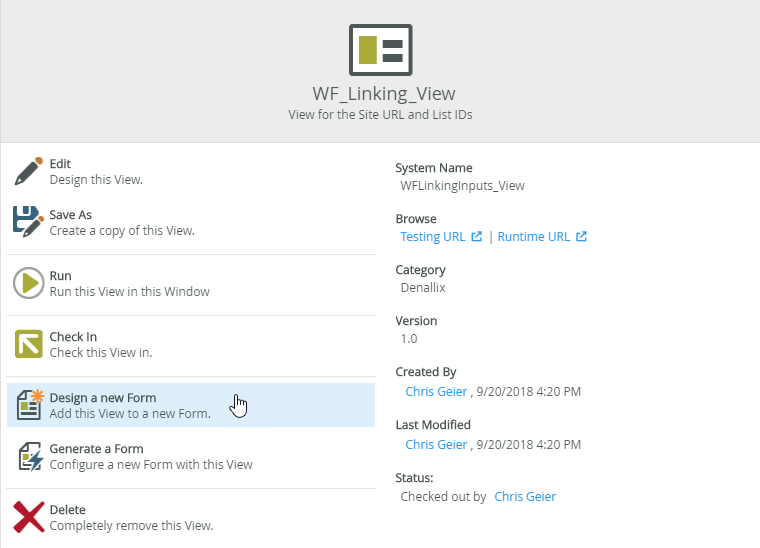
- Select Design a new View from the SmartObject page. See the How To: Create an Item View and a List View article of the How To: Build a Simple Application series for steps on creating views.
- Specify WF_Linking_View as the name, select your category, keep Item View as the view type, then click Create.
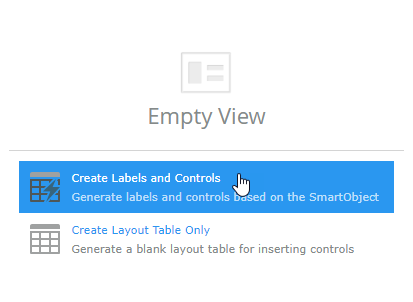
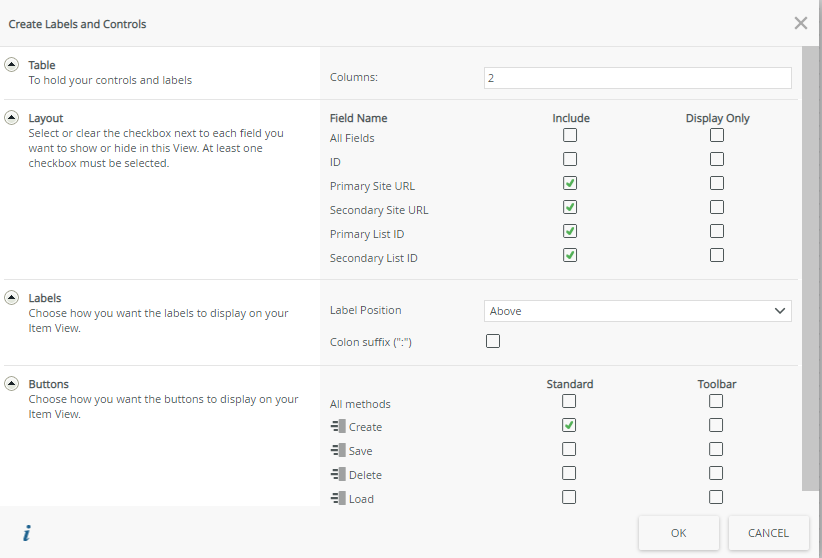
- Select Create Labels and Controls for the view.
- Select to include Primary Site URL, Secondary Site URL, Primary List ID, Secondary List ID fields names for the layout, and the standard Create method as the button.
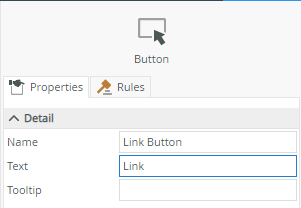
- Once the view shows, select the Create button and change the Name and Text properties to Link as shown below:
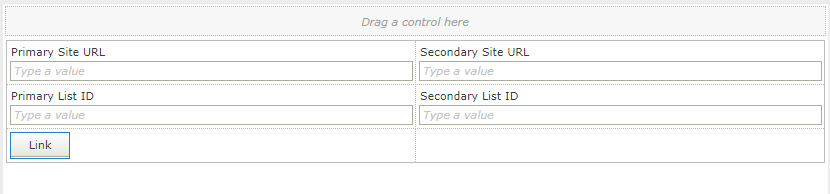
- Your view should look like this:
- Select Finish to save your view.
- Select Design a new View from the SmartObject page. See the How To: Create an Item View and a List View article of the How To: Build a Simple Application series for steps on creating views.
- Create a Form from your view.
- Select Design a new Form from the view page. See the How To: Create a Form article of the How To: Build a Simple Application series for steps on creating forms.
- Specify WF_Linking_Form as the name and a description as shown below:
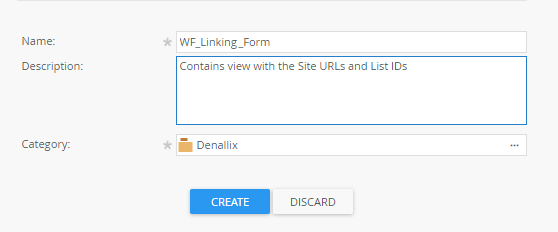
- Click Create.
- Specify Copy in the Site URL and List ID values as the form title.
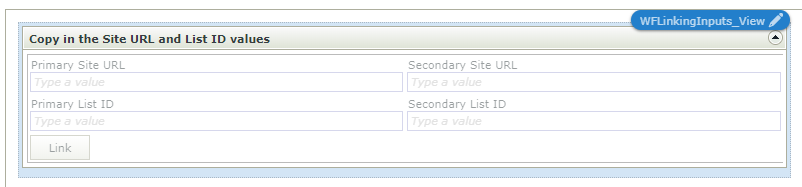
- Click Finish.
- Select Design a new Form from the view page. See the How To: Create a Form article of the How To: Build a Simple Application series for steps on creating forms.
- Create a Workflow using the form, starting the workflow when you click the Link button.
- Select Design a new Workflow from the form properties page. See the How To: Create a Workflow article of the How To: Build a Simple Application series for steps on creating workflows.
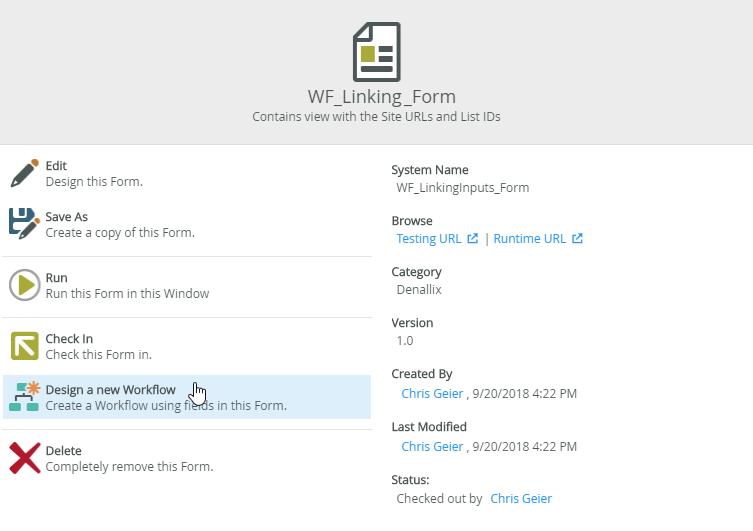
- Specify WF_Linking_WF as the workflow name.
- Expand the start event and click Edit to configure how the workflow starts.
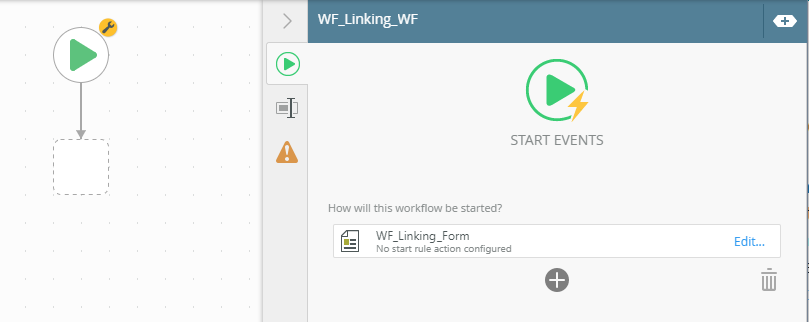
- Select Do it for me! and click Next.
- Click Next.
- Click Save and Finish to complete the start event configuration.
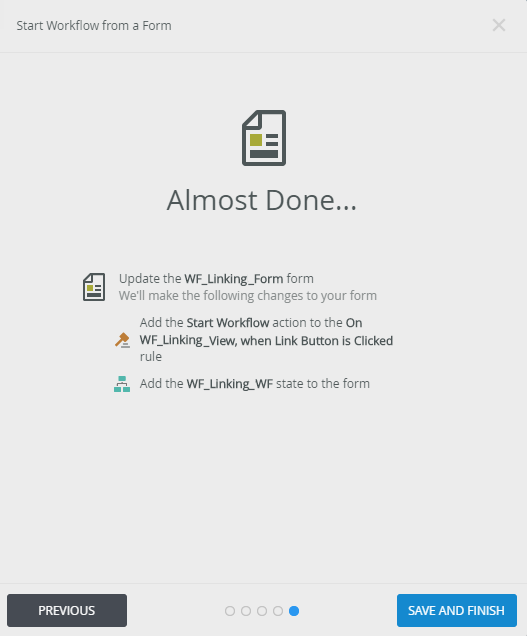
- Click OK.
- Select Design a new Workflow from the form properties page. See the How To: Create a Workflow article of the How To: Build a Simple Application series for steps on creating workflows.
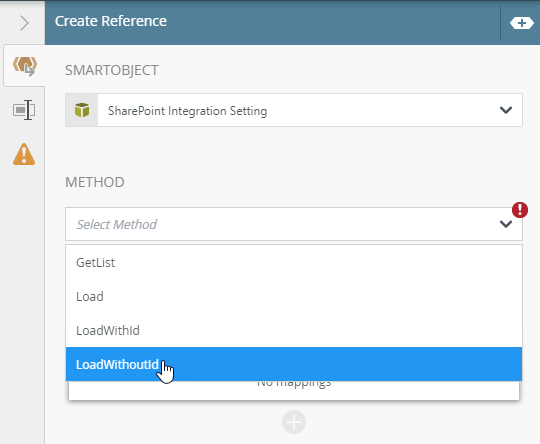
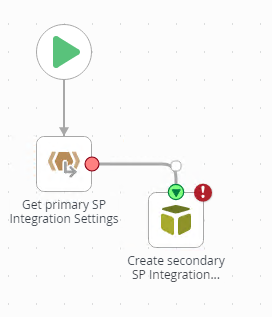
- Add a Create Reference step to get the SharePoint Integration Setting properties of the primary list . You use properties from this reference in later steps.
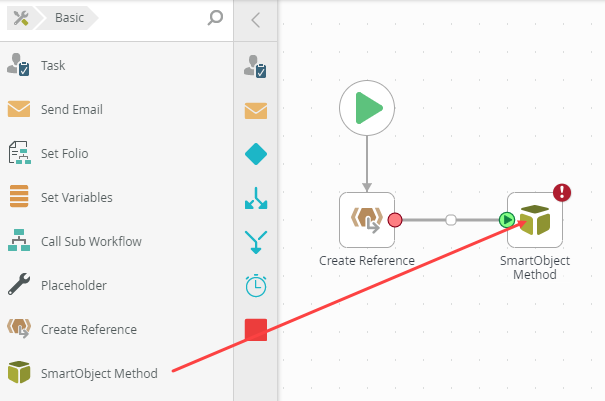
- Drag a Create Reference step from the Basic steps onto the design canvas.
- Name the Create Reference step Get primary SP Integration Settings.
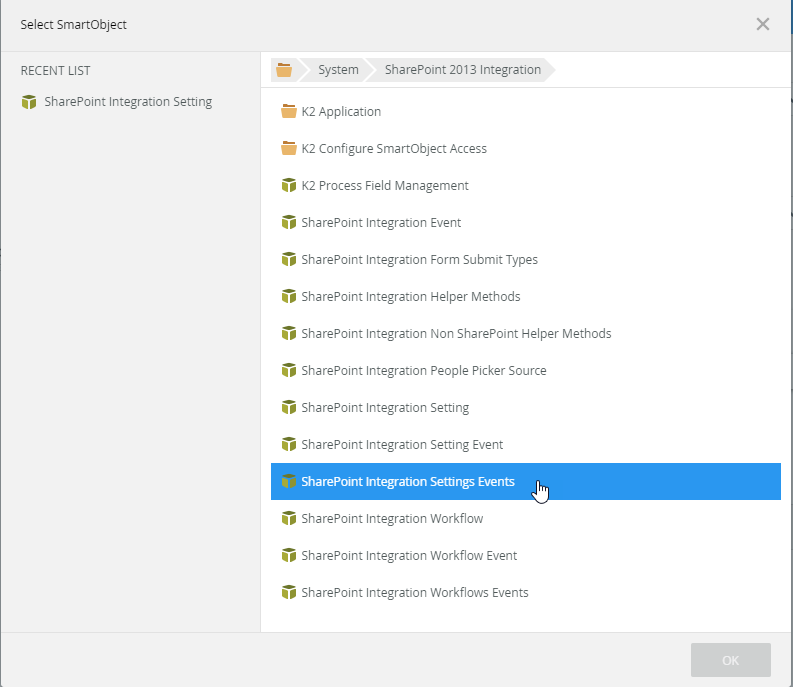
- For the SmartObject, navigate to System > SharePoint 2013 Integration and select the SharePoint Integration Setting SmartObject.
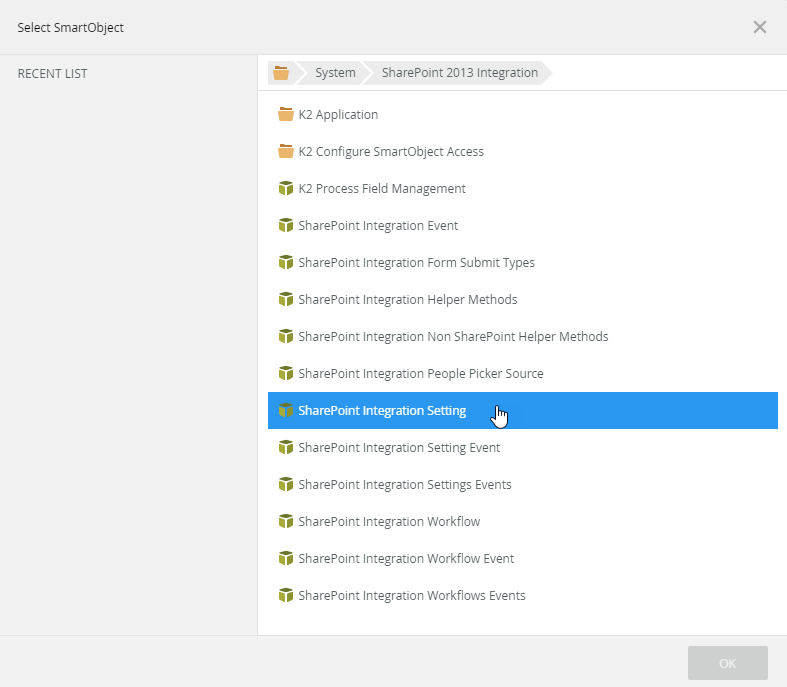
- Click OK.
- Select LoadWithoutID as the SmartObject method.
- Add SiteURL and ListID as input mappings.
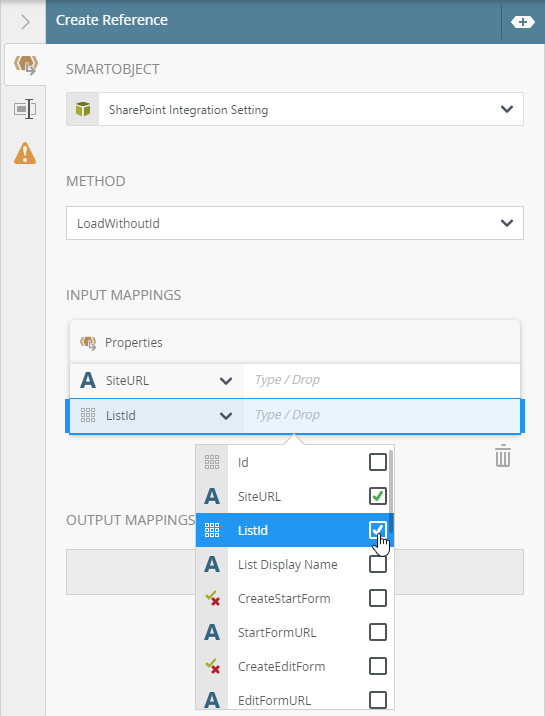
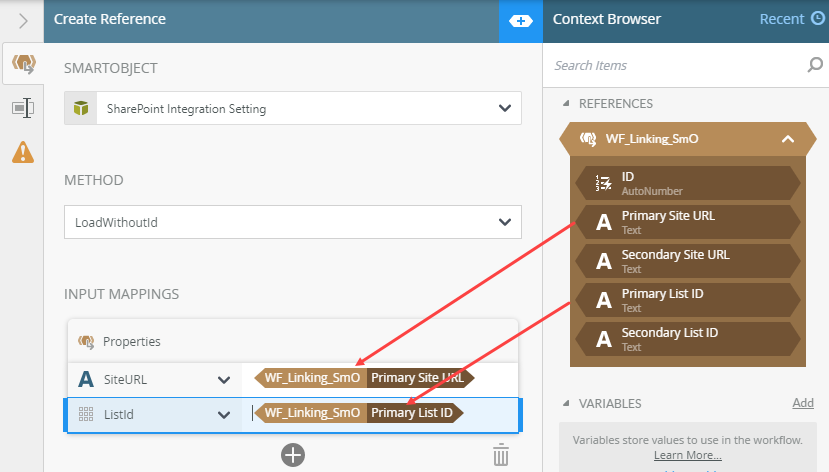
- Expand the context browser and drag and drop Primary Site URL and Primary List ID from the WF_Linking_Smo SmartObject reference to the matching input properties.
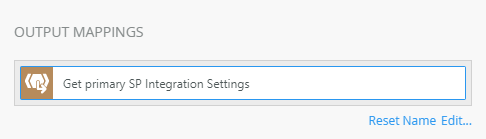
- Click Create to reference your output mappings. Name the reference Get primary SP Integration Settings.
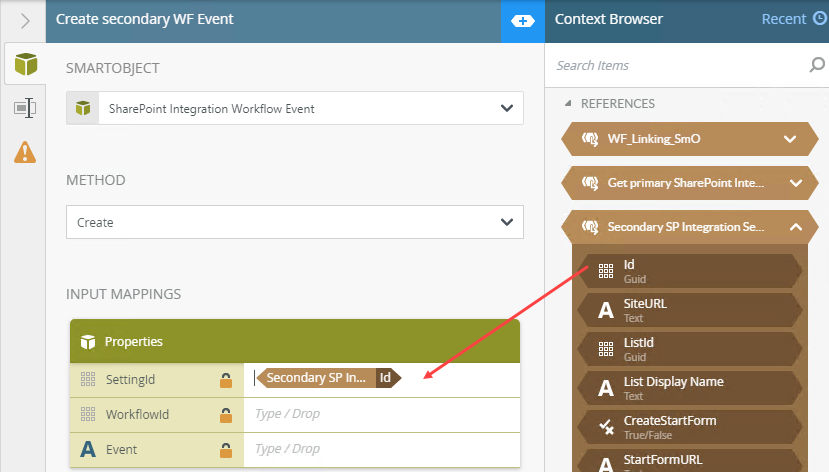
- Add a SmartObject Method step to create a new Settings ID for your secondary list using properties from the SharePoint Integration Settings of the primary list. Each secondary list linked to a workflow has a unique Setting ID used to bind the events and workflow. The SharePoint Integration Setting SmartObject's Create method returns this new Setting ID.
- Drag and drop a SmartObject Method from the Basic steps to the design canvas.
- Name the SmartObject Method step Create secondary SP Integration Settings.
- Connect the step in the workflow.
- For the SmartObject, navigate to System > SharePoint 2013 Integration and select SharePoint Integration Setting .
- Select Create for the method.
- Drag and drop the Secondary Site URL and Secondary List ID from the WF_LinkingInputs_SmO SmartObject reference to the SiteURL and ListID input properties.
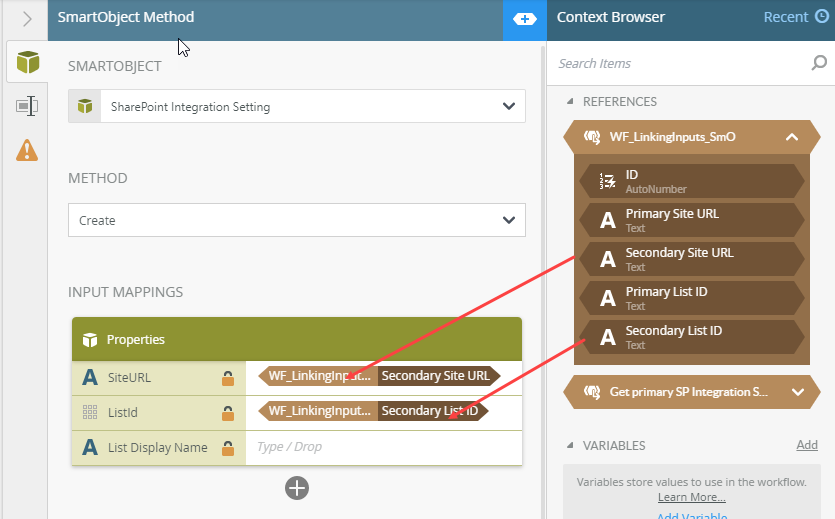
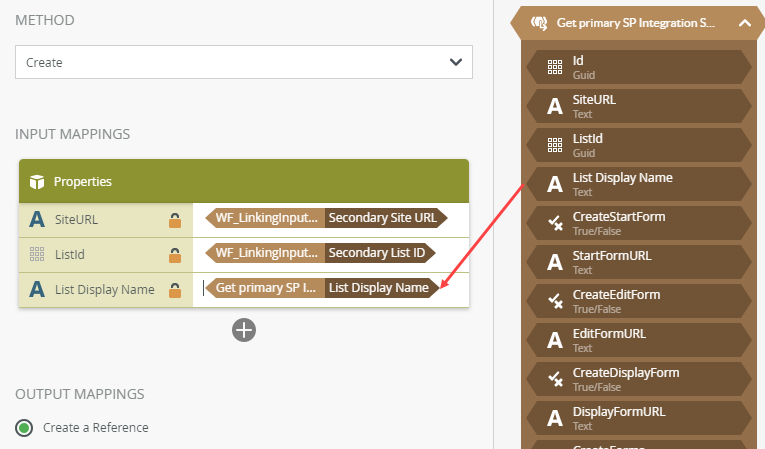
- Drag and drop the List Display Name from the Get primary SP Integration reference.
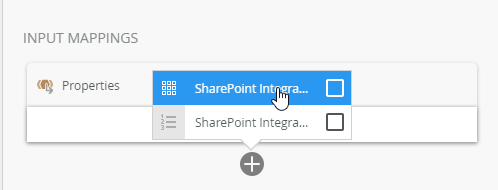
- Add the following properties to the input mappings by clicking the plus (+) under the last input property:
- CreateSmartObjects
- CreateForms
- CreateWorkflows
- CreateStartForm
- CreateEditForm
- CreateDisplayForm
- FormSubmitted
- EventOccured
- Manual
- SmartObjectName
- DocumentLibrary
- FormResetVersion
- Drag and drop the matching properties from the Get primary SP Integration reference:

- Select Create a Reference from output mappings.
- Click Create and specify Secondary SP Integration Settings as the name.

- Drag and drop a SmartObject Method from the Basic steps to the design canvas.
-
Add a Create Reference step to get the SharePoint event of the primary list.
- Drag a Create Reference step from the Basic steps onto the design canvas.
- Name the step Get primary SP Event.
- Link the step to the previous SmartObject Method step.
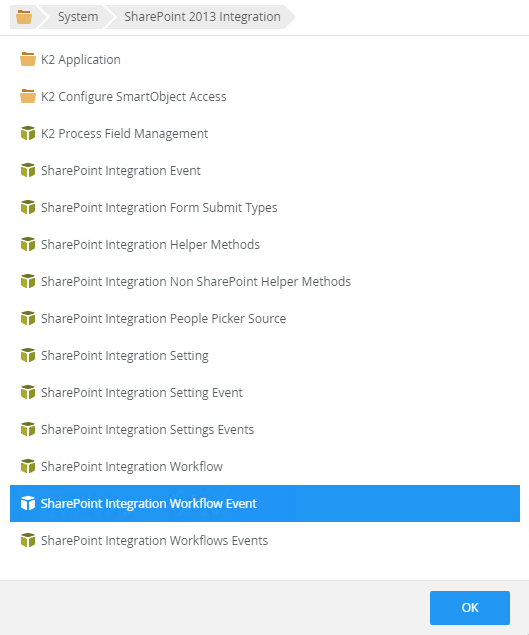
- For the SmartObject, navigate to System > SharePoint 2013 Integration and select SharePoint Integration Settings Events.
- Click OK.
- Select Get List as the Method.
- Select SharePoint Integration Setting ID as the identifier.
- Add SharePoint Integration Setting ID to the input properties.
- Drag and drop the ID from the Get primary SP Integration Settings reference to the SharePoint Integration Setting ID input property.
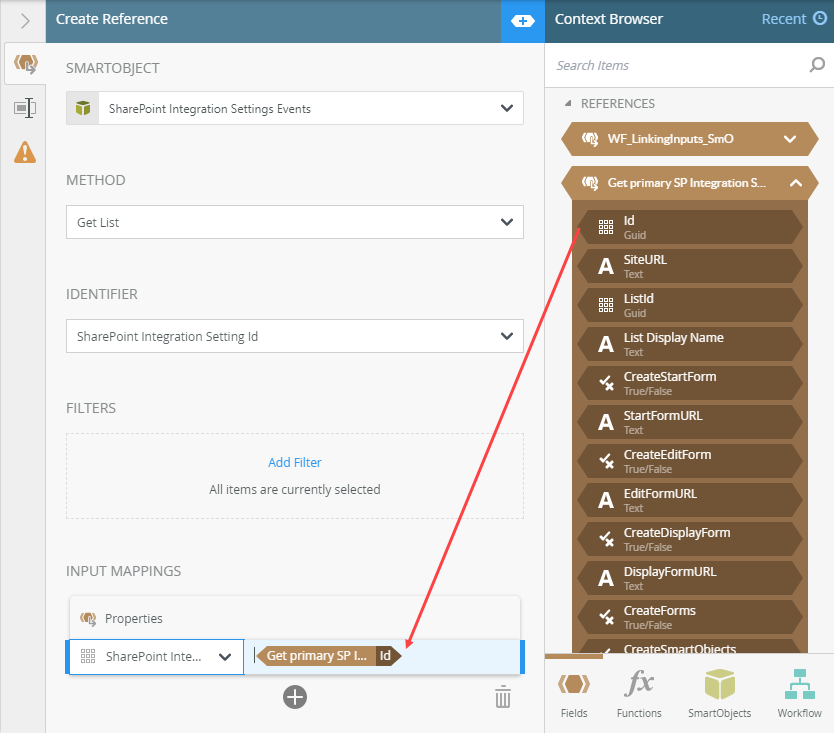
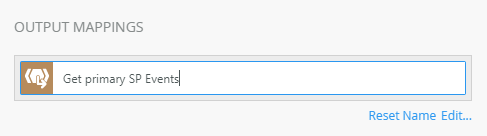
- Click Create Reference in output mappings and specify Get primary SP Events as the name.
-
Add a SmartObject Method step to create the linked SharePoint event for your secondary list using your secondary list's Setting ID.
- Drag and drop a SmartObject Method from the Basic steps to the design canvas.
- Name this step Create secondary SP Events.
- Connect this step to the previous Create Reference step.
- For the SmartObject, navigate to System > SharePoint 2013 Integration and select SharePoint Integration Settings Events.
- Select Create for the method.
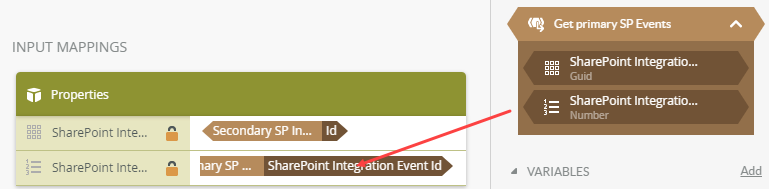
- Drag and drop the ID from your Secondary SP Integration Settings reference to the SharePoint Integration Settings ID input property.
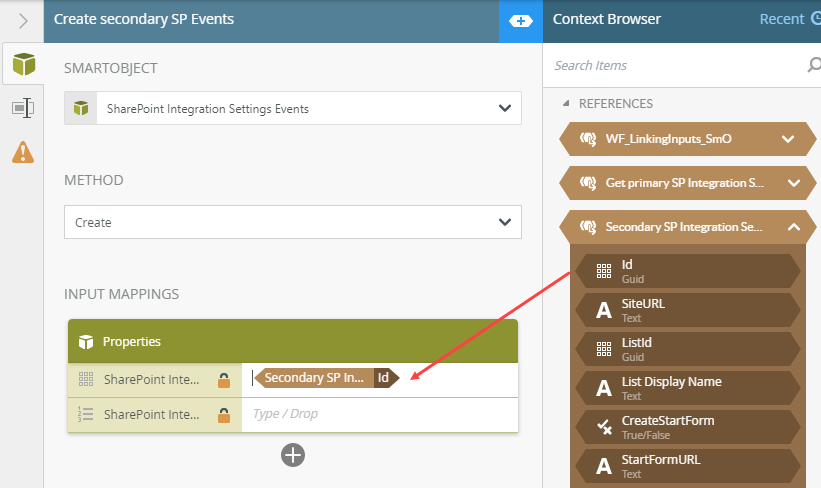
- Drag and drop the SharePoint Integration Event ID from your Get primary SP Events reference to the SharePoint Integration Event ID input property.
- Add a Create Reference step to get the workflow registry for the primary list.
- Drag a Create Reference step from the Basic steps onto the design canvas.
- Name the step Get primary WF Registry.
- Link the step to the previous SmartObject Method step.
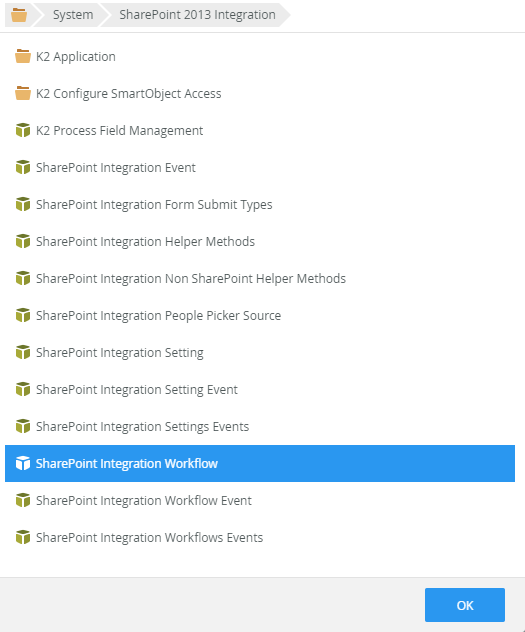
- For the SmartObject, navigate to System > SharePoint 2013 Integration and select SharePoint Integration Workflow.
- Select Get List for the method.
- Select Id for the identifier.

- Add SettingId to the Input properties
- Drag and drop Id from your Get primary SP Integration Settings reference to the SettingsId input property.

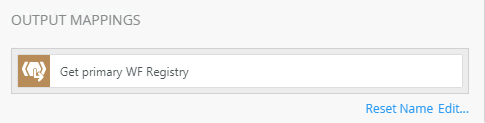
- Click Create Reference in output mappings and specify Get primary WF Registry as the name.
- Add a SmartObject Method step to create the secondary list's workflow registry
- Drag and drop a SmartObject Method from the Basic steps to the design canvas.
- Name this step Create secondary WF Registry.
- Connect this step to the previous create reference step.
- For the SmartObject, navigate to System > SharePoint 2013 Integration and select SharePoint Integration Workflow.
- Select Create for the method.
- Drag and drop the Secondary Site URL and Secondary List ID from your WF_Linking_SmO reference to the matching input properties.
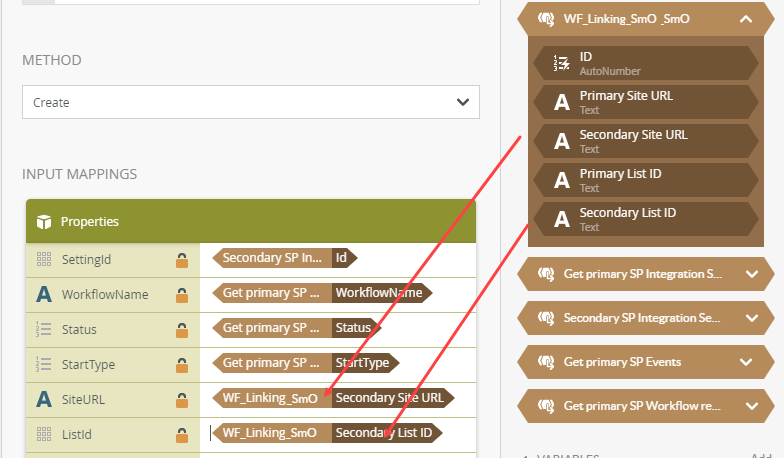
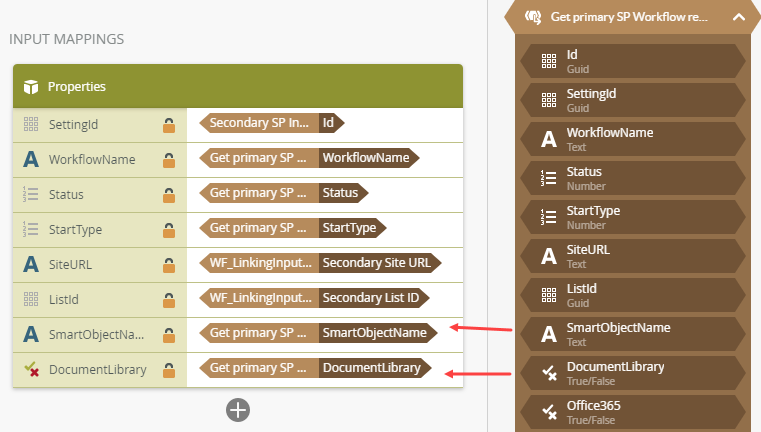
- Drag and drop Id, WorkflowName, Status, StartType, SmartObjectName, and DocumentLibrary fields from your Get primary SP WF Registry reference to the matching input properties.
- Add a Create Reference step to get the primary workflow event.
- Drag a Create Reference step from the Basic steps onto the design canvas.
- Name the step Get primary WF Event.
- Link the step to the previous SmartObject Method step.
- For the SmartObject, navigate to System > SharePoint 2013 Integration and select SharePoint Integration Workflow Event.
- Select Get List for the method.
- Select SettingId;WorkflowId for the identifier.
- Add SettingID to the input properties.
- Drag and drop the Id field from your Get primary SharePoint Integration Settings to the SettingId input property.
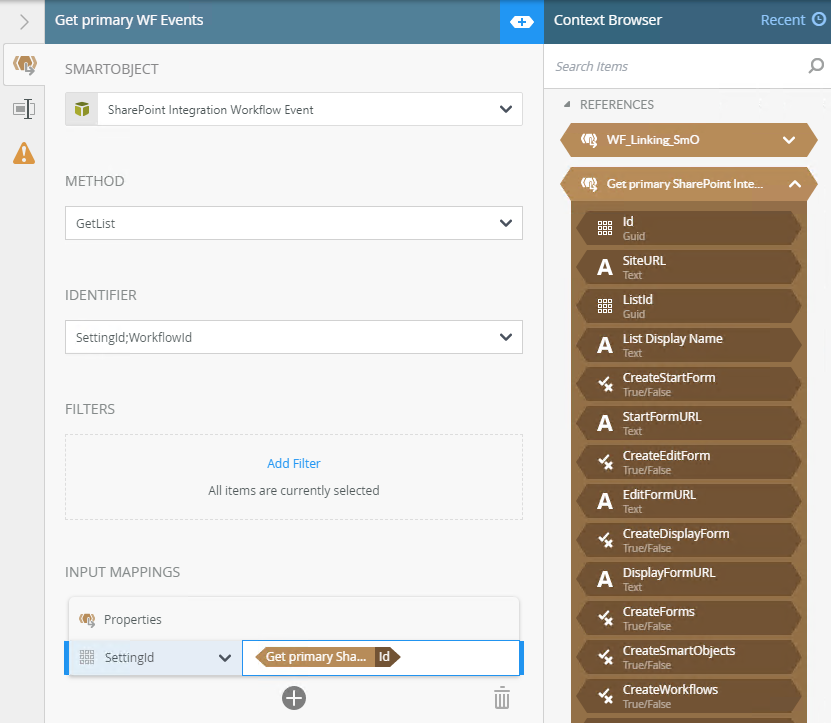
- Click Create Reference in output mappings and specify Get primary WF Event as the name.
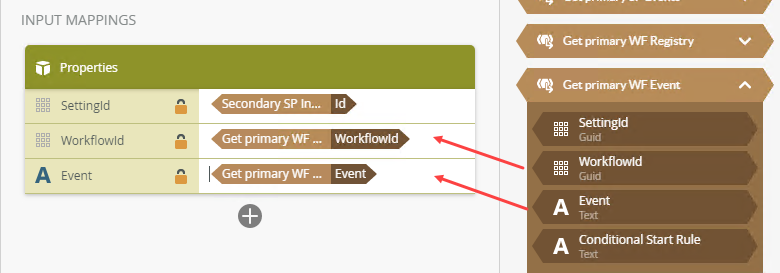
- Add a SmartObject Method step to bind the secondary list's workflow event using the secondary list's Setting ID.
- Drag and drop a SmartObject Method from the basic steps to the design canvas.
- Name this step Create secondary WF Event.
- Connect this step to the previous create reference step.
- For the SmartObject, navigate to System > SharePoint 2013 Integration and select SharePoint Integration Workflow Event.
- Select Create for the method.
- Drag and drop the Id field from your Secondary SP Integration Settings reference to the SettingID input property.
- Drag and drop WorkflowId and Event from your Get primary WF Event reference to the matching input properties.
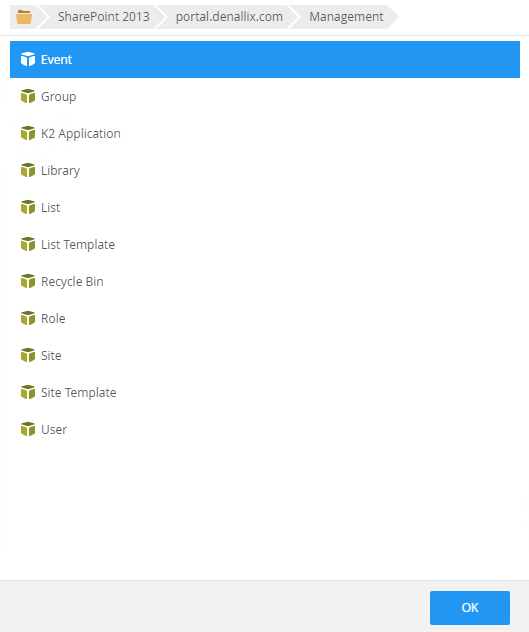
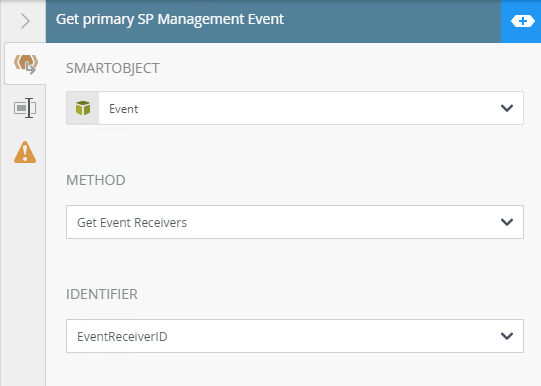
- Add a Create Reference step to get the primary SharePoint management event. This is the event method from your SharePoint service object.
- Drag a Create Reference step from the basic steps onto the design canvas.
- Name the step Get primary SP Management Event.
- Link the step to the previous SmartObject Method step.
- For the SmartObject, navigate to SharePoint 2013 > [your SharePoint site] > Management and select Event.
- Click OK.
- Select Get Event Receivers as the method.
- Select EventReceiverID as the identifier.
- Drag and drop Primary List ID from your WF_Linking_SmO reference to the List ID input property.
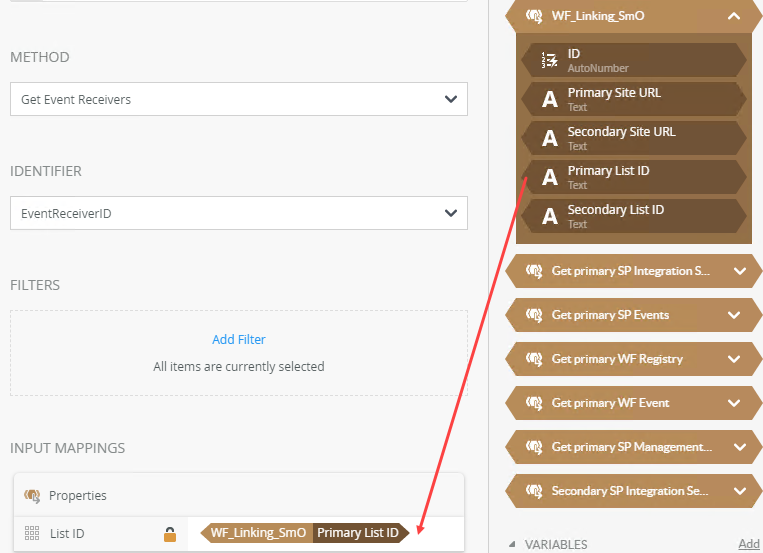
- Click Create Reference in output mappings and specify Get primary SP Management Event as the name.
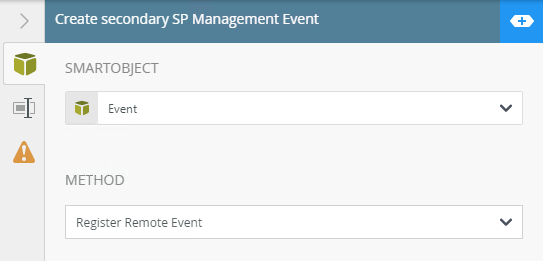
- Add a SmartObject Method step to create the secondary list's SharePoint Management event.
- Drag and drop a SmartObject Method from the Basic steps to the design canvas.
- Name this step Create secondary SharePoint Management Event.
- Connect this step to the previous Create Reference step.
- For the SmartObject, navigate toSharePoint 2013 Integration > [your SharePoint site] > Management and select Event.
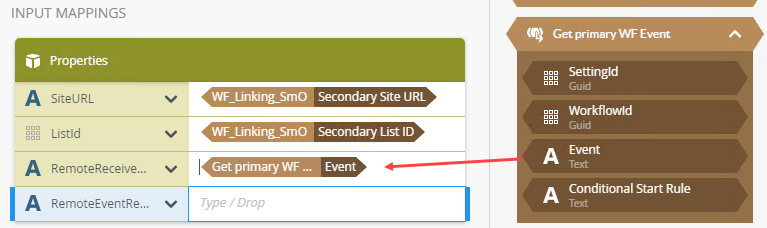
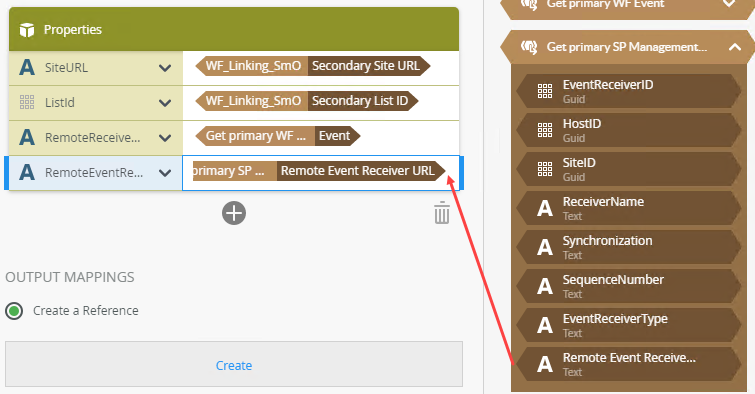
- Select Register Remote Event for the method.
- Drag and drop the Secondary List ID field from your WF_Linking_SmO reference to the List ID input property.
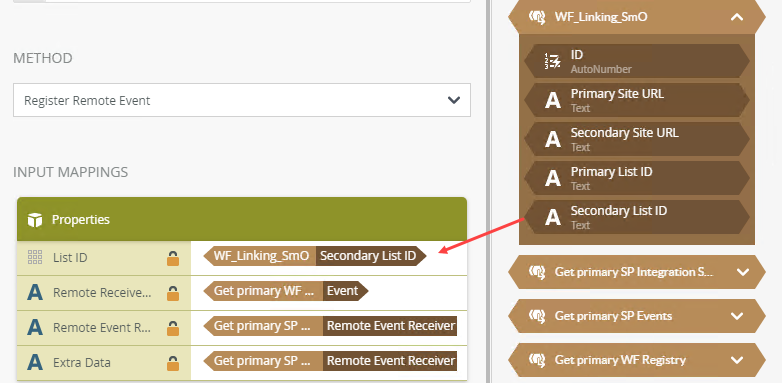
- Drag and drop the Event field from your Get primary WF Event reference to the Remote Receiver Types input property.
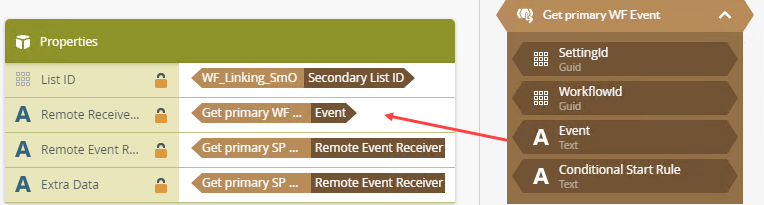
- Drag and drop the Remote Event Receiver URL from your Get primary SP Management Event reference to the Remote Event Receiver URL and Extra Data input properties.
- Add a SmartObject Method step to link the secondary list's SharePoint events to the workflow.
- Drag and drop a SmartObject Method from the Basic steps to the design canvas.
- Name this step Register secondary SP Events to WF.
- Connect this step to the previous create reference step.
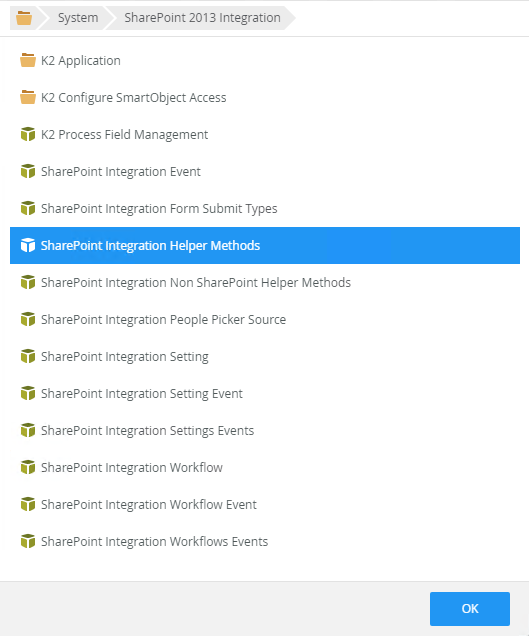
- For the SmartObject, navigate to System > SharePoint 2013 Integration and select SharePoint Integration Helper Methods.
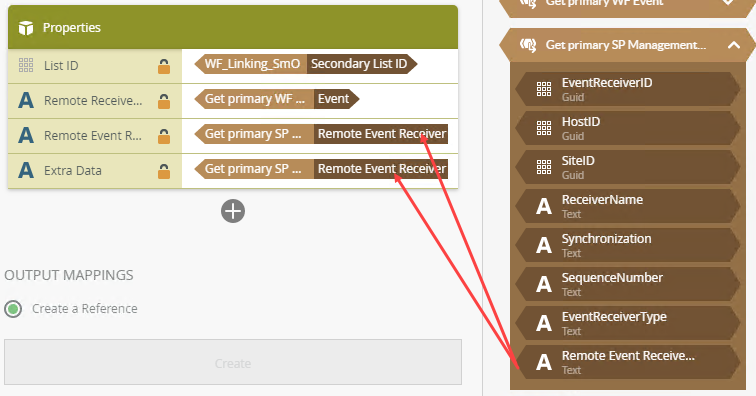
- Select Register Remote SharePoint Events for the method.
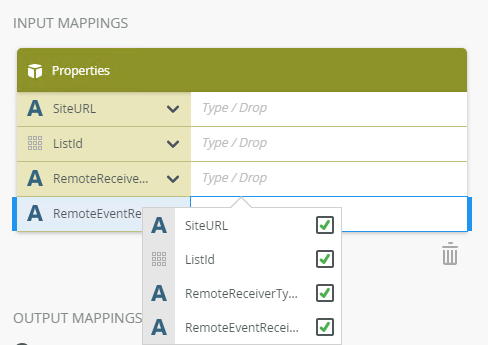
- Add SiteURL, ListId, RemoteReceiverType, and RemoteEventReceiverURL input mappings.
- Drag and drop Secondary Site URL and Secondary List ID from your WF_Linking_SmO reference to the matching input properties.
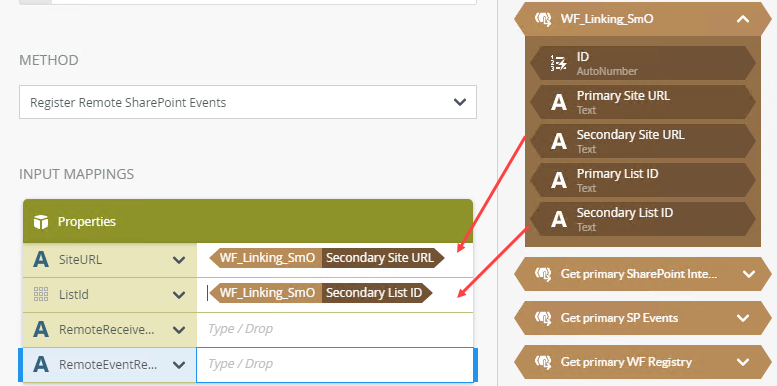
- Drag and drop the Event field from your Get primary WF Event reference to the RemoteRecevierType input property.
- Drag and drop the Remote Event Receiver URL field from your Get primary SP Management Event reference to the RemoteEventReceiverURL input property.
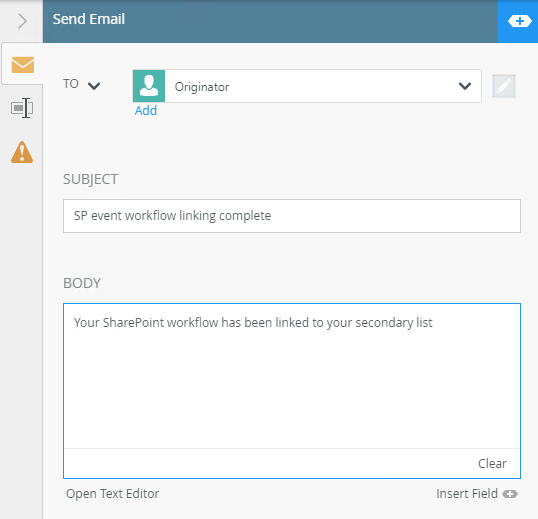
- Add a Send Email step to conclude the workflow. This email notifies you that the linking SmartObject methods have completed.
- Drag a Send Email step onto the design canvas.
- Connect this step to the previous SmartObject Method step
- Specify the subject and body as shown below.
- Deploy your workflow and use the SmartForm to create the links between your primary workflow and secondary list.
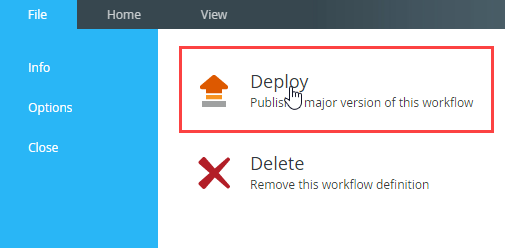
- Click File > Deploy.
- Once your workflow is deployed, run the WF_Linking_Form SmartForm.
- Paste the Site URL and List IDs of your primary and secondary lists.
- Click Link.
- You should receive the notification email from the workflow final step.
- You can add a new item to your secondary list and the workflow associated with the primary list starts.
- Click File > Deploy.
Review
In this article you create a utility workflow to execute a sequence of SmartObject Method steps to create links between the workflow of your primary SharePoint list and a secondary SharePoint list.