Reusing K2 for SharePoint Workflows
When you create an application from a SharePoint list or library, you create SmartObjects which are then used to create SmartForms, workflows, and reports if you choose those options.
If you create a workflow for your list or library, you can link it to other matching SharePoint lists or libraries. For example, if you have regional staff employee lists (Employees_USA, Employees_EU, and Employees_APAC), and the data structure of all lists are the same and are on the same SharePoint Web Application, you can appify a primary list (Employees_USA) with SmartObjects, SmartForms, and a workflow, and then reuse the same items for the other two lists.
Reusing primary list and library workflows for secondary lists and libraries
How you configure the reuse of your K2 for SharePoint application's workflow depends on how the workflow starts. If it starts when a SmartForm is submitted, then you modify the workflow's references and the SmartForm start rule. If it starts from a SharePoint event, you run a sequence of SmartObject methods to create the event links between the workflow and the secondary list or library.
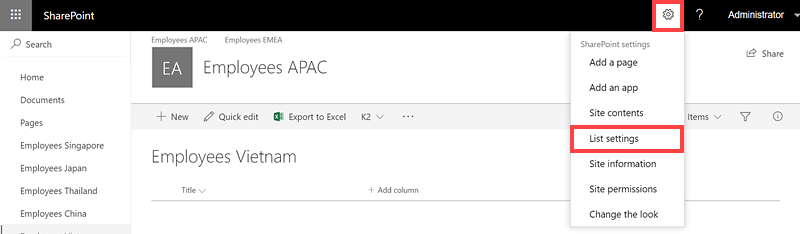
- Click on your List's List Settings icon in the list menu
- On the List Settings page, copy the first portion of the URL which is your Site URL. Include site and subsite values, such as https://sa-sp-current.denallix.com/HR/USA

- Copy the string at the end of the URL between =%7B and %7D which is your List ID

Workflow starts when a SmartForm is submitted
To link a workflow that starts when a SmartForm is submitted, you configure your workflow and SmartForm to use the Site URL and List ID properties. To do this, you first remove the SharePoint list or library's item references from the workflow and create new item references and configure them to use the Site URL and List ID properties. You then re-configure the start rule of the form to use those Site URL and List ID properties. See How To: Modify a Workflow to link an application's start rule to a secondary list or library for a step-by-step example.
Workflow starts from SharePoint events
To link a workflow that starts from SharePoint events, you call a sequence of SmartObject methods to create the SharePoint event links and workflow links from the workflow to the secondary list or library.
Use the following sequence of SmartObject method calls to create the integration links:
- Create a Setting ID for the secondary list or library. The Setting ID binds the workflow and events together and is unique for each SharePoint list or library
- Get the primary workflow's Setting ID. Execute the System > SharePoint 2013 Integration > SharePoint Integration Setting's Get List method using the primary list or library's Site URL and List ID
- Create a Setting ID for the secondary list or library. Execute the SharePoint Integration Setting's Create method using returned values from the Get List method of your previous step. In addition to the required properties, also add values for the following properties:
- CreateSmartObjects
- CreateForms
- CreateWorkflows
- CreateStartForm
- CreateEditForm
- CreateDisplayForm
- FormSubmitted
- EventOccured
- Manual
- SmartObjectName
- DocumentLibrary
- FormResetVersion
- Add the SharePoint events to the secondary Setting ID. When you have more than one event you create a new event link for each one
- Get the primary workflow's SharePoint integration setting events. Execute the System > SharePoint 2013 Integration > SharePoint Integration Setting Events' Get List method using the primary list or library's Setting ID
- Create the linked SharePoint events for your secondary list or library. Execute the SharePoint Integration Setting Events' Create method using your secondary Setting ID and primary SharePoint Integration Event ID
- Create a new workflow registry using your secondary Setting ID
- Get the primary workflow's SharePoint integration workflow values. Execute the System > SharePoint 2013 Integration > SharePoint Integration Workflow's Get List method using the primary list or library's Setting ID
- Create your secondary list or library's workflow registry. Execute the System > SharePoint 2013 Integration > SharePoint Integration Workflow's Create method using the secondary Site URL, List ID, and Setting ID, and the WorkflowName, Status, StartType, SmartObjectName, and DocumentLibrary values from your previous Get List method results
- Bind the workflow events to the workflow registry using the secondary Setting ID
- Get the primary workflow's SharePoint integration workflow values. Execute the System > SharePoint 2013 Integration > SharePoint Integration Workflow Event's Get List method using the primary list or library's Setting ID
- Create your bindings from your secondary list or library to the workflow registry. Execute the System > SharePoint 2013 Integration > SharePoint Integration Workflow Event's Create method using the secondary Setting ID, and WorkflowId and Event from your previous Get List method results
- Register the SharePoint event workflow trigger. The SmartObject executed in this step is from your SharePoint service object.
- Get the primary workflow's SharePoint integration workflow values. Execute the SharePoint 2013 Integration > [your.SharePoint.site] > Management > Event Get Event Receivers method using the primary list or library's List ID
- Register your secondary list's event trigger. Execute the SharePoint 2013 Integration > [your.SharePoint.site] > Management > Event's Register Remote Event method using the secondary List ID, primary workflow events for the RemoteReceiverTypes (you can pass all the events together separated by a semi colon ';', such as 1111;10001;10002), and the RemoteEventRecieverURL value from the Get Event Receivers method from the previous step
- Register the events to the workflow
- Execute the System > SharePoint 2013 Integration > SharePoint Integration Workflow Helper Method's Register Remote SharePoint Events method using the secondary Site URL and List ID primary workflow events for the RemoteReceiverTypes (you can pass all the events together separated by a semi colon ';', such as 1111;10001;10002), and the RemoteEventRecieverURL value from the Get Event Receivers method from the previous step
See How To: Link a SharePoint application's workflow to a secondary list or library for a step-by-step example of adding these SmartObject method calls to a utility workflow to create the linking.
Resetting the workflow links
When you need to remove the reuse links, such as if your secondary list is no longer part of the same set of lists and is customized with new columns just for that region, you must reset the list. You can then appify it and it becomes its own solution not linked to other solutions.
For SmartForm links, run the ResetSharePointListFormsUrl method of the SharePoint.Integration.HelperMethods system SmartObject. Use the Site URL and List ID values of the secondary list or library you're resetting as inputs to the method.
For lists and libraries only appified with forms, if you change your primary list from using SmartForms back to using SharePoint forms, you can appify your secondary list or libraries without resetting the form links. See Working with SharePoint Forms for more information on using SharePoint forms.
For workflow links, run the RemoveSharePointDynamicWorkflowLinking method of the SharePoint.Integration.HelperMethods system SmartObject. Use the Site URL and List ID values of the secondary list or library you're resetting as inputs to the method.
Considerations
- Create your application on your SharePoint root list, then re-use those SmartObject methods to access your secondary lists on your sub sites.
- The K2 for SharePoint App must be installed and activated on the site on which you create the primary application.
- You must activate K2 for SharePoint on site collections containing secondary lists and libraries before you can link them to primary lists and libraries.
- Using a primary SmartObject method to access a secondary list only works on the same SharePoint Web Front-End (WFE), which can have multiple site collections with sub sites.
- When you make changes to your primary list or library, you must re-appify it to update the associated SmartObject. Click the list or library menu and select the Application icon. For more information see Changes to a SharePoint List or Document Library Structure
- Any changes you make to the primary list or library must also be made to the matching secondary lists or libraries.
- K2 for SharePoint artifact reuse only works for lists and libraries that are compatible with each other. The secondary list or library must have the same columns and column types as the primary list.
- Reusing K2 for SharePoint application artifacts only works with SharePoint objects of the same type. You cannot appify a document library and reuse those artifacts with a list.
- You cannot use Calendar lists with the K2 for SharePoint artifact reuse options. The Calendar list type does not include parameters used to link primary and secondary lists.
- You cannot use lists or libraries with a lookup to a library with the K2 for SharePoint artifact reuse options.
-
When you attempt to create an Application of a list or library that is linked to a primary list's Nintex K2 artifact, you see an error message stating "This list is re-using a K2 Application". You must remove the reuse links before you can appify the list or library. See Resetting the Secondary List or Library Links for the steps to detach the Application from the secondary list or library.

- For lists and libraries only appified with forms, if you change your primary list from using Nintex K2 forms back to using SharePoint forms, you can appify your secondary list or libraries without resettling the form links. See Working with SharePoint Forms for more information on using SharePoint forms.
- You must refresh SmartObjects created before K2 Five Update 5.2 to enable the Site URL and List ID parameters.
- You can start a workflow using SharePoint events without appifying the list or library.