Install and configure a K2 Host Server
 |
Download: You can download an Excel Workbook to help you organize your K2 blackpearl installation by clicking here. Use this checklist to ensure that all topics have been read, understood and implemented successfully before, during and after K2 blackpearl installation. The checklist includes all possible items for both Standalone and Distributed installations. Please read the Reference Topic to determine if the item applies to your environment. There is also a worksheet where users can record their configured settings as reference. |
Prerequisites
![]()
The K2 Server role is defined to be the server on which the K2 Host Server runs. The K2 Server component, configuration manager, and K2 documentation will be installed on this server.
 |
The same version of K2 blackpearl must be installed on all K2 servers in the distributed environment. |
The K2 Server role requires the following prerequisites:
| K2 blackpearl Prerequisites for the K2 Server | |
|---|---|
| Operating System |
|
| Windows Components |
|
| Additional Software |
|
|
While infrastructure changes are required by K2, each environment is different and has its peculiarities which must be taken into account. Modifying the infrastructure could have unforeseen results if the changes are not appropriately understood or managed. Given the broad spectrum of underlying infrastructure utilized, it is recommended that a panel or committee with appropriate skill in each area concerned be assembled to outline the underlying infrastructure changes and gauge the impact of the required changes. |
Rights and Permissions
The K2 Service Account is the account under which the K2 service runs.
The rest of this guide will use domain\K2 Service Account as a placeholder for the K2 Service account name. When installing K2 in your environment, replace this placeholder with your actual account name.
The K2 Service Account will need the following permissions:
| K2 Server | |
|---|---|
| Permission | Used For |
|
In order to run the K2 blackpearl Service, the Service Account will need this permission. To see how to set this permission, click here. |
|
| Rights | Folder or Registry Key |
| Full Control | %SYSTEMROOT%\temp |
| Full Control | %ALLUSERSPROFILE%\Application Data\Microsoft\Crypto\RSA |
| Full Control | HKEY_LOCAL_MACHINE\SOFTWARE\SourceCode\Logging (* Note) |
| Modify | %PROGRAMFILES%\K2 blackpearl\Host Server\Bin (* Note) |
| * Note | The following step is done post installation |
The Installation Account will need the following permissions during installation and configuration:
| All Servers with K2 Components | |
|---|---|
| Permission | Used For |
| Local Administrator |
In order to successfully install and configure K2 blackpearl components, the Installation User account must be a local administrator on all the servers that will have K2 components installed. |
Kerberos / Pass Through Authentication
When components are installed on separate servers, credentials must be passed between the services. This can be accomplished by setting up Kerberos, which should be configured prior to installing K2. Any time where two or more hops are required for user authentication, Kerberos must be configured.
Pass Through Authentication is a K2 proprietary authentication methodology specifically for authenticating users whose credentials need to be passed between machines that interact with the K2 APIs. This authentication model can be used as an alternative to Kerberos, but is not in any way intended to be a replacement for Kerberos within the overall infrastructure.
Install Steps
After you have installed all the prerequisites, created the service accounts, enabled DTC and installed MSMQ, you are now ready to install the K2 blackpearl Server.
Once the installation is done, the Configuration Analysis tool will be available to help troubleshoot any errors detected during the installation.
 |
It is recommended to install all K2 components using the K2 Service Account. Log on to the server as the K2 Service Account before installing. |
Click on this link to see a flow diagram of the install steps.
To install the K2 Server component, follow the below steps:
 |
From the local installation folder, double-click on the Setup.exe file |
||||
 |
On the Welcome screen, click Next |
||||
 |
On the Checking for Latest Version screen, the installation will verify the version |
||||
 |
On the End User License Agreement screen, read through the EULA. You must select the I agree option before you can continue with the installation. You can print out the EULA for your records. Once you have read the EULA, click Next |
||||
 |
On the Installation Type screen, select the Custom Installation option and type in an Installation Folder, and click Next |
||||
 |
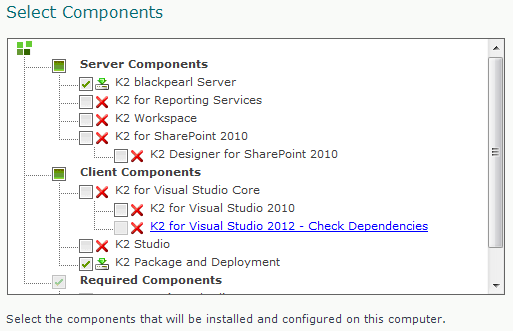
On the Select Components screen, you should see that the only components for which the prerequisites are met are checked. Uncheck everything except the K2 blackpearl Server:
|
||||
 |
On the License Configuration screen enter the License Key.
|
||||
 |
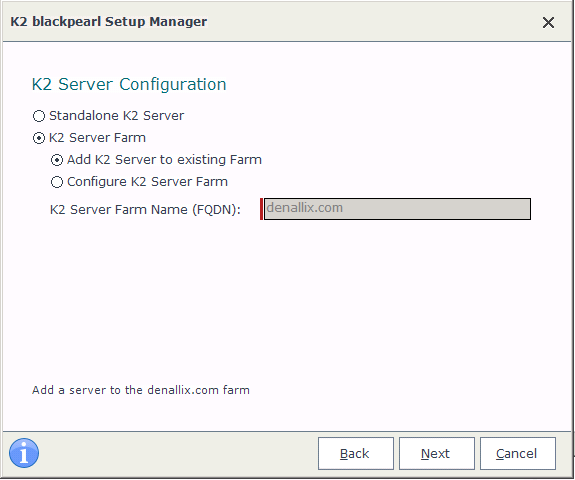
On the K2 Server Configuration screen, select the appropriate option:
|
||||
 |
On the K2 Pass-Through Authentication screen, if Kerberos is installed select Kerberos and if not then select Windows |
||||
 |
On the K2 Server Configuration screen, take note of the ports that are used for communication. It is strongly recommended to leave the default ports as is.
The ports are as follows:
|
||||
 |
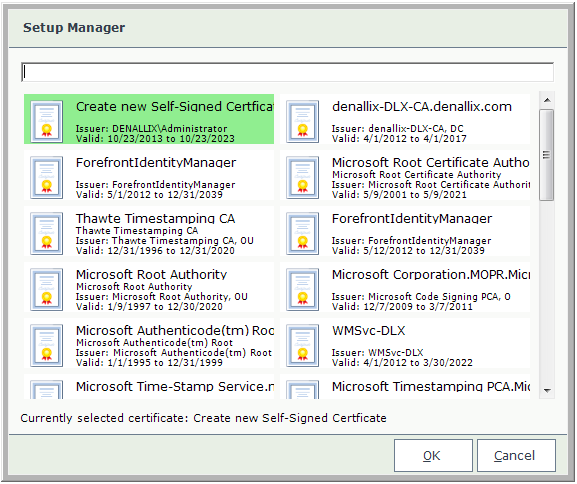
On the Workspace Web Site Configuration screen, type in the URL to the K2 Workspace Web Site, and click the Browse button to browse and select an existing security certificate or create a new certificate. K2 Certificate To create a new security certificate, select 'Create new Self-Signed Certificate', enter a name in the text box and click OK.
|
||||
 |
On the CRM Server Settings screen,the details of the CRM Server and the Organizations name can be added. The CRM server details entered on this screen are used to create the Environment Library entry that can be used within the K2 wizards. This screen is optional and the installation will complete without any information being entered on the screen. Ensure that the Microsoft CRM Server is started before adding the information to this screen. CRM integration in K2 such as the CRM Entity Wizard is dependent on the information entered on this screen. |
||||
 |
On the Database Configurations screen, you will see the list of K2 Databases that will be created as well as the SQL Server they will be created on. You can change the installation location for the databases by clicking on each database's change link, or the Change All button. You can select whether you want to use Windows or SQL Authentication by changing the database configuration. You can also change the Database Name by clicking on the change link and editing the Database Name field. When you have completed your database configuration, click Next to continue. |
||||
 |
On the Service Accounts Configuration screen, enter in the following user accounts:
|
||||
 |
On the Exchange Server Settings screen, enter details as required. See the topics Exchange Server Configuration and Exchange Integration for important information. |
||||
 |
On the SmartActions Configuration screen, enter details as required. See the topic SmartActions Configuration for important information. |
||||
| Note: | The SMTP Settings screen is displayed after the SmartActions setup step only if the Use Exchange for mail integration option has been selected on the Exchange Server Configuration screen. | ||||
 |
On the Configuration Summary screen, validate the settings. You can go back to make any necessary changes, and you can print this page for reference later. Once you are satisfied with your settings, click Install. |
||||
 |
The Setup Manager will update and show you the progress of the components as it installs. |
||||
 |
When the installation has completed, you will see a finished screen. There will also be a link to the created configuration log file. When you click Finish, you will be prompted to restart now (click Yes) or restart later (click No). It is important to restart in order to complete the installation and configuration of K2 blackpearl. |
 |
Recommendation: When the K2 Server is run in console mode make sure to be logged in as the correct user and make use of the “Run as Administrator” option to ensure that the correct elevated privileges are utilized. |
K2 Service Account
In a distributed environment where components are installed on more than one server, Kerberos security must be configured. One of the components of Kerberos is the Service Principal Name (SPN). Whenever user credentials must be passed from one system to another, the system that is attempting to pass the credentials must be trusted for delegation. For this step to take place successfully, Kerberos delegation must be configured.
|
Configuring SPNs is an advanced task and should only be performed by an appropriately trained professional. The steps and configurations given in this help file are to be used as a guide - your system may require additional configuration due to different hardware and software compatibilities. |
There are two sets of SPNs that need to be set up for the K2 Service Account:
- K2Server
- K2HostServer
The following placeholders are used in the commands:
- domain\K2 Service Account - The K2 Service Account that runs the K2 Service
- MachineName - The name of the computer on which the K2 Service is running
- MachineName.FQDN - The fully qualified domain name of the computer on which the K2 Service is running
|
Be sure to set all the SPNs as listed below. Also, the service account is required so be sure to specify the account properly. The SPNs listed below are for K2 blackpearl. |
|
If you have a K2 Server farm running on a cluster, be sure to use the name of the cluster and the fully qualified cluster name instead of a single node's machine name. |
Open a command prompt on a server that has the Windows Support Tools installed, and execute the following commands:
- setspn -A K2Server/MachineName:5252 domain\K2 Service Account
- setspn -A K2Server/MachineName.FQDN:5252 domain\K2 Service Account
- setspn -A K2HostServer/MachineName:5555 domain\K2 Service Account
- setspn -A K2HostServer/MachineName.FQDN:5555 domain\K2 Service Account
|
If you are installing K2 blackpearl on an NLB environment, the MachineName will change to the the LBHostServerName |
After the commands have successfully executed, you can verify the SPNs were set by executing the following command:
- setspn -L domain\K2 Service Account
|
While infrastructure changes are required by K2, each environment is different and has its peculiarities which must be taken into account. Modifying the infrastructure could have unforeseen results if the changes are not appropriately understood or managed. Given the broad spectrum of underlying infrastructure utilized, it is recommended that a panel or committee with appropriate skill in each area concerned be assembled to outline the underlying infrastructure changes and gauge the impact of the required changes. |
After installing and configuring the K2 Server component, you can easily validate that the K2 Server is functioning properly by running the K2 Service in console mode. Console mode is a useful troubleshooting tool, as all error and informational messages are sent to the console window so you can watch what is going on. It is important that you run the service as the Service Account in order to accurately troubleshoot permissions and other errors.
To run in console mode, perform the following steps:
|
Open the Services manager (Start > All Programs > Administrative Tools > Services) |
|
Scroll down to the K2 blackpearl Server service, select it and click the Stop Service button |
|
Once the service shows as stopped, you can close the Services manager |
|
Right-click on the K2 blackpearl Server item in the Start menu (under Start > All Programs > K2 blackpearl) and select Run as... |
|
Select The following user option, and type in the domain\K2 Service Account as the User Name and password, and click OK |
|
If you see the following error messages, the SPNs for the K2 Service Account were not set properly:
|
|
Be sure to see the section on Post instillation common tasks once done with the install. |
