Review the pre-installation checklist
Ensure that you have reviewed, understand, and completed all of the sections in this part of the Quick Start Guide.
- Review system requirements
- Review domain requirements
- Check your firewall settings
- Obtain a valid license
- Download the latest release
Review system requirements
The latest system requirements are included in the Nintex RPA LE Release Notes. Be sure to review the system requirements for your application and version.
Note: System requirements are subject to change without notice. Be sure to apply all critical updates and service packs issued by Microsoft® for your operating system. To obtain these updates, visit Microsoft's online Windows® update service.
- Ensure that applications can be installed on the target machine.
- To avoid registry repair, do not install Nintex RPA LE on a computer running Microsoft Office 365 with FastTrack or Click-to-Run.
- If not installed already, Nintex RPA Central installs Microsoft .NET Framework 4.7.2, Microsoft SQL Server 2017 Express, and Windows PowerShell 3.0. These prerequisites are required for Nintex RPA Central.
-
Review domain requirements. Your computer must be part of a domain (not a workgroup) and be connected to that domain.
Caution: The installation will fail if installing on a computer that is not connected to a domain.
-
Nintex RPA Central requires access to a Nintex URL to verify the license key Required to complete your Nintex RPA LE installation. or it will not be allowed to run. The access for communication is only for license validation and is encrypted and secured over TLS 1.2, using SSL certificates. The product key information is only communicated once at registration and a unique API key is generated per product key and used for further communications, which are event-driven. Every 24 hours, Nintex RPA Central confirms that the license is valid and securely sends Nintex RPA Central and Nintex Bot version, inventory, and usage information to the Nintex URL.
- Ensure that you are connected to the internet. This will be required to activate the license key Required to complete your Nintex RPA LE installation..
- If a firewall is in place, confirm with your IT team that outbound HTTPS access to the endpoints wus-api-rpa.nintex.io and rpadownload.nintex.io is currently allowed from the Nintex RPA Central server and safe listed as described in IP safe listing. Configure it to allow HTTPS traffic on port 443.
-
Ensure that there is a connection to and from where Nintex RPA Central is hosted to an active web gateway/proxy server, such as ZScaler, Cisco, or Symantic.
-
Ensure PowerShell scripts are not blocked by your network.
-
Ensure Google Chrome is not blocking any requests due to an SSL certificate using an outdated encryption algorithm. For example, browse the error code
NET::ERR_CERT_WEAK_SIGNATURE_ALGORITHM. - If your IT team has policies on browser privacy configuration, contact them for guidance on options, such as using Microsoft Edge in private view.
- Set your Desktop Zoom (sometimes called Display Size) and browser zoom at 100%. If not set to 100%, Nintex Bot will have trouble interacting with your applications. You may be prompted to restart or log off from your computer after changing this setting.
-
Ensure that you are using a standard dedicated Windows session for each Nintex Bot user. Nintex RPA LE does not support shared/non-persistent user sessions in virtualization technologies. Non-persistent VDI environments do not meet the minimum Nintex RPA Central requirements to recognize a user session. You can use a Remote Desktop session to remote into a persistent Windows session on a virtual server as long as non-shared/persistent user sessions are set up on the server.
See the Allowlist IP addresses page for references to the IP addresses that you may need to allowlist in your firewalls and networking devices to enable communications with Nintex RPA Central.
Nintex Bot and target applications, such as Microsoft Edge, Google Chrome, and Microsoft Excel, must be installed and run on the same machine. When Nintex Bot interacts with target applications, it uses Microsoft Windows components provided by the target applications to properly locate and interact with those target applications. When both Nintex Bot and the target applications are installed on the same machine, Nintex Bot can interact with target applications as they are running, allowing for optimal functionality.
You can install Nintex Bot in the following Citrix Systems environments:
- Desktop Mode: Nintex recommends that when installing Nintex Bot on Citrix Systems, it is used in Desktop Mode. This allows Nintex Bot to interact with target applications as expected.
- Published Applications: When installing Nintex Bot through published applications, target applications may be unobtainable by the Nintex Bot, resulting in unexpected behavior. This could include the Nintex Bot failing to recognize the target applications because they technically do not exist on the same machine. When using published applications, it is not uncommon for both the Nintex Bot and the target applications to be running on different Citrix System servers, but be presented as two applications running together on the same machine.
Important: Nintex RPA LE does not support shared/non-persistent user sessions in Citrix Systems. You must use a standard dedicated Windows session for each Nintex Bot user.
Nintex recommends that you allow traffic to the Nintex RPA LE API in Microsoft Azure. However, if you are using Nintex RPA Central 2.1.0 or above, you can configure a proxy server to use instead of attempting to directly call the Nintex RPA LE API in Microsoft Azure. If your on-premises systems are blocked from calling the internet and forcing calls through a proxy server for security reasons, follow the instructions below to correctly configure your proxy server and allow traffic to the Nintex RPA Central API in Microsoft Azure (https://wus-api-rpa.nintex.io/).
-
Navigate to the RPA Central folder, usually located at C:\Program Files (x86)\Nintex\RPACentral\RPACentral.
-
Open the sharedServiceSettings.xml file with a text editor using administrator rights.
-
In the ProxyServerSettings node, populate the Address node.
<ProxyServerSettings>
<Address>ip.of.proxy.server:port</Address>
</ProxyServerSettings>
-
Save your changes. You must have administrator rights to save your changes to this file.
-
Restart the RPA Central Service from Services.
Review domain requirements
Nintex RPA Central must be installed as follows for authentication and security purposes. If installing on a computer that is not connected to a domain, the installation will fail.
- All machines with a Nintex Bot and Nintex RPA Central component must be joined, part of, and connected to an Active Directory Domain Services domain and not as a workgroup.
- Machines with a Nintex Bot and Nintex RPA Central 2.6.0 or below component must be deployed in the same domain. Machines with a Nintex Bot and Nintex RPA Central 2.7.0 or above component can be deployed in multiple properly-trusted domains. Installing Nintex RPA LE in multiple properly trusted domains is particularly beneficial if you are installing Nintex RPA Central on a parent domain and have users in child domains. This type of domain architecture is common at companies that have multiple locations or branches that manage users at the location or branch level. To add users from trusted domains or add and validate users from unknown domains so that they are known, go to Add a user.
- If remote or off-site, the computer needs to be connected to a domain via a VPN and the DNS and AD servers must be accessible in order for Nintex Bot and Nintex RPA Central to be installed and the license be activated. To add additional VPN IP addresses to the configuration and ensure that the connection is successful, go to Verify Machine Name and Configure Nintex Bot VPN and Nintex RPA Central Firewall IP Addresses.
-
The user account on the machine where the Nintex Bot resides must have at least standard user permissions to the Nintex RPA Central machine.
Important: In a trial deployment, the machine needs to be on a domain during installation and have access to a domain during activation. During deployment where Nintex Bot and Nintex RPA Central are installed on the same machine, a self-signed certificate will be automatically generated and installed onto the machine. Once activated, the machine does not need access to the domain for Nintex Bot and Nintex RPA Central to function. In this setup where Nintex RPA Central will only run on localhost and will not be accessible by other computers, communication to the domain server is not required (such as VPN), as the certificate will not be required to be verified by a Certificate Authority. The use of self-signed certificates outside of development and testing environments is forbidden in most organizations by policy.
If your Active Directory supports domain distributed machine certificates, the Nintex RPA Central machine must be connected to the domain (directly or via VPN) to request a certificate from the Certificate Authority. Once the certificates exist, there is no need to have communication to the domain, either in localhost or machine certification.
Nintex RPA Central uses Windows Authentication and Active Directory to verify the identity of users. This creates a trusted and seamless sign-in experience without prompting users with a sign-in screen while
- Starting the Nintex RPA Central browser-based application from a domain joined computer.
-
Starting the Nintex Bot desktop-based application on a domain-joined computer linked to a trusted Nintex RPA Central instance.
Nintex RPA Central uses Windows Authentication, Active Directory, and Windows Domain DNS services to verify the identity of Nintex Bot installed on domain-joined computers, preventing third-party applications on the network from acting as a known bot and compromising data from Nintex RPA Central.
Nintex RPA Central 2.7.0 and above can be deployed in multiple properly-trusted domains. Active Directory domain-to-domain communications occur through an established trust relationship. Trust only happens in a securely authenticated communication channel. When you establish trust between domains, you are able to grant users who reside in a domain other than the one where Nintex RPA Central is installed access to Nintex RPA LE. Domain trust relationships work through established trust and permissions/passwords. Your domain administrator can create one-way or two-way trust relationships between two domains. It is also the responsibility of your domain administrator to manage these relationships.
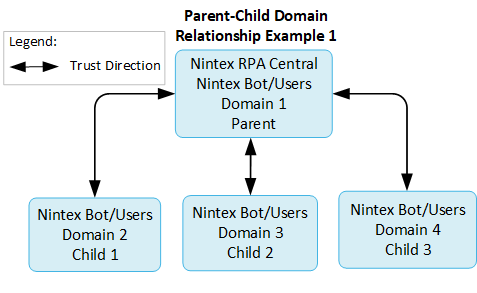
Parent-child relationships
The most common multiple domain relationship is between a primary parent domain and one or more child domains. Nintex recommends that you install Nintex RPA Central on the parent domain and then add users on child domains because, by default, parent-child relationships always have two-way trust and the parent domain is always trusted by the child domains.
Example 1 - Two-Way Relationship: In this relationship example, Nintex RPA Central is installed on the parent domain. Nintex Bot and users can exist on the parent and child domains. There is two-way trust between the parent domain and each child domain, which means that Nintex RPA Central can use Nintex Bot and users on the parent domain and all child domains. The parent domain trusts all child domains and all child domains trust the parent domain. There is no trust between siblings.
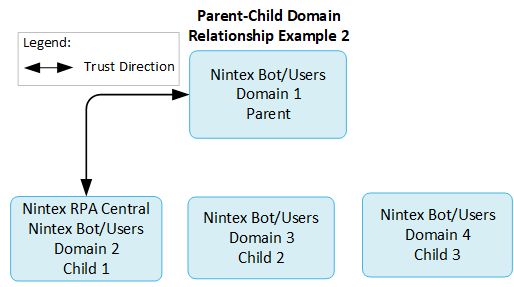
Example 2 - Two-Way Relationship: In this relationship example, Nintex RPA Central is installed on a child domain. Nintex Bot and users can exist on the parent and child domains. There is only two-way trust between the parent domain and the child domain where Nintex RPA Central is installed, which means that Nintex RPA Central can use Nintex Bot and users on the parent domain and the first child domain. The parent domain only trusts the first child domain and the first child domain only trusts the parent domain. There is no trust between siblings.
Two-way sibling relationships
Your domain administrator can establish two-way sibling relationships. Although not depicted below, siblings can be child domains of a parent domain.
Example - Two-Way Relationship: In this relationship example, Nintex RPA Central is installed on a sibling domain. There is a two-way trust between the first sibling domain where Nintex RPA Central is installed and the second sibling domain, which means that Nintex RPA Central can use Nintex Bot and users on the first and second sibling domains. If Nintex RPA Central is installed on the second sibling domain, then Nintex RPA Central can still use Nintex Bot and users on the first and second sibling domains.
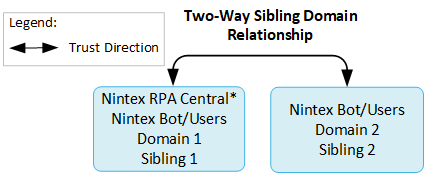
*Nintex RPA Central can be installed on the first or second sibling domain in this example.
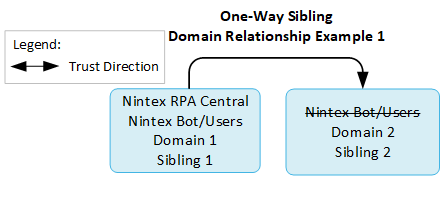
One-way sibling relationships
Your domain administrator can also establish one-way sibling relationships.
Example 1 - One-Way Relationship: In this relationship example, Nintex RPA Central is installed on a sibling domain. There is a one-way trust between the first sibling domain where Nintex RPA Central is installed and the second sibling domain, which means that Nintex RPA Central can use Nintex Bot and users only on the first sibling domain. The first sibling domain trusts the second sibling domain, but the second sibling domain does not trust the first sibling domain, which is why the first sibling domain cannot use Nintex Bot and users on the second sibling domain.
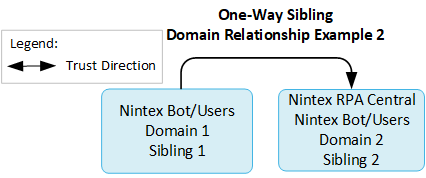
Example 2 - One-Way Relationship: In this relationship, Nintex RPA Central is installed on a sibling domain. There is a one-way trust between the first sibling domain and the second sibling domain where Nintex RPA Central is installed, which means that Nintex RPA Central can use Nintex Bot and users on the first and second sibling domains. The first sibling domain only trusts the second sibling domain, but the second sibling domain does not trust the first sibling domain; however, since Nintex RPA Central is installed on the second sibling domain, that domain can use Nintex Bot and users on the first sibling domain.
Other Relationships
There are many possible, but less common, trust relationships that your domain administrator can establish. If you have questions about how these other relationships work with Nintex RPA Central, contact Support.
Nintex RPA Central and Nintex Bot work with Microsoft Azure Active Directory Domain Services (AD DS) on a 2019 server. Currently, Nintex Bot does not work with Microsoft Azure AD. Nintex RPA LE supports configurations where Microsoft Azure AD DS is installed in your Microsoft Azure AD environment and your servers and computers are joined to the Microsoft Azure AD DS. Microsoft Azure AD DS runs a Microsoft Windows domain in Microsoft Azure, with support for:
- Domain Name System (DNS)
- Active Directory
- Kerberos
- New Technology LAN Manager (NTLM)
Traditional applications that use Windows Authentication as a security model do not require changes to those applications' authentication layer and work as expected.
In some instances, Nintex RPA Central may not correctly connect to a domain. You can check the Microsoft domain controller to verify connection.
To check the Microsoft domain controller:
- Open the Microsoft Windows Command Prompt window in the Windows System folder from the Windows menu .
- Type set L and press Enter.
- Note the LOGONSERVER field information, such as LOGONSERVER=\\YOURDOMAINDC##.
- Type Ping YOURDOMAINDC## and press Enter, omitting the leading \\ characters. YOURDOMAINDC## is the value returned for LOGONSERVER in step 3.
The ping test returns statistics and round trip values. Otherwise, the ping test returns that it could not find the host.
You must register the SPN if you want:
-
To make Nintex RPA Central accessible from other machines.
-
The site URL to differ from the domain. For example, rpa.company.com instead of hostname.company.local.
-
To allow interaction with Nintex RPA Central from the machine on which it is installed.
In addition to installing the certificate for the site URL, perform the following actions by executing these commands in a command prompt window on the Nintex RPA Central machine:
Note: You must be a domain administrator or a user with the "Validated write to service principle name” permission to use these commands.
-
Get the hostname of the machine: Type hostname and press Enter.
-
Get the domain and username: Type whoami and press Enter.
-
Register the custom domain name service principal with the host: Type setspn -S HTTP/{siteUrl} {domain}\{hostname} and press Enter.
-
List all SPNs: Type setspn -L {domain}\{hostname} and press Enter.
-
Delete an SPN: Type setspn -D HTTP/{siteUrl} {domain}\{hostname} and press Enter.
-
Purge all cached tokens after updating the SPN list: Type klist purge and press Enter.
Note: If you have the {siteUrl} registered with a different hostname or with a username, delete and purge it first before adding the correct SPN. Also, you may want to run the list command before and after setting the SPN.
Check your firewall settings
Ensure that your firewall settings are prepared for use with Microsoft Windows 10. The inbound and outbound rules are required for the Nintex RPA Central server and remote Nintex RPA LE bots to communicate.
- Navigate to System and Security > Windows Defender Firewall > Advanced settings.
- Click Inbound Rules on the left pane.
- Click New Rule on the right pane.
- Click Port and then click Next.
- Select TCP and, based on the format of your Nintex RPA Central URL, type the following number in the Specific local ports field.
- If your Nintex RPA Central URL ends in a number, such as 8080, type that number.
- If your Nintex RPA Central URL does not end in a number, type 443.
- Click Next.
- Select Allow the connection and click Next.
- Select Domain.
- Ensure Private and Public are not selected.
- Click Next.
- Type a rule Name, and optionally, type a rule description.
- Click Finish.
- Click Outbound Rules on the left pane.
- Complete steps 4-13 again.
Note: The port number can be different depending on your machine and network environment. Consult with your Network Administrator.
Obtain a valid license
To complete the installation, have your license key ready. The license key is emailed to you after you purchase Nintex RPA Central and is in the following format: XXXXX- XXXXX- XXXXX- XXXXX- XXXXX
Please contact Nintex Support with any questions.
- Email: support@nintex.com
- Phone: 1-800-658-1147
- https://customer.nintex.com/
Download the latest release
Ensure you download the files that are correct for your licensing needs available on the Product Releases page.
Note: Nintex customer registration is required to use the Product Releases download page.
Ensure you review the Release Notes for your release for important release information.
Next step: