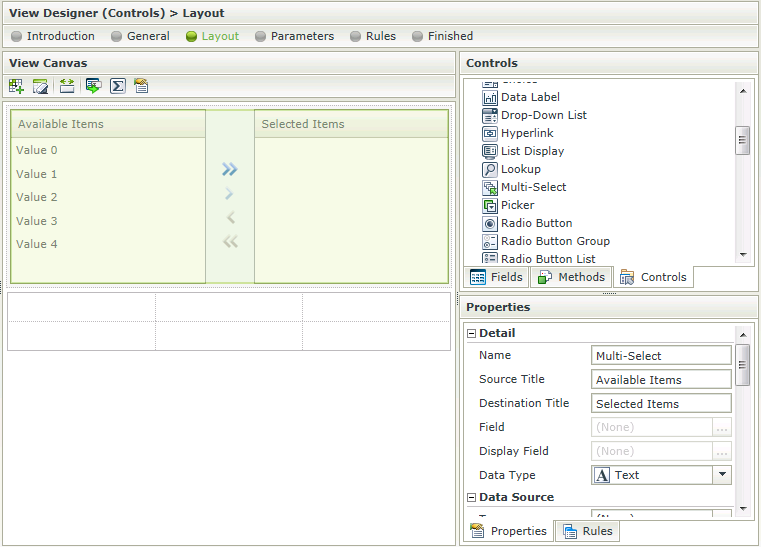
Multi-Select Control
The Multi-Select control is an input control and allows comfortable input of
multiple selections of items from a defined number of items. Single items can be added to the Selected
Items list by clicking on a single item and clicking on the arrow icons  . When adding multiple items, hold down the control (ctrl) button on your keyboard, click on the items required and click on the plus icon. The items are transferred to the Selected Items list and will be used when executing for example a Save method.
- Create a View
- Drag the Multi-Select control onto the canvas. The control can be found in the Input section of the Controls found in the View Designer, see the Properties section below
- Configure the Type located in the Data Source section of the Properties
- Configure the rest of the properties as required
- Run the View
If a field exists with relevant data that can be used in a list, the field can be dragged into the Multi-Select control to bypass step 3 above
- Values can be transferred to the Multi-Select control by using the Transfer Data action mappings screen
- The value should correspond to the list item value
- A Multi-Select control can be associated to a SmartObject or have static list values
- The data is a delimited list of values that the control saves and loads. It is important to always have a delimiter specified
The Multi-Select control interacts with other controls through rules. Depending on the control properties, there are certain actions where the control surfaces. Following are a few examples:
- Populate a list control with data - The control can be populated if it has a SmartObject-based data source
- Execute a method on a control for values that are in a specific state - If the control is compatible with multi-value fields it will surface in this action
- Set a control’s properties- The control's settable properties can be configured using this action
- Show/Hide - The Visible property allows for the control to be shown or hidden through rules
- Enable/Disable - The Enabled property allows for the control to be enabled or disabled through rules
- Data Transfer - Data can be transferred from items listed in the Context Browser to the Multi-Select control
The Multi-Select control is available in the Input section of the Controls found in the View Designer.

| Property | Description | Can be set in runtime using Rules |
|---|---|---|
| Detail | ||
| Name | A unique identifier for the selected control. This property is required | Yes, see Control Properties Actions for more information |
| Source Title | The Title of the available items list | Yes, see Control Properties Actions for more information |
| Destination Title | The Title of the selected items list | Yes, see Control Properties Actions for more information |
| Field | The field that is bound to the selected control | No |
| Display Field | Allows you to show the control’s display value before its data has been loaded | No |
| Data Type | A drop-down list containing the types of values that the control can accept | No |
| Data Source | ||
| Type | Set up data-bindings for the selected control | No |
| Items | A read-only list of fixed list items | No |
| SmartObject | The selected SmartObject that has been bound to the control. See Configure Data Source section | No |
| Method | The method to be used to populate the control. See Configure Data Source section | No |
| Value | The SmartObject property to be used as a value member. See Configure Data Source section | No |
| Lookup SmartObject | An alternate SmartObject to be used as the source of the display values (*optional). See Configure Data Source section | No |
| Lookup Method | The method to be executed on the lookup SmartObject when retrieving the display values. See Configure Data Source section | No |
| Source Join Property | The SmartObject property on the original SmartObject that will be used to join the original SmartObject with the Lookup SmartObject. See Configure Data Source section | No |
| Lookup Join Property | The SmartObject property on the lookup SmartObject that will be used to join the original SmartObject with the Lookup SmartObject. See Configure Data Source section | No |
| Display | The display name of the selected SmartObject that has been bound to the control. See Configure Data Source section | No |
| Display | ||
| Delimiter | The type of delimiter to be used when saving the values. The default is ";" | Yes, see Control Properties Actions for more information |
| General | ||
| Height |
Adjusts the height of the control. The default value is set to 175px. If the height is blank and the data source is a static list, the control adjusts to the size of the static list, with a minimum value as per the default height value. If the height is blank and the data source is a SmartObject, the control reverts to the default height. If the height is specified, no matter what the data source type, the control applies that height. |
Yes, see Control Properties Actions for more information |
| Width | Adjusts the width of the control. Any whole percentage up to 100%, whole number or pixel value to a maximum of 32767px can be entered. Type the dimension to be used | Yes, see Control Properties Actions for more information |
| Tab Index | Used to define a sequence that users follow when they use the Tab key to navigate through a page at runtime | Yes, see Control Properties Actions for more information |
| Visible | Shows or hides the control in runtime | Yes, see Control Properties Actions for more information |
| Enabled | Enables or disables the control in runtime | Yes, see Control Properties Actions for more information |
| Read-Only | Used to establish whether the control is read-only during runtime | Yes, see Control Properties Actions for more information |
| Styles | Opens the Style Builder enabling the user to specify style features like Format, Font, Borders, Padding and Margins. See the Style Builder topic for more information on styling options | No |
| Conditional Styles | Opens the Conditional Formatting Designer. This is used to design styles that will apply only when certain conditions are met. See the Conditional Styles section for more information. Click on the ellipsis to open the Conditional formatting screen | No |
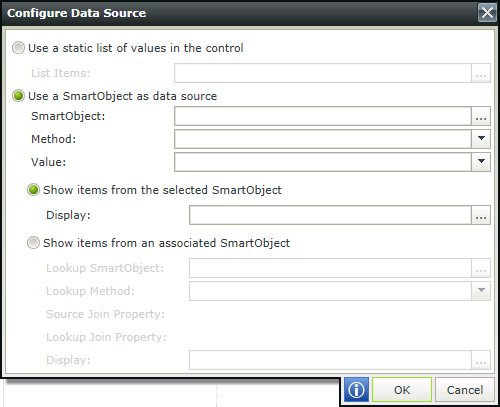
When clicking on the ellipsis next to Type in the Data Source section, the Configure Data Source screen opens. Configure the data source to be used for the control

| Field | Description |
|---|---|
| Use a static list of values in the control | A static list of items can be configured. Click the ellipsis next to List Items to configure the list |
| List Items | List Item selected. Click the ellipsis next to List Items to configure the list |
| Use a SmartObject as data source | A SmartObject can be used as data source. Select this option if a SmartObject should be used as data source |
| SmartObject | The selected SmartObject that has been bound to the control. Click the ellipsis next to SmartObject to select the SmartObject |
| Method | The method to be used to populate the control. Select the method from the drop-down list |
| Value | The SmartObject property to be used as a value member. Select the property from the drop-down list |
| Show items from the selected SmartObject | Shows items from the selected SmartObject. |
| Display | The SmartObject property to be used as a display member. Select the item |
| Show items from an associated SmartObject | Shows items from an associated SmartObject |
| Lookup SmartObject | An alternate SmartObject to be used as the source of the display values (*optional). Click on the ellipsis to select the SmartObject |
| Lookup Method | The method to be executed on the lookup SmartObject when retrieving the display values. Select the method from the drop-down |
| Source Join Property | The SmartObject property on the original SmartObject that will be used to join the original SmartObject with the Lookup SmartObject |
| Lookup Join Property | The SmartObject property on the lookup SmartObject that will be used to join the original SmartObject with the Lookup SmartObject |
| Display | The SmartObject property to be used as a display member. Select the item by clicking on the ellipsis |
