Formula builder
Use the Formula builder to create formulas with calculated and connected values for variables A placeholder that stores changes each time the workflow runs, such as the information entered in a form, or the name of a file. You can also create variables to store information you use in a workflow, such as an email address..
A formula consists of different parts, and in this topic, the functions, inline formulas, and variables are distinguished in the following formats:
|
|
|
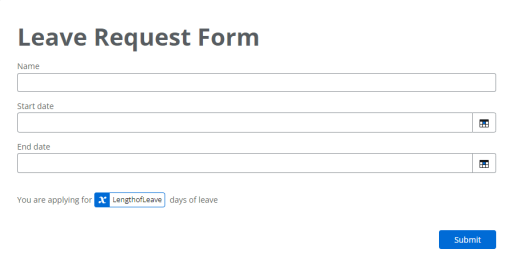
Let's look at a simple example of how to calculate a variable value using a formula. You have a leave request form, which has three fields: Name, Start date, and End date. To calculate the total days of leave, you must calculate the number of days between the start date and end date entered in the form. You can create a variable named LengthofLeave and apply the following formula using the dateDiff function:
- dateDiff(Datetime.TotalDays,Form.Start date,Form.End date)
On your form, you can insert your LengthofLeave variable in a Label control so that the following message displays:
- You are applying for 10 days of leave.
For step-by-step instructions
The Formula builder can be used:
-
When configuring form controls in the Form designer, you can insert inline formulas directly on a field that has the Insert option available.
-
When creating If-Then-Else statements for form rules, you can create and insert variables with applied formulas.
-
When creating form variables in the Form variables tab.
Note: All variables that you create in Start event forms are available as an object under start event variables in the workflow; while variables created in Form based tasks are available as task variables. See Manage variables in a workflow.
Access the Formula builder
Access the Formula builder from the Form designer, Rules, and Form variables tabs.
Open the Formula builder from the Designer tab
While designing forms, you can insert inline formulas directly on a field that has the Insert option available.
Note: Click the Insert option to insert form controls and variables with applied formulas. See Insert variable dialog fields, buttons, and settings for field descriptions.
- In the Form designer, click the Designer tab.
- Click the form control where you want to insert a variable with an applied formula.
- Hover over a field that has + displayed, until +Insert is displayed.
- Click Insert.
The Insert variable dialog that includes the Formula builder is displayed.
- In the Formula field, type the formula.
- As you type the formula, suggestions of possible functions and variables are displayed to select from, if required.
- From the Lookup pane on the right, you can search for Functions and variables to insert in the formula.
- You can use logical operators such as && (And), || (Or), == (Equal), and != (Not Equal).
- On the Functions tab, click the name of a function to display its description, format, and an example.
- After you create the formula, click Insert. Your new variable is shown as an inline formula and the calculated value becomes the default value.
For example, avg(84,96,150) will insert 110 as the default value.
Open the Formula builder from the Rules tab
When creating If-Then-Else statements, you can create and insert variables with applied formulas.
- In the Form designer, click the Rules tab.
- Depending on your workflow, click Add form rule or Add submit rule.
- Type a Name for your rule.
- Enter parameters for the following statements:
- If
- Then
- Else
- Click the Insert option that appears on each field when you hover over a field. The Insert variable dialog appears where you can view the Formula builder and a list of form controls and variables with applied formulas. See Insert variable dialog fields, buttons, and settings for detailed descriptions of the Insert variable window.
- To type a formula complete one of the following tasks:
- Select the Formula tab on the left and type your formula in the Formula field and then click Insert. Your new variable is shown as an inline formula.
- Select the Form variable tab on the left and then complete the following steps:
- Click Add form variable to open the Formula builder.
- Type a Name for your variable.
- Select a Type.
- In the Value field, type your formulas.
- Click Create & insert.
Your new variable with the applied formula is now included in the If-Then statement.
For example, you can create a rule to check that the entered age matches the age calculated based on birthday. If true, the form can be submitted. Else, a warning message appears.
Note:- As you type the formula, suggestions of possible functions and variables are displayed to select from, if required.
- From the Lookup pane on the right, you can search for Functions and variables to insert in the formula.
- You can use logical operators such as && (And), || (Or), == (Equal), and != (Not Equal).
- On the Functions tab, click the name of a function to display its description, format, and an example.
Open the Formula builder from the Form variables tab
-
In the Form designer, click the Form variables tab.
-
Click Add form variable.
For more information, see Form variables
This video demonstrates an example of how to use the Formula builder to calculate a percentage.
This sample scenario will create a variable with a formula that calculates the number of days between two date variables (DateTime). We will create the variable in the Designer tab.
- In the Form designer, click Designer tab.
- Design the form:
- Drag controls onto the Form designer canvas in the following order:
- Label 1
- Text - short 1
- Date/ time 1
- Date/ time 2
- Label 2
- Click Label 1, and then type Leave Request form in the Text field.
- Click Text - short 1, and then type Name in the Title field.
- Click Date/time 1, and then type Start date in the Title field.
- Click Date/time 2, and then type End date in the Title field.
- Click Label 2, type You are applying for days of leave in the Text field, and then place cursor before the word "days."
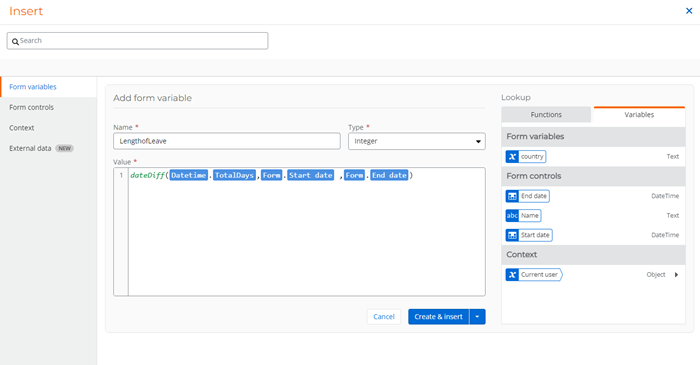
- To create the variable with a formula:
- Click the Insert option that appears on the Text field.
- Click Add form Variable.
- In the Name field, type "LengthofLeave."
- From Type, select Integer".
- From the Functions tab in the Lookup pane, hover your mouse over dateDiff, and then click Insert.
- In the Value field, enter the parameters for the dateDiff function:
- For Text date unit type, type "Total." A drop-down option appears where you can select the unit of time for your variable. Select TotalDays.
- For DateTime start, click the Form variables tab, hover your mouse over Start date, and then click Insert.
- For DateTime end, hover your mouse over End date, and then click Insert.
- After you make changes, click Create & insert. The Formula builder closes and your new variable with applied formula is now created.
Tip: Click datediff to view its description, format, and an example of how to use it.
dateDiff(Text date unit type, DateTime start, DateTime end)
Your formula should look like the image below:
Your form should look like the image below:
|
User interface |
Description |
|---|---|
| Search |
A text box to find variables that you want to locate or insert into a field. Type a variable name or the word that the variable name starts with to see a list of searched variables. To locate where a variable is, click the variable from the displayed list of searched variables. The path to the variable is also displayed in the list of search results. To insert a variable, hover over a variable from the displayed list of searched variables, and click the Insert button that appears. Important: Only valid variable types for the field are displayed. |
| Formula |
Formula builder to create formulas and variables. |
| Form variables |
List of variables with applied formulas, which you can use throughout your form and workflow. This tab appears depending from where you click Insert. For example, this tab appears when you click Insert from the Label control in the Form designer. Click Create variable to open the Formula builder where you can create variables with applied formulas. |
|
Form controls |
List of variables that hold values entered in form controls. Each form control that you add in the Form designer is listed here. |
| Context |
Variables that represent data related to the current user object variable. This object variable stores the following text variables:
You can use these variables to personalize the text that appears on the published form. For example, the label can display a greeting with the signed-in user's first name and last name, such as "Welcome John Doe." Important:
|
|
External data |
External data variables that display data from third-party services or Connectors. External data is displayed in the:
For more information on external data variables, see External data . |
| Name | Name of the variable with applied formulas. |
|
Type |
Type of variable:
|
|
Value |
The values and/ or formulas stored in the variable. |
|
|
If in the Designer tab, click to insert the variable into the Label control. If in the Rules tab, click to insert variable into a field of a statement. |
|
|
Click to edit an existing variable. |
|
|
Click to delete a variable. |
|
Section |
Field |
Description |
|---|---|---|
|
Add form variable |
Name |
Type a name for your new variable. Note:
Variables names must adhere to the following naming conventions to support localization:
|
|
|
Type |
Select a type for your new variable. |
|
|
Value |
A text box where you type your formulas. |
|
|
Create |
Saves your new variable. |
|
|
Update |
Saves your updates. |
|
|
Cancel |
Discards your changes and hides the Formula builder. |
|
Lookup |
Functions |
A list of functions that you can use to build formulas. Each function is a code that performs a specific operation. Click the name of a function to display its description, format, and an example on how to use it. For more information, see Functions. |
|
|
Variables |
Includes the following:
|
|
|
Insert |
Appears when you hover over a row in the Functions, Form, or Workflow tab. Click to insert a function or variable to the Value box. |