Repeating section

|
This form control is supported on Nintex Mobile in both online and offline modes. |
Use the Repeating section form control to allow form users to add multiple instances (repeating rows) of that section. The Repeating section control contains a set of other controls that can be repeated in the form as necessary. This control is useful when you want to collect multiple instances of the same type of data. For example, you can use a Repeating section on an order form with multiple order items in which each row is an order item.
When you insert a Repeating section control to a form, it is an empty container until you insert other controls inside of it. If required, you can insert a Repeating section inside another Repeating section.
If you add a Repeating section control to a form, you can also reuse it as a start event variable by dragging and dropping it onto a task form. You can adjust the layout and format of the reused Repeating section so that it looks the same as it did on the original form and you can add non-input controls, such as Group, Image, and Space controls (the input controls, however, are read-only). You can also reuse a nested Repeating section. This feature allows you to use collection variables created in forms in other task forms in the workflow. The data that is collected in the Repeating section control can be easily reused and displayed in a task form for an assignee. For example, an equipment order start form with a Repeating section used to capture item numbers, descriptions, and quantities can be reproduced on a task form so that the order can be approved or further processed.
The Repeating section control includes functionality to compute row-based calculations. The controls in a Repeating section are available as an Object variable that contain the following variables:
- Collections of all of the controls that are within the Repeating section.
- An Object type variable that includes properties for each control within the Repeating section that can be inserted into row-based calculations inside a Repeating section row.
-
Designers can use the Current Row number variable to add row numbering in Repeating sections and nested Repeating sections. The Current Row number variable is useful for row-based calculations and can be utilised in Rules as well. To select the variable, go to the Repeating sections object variable > Current row > Row number
-
Use the Loop for each action to repeatedly run a set of child actions in a Repeating section.
-
You can add controls that allow nesting, such as a Group or Repeating Section control, inside a Repeating section control. However, only two levels of nesting is allowed. For example, you can add one Group or another Repeating section control inside a Repeating section, but you cannot add another Group or Repeating Section within that inner control.
Let's look at the basics of building an order form with multiple order items. To do this, you can add a Repeating section control to your form. Each row in the Repeating section control can be used to enter an order quantity and item price. You can then calculate the total of the current row.
- Create a form with a Repeating section control and name the Title "Order items."
- Configure the Repeating section control with a minimum and maximum number of rows that you want displayed. For more information about the configuration, see Fields and settings.
- Add a Number control inside the Repeating section. You can use this control to enter the price of an order item, so name the Title "Price."
- Add another Number control inside the Repeating section and name it "Quantity" to use it to enter the quantity of each order item.
- Add a Label control to the form and name it "Line item total" to display the order value for each row in the Repeating section.
- Configure the Label control and calculate the total of each row using the current row functionality:
- Click the Insert tab and then click Add form variable to create a variable. The Formula builder opens.
- Type a Name for the variable and select the Type.
- In the Value field, define the formula for the variable. To select the variables of the current row, click the Variables tab. The Variables tab displays a list of variables created in the Formula builder or variables that hold values in form controls.
- Click the Order items Object created for the Repeating section that you added to the form. The object variable displays collection variables for all of the controls in the Repeating section, as well as a Current row Object variable.
- Click the Current row object variable and use the Price and Quantity variables to build your formula. Use Price multiplied by the Quantity to calculate the order value for each row in this example.
- Click Create to save the variable.
- Insert the variable you created in the Label control that you added to the form. The form will calculate and display the total of the each row in the form.
To automatically populate a Repeating section control, you can provide default values using different types of input:
For information about the configurations fields, see Default value type and Default value.
-
Using XML Input
-
Set Default value type to Text.
-
Paste your XML input directly into the Default value field.
-
-
Using a Text Collection
-
This option allows you to pass in a collection in text format. For example, if you have a SharePoint list containing a column with a collection of objects that should populate the Repeating section control:
-
Set Default value type to Text.
-
Select the external data variable that contains the collection in the Default value field.
-
-
-
Using a Table Data Collection
-
You can choose to show data from a row in the Repeating Section.
-
Set Default value type to Collection.
-
Insert the Rows Table data variable in the Default value field.
-
Map the keys of the object with names of form controls.
-
-
Using an External Data Variable
-
If the repeating section should be populated with data from an External data variable.
-
Set Default value type to Collection.
-
Use the external data variable's records field to populate the repeating section and map the control names.
-
-
Using Repeating section value from a start form
-
Log the value of the start form's Repeating section in a label control in the task form.
-
Ensure that each object’s keys exactly match the control names inside the Repeating section.
-
This allows dynamic population of the Task form's repeating section based on input values from the start form.
-
-
For a Repeating section control that uses a collection variable, all control values in the data source must be at the root-level of the object, not nested. Only root-level values are used to map to form controls. Keep all mapped values at the root-level to simplify mapping and ensure the Repeating section displays correctly.
If values from a nested object are required:
-
Create a Text type form variable that takes the nested object as input.
-
Convert the nested object to a string using the convertToString function.
-
Use this variable in the Repeating section control by setting the Default value type to Text.
-
When the value of the connected control or variable changes, the Repeating section refreshes automatically to display the updated data. This ensures that the data shown in the section always reflects the latest selection in the form. The XML input option is available only if the section uses a table or an external data variable as its default value. For more information about using default value, see Using the Default value field in a Repeating section control.
You can configure form controls in a Repeating section form control of a task form to auto-populate with XML data submitted through a SharePoint Online list form. Task assignees can make updates to the data before responding to the task. The task form Repeating section form controls will be pre-filled using XML input data when the task form loads, where each item in the XML input represents a row in the repeating section. The values are automatically mapped to the corresponding form controls based on the control names given. To add the XML input data, use the Default value field in the configuration of the Repeating section form control. You can either paste raw XML input directly or generate it via an external data variable, pulling the necessary data from the SharePoint Online list for input.
This includes GUID support for control names, making it easier to map data from SharePoint Online list forms into repeating sections in Nintex Workflow Forms. If the XML includes GUID-based keys, they will be automatically mapped to the corresponding form controls based on the GUIDs defined in the form.
Important: The task form's repeating section outputs data in JSON format, which cannot be directly updated back into SharePoint.
-
Use a SharePoint Online start event in the workflow.
The SharePoint Online list used in the start event has a lift form that collects the start data required.
-
In the workflow, add the Assign a task to multiple users action and create a task form.
-
Create the task form with a Repeating section identical to the SharePoint Online list form.
Note:-
Ensure the form control names or GUIDs match those used in the original list form.
-
The following form controls are currently not supported for this feature:
-
Label
-
Space
-
Geolocation
-
File Upload
-
Bar code
-
Address
-
Data look up control
-
-
When using the Choice - Multiple form control within a Repeating section, and raw XML data is pasted into the Default value field, the delimiter must be manually changed from ;# to a comma (,).
You can use the default value field in the Repeating section control to populate the controls with the start form XML data.
-
-
Select Text as the Default value type.
-
In the Default value field of the Repeating section form control, click Insert. The Insert variable dialog box is displayed.
-
Select the Start event variable that contains the XML data generated by the SharePoint Online list form from the Start event variable category.
When you have one or more Repeating section controls in the form, the Apply to drop-down is displayed in the Rules with options to select the form or select a Repeating section to which you want to apply the rule. For example, if you select a Repeating section, the rule is applied to that Repeating section. In the example below, there are two Repeating sections in the form:
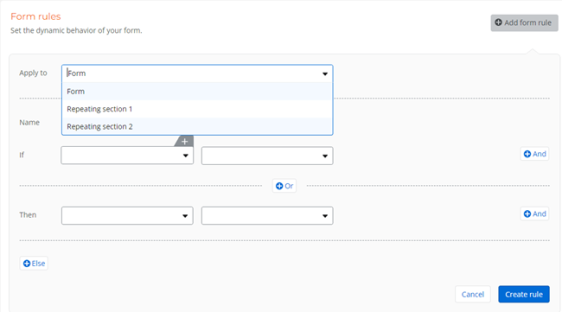
If a Repeating section is selected, you can select any control that is on the form and inside the Repeating section in the If field. However, the Then field will only display the controls inside the Repeating section that you selected in the Apply to field.
Fields and settings
| Section | Setting | Description | |||||||||||||||||||||||||||||||||||||||||||||||||||||||||||||||||||||||||||||||||
|---|---|---|---|---|---|---|---|---|---|---|---|---|---|---|---|---|---|---|---|---|---|---|---|---|---|---|---|---|---|---|---|---|---|---|---|---|---|---|---|---|---|---|---|---|---|---|---|---|---|---|---|---|---|---|---|---|---|---|---|---|---|---|---|---|---|---|---|---|---|---|---|---|---|---|---|---|---|---|---|---|---|---|---|
| (unlabeled) | Title |
Field title displayed on the published form. |
|||||||||||||||||||||||||||||||||||||||||||||||||||||||||||||||||||||||||||||||||
|
Customize |
Switch toggle to Yes to enable customization of the variable Name of the form control. |
||||||||||||||||||||||||||||||||||||||||||||||||||||||||||||||||||||||||||||||||||
|
Name |
(This field becomes configurable only when you switch the Customize toggle to Yes.) Customizes the name of the variable A placeholder that stores changes each time the workflow runs, such as the information entered in a form, or the name of a file. You can also create variables to store information you use in a workflow, such as an email address. for the field. If the name is not customized, the Title will be used as the variable name. |
||||||||||||||||||||||||||||||||||||||||||||||||||||||||||||||||||||||||||||||||||
| Default value type |
The type of default value input.
Important:
When inserting a variable into the default value field, make sure its structure aligns with the selected input mode:
|
||||||||||||||||||||||||||||||||||||||||||||||||||||||||||||||||||||||||||||||||||
| Default value |
Use this to populate a repeating section form control with structured data when the form loads. You can paste input data into the field or retrieve data dynamically using an External data variable, to pull the necessary data for input. For more information about how to use the default value field, see Using the Default value field in a Repeating section control. |
||||||||||||||||||||||||||||||||||||||||||||||||||||||||||||||||||||||||||||||||||
|
Visible |
Options to show or hide the field in the form.
|
||||||||||||||||||||||||||||||||||||||||||||||||||||||||||||||||||||||||||||||||||
| Show header |
Select Yes or No to specify if you want to display a header for the control on the published form.
|
||||||||||||||||||||||||||||||||||||||||||||||||||||||||||||||||||||||||||||||||||
|
Header text |
(Becomes configurable only when you enable Show header.) The header text to display for the control on the published form.
|
||||||||||||||||||||||||||||||||||||||||||||||||||||||||||||||||||||||||||||||||||
|
Formatting options |
(Becomes configurable only when you enable Show header.) Formatting options for the header.
|
||||||||||||||||||||||||||||||||||||||||||||||||||||||||||||||||||||||||||||||||||
| Default number of rows | The number of rows to be displayed on the published form by default. | ||||||||||||||||||||||||||||||||||||||||||||||||||||||||||||||||||||||||||||||||||
| Minimum number of rows | The minimum number of rows to be displayed on the published form. | ||||||||||||||||||||||||||||||||||||||||||||||||||||||||||||||||||||||||||||||||||
| Maximum number of rows |
The maximum number of rows that can be displayed on the published form. The Add new row button will be disabled on the published form when the maximum number of rows are added. |
||||||||||||||||||||||||||||||||||||||||||||||||||||||||||||||||||||||||||||||||||
| Add row button label | Text to display in the add row button. | ||||||||||||||||||||||||||||||||||||||||||||||||||||||||||||||||||||||||||||||||||
|
Alternate row color |
Switch toggle to Yes to apply a color to alternate rows. |
||||||||||||||||||||||||||||||||||||||||||||||||||||||||||||||||||||||||||||||||||
| Styling | CSS class |
Add a CSS class to apply a style to this form control. You can create the CSS class in the CSS code editor in form styles. Enter one class name or multiple class names separated by a space. For more information, see Add a custom CSS to individual controls. Note: The CSS Class field is available only if the Custom CSS setting is enabled in Nintex Workflow Form settings. |
|||||||||||||||||||||||||||||||||||||||||||||||||||||||||||||||||||||||||||||||||
| Border color |
Border color to apply to the field. To select a color, click the color box and use the color picker to specify the color you want. You can click on the color map to select the color or enter the Hex code. To revert back to the global style, click Reset to global style. |
||||||||||||||||||||||||||||||||||||||||||||||||||||||||||||||||||||||||||||||||||
| Background color |
The color to fill the background of the field. To select a color, click the color box and use the color picker to specify the color you want. You can click on the color map to select the color or enter the Hex code. To revert back to the global style, click Reset to global style. |


