Temporary Access Application: Part 4 (Building a composite SmartObject with K2 Studio)
In Part 1 and Part 2 you built a workflow in K2 Studio to manage temporary access requests. In this part, you will create a report against this data by combining the workflow reporting data with the request's record data. In effect, you are going to combine workflow reporting data with business data to build a report that is relevant to your users. In this case, you want to create a view of temporary access requests that anyone in the organization can review at any time, along with the workflow status and a link to the workflow. This is a security measure so that it is easy to see who is allowed to access the premises and so that it is easy to track down a workflow if it is stuck at a user task or to identify if the workflow failed.
To achieve this, you will build a composite SmartObject in K2 Studio, build a view against the SmartObject, then add the view to your Temporary Access Request Form.
From a technical perspective, what this tutorial illustrates is how to build an advanced composite SmartObject that combines data from different systems, so that you can create logical business entities that present relevant information to users, without them having to look in several different places for the information they need.
In this step you will be adding a new SmartObject to your existing K2 Learning project using K2 Studio. You will then configure the new SmartObject as a composite SmartObject that retrieves and combines data from two different systems.
Step 14 Tasks
- In K2 Studio, open the project from Part 1 and add a new SmartObject called
Temporary Access Request Composite SmartObject
to the Temporary Access Application project folder. - Create an advanced method for the SmartObject that combines data from the
Service Object Server(s) > Service Object Server > SmartBox Service > Temporary Access Request SmartObject > Get List method
to the
Service Object Server(s) > Service Object Server > Workflow Reporting Service > K2 Learning\Temporary Access Application > Temporary Access Application Workflow > K2 Learning\Temporary Access Application Workflow > List Process Instances method.
Auto-create properties for all the properties returned by the Temporary Access Request SmartObject > Get List method.
Manually create properties for the following properties returned by the List Process Instances method:Service Property SmartObject Property Start Date Workflow Start Date Finish Date Workflow Complete Date Status Workflow Status View Flow Workflow View Flow RecordID Workflow Record ID - Map the service object methods with the Get List Method.ID = List Process Instances.RecordID
- If necessary, open K2 Studio and open the project that you created in Part 1 of this tutorial. (Called K2 Learning.)
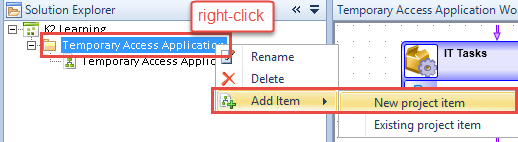
- Expand the Solution Explorer. Right-click on the Temporary Access Application folder and select Add item > New project item.
- On the templates window select K2 SmartObject. Give the SmartObject a name of
Temporary Access Request Composite SmartObject
and click Create.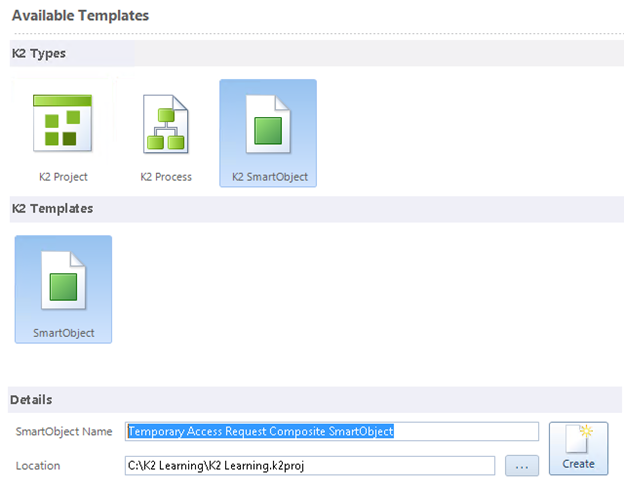
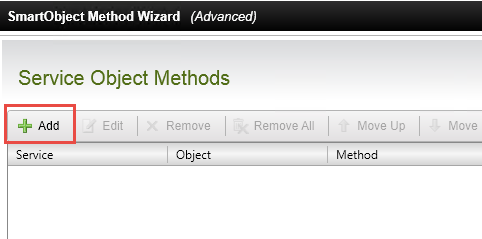
- Wait for the new SmartObject design screen to appear. You will be creating an advanced SmartObject, so in the ribbon bar click on Remove All to remove all the methods from the SmartObject. Click OK on the confirmation message that appears.
- Click Add from the Methods group to begin.

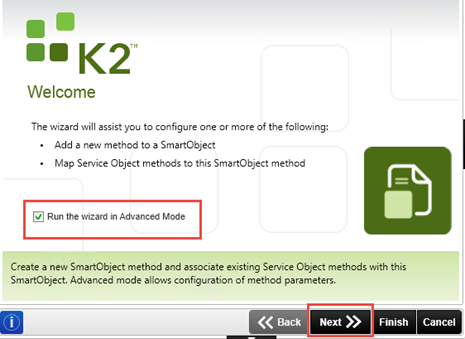
- On the wizard welcome screen, select the Advanced Mode check box and click Next. You must select the advanced mode option to combine results from two different systems as one method.
- Configure the Method Details screen as follows, then click Next.
Field Value Name Get List Description Get list of workflows and requests Type List
(you are returning a list of records with this method)Transaction Continue
(Continue means that if one of the systems that returns data returns an error, K2 will attempt to continue calling the other system regardless.)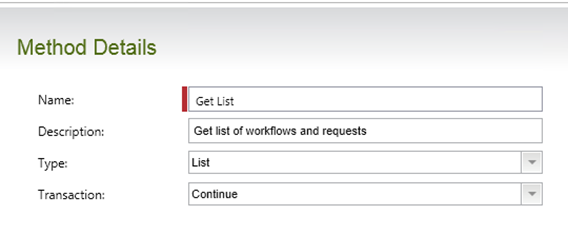
- You don’t need to add method parameters, so click Next to skip over the Configure Method Parameters screen.
- On the Service Object Methods screen, click the Add button to add a new method.
- Use the ellipsis button to browse for the following method and then drag it into the Service Object Method text box:
Service Object Server(s) > Service Object Server > SmartBox Service > Temporary Access Request SmartObject > Get List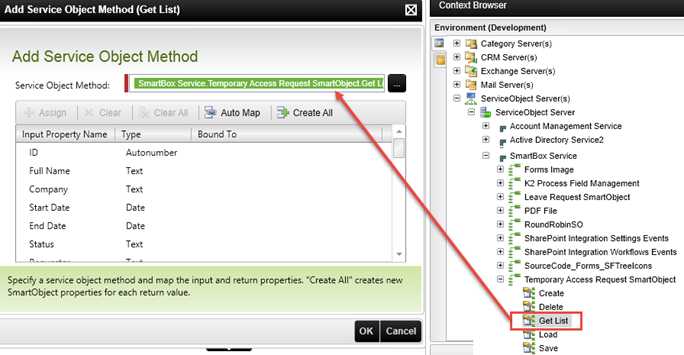
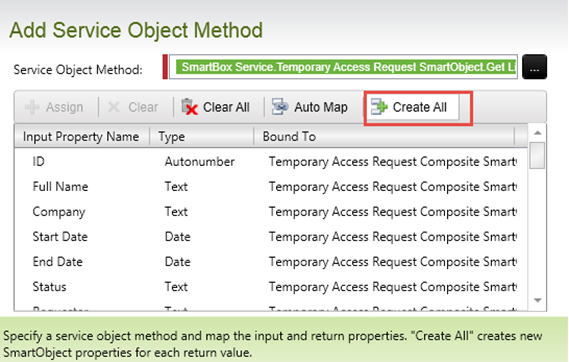
- Click on the Create All button to create the properties for the SmartObject that will be bound to the properties of the service object, and then click OK. (You want to return all the properties from this service as properties of the new SmartObject.)
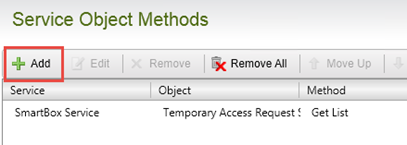
You have just added the first service object method to your composite SmartObject. Remember that SmartObjects are associated with service objects and you can combine multiple service objects to make up a composite SmartObject.
So far, you have added the method (Get List) that returns all of the Temporary Access Request records that are stored in the K2 SmartBox database, and you configured the mappings so that all of the properties stored in the database will be exposed on the composite SmartObject.
Next you will add the second service object method to your composite SmartObject, specifically a method in the Workflow Solutions Reporting service. - On the Service Object Methods screen, click the Add button again, because you want to add a second service method call to your composite SmartObject.
- This time, use the ellipsis button to browse for the following service object method, and drag it into the Service Object Method text box. Service Object Server(s) > Service Object Server > Workflow Reporting Service > K2 Learning\Temporary Access Application > Temporary Access Application Workflow > K2 Learning\...\Temporary Access Application Workflow > List Process Instances
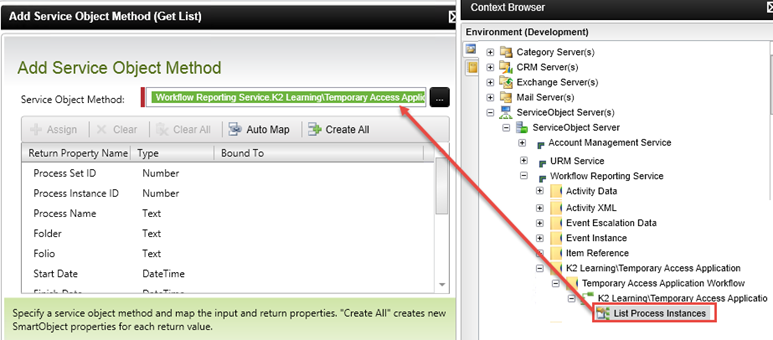 Remember when you selected the Create workflow reporting SmartObjects option when deploying the workflow? That is what created this reporting service method for you.
 - For this second service method, instead of auto-generating all properties, you only want specific properties returned from this service. Locate and select the Start Date property and click the Assign button.
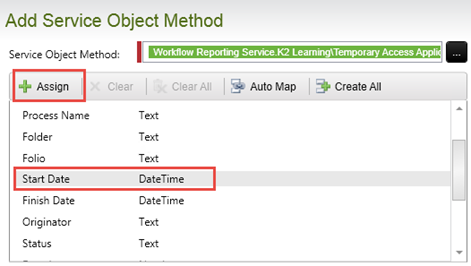
- On the Map Service Property screen, click the Create button and then on the popup window, set the Property Name of the new property to
Workflow Start Date
and click OK.
- Click OK to close the Map Service Property screen and you should see that the Start Date has been mapped to a new property called Workflow Start Date.
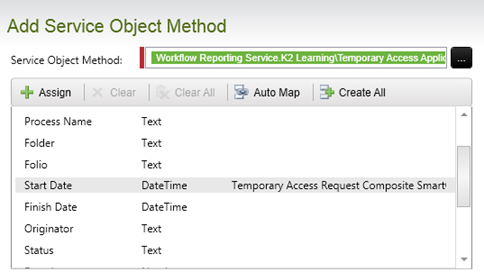
- Repeat the same process to Assign and Create properties for each of the following service properties. (You want to identify which properties come from the workflow service, which is why you are renaming these properties and to include "Workflow" in the property names.)
Service Property SmartObject Property Finish Date Workflow Complete Date Status Workflow Status View Flow Workflow View Flow RecordID Workflow Record ID 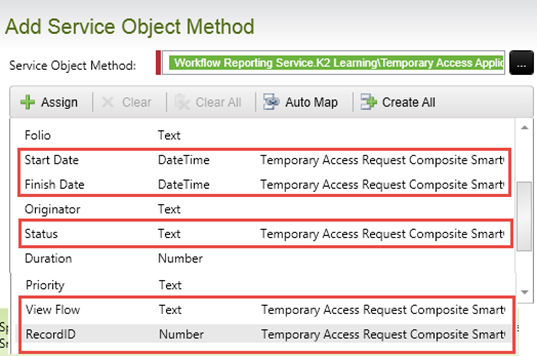
- Click OK to close the Add Service Object Method screen.
You have added the second service object method that is going to make up your composite SmartObject. In this case, you only wanted to return a few select properties from the workflow reporting service. You renamed the properties so that it is obvious that they came from the workflow service.
Importantly, you included the RecordID property from the workflow. This will be the common value that will allow you to join the data returned by the Workflow Reporting service with the Temporary Access Request records data returned by the SmartBox service. Remember that when you first set up the workflow, you configured it so that the form will create the record, get the record ID and then save the record ID back into the workflow. Doing this allows you to easily join the workflow reporting data with the business data. - Next you will configure the composite SmartObject to use a common property to join the data from the two services.
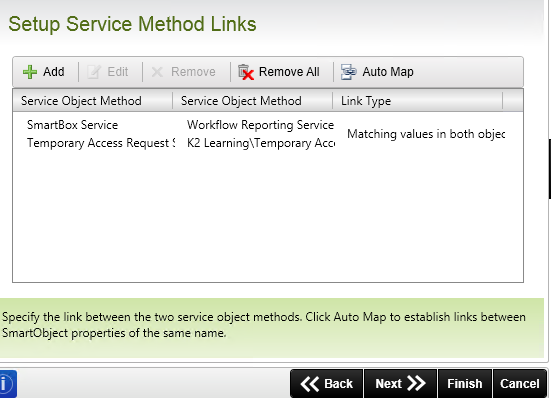
Click the Next button to go to the Setup Service Method Links screen, and then click Add.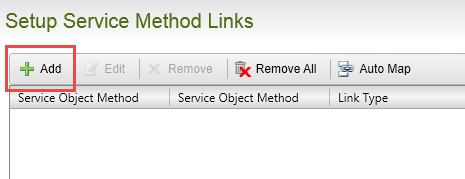
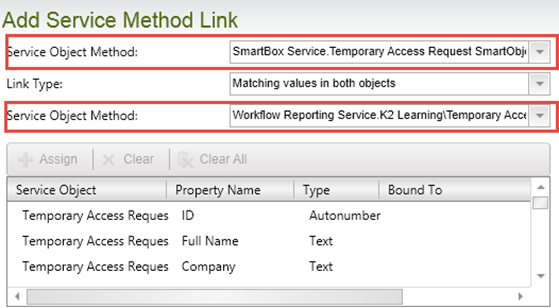
- In the Add Service Method Link screen, select SmartBox... service from the first drop-down menu and Workflow Reporting... service from the second drop-down menu. Select the option to return Matching values in both objects.
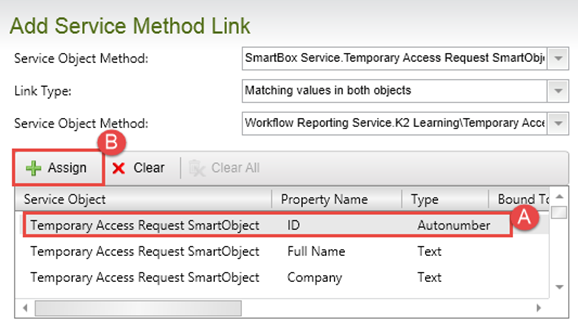
- In the list of properties, locate and select the Temporary Access Request SmartObject > ID property, and click Assign.
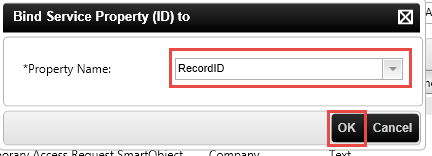
- In the Bind Service Property (ID) to dialog box, select RecordID from the drop-down list, then click OK.
- Click OK to close the Add Service Method Link screen.
In this step, you added the two service methods that return the data you need, selected which properties from those methods you want in your composite SmartObject, and told K2 how to join the data from the two services to one another with a common property (ID/RecordID). - Click Next on the Setup Service Method Links screen, and then click Finish to complete the wizard.
- Save your work.
When you create an advanced SmartObject in K2 Studio, K2 will automatically add default methods (Create, Save, Delete, etc.). Since you only need one method (list), you can remove the default methods. You will add in the list method in the next few steps.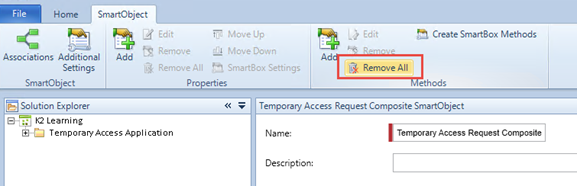
Step 14 Review
In this step you created a composite SmartObject that combines data returned by the SmartBox service (the Temporary Access Request records) with data returned by the Workflow Reporting Service (which is comprised of reporting data from all of the process instances of the Temporary Access Request Workflow). You selected which properties from each service to include in your SmartObject, then told K2 which common property it should use to join the two result sets to each other. (If you are familiar with the SQL language, it is almost the same as a JOIN statement in SQL: you have to tell the system which property to join the two result sets with and the tables you join are analogous to the service methods you are chaining together.)
Next you will deploy the new SmartObject.
When you build workflows and SmartObjects with K2 Studio, you must deploy them before they are available in your K2 environment. In this step, you will deploy the new composite SmartObject and then test it. Because you have not made any changes to your workflow and don't need to re-deploy it, you will exclude the workflow project item from the deployment task.
Step 15 Tasks
- Exclude the workflow from the project deployment, then deploy the project.
- Test the new SmartObject in the K2 Management site.
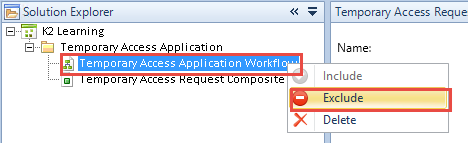
- You must deploy the new SmartObject to your K2 server, but you don’t need to deploy the workflow because nothing has changed in the workflow. Open the Solution Explorer, then right-click the Temporary Access Request Workflow. Select the Exclude option.
- Deploy the solution like you did before, by clicking Next through the deployment wizard. Because you excluded the workflow from the deployment, the deployment should complete quicker than it did the last time.
- Save your work, and then close K2 Studio.
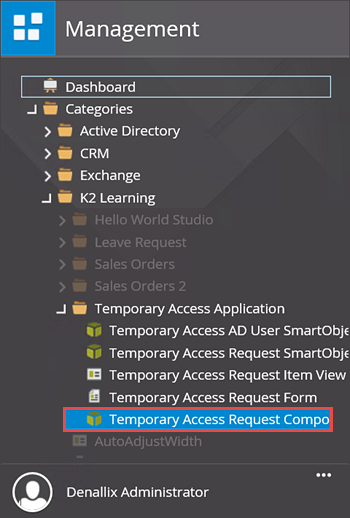
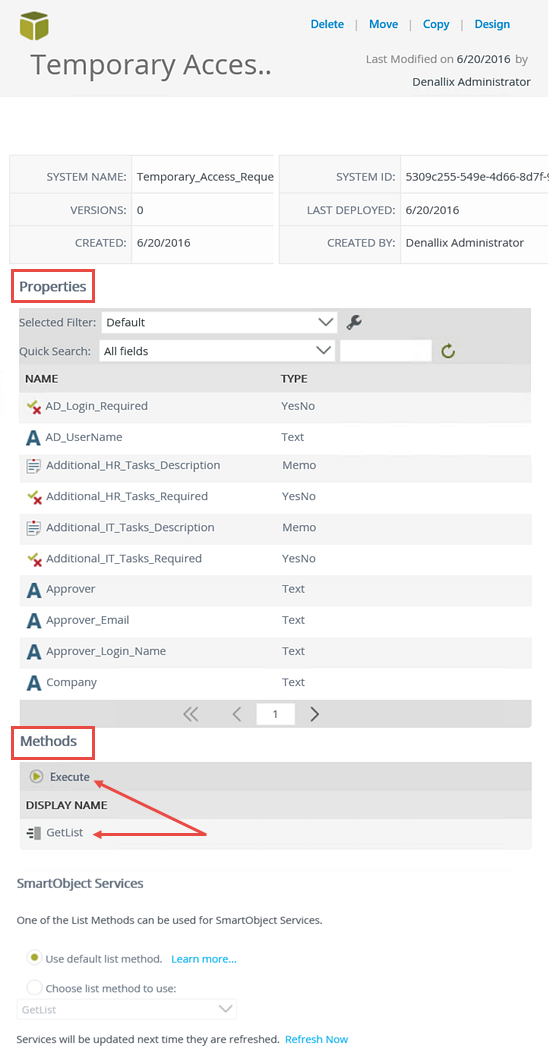
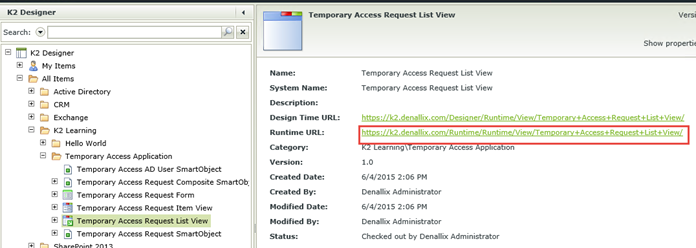
- Return to the K2 Management site in your browser. Expand the Categories > K2 Learning nodes, then Temporary Access Application. Click to highlight the Temporary Access Request Composite SmartObject (you may not be able to see the entire title).
- The SmartObject's properties and methods are displayed in the central pane. Locate the Methods section, then highlight the GetList method and click Execute.
- You want to return all of the records, so you don't have any input parameters. Click Execute.
It is a good idea to test new SmartObjects before using them in forms and workflows. You can test SmartObjects directly from the K2 Management site.

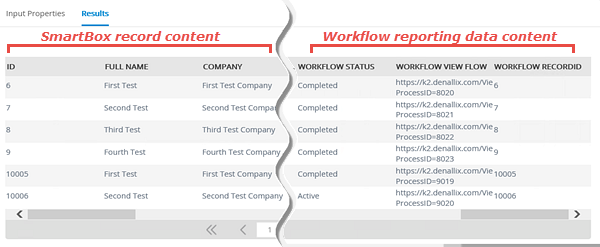
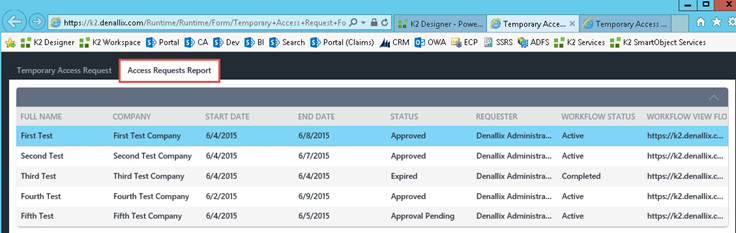
You should now see a report of process instance data from your workflow. In particular, notice that the Full Name, Company, etc., is coming from the access request SmartBox records and the Workflow Status, etc., is coming from the workflow reporting data. (You will need to scroll to the right to see all of the returned properties.) By joining the two data sources together via a common property (ID and RecordID), you now have a report containing relevant information for your users.
Step 15 Review
In this step you deployed the new SmartObject to your K2 environment. When you build artifacts with K2 Studio, you must always deploy those items to the K2 server. You can use the Exclude option to selectively include or exclude items from the deployment task – doing so can help to speed up your deployments. You also learned how to use the SmartObject execute function in the K2 Management site to test the new composite SmartObject.
Next you will create a view so that the data in this composite SmartObject can be shown to users.
In this step you will create a new SmartForm view that will display the data returned by the composite SmartObject you just deployed. You will add a rule to this view so that users can double-click a row to open the View Flow Report for a specific request. Finally, you will add the new view to the existing Temporary Access Request Form so that users can easily see all access requests from the same form used to capture new temporary access requests.
Step 16 Tasks
- Design a new list view called
Temporary Access Request List View
for the composite SmartObject created in this exercise. - Add the following properties to the list view:
Full Name
Company
Start Date
End Date
Status
Requester
Workflow Status
Workflow View Flow - Add a rule that will navigate to a URL in a new window if a row is double-clicked in the view. Use the Workflow View Flow property of the SmartObject as the base URL for the navigate action.
- Test the view.
- Add the view to the Access Requests Report tab on the Temporary Access Request Form.
- Check-in and then test the form to verify that the report data is returned and double-clicking a row opens the View Flow Report.
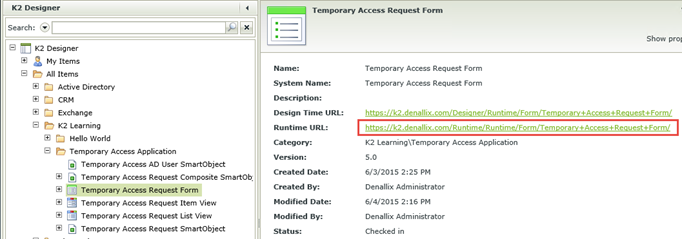
- Open K2 Designer: Start > All Programs > K2 blackpearl > K2 Designer
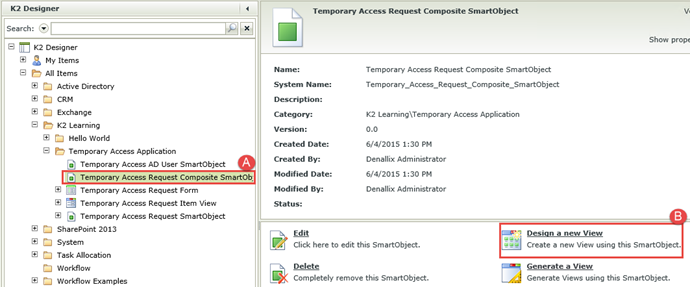
If the start menu link is not there, contact your K2 administrator for the URL to the K2 Designer environment. - Browse to the All Items > K2 Learning > Temporary Access Application folder where you should see the new composite SmartObject. Select the SmartObject, then select the Design a new View option.
- Click Next on the welcome page.
- Configure the new view as follows, then click Next.
Field Value Name Temporary Access Request List View Category (leave default value) View Type List View Data Source (leave default value, should automatically be set to the Composite SmartObject) List Method Get List Call this method when the form loads CHECKED 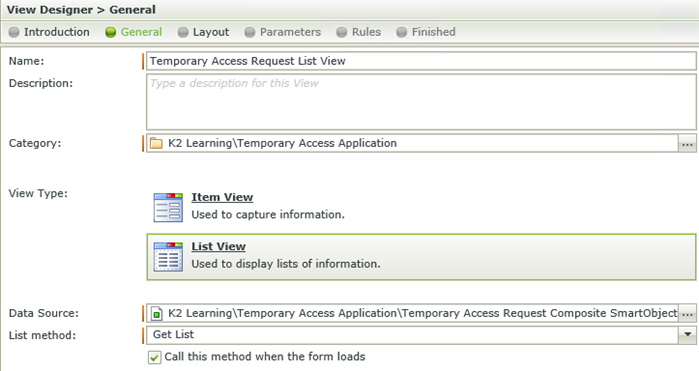
- Click the Create Labels and Controls link. In the dialog box that appears, select the following properties:
Full Name
Company
Start Date
End Date
Status
Requester
Workflow Status
Workflow View Flow
Leave the remaining options on this screen unchanged and click OK.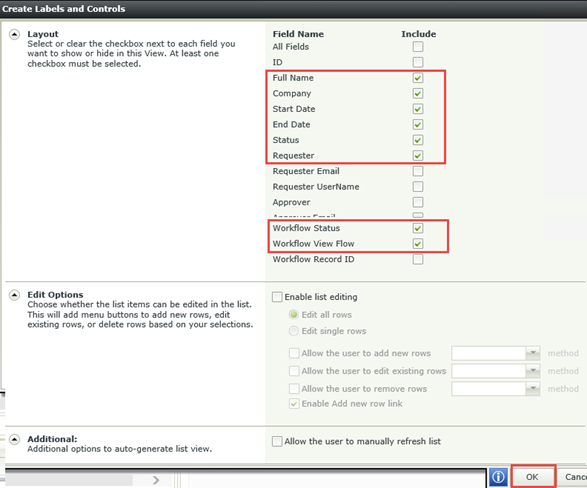
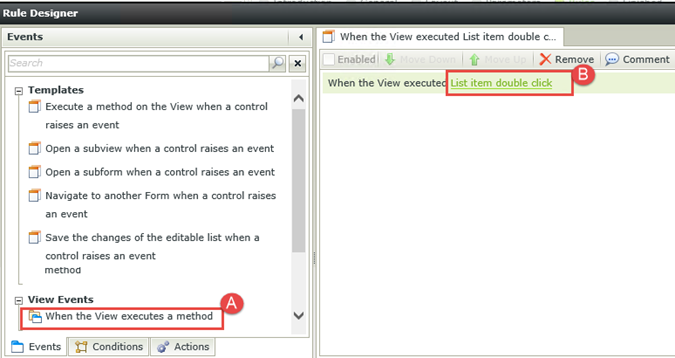
- For this exercise, you will not be formatting this view, so click Next twice to move to the Rules screen. You will be adding a basic rule to this view so that when a user double-clicks a row, the View Flow Report will open for that process instance. Click on the Add Rule button.
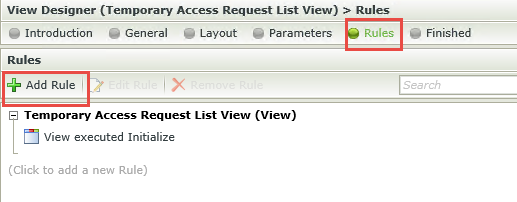
- For the rule Event, select When the View executes a method and for the method, select List Item Double Click.
- Events are when something occurs, such as clicking a button or when the form or view loads.
- Conditions evaluate if a criteria has been met: if the condition is true, continue. For example, evaluating a required field to determine if the field contains a value.
- Actions do something. If the event and condition passes, then perform the action, such as starting a workflow, or calling another rule, or enabling a form field.
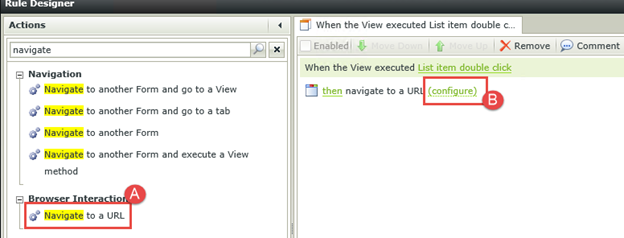
- Select the Actions tab and then select the Navigate to a URL action. Click the (configure) link to set up the action.
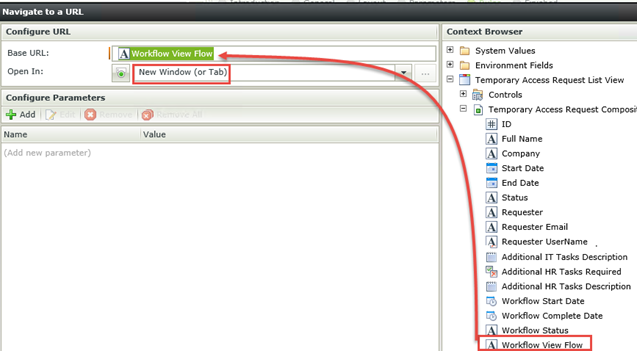
- Drag the Workflow View Flow property into the Base URL text box, and select the New Window (or Tab) option. Click OK to complete the action configuration.
- Click OK to close the rule configuration screen.
- The view is complete, so click Finish to complete the wizard. (Finish is near the lower right corner of the screen, just below the properties pane.)
- Before you add the new view to the request form, you should test it to confirm the rule configuration is functioning correctly. Make sure the view is selected in the category browser, then click on the Runtime URL link to open the view. You should see the temporary access requests you entered earlier, and if you double-click on a row, the View Flow Report for that request should open in a new window or tab.
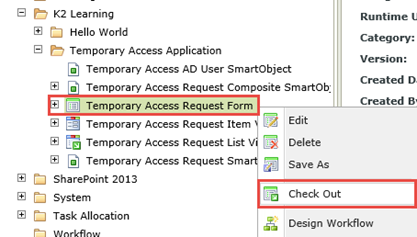
- Next, you will add this view to the Temporary Access Request Form, so that users can easily see what temporary access requests were entered and add a new one. Locate the Temporary Access Request Form, right-click it and select Check Out (if it is not already).
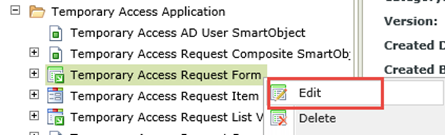
- Right-click the Temporary Access Request Form once again and select Edit.
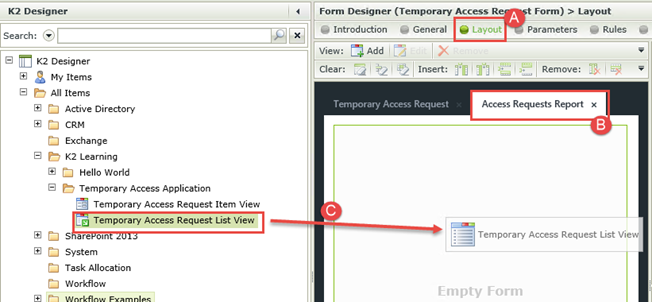
- Skip to the Layout screen, then click the Access Requests Report tab. (The Access Request Report tab was added previously as part of the project package you deployed. See tutorials on SmartForms for instructions on how to add tabs.) From the category system, drag and drop the Temporary Access Request List View into the blank Access Requests Report tab.
- Click Finish to complete the form changes.
- Right-click the Temporary Access Request Form and select Check In. Click OK on the warning message that appears. This message is simply stating that any associated views will be checked in as well.
- Open the Temporary Access Request Form using the Runtime URL in the properties window, or using the browser bookmark that you saved earlier.
- Click the Access Requests Report tab, and you should see all of the access requests listed, along with the workflow status column. Double-click any row to open the View Flow Report for that workflow instance.
As a reminder, rules consist of events, conditions and actions.
Step 16 Review
In this step you created a view that uses the data returned by your composite SmartObject, along with a rule that will open the View Flow Report if a row is double-clicked. You then added that view to your application form so that users can easily see the temporary access requests and open the View Flow Report if they need to see more detail about the workflow.
This concludes the Temporary Access Application tutorials. You can close any open browser windows, K2 Studio or other K2 tools.
If everything worked as expected, congratulations!