Temporary Access Application: Part 3 (Testing the application)
In this part of the tutorial, you will test your new Temporary Access Application by starting several new instances with different combinations of requirements and dates.
Now that the workflow is deployed it is ready to test. In this step you will start a few new instances of the Temporary Access Application Workflow with different combinations of additional tasks and dates, to verify that all of the conditional executions and escalations in our workflow work as expected.
Step 13 Tasks
- Open the Temporary Access Request Form and submit four new temporary access requests.
Field Value First Test Item Full name First Test Company First Test Company Start Date (today’s date) End Date (tomorrow’s date) AD Login Required No Additional IT Tasks No Additional HR Tasks No Second Test Item Full name Second Test Company Second Test Company Start Date (today’s date) End Date (2 days from today’s date) AD Login Required No Additional IT Tasks Yes Additional IT Tasks Description (Additional IT Tasks) Additional HR Tasks No Third Test Item Full name Third Test Company Third Test Company Start Date (3 days before today’s date) End Date (2 days before today’s date) AD Login Required No Additional IT Tasks No Additional HR Tasks Yes Additional HR Tasks Description (Additional HR Tasks) Fourth Test Item Full name Fourth Test Company Fourth Test Company Start Date (today’s date) End Date (today’s date) AD Login Required Yes AD-User Name Set to Default Additional IT Tasks Yes Additional IT Tasks Description (Additional IT Tasks) Additional HR Tasks Yes Additional HR Tasks Description (Additional HR Tasks) - Using the appropriate approver account, approve all four requests. (The approver may vary, depending on where you are logged in. If on a K2-provided VM, logged in as Administrator, use Jonno's IE account found in the User Shortcuts.)
- In the K2 Management site, open the process instances for the Temporary Access Application Workflow. Use the View Flow Report to verify that the workflows are at the expected activities, based on the selected options.
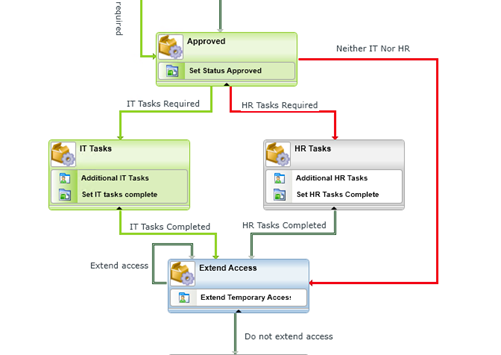
First Test – skipped the Create AD Account step, skipped the IT Tasks Step and skipped the HR Tasks step, and is waiting at the Extend Access step.
Second Test – skipped the Create AD Account step, waiting at the IT Tasks step.
Third Test - skipped the Create AD Account step, waiting at the HR Tasks step.
Fourth Test – executed the Create AD Account step, waiting at the IT Tasks step and waiting at the HR Tasks step. - Submit another request and ask the approver to Reject the request, or reject the request as the approver. (Optional)
- Complete the IT Tasks for the Fourth Test and the Second Test. Use the View Flow report to verify that the Second Test moved to the Extend Access step, but the Fourth Test is still waiting for HR Tasks to be completed.
- Complete the HR Tasks for the Third Test and the Fourth Test. Use the View Flow report to verify that the Third Test moved to the Extend Access step, and the Fourth Test has also moved on to Extend Access because the HR task has completed.
- As the originator, complete the First Test with Do Not Extend Access.
- As the originator, open the Third Request, select an End Date in the future and complete the task with Extend Access.
- Using View Flow reports, verify that the Third Request and the Second Request workflows are waiting to start the Extend Access step, because the end date is in the future.
- Verify that the Third Test workflow expired at the Extend Access step and continued on to the Set Status Expired step. It did not go further than this because there was no AD account for this request.
- You will use the Temporary Access Request Form to start four new instances of the workflow. Open K2 Designer: Start > All Programs > K2 blackpearl > K2 Designer. (If the link does not appear in your menu, contact your K2 administrator for the URL to your K2 Designer environment.)
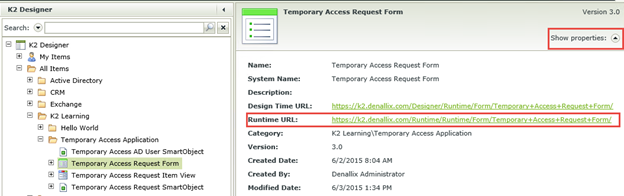
- Locate the K2 Learning > Temporary Access Application folder, then select the Temporary Access Request Form.
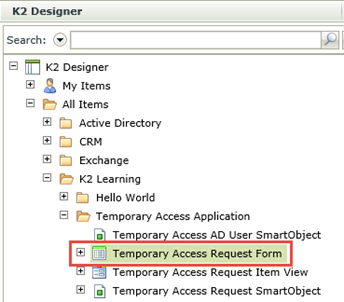
- In the properties pane, click the Runtime URL to open the form in a new tab.
- Once the form loads, enter some data for the test requests, then Submit the form. Use the table below to capture the details for each request. Make sure to select the options exactly as shown, since you will use reporting to validate that the workflow is executing as expected. Make a note of the approver value, because this user will need to approve the requests. When you submit the form you should see a confirmation message. In the background, the workflow will be starting.
Field Value First Test Item Full name First Test Company First Test Company Start Date (today’s date) End Date (tomorrow’s date) AD Login Required No Additional IT Tasks No Additional HR Tasks No Second Test Item Full name Second Test Company Second Test Company Start Date (today’s date) End Date (2 days from today’s date) AD Login Required No Additional IT Tasks Yes Additional IT Tasks Description (Additional IT Tasks) Additional HR Tasks No Third Test Item Full name Third Test Company Third Test Company Start Date (3 days before today’s date) End Date (2 days before today’s date) AD Login Required No Additional IT Tasks No Additional HR Tasks Yes Additional HR Tasks Description (Additional HR Tasks) Fourth Test Item Full name Fourth Test Company Fourth Test Company Start Date (today’s date) End Date (today’s date) AD Login Required Yes AD-User Name Set to Default Additional IT Tasks Yes Additional IT Tasks Description (Additional IT Tasks) Additional HR Tasks Yes Additional HR Tasks Description (Additional HR Tasks) -
Exit the form.
- If you are building this tutorial using a K2-provided VM, open the approver’s Internet Explorer (most likely Jonno) using the User Shortcuts. If prompted, login with the following credentials:
Username: Denallix\Jonno
Password: K2pass!
Alternatively, ask the approver that you noted while completing the requests to log in so that they can approve the requests.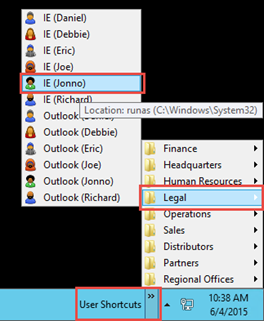
- Open the approver’s email or Outlook Web Access (OWA). You should see four approval tasks for the approver, one for each test you started.
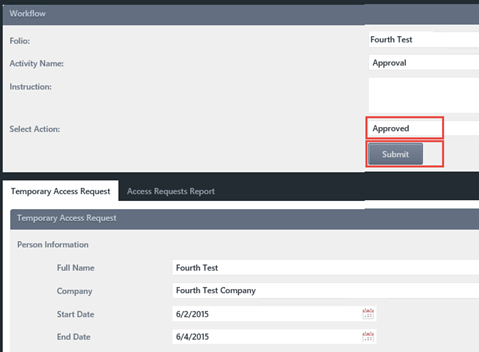
- Open the link for each of the tasks, and then approve each request. Alternatively, just reply to the emails with
Approved
for each item. - Close the approver's browser.
- Switch back to the K2 Management site tab in your browser. (If you closed the K2 Management site, use the start menu link to open it once again: Start > All Programs > K2 blackpearl > K2 Management)
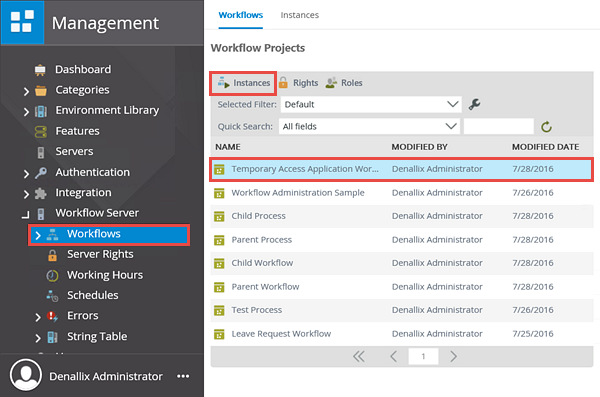
- Expand the Workflow Server node, then click Workflows so that the workflow projects are displayed in the central pane. Locate, then click to highlight, the Temporary Access Application Workflow. Click the Instances button located in the toolbar.
- Located the First Test process instance and click it to highlight it. Click the View Flow button located in the toolbar. Use the View Flow Report to verify that the workflows are at the expected activities, based on the selected options: (Leave the View Flow browser pages open, as you will return to them in a later step.)
First Test: skipped the Create AD Account step, skipped the IT Tasks Step and skipped the HR Tasks step, and is waiting at the Extend Access step.
Second test: skipped the Create AD Account step, and is waiting at the IT Tasks step.
Third Test: skipped the Create AD Account step, and is waiting at the HR Tasks step.
Fourth Test: executed the Create AD Account step, is waiting at the IT Tasks step and also waiting at the HR Tasks step. - If you have time, submit another request and ask the approver to Reject the request, or reject the request as the approver.
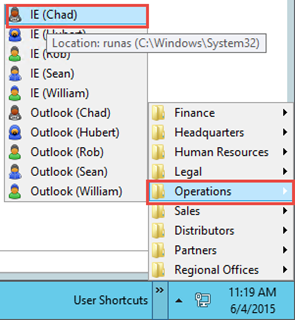
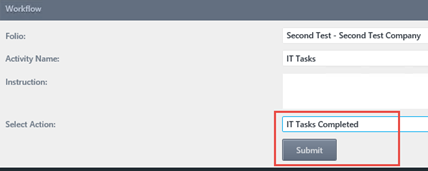
- For the IT tasks, open the any user from the Operations group. Launch K2 Workspace from the start menu link.
- You should see two tasks for the IT Tasks step (Fourth Test and Second Test). For both tasks, open the task form and then submit the form with the IT Tasks Completed task action.
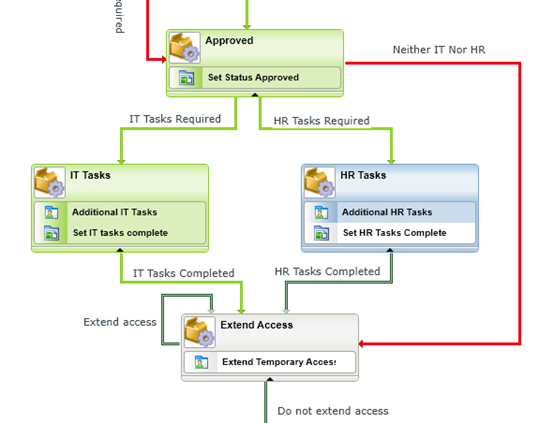
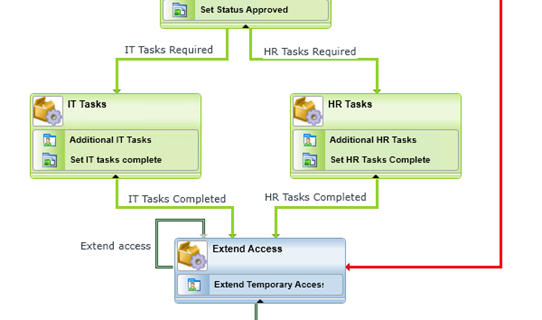
- Return to the View Flow Reports that you left open (or re-open the View Flow Reports for the workflows that you started). For the Second Test workflow, you should see that the IT Tasks step has completed and the workflow moved on to the Extend Access step, because there were no HR Tasks for this request.
- For the Fourth Test workflow, you should see that the IT Tasks step has completed but the workflow has not moved on to the Extend Access step because there is still an active HR Tasks for this request.
- Next you will complete the outstanding HR Tasks. If you are using the K2-provided virtual server, open Internet Explorer as a user in the Human Resources group. If you assigned a different user, open that user's browser instead. As you did for the IT Tasks, open both HR Tasks and submit the forms with HR Tasks Completed as the action.

- Return to the View Flow Reports that you had left open. You should see that the Fourth Test workflow has now progressed to the Extend Access step, because both the IT Tasks and the HR Tasks were completed. This verifies that our parallel workflow configuration is working as expected.
- The workflow for the Third Test instance should also have progressed to the Extend Access step. If you entered the dates correctly, the Third Test instance should actually already have moved on to the Set Status Expired step, because the end date for this request was two days ago. Remember that you defined an escalation for the Extend Access task to expire it one day after the end date of the request.
Because there was no AD account for the Third Test request, the workflow did not try to disable the account and the workflow competed.
If this is what you see in the View Flow report, it means that the escalation and conditional line rules are working as expected.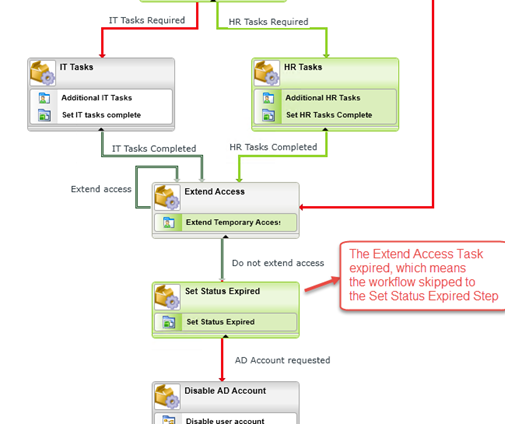
- Open K2 Workspace as the user who initially requested the temporary access. You should see two instances for the temporary access request workflow: First Test and Fourth Test

- Open the First Test request form, select the Do Not Extend Access option and Submit the form.
- Open the Fourth Test form, select a date in the future for the End Date, select the Extend Access action and Submit the form.
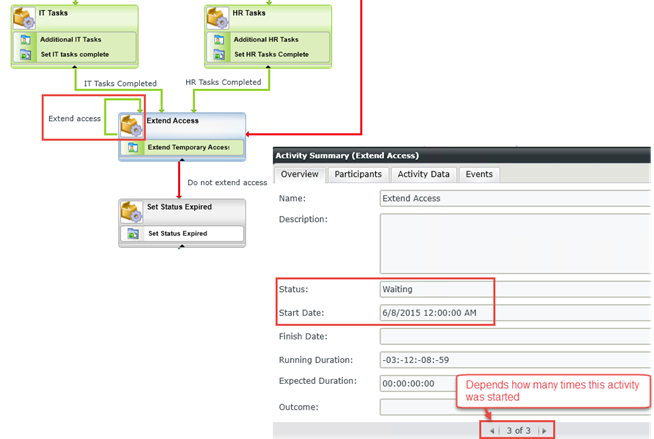
- If you refresh you task list, you should not see any Extend Access tasks because the remaining tasks are delayed until one day before the end date. For example, Second Test does not show up in the requester’s task list yet, because you delayed this task to start one day before the temporary access is due to expire. In fact, if you open the View Flow Report for the Second Test and then double-click the Extend Access step, you should see that the status is waiting and the start date is a date in the future.

- If you open the View Flow Report for the Fourth Test workflow, you should see that the Extend Access line was followed and the activity looped back to itself. If you double-click the Extend Access step, notice that the status is waiting with a start date sometime in the future, based on the end date you selected. Notice at the bottom of this screen that there are multiple instances of this activity (probably two in our case), because the same activity was started twice. You can click the arrows to move between the reporting data for each instance of the activity.
- Your are done with the tests, so you can close all browser windows. Close the Instances screen in the K2 Management site.
Now, you will action the requests as the approver.
 p
p
You should see the four instances that you started in the previous step. (The order of your process instances may not match the image below.) You will be opening the View Flow Report for each process instance to observe the current status of the workflow.
Process instances of the Temporary Access Application Workflow

In next several steps, you will action the IT and HR tasks as the user assigned the task. If you followed the tutorial exactly, open the group member that is described in the steps below. If you assigned a different user as the participant, open that user's K2 Workspace to action the task. To open a user's K2 Workspace, begin by opening IE for that user. After IE is launched, confirm that it is the active window. Launch K2 Workspace (Start > All Programs > K2 blackpearl > K2 Workspace) so that it opens for the target user.

Step 13 Review
In this step you tested your workflow to verify that the workflow is executing as expected. Between the conditional paths, the start rules and escalation rules you have learned quite a lot about building more complex workflows with K2 Studio!
In Part 4: Building a composite SmartObject of this tutorial, you will look at creating a composite SmartObject and a view so that it is easier to report on temporary access requests.