Temporary Access Application: Part 1 (Building a workflow with K2 Studio)
In Part 1, you will build the basic parts of the workflow component for your Temporary Access application. Using K2 Studio to build the workflow, you will become familiar with the K2 Studio workflow design environment, how to build workflows and use wizards and how to format workflows for clarity.
Because this tutorial focuses on using K2 Studio to build workflows and advanced SmartObjects, you are provided with a starter project that contains the user interfaces (SmartForms) and SmartBox-based SmartObject. (Other tutorials go into more detail on creating basic SmartBox SmartObjects and SmartForms.)
You must deploy this starter project in your environment before beginning the application build.
User Name: Denallix\Administrator
Password: K2pass!
Step 1 Tasks
- Download the K2 deployment package from http://help.k2.com/files/9872.
- Use the K2 Package and Deployment tool to deploy the project file. (Start > All Programs > K2 blackpearl > K2 Package and Deployment)
- Verify that the forms and SmartObject have been deployed.
-
Download the K2 project file located at http://help.k2.com/files/9872 and save it to your desktop.
(To download the file, enter the URL in your browser. You should then see a message with the options to either open the file or save the file. Select Save As and save the file to your desktop.) - Launch the K2 Package and Deployment tool. (Start > All Programs > K2 blackpearl > K2 Package and Deployment)
-
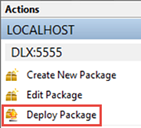
Once the package and deployment tool has opened, from the right-side Actions column, click Deploy Package.
- For the File Name, Browse to the K2 project file that you previously saved to your desktop. (The file name will be: K2Learning-100.EDI_K2StudioIntro.kspx.) Keep the default values for the remaining deployment options and click Next.
-
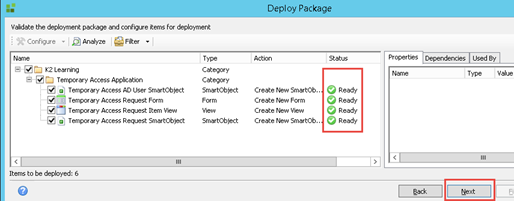
On the Validate the deployment package screen, CHECK the box next to K2 Learning to select all of the package elements. Wait a few seconds until you see the Ready indicators in the Status column. Click Next to continue.
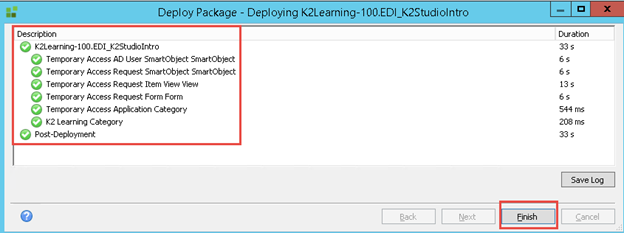
- Allow a minute or two for the package deployment to process and complete. When you see the green success indicators next to the deployment descriptions, click Finish. Close the K2 Package and Deployment tool.
- Now you will confirm that the forms and SmartObjects have been deployed.
Launch K2 Designer (Start > All Programs > K2 blackpearl > K2 Designer)
(If the menu link is missing, contact your K2 administrator to obtain the URL for K2 Designer.) - Once K2 Designer has opened, browse to the following category:
All Items > K2 Learning > Temporary Access Application
You should see the following item view, form and two SmartObjects in this category. If all four artifacts are there, the deployment was successful, continue to Step 2.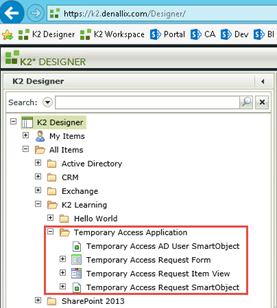
Step 1 Review
In this step you downloaded and deployed a starter project for this tutorial. The starter project contains a view, a form and two SmartObjects. You will be using these items in the workflow and the composite SmartObject steps later on.
In this step you will create a new project with K2 Studio and add a workflow to the project.
Step 2 Tasks
- Launch K2 Studio and create a new project with the following settings:
Field Value K2 Type K2 Project K2 Template K2 Project Project Name K2 Learning Location (Select a location such as C:\K2 Learning) Target Framework (use default value) - Add a folder called to the K2 Learning project and name it
Temporary Access Application - Add a new workflow to the project and name it
Temporary Access Application Workflow
- Launch K2 Studio (Start > All Programs > K2 blackpearl > K2 Studio)
- Click on File > New.
- Create a new K2 Project with the following settings. Click Create when you are ready.
Field Value K2 Type K2 Project K2 Template K2 Project Project Name K2 Learning Location (Select a location such as C:\K2 Learning) Target Framework (use default value) 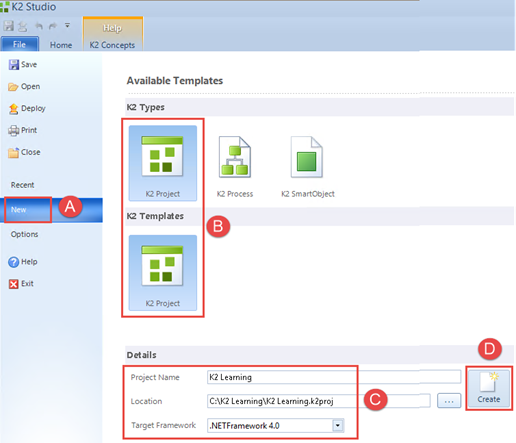
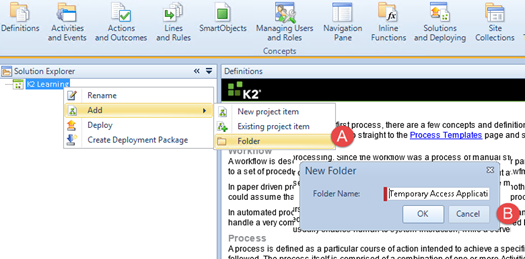
- Once the new project is created, right-click on the K2 Learning node and select Add > Folder.
Name the new folder
Temporary Access Application
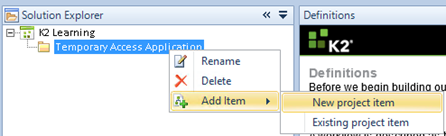
- Right-click on the new folder and click Add Item > New project item.
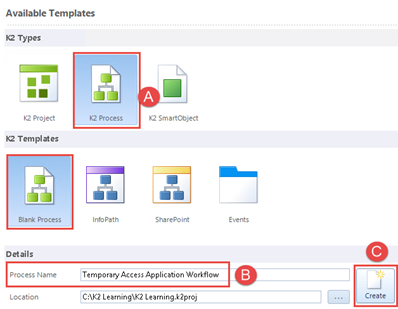
- Notice that K2 Process and Blank Process are preselected for you. Name the new process
Temporary Access Application Workflow
then click Create. - Once the workflow is created, click File > Save to save your project.
Step 2 Review
In this step you created a new K2 Studio project and added a blank workflow to the project. You used a specific folder structure (K2 Learning) so that when the workflow is deployed, it will deploy to the existing (K2 Learning) category that was created for this application when you deployed the starter project.
In this step you will add a data field to the workflow, then configure the workflow to start when the Temporary Access Request Form is submitted. The data field is necessary as later on you will use this field to bind the workflow reporting data (for example, number of process instances, average process instance duration, etc.) with the Temporary Access Request (user details) data. You will then create a composite SmartObject that joins these two data sources, essentially allowing you to create a report that combines workflow reporting data with business (user) data.
Step 3 Tasks
- Add a data field to the workflow
Name: RecordID
Data Type: Integer - Use the SmartForms Integration wizard to configure the workflow to start when the Temporary Access Request Form is submitted. Use the following settings:
| Field | Value |
|---|---|
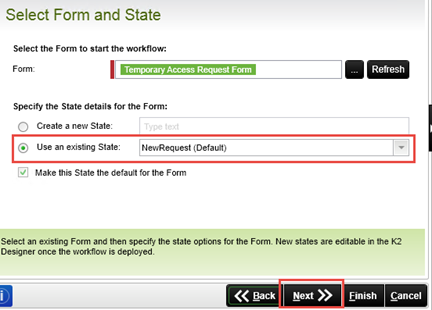
| Form | Temporary Access Request Form |
| State | Use Existing State > NewRequest (Default) |
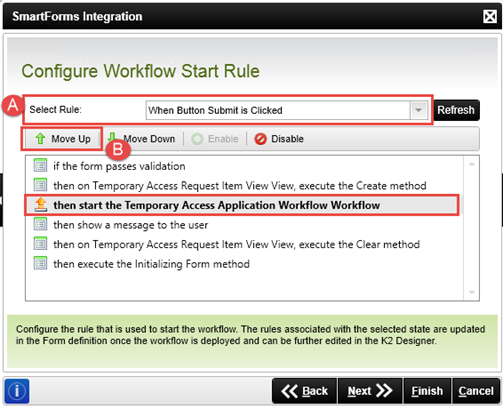
| Select Rule | When Button Submit is Clicked. Move the Start Workflow action up so that it happens right before the message is shown to the user. |
| Item Reference | Create an Item Reference called Temporary Access Request; browse for and select the Temporary Access Request SmartObject. |
| Data Binding | Link the RecordID workflow data field with the ID of the Temporary Access Request SmartObject |
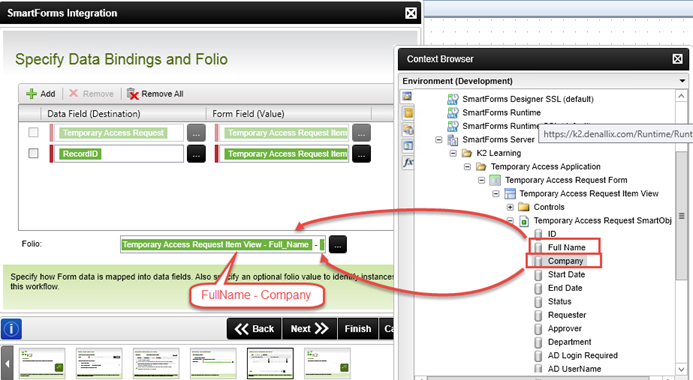
| Folio | FullName – Company from the Temporary Access Request SmartObject |
- First you will add a data field to store the ID of the current process instance (SmartObject) record. Open the Object Browser and then the Process/Activity Data tab. The goal is to have a relationship between the SmartObject record and the process instance.
- Right-click on the process name in the Process/Activity Data tab and select Add…
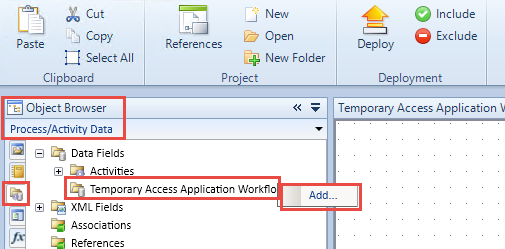
- Add a data field with the following settings:
Name: RecordID
Data Type: Integer
Click OK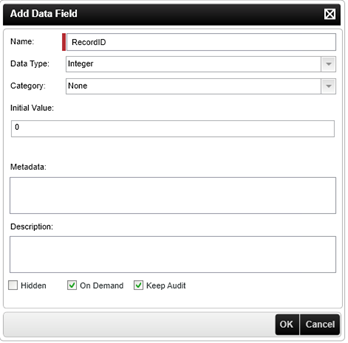
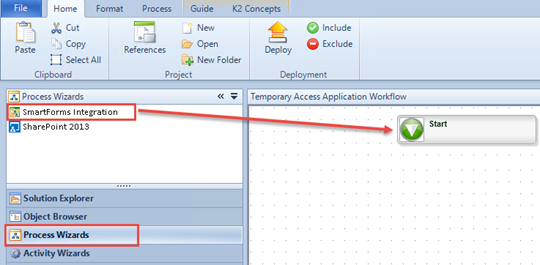
- Now you will configure the workflow to start when the Temporary Access Request Form is submitted. Click on Process Wizards, then drag and drop the SmartForms Integration wizard into the Start box.
- Click Next on the wizard Welcome page.
- On the Select Form and State screen, use the browse icon to select the Temporary Access Request Form. Drag and drop the form into the Form text box.
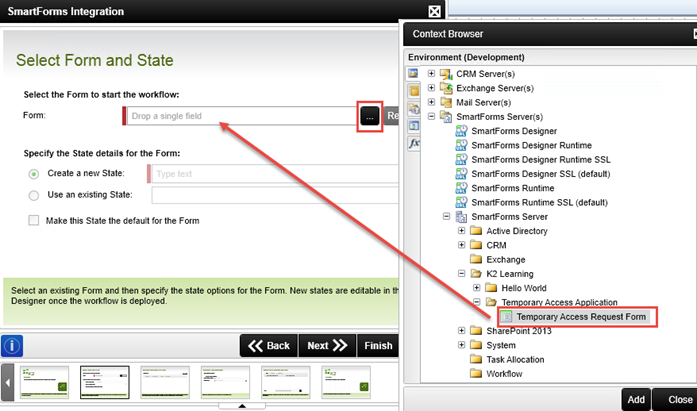
- For the State of the form, select Use an Existing State and pick the NewRequest (Default) state. Click Next to continue.
- On the Configure Workflow Start Rule screen, select the When Button Submit is Clicked rule from the Select Rule drop-down list. If you see a warning message, click OK to accept the warning. Use the Move Up button to move the then Start the Temporary Access Application Workflow Workflow action up so that it happens right before the message is shown to the user.
- Click Next to continue.
- On the Configure Item Reference screen, select the Create Item Reference option.
Name the Item Reference
Temporary Access Request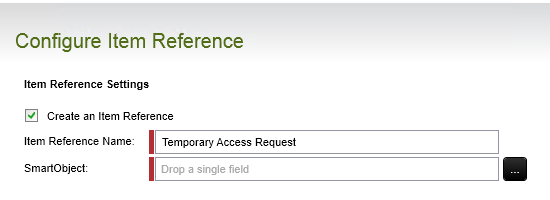
Close the context browser, then click Next to continue.
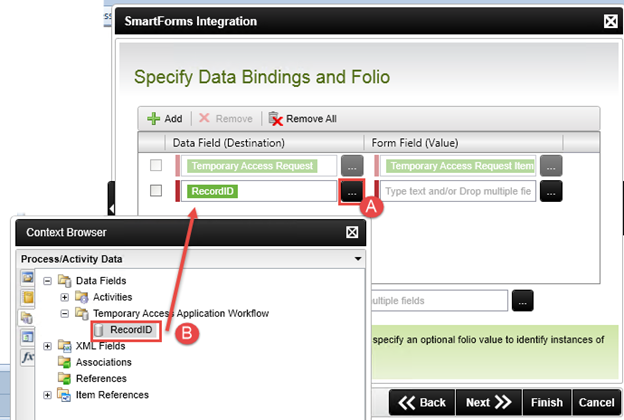
In a previous step, you created a data field (RecordID) so that you could save the ID for the current SmartObject record that is created as part of the process instance. In the next few steps, you are going to map the RecordID data field to your SmartObject ID property. This will complete the association between the SmartObject record that has been created and its corresponding process instance.
- On the Specify Data Bindings and Folio screen, click on Add.
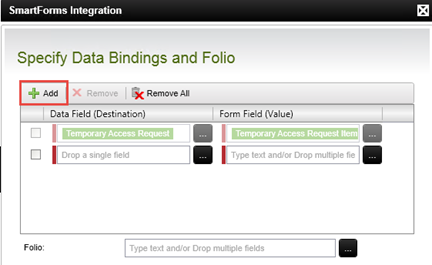
- Click on the first ellipsis icon to select the RecordID data field you created earlier.
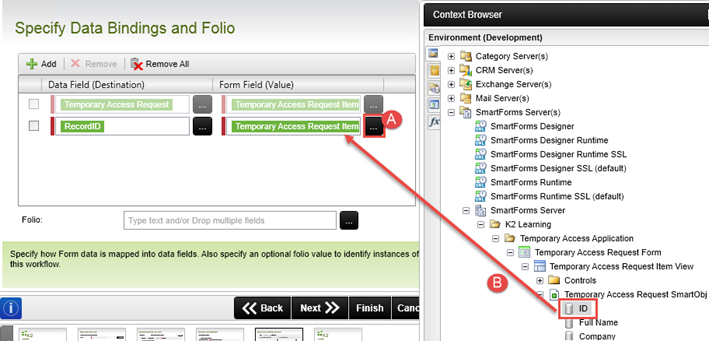
- Click on the second ellipsis icon and select the ID property of the Temporary Access Request SmartObject. Close the context browser.
- For the Folio, use the ellipsis button to configure the folio to use the Full Name and Company of the Temporary Access Request SmartObject. (See the note box below the image for a brief explanation of the folio, if necessary.) Close the context browser.
- Close the context browser, then click Next and Finish to complete the SmartForms wizard.
- Save your workflow.
WARNING: Do not skip this step. Doing so will result in the workflow throwing an error.
What you are doing in this step is to tell the workflow to start when the user clicks the submit button on the request form. This particular configuration is specific to K2 SmartForms. If you were using a different form technology, you would configure the workflow start rule differently.
Use the ellipsis button to browse for and select, then drag, the Temporary Access Request SmartObject into the SmartObject field.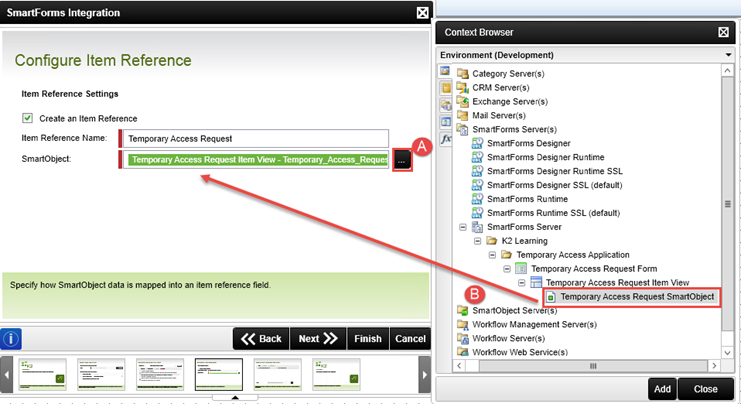
K2 keeps track of items that relate to the current process instance, known as Item References. For example, when a workflow is started from a SharePoint list or library, or from a SmartObject, K2 will store a pointer to the current record in the Item References properties so that those values can be used later on in the workflow or rules. For now, just think of Item References as a shortcut to the current record values from the SmartObject, or data source.
What is the Folio? The folio is a text field that is commonly used to distinguish one process instance from another process instance (of the same workflow). The folio is not required, nor does it have to be unique. Since all processes, or workflows, will have the same process name, using a unique folio value will aid in identifying the individual process instances of the workflow. This is especially useful when viewing workflow reports having many process instances.
To make the folio unique, you can use a combination of fields, such as a customer name combined with an order number. Setting the folio value typically comes from properties found in the context browser. The property values are variables that are replaced at runtime by actual content specific to the process instance.
You can also use the folio as a variable throughout your workflow. For example, if you assign a customer name as the folio, you can use the folio to customize emails so that the customer is referenced by their name.
Three instances of the same workflow showing unique folio values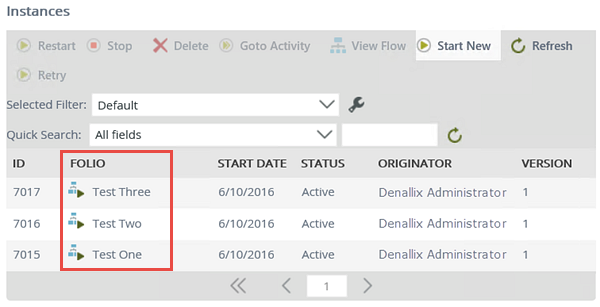
To review the steps you just completed, you configured the workflow wizard to pass the ID of the SmartObject record that is created when a new process instance is created, to the RecordID data field. This will allow you to join the workflow reporting data with the user's request data in a later exercise. You also configured the workflow folio so that it will use the full name, along with the company name that is entered by the requester. This folio value will distinguish one process instance from another.
Step 3 Review
In this step you added a data field to the workflow and configured the workflow to start when the Temporary Access Request Form is submitted. As part of the configuration, you specified when the workflow should be started and opted to create an item reference to the SmartObject record that is created. This will allow you to use values from the SmartObject record throughout your workflow and in form rules. You mapped the SmartObject record ID to the RecordID data field, that essentially binds the record that is created with the process instance. The majority of this configuration is specific to SmartForms because you want a SmartForm to start the workflow.
In this step you will add a client event (or user task) to the workflow. You will be using the same Temporary Access Request Form and using a specific state of the form for the task. While this approval task will have two actions (approve and reject), there will be three outcomes:
- Rejected (the approver rejects the request)
- Approved and AD Account required (the approver approved the request and the workflow must create an Active Directory account for the temporary user)
- Approved and AD Account not required (the approver approved the request and the workflow does not need to create an Active Directory account for the temporary user)
The workflow will follow one of the three outcomes above, depending on the requester's options selected from the request form.
Step 4 Tasks
- Add a SmartForms Client Event to the workflow and configure it as follows:
Field Value Name Manager Approval Form Temporary Access Request Form State Use existing Approval state Configure Item Reference (no changes, use default values) Specify Form Parameters (no changes, use default values) Configure Open Worklist Item Rule (no changes, use default values) Transfer Workflow Data to Form (no changes, use default values) Actions Approved
RejectedAction Display Settings (no changes, use default values) Transfer Form Data to Workflow (no changes, use default values) Outcomes Edit the existing Approval outcome. Add a condition
And
Temporary Access Request.AD Login Required
=
True
Rename the outcome to
Approved and AD Account required
Add another outcome so that
All Slots = Approved
And
Temporary Access Request.AD Login Required = False
Rename the outcome to
Approved and AD Account not requiredLeave the Reject outcome as-is
Destination User Temporary Access Request Item Reference > Approver Login Name Task Notification Customize the task notification email and add some contextual information about the temporary access requests, such as the Full Name, Company, Start Date, End Date and Requester.
-
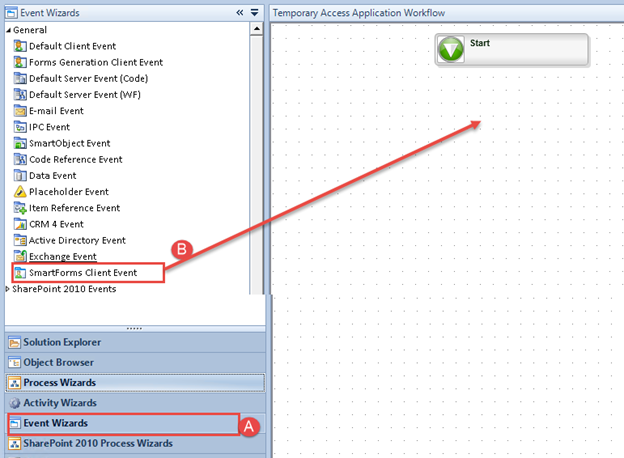
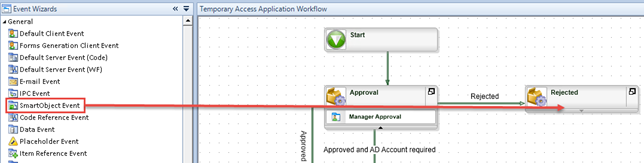
Select the Event Wizards pane and then drag and drop a SmartForms Client Event onto the workflow design canvas.
- Click Next on the wizard welcome page.
- On the Select Form and State screen, change the Event Name to
Manager Approval
Select the Temporary Access Request Form, then configure the State to use the existing Approval State. - Close the context browser and click Next.
- Leave the Configure Item Reference screen as-is (it will automatically be configured to use the existing Temporary Access Request item reference) and click Next.
- Click Next on the Specify Form Parameters screen.
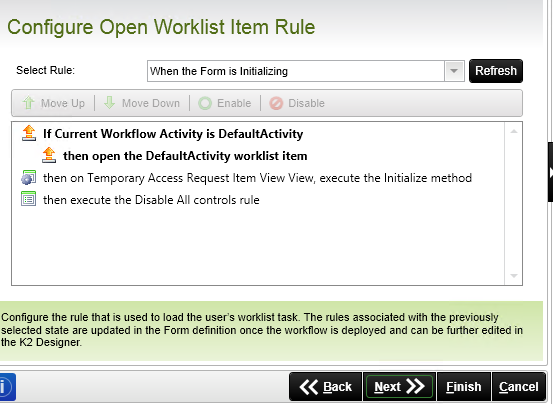
- The Configure Open Worklist Item Rule screen should be automatically configured to open the task When the Form is initializing, so click Next.
- The Transfer Workflow Data to Form screen should be configured correctly by default, so click Next.
- On the Configure Actions screen, use the Add button to add the following two actions:
Approved
Rejected
then click Next.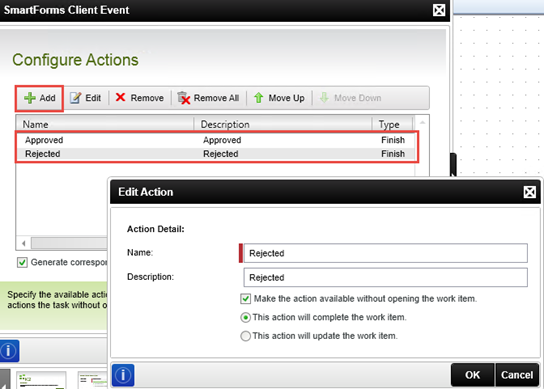
- You can leave the Action Display Settings screen as-is and click Next.
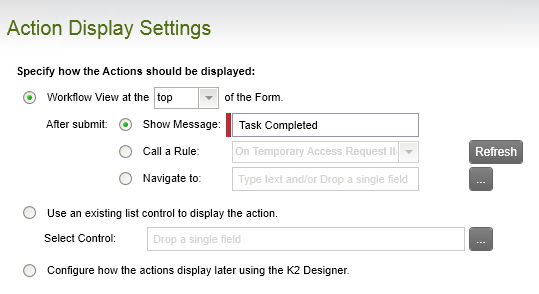
- You don’t need to configure any data transfer, so click Next on the Transfer Form Data to Workflow screen.
- On the Configure Outcomes screen, you will be adding an outcome and configuring the approved outcomes (remember one outcome is approved and AD account required, and the other is approved and AD account not required) In the next step, you will configure the existing approved outcome so that the AD account is required.
First, select the existing Approved outcome and click Edit.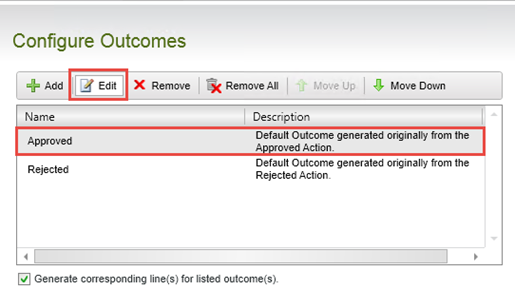
- Click the Add button to add another condition to this outcome.
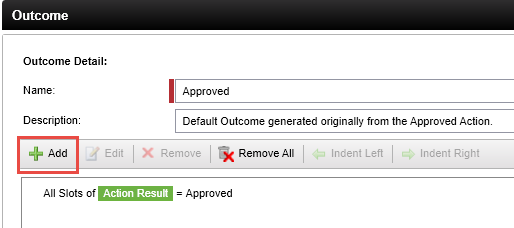
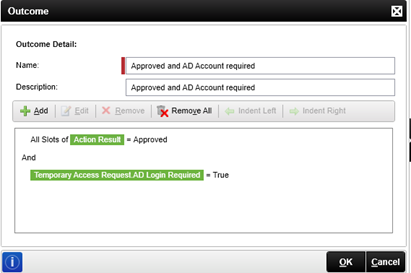
- Configure the outcome so that it evaluates as follows:
Boolean Operator: And
First Variable: Temporary Access Request.AD Login Required
Comparison Operator: =
Second Variable: True
See the screenshot below for reference.
- Click OK to close the outcome configuration screen.
- Change the edited outcome Name to
Approved and AD Account required
and change the Description to
Approved and AD Account required
Click OK to continue. - Click on the Add button. For the Name and Description, enter
Approved and AD Account not required
then click OK.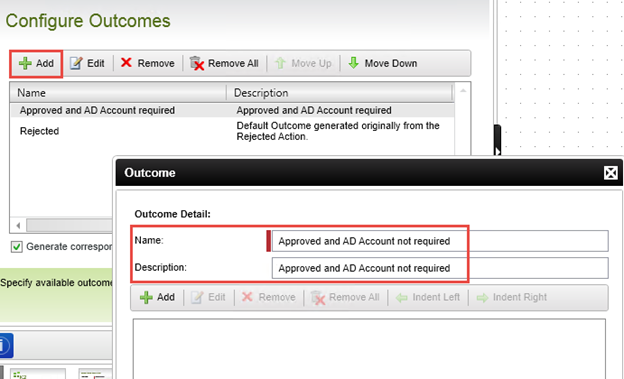
- Click the Add button and add an condition as follows:
First Variable: Action Result
Logical Function: All Slots
Comparison Operator: =
Second Variable: Approved
In this step, you are telling K2 to evaluate if the request action is approved.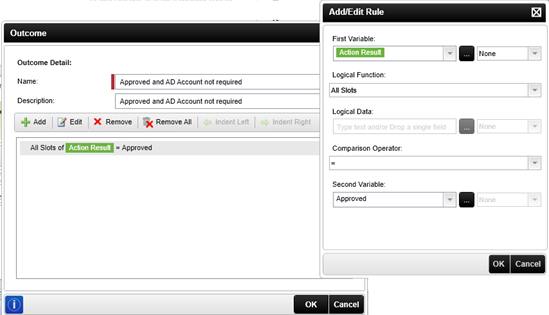
- Add a second condition to the outcome as follows:
Boolean Operator: And
First Variable: Temporary Access Request.AD Login Required
Comparison Operator: =
Second Variable: False
In this step, you are adding a condition to evaluate the form's AD Login Required field to see if it returns as false, or not selected. Close the context browser, then click OK.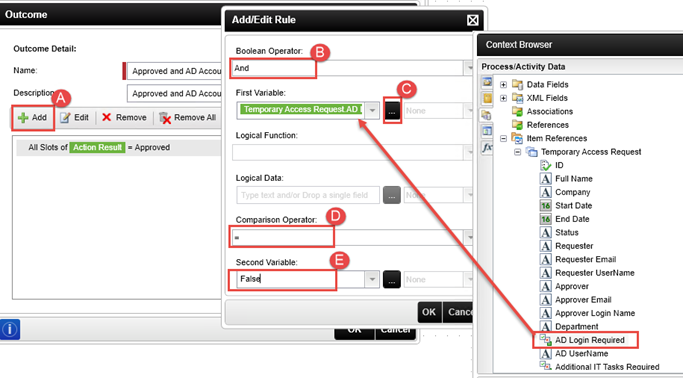
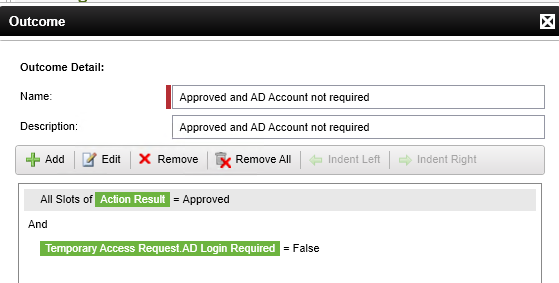
- The outcome should look like the image below. Click OK to continue.
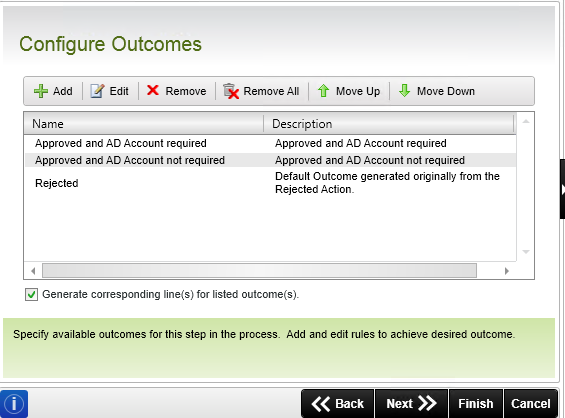
- Use the Move Up button to move the two approved outcomes next to each other. The Configure Outcomes screen should look like the image below. Click Next to continue.
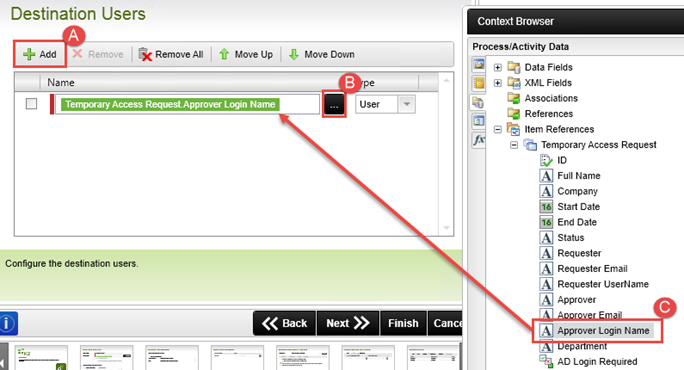
- On the Destination Users screen, click the Add button and then click the ellipsis to select the Approver Login Name field from the Temporary Access Request Item Reference, as shown below. Close the context browser and click Next to continue.
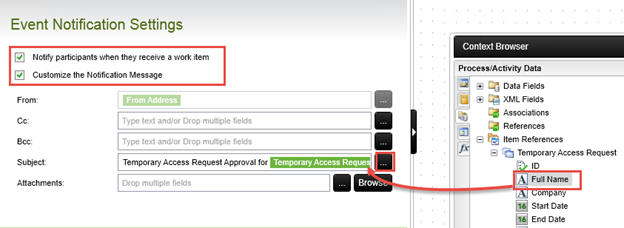
- On the Event Notification Settings screen, select the option to Notify participants when they receive a work item, then customize the notification email. Modify the subject line to better describe the task and add the Full Name from the Item Reference. Close the context browser and click Next.
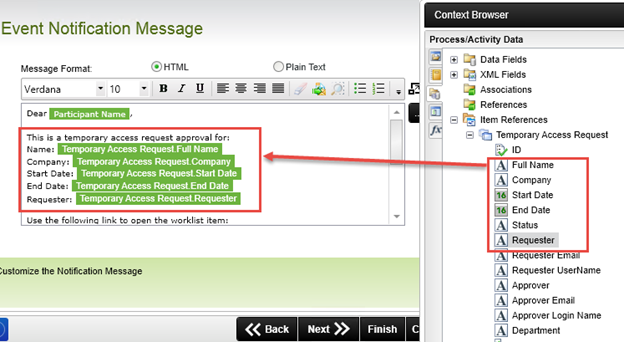
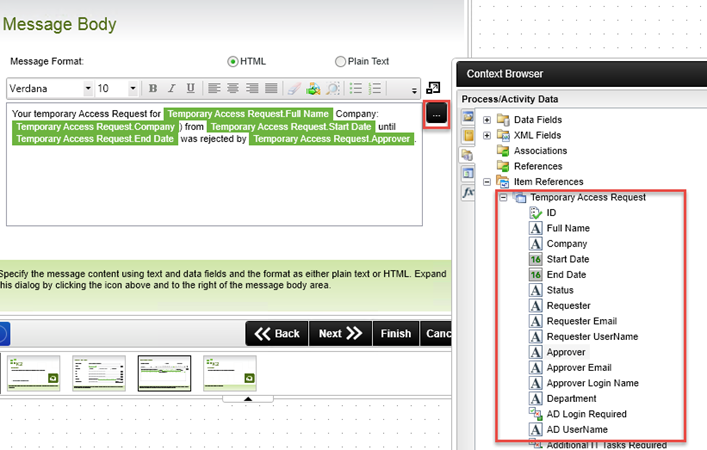
- For the Event Notification Message body, add some information from the Item Reference so that the approver can approve or reject the request using email if they want to. The sample below includes the Full Name, Company, Start Date, End Date and Requester. You can add whatever information you like from the Item Reference.
- Close the context browser, then click Finish to complete the client event wizard.
- Save your workflow.
You are now changing the state from the default state to a new state that you will later adjust so that it is specific to this user task.

In this step, you edited the approved outcome to evaluate the form's AD Login Required field. If the login option was selected on the form, then it's value becomes true. In this case, the workflow will follow this outcome path to the next activity or event. If the login option was not selected on the form, the workflow will not follow this outcome path. In the next step, you will add and configure an additional outcome that will provide an outcome path in the event the request is approved, but the AD account option is not selected.
Next you will add the destination user, or the user that will be approving the request. (This user is also referred to as the task participant.) In this application, the approver name is being saved along with the request data, so you can read the approver login name from the Temporary Access Request SmartObject Item Reference.
Step 4 Review
In this step you added a client event to the workflow for the manager approval task. You configured the event to use the Temporary Access Request Form and configured the outcomes to follow a different path depending on whether the workflow should create an AD account or not. This step demonstrated how you can configure more advanced outcomes that evaluate data as well as user input. You used a variable (the Approver Login Name) rather than a static user name as the user for the approval task. Finally, you customized the task notification email that is sent to the approver.
Once again, item references are shortcuts to the current SmartObject record that is created as part of the process instance. Using item references in your workflow creates dynamic content for your workflow properties, as well as user content.
In this step you will format your workflow incorporating the outcomes you created in Step 4. You will add blank activities, that will eventually contain events for each of the outcome paths. This step is intended to further familiarize you with the K2 Studio design canvas.
Step 5 Tasks
- Rename the DefaultActivity to
Approval
(you can accept the warning message). - Add three new blank activities to the design canvas:
Rejected
Create AD Account
Approved
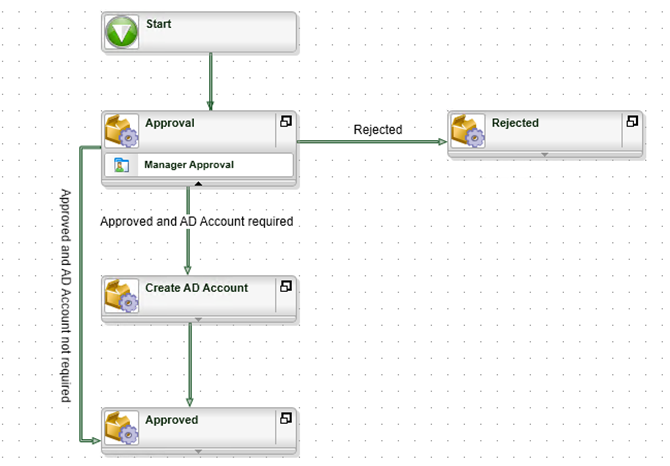
then either draw or move lines and labels around so that the workflow layout looks like the image below.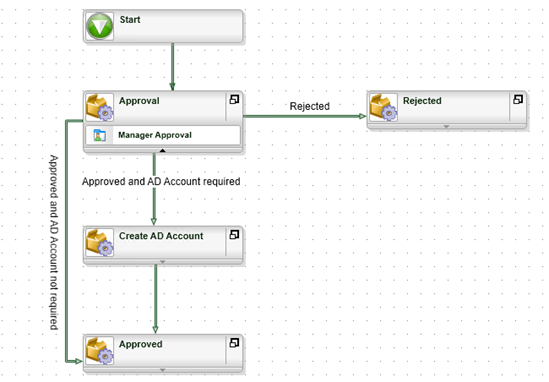
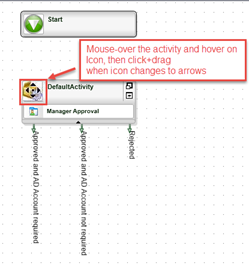
- Move the new activity in the workflow so it lies directly underneath the Start step of the workflow. To do this, move your mouse over the box icon for the activity, and then click+drag when your mouse pointer changes to four arrows.
- Rename the new activity by double-clicking the activity name and typing the new name
Approval
then click anywhere on the design canvas to set the new name. Click OK if you see a warning message. You can safely ignore this warning.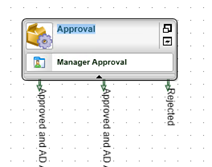
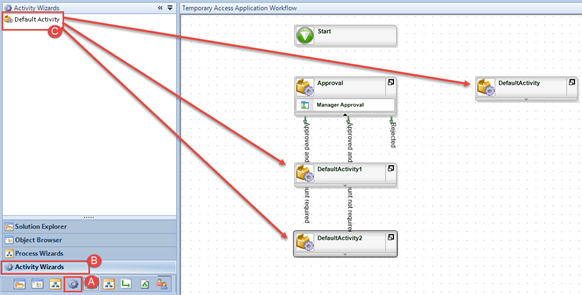
- Open the Activity Wizards pane, then drag and drop three blank Default Activities onto the design canvas. You will configure the activities for each of the outcome lines.
- Double-click each of the activity names and rename them as follows:
Rejected
Create AD Account
Approved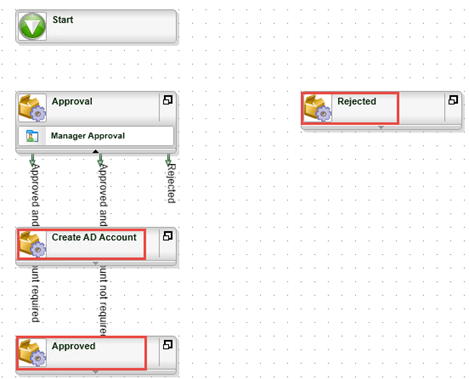
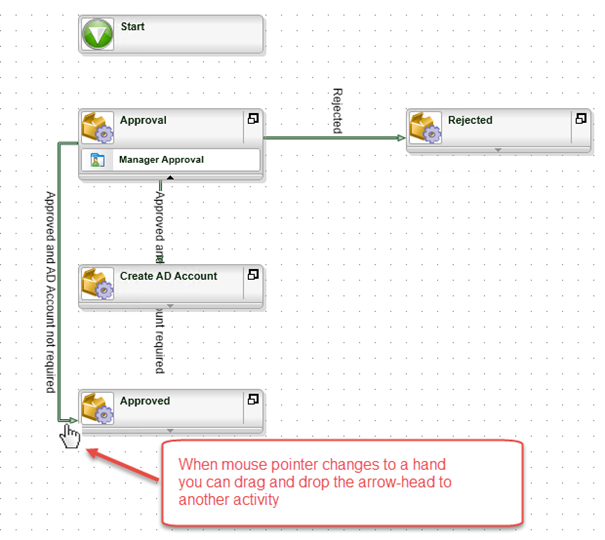
- Using your mouse, grab the arrow-head for each line that comes out the Approval activity, then attach the lines to the new activities. Use the image below for reference.When the mouse pointer changes to a hand, you can grab that end of the line and move it around to another activity. You can also move the start of a line around, but you cannot detach the start of a line from an activity. Lines flow out of activities and are bound to the source activity.
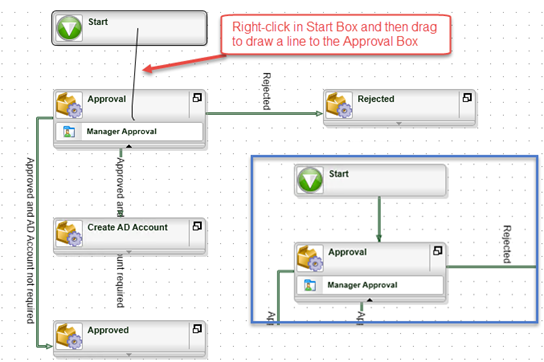
- Draw a line between the Start step and the Approval step by right-clicking inside of the Start activity, then dragging a new line into the Approval activity. K2 will draw an arrow-line between the two activities.
- Right-click on the Rejected line and select Label > Rotate Left to rotate the label name. You can then mouse-over the line label and click+drag it around to align it with the outcome line.
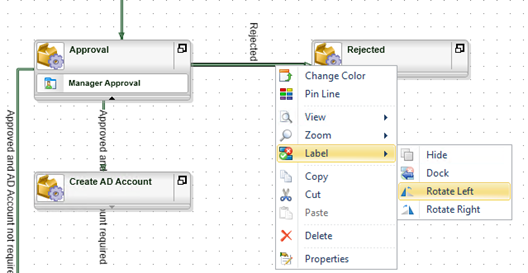
- Repeat the Label > Rotate Left for the Approved and AD Account Required line and move the label if required.
- Draw a line between the Create AD Account activity and the Approved activity. Your workflow should look like the image below.
- Save your workflow.
Step 5 Review
In this step you formatted your workflow layout, added new activities and drew lines to connect the activities. Depending on the form and approval options selected, the workflow will following the appropriate outcome path.
In this step you will be adding system tasks to each blank activity you added in the previous step. System tasks are tasks that are performed by the K2 server and do not required any human interaction. The system tasks include updating the request status property, sending an email and creating (if required) the AD user account.
Step 6 Tasks
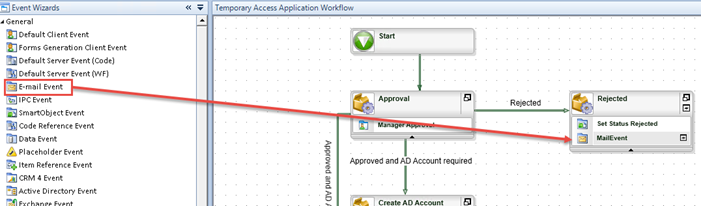
- Add a SmartObject event to the Rejected activity to set the Status property of the Temporary Access Request SmartObject to
Rejected - Add a Send E-mail event to the Rejected activity to notify the originator that their request was rejected. Use some values from the Item Reference to add contextual information to the email such as the Full Name, Company, Start Date and End Date, so that the originator knows which request was rejected.
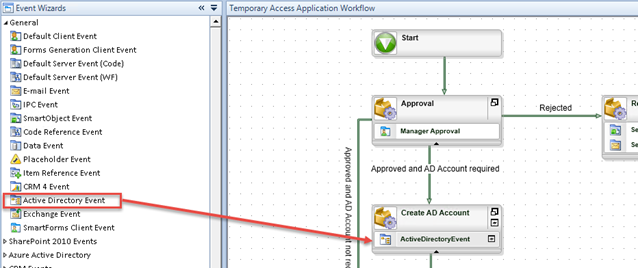
- Add an Active Directory event to create a new account for the user in the Create AD Account activity, with the following properties:
Field Value Full Name Use the Trim inline function and select the Full Name property from the Temporary Access Request Item Reference, then add
(Temp)
to the end of the Full Name property.Logon Name Use the Trim inline function, and select the AD UserName property from the Temporary Access Request Item Reference Password K2pass! Do not create an item reference, and do not create a mailbox or add the user to groups. - Copy and paste the Set Status Rejected event into the Approved activity, and re-configure it to set the Status property of the Temporary Access Request SmartObject to
Approved
then rename the copied event to
Set Status Approved
- Switch to the Event Wizards pane, then drag and drop a SmartObject Event into the Rejected activity. When you drop the event into the activity, the wizard will automatically start. Click Next on the welcome screen.
- On the Event Name and SmartObject Method screen, name the event
Set Status Rejected
and then use the ellipsis to locate the following method:
Environment > SmartObject Server(s) > SmartObject Server > K2 Learning > Temporary Access Application > Temporary Access Request SmartObject > Single Method > Save.
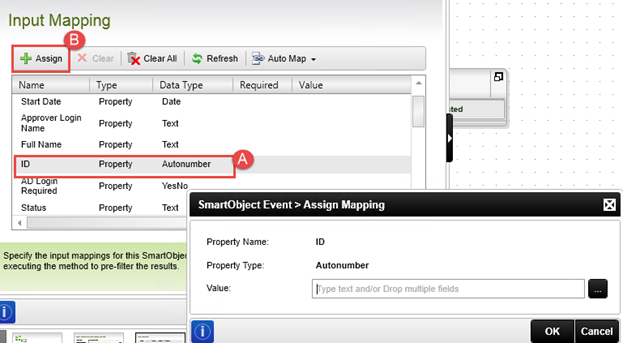
Drag the method into the SmartObject Method text box. Close the context browser. Click Next to continue. - On the Input Mapping screen, locate the ID property, then click the Assign button. You have to tell K2 which record you want to update. Remember that the ID of the access request record is saved in the RecordID data field - you will be mapping this data field to the ID input property.
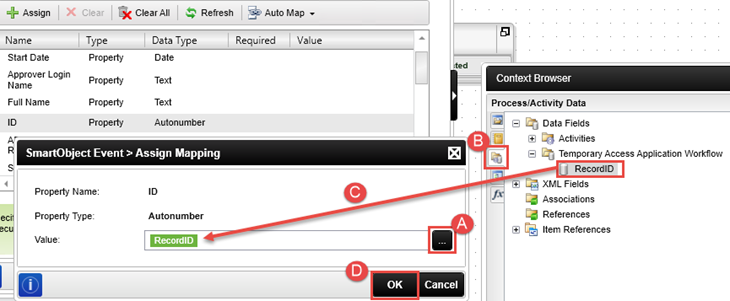
- On the Assign Mapping screen, click the ellipsis icon and then locate and drag and drop the RecordID data field that exists in the Process/Activity Data pane. Close the context browser, then click OK to close the Assign Mapping screen.
- On the Input Mapping screen, locate the Status property and click Assign. Enter
Rejected
as the Status for this request, then click OK. Click Next, Next and then Finish to complete this wizard.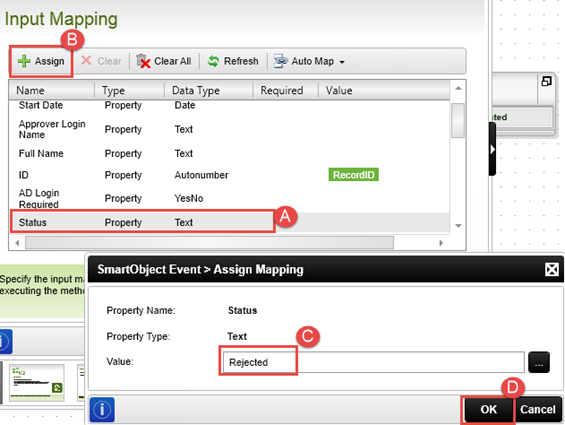
- From the Event Wizard pane, drag and drop an E-mail event into the Rejected activity so that it is below the Set Status Rejected event. The E-mail Event wizard will start as soon as you drop the event. Click Next on the wizard home screen to continue.
- Configure the E-mail settings using the table below as a guide. Use the Item References > Full Name property found in the context browser in place of the [Full Name] placeholder. Close the context browser and click Next.
Field Value Event Name Send Rejected Notification From Leave default value unchanged, it should say From Address Recipient UNCHECK Specify and CHECK Originator Subject Access Request for [Full Name] REJECTED 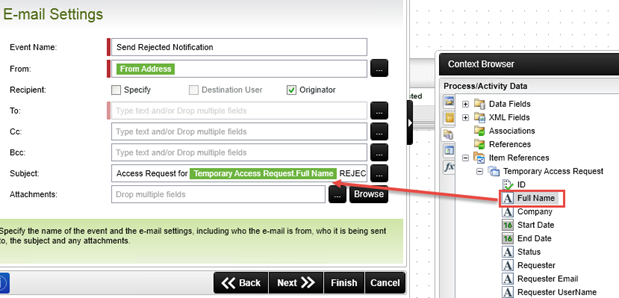
- For the message body, use the context browser and Item Reference properties to add some contextual information about the request. Use the sample below as a guide, but feel free to use whatever text you like. Close the context browser after you have the message body set, then click Next and Finish to complete the wizard.
- From the Event Wizards pane, drag and drop an Active Directory Event into the Create AD Account activity. The event wizard will start as soon as you drop the event into the activity.
- Click Next on the welcome page. On the Event Name and Actions screen, enter
Create New Account
as the Event Name, then select the Create New User action and click Next.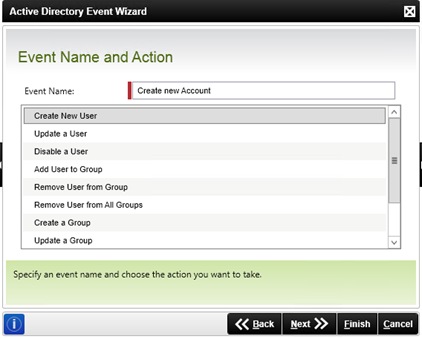
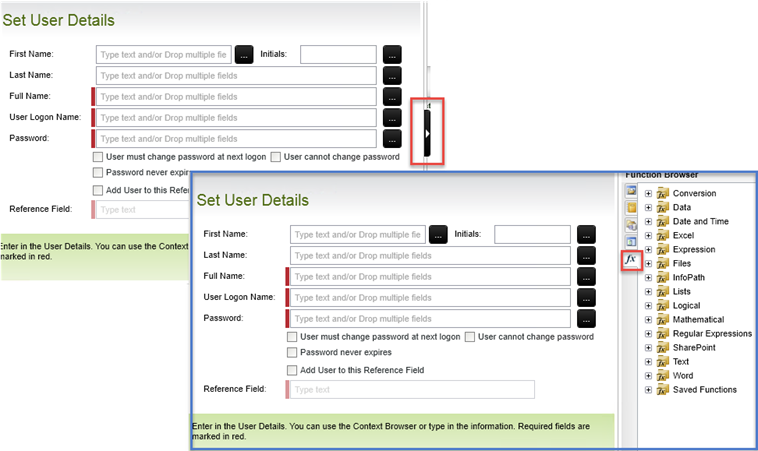
- You will be using inline text functions to remove any extra spaces from the values entered by the requester as Active Directory is sensitive to leading and trailing spaces. On the Set User Details screen, click the arrow on the right side of the screen to expose the context browser, then select the Inline Functions tab.
-
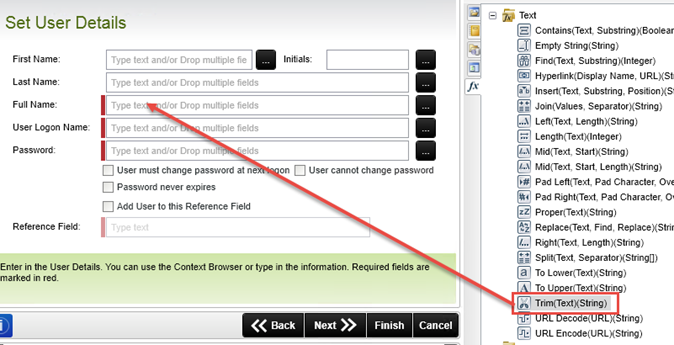
Drag and drop the Text > Trim function into the Full Name text box. The trim function removes extra spaces from the text that was entered by the user.
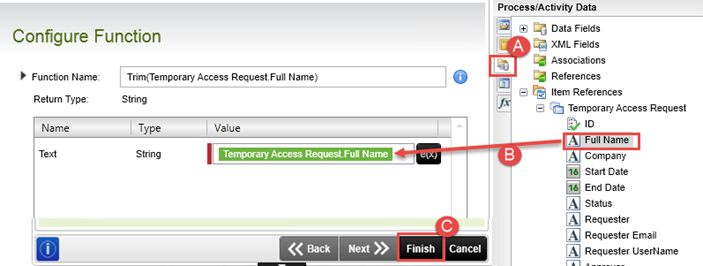
- The Configure Function window will open. From the Context Browser, drag the Full Name property from the Temporary Access Request Item Reference into the Text textbox, as shown below, then click Finish.
- Manually add
(Temp)
after the Full Name to indicate that this is a temporary account.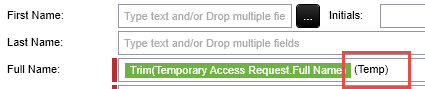
- Next you will set the User Logon Name property. Drag the Trim Inline Function into the User Logon Name text box, and configure the function to use the AD UserName property from the Temporary Access Request Item Reference. Click Finish.

- For the Password, type
K2pass!
then click Next.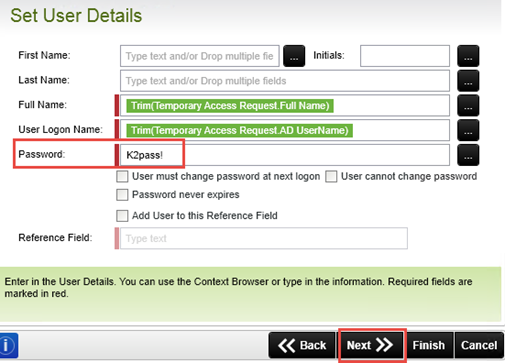
- To save time you won’t add more properties to the new AD account or create a mailbox for this user, so just click Next, Next and Finish to complete the Active Directory Event Wizard.
Do not select the options to add the user to AD Groups or to create a mailbox for the user. In a real-world environment you may want to populate additional properties for the user or create a mailbox, and you can use the context browser to drag and drop variables into fields as necessary just like you did for the first screens of the wizard. You can skip any additional properties to save time in this tutorial. - In the workflow canvas, right-click the Set Status Rejected event and select Copy.
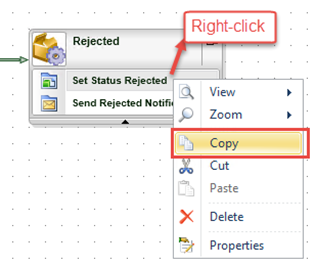
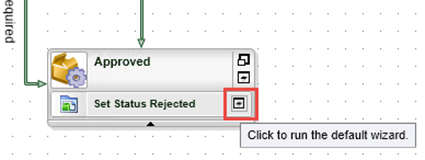
- Right-click on the Approved step and select Paste, and then click the expand-down arrow to show the pasted event.

- Move your mouse pointer over the copied event and click the event icon to re-run the wizard for the copied event.
- Click Next to get to the Input Mapping screen for the wizard. Click to highlight the Status line, then click the Assign button and change the text box entry to
Approved
Click OK, then Finish to complete the wizard.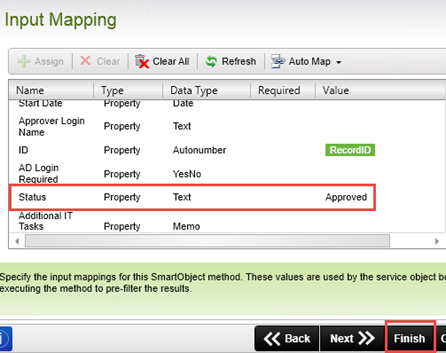
- Double-click the copied event name and rename it to
Set Status Approved
Your workflow should look like the image below.
- Save your work. (File > Save)

In this step, you assigned the save method of the Temporary Access Request SmartObject to update the status property. You mapped the ID of the SmartObject record to the RecordID data field so that K2 knows to update the current record. Recall that the RecordID data field value is set by the form when the workflow is started. You manually entered a value for the status property to show that the workflow request was rejected. This step was an example of how you can use the SmartObject Event in a workflow to call a SmartObject method as a system task.
Now you will add an email event and configure it to let the originator know their request was rejected.
This concludes the events you want to execute if the request was rejected. Notice that when building workflows with K2 Studio, you can insert multiple events into the same activity. When the workflow runs, K2 will execute all of the events in an activity in sequence, assuming that activity was reached in the path of the workflow.
Next, you will add an event to create an Active Directory account if one is required.
Now you will add a SmartObject event to set the status of the request to approved. Instead of dragging and dropping (and configuring) a new SmartObject event, you can simply copy and paste an existing SmartObject event and re-configure it, as it already does something similar to what you want to achieve.
Step 6 Review
In this step you added system events so that the workflow will perform tasks depending on whether the request was rejected or approved. You also created a new user account in Active Directory for the temporary user (if an account was required). You learned how to use inline functions in a wizard, and how to copy and paste events into activities and re-run a wizard to reconfigure an event. You also learned how to call a SmartObject method (save - to update the request status) in a workflow and how to send an email during a workflow.
In the next part of this tutorial, you will add some more advanced workflow design concepts.
Part 1 Review
In this part of the tutorial you learned how to build a workflow with K2 Studio, how to use wizards and connect activities with lines. These are the basic principles used to assemble workflows with K2 Studio. In Part 2: Building a more complex workflow with K2 Studio, you will explore more advanced workflow concepts like conditional lines, evaluating user data and business data in a line, escalations, loop-back lines and more.