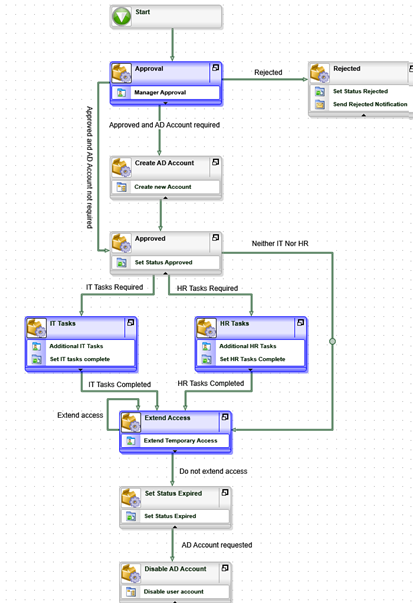
Temporary Access Application: Part 2 (Building a more complex workflow with K2 Studio)
In Part 2 of the Temporary Access Application tutorial, you will continue building the workflow that you begin in Part 1. You will explore more advanced concepts such as adding conditional lines, evaluating user data and business data in a line, enabling escalations, loop-back lines and more. You will also learn how to format workflows for clarity. Finally, you will deploy the finished workflow to a K2 environment.
In this step you will add the HR user task and the IT user task to the workflow. You will configure a conditional rule to evaluate which task line the workflow should follow or if the workflow should follow both task lines. In this step, you are configuring the workflow to run in parallel mode.
Step 7 Tasks
- Add two Default Activities called
IT Tasks
HR Tasks - Add lines to join the Approved activity to the IT Tasks and HR Tasks in parallel and then define line rules to conditionally follow the lines depending on whether the Additional IT Tasks and Additional HR Tasks properties of the Temporary Access Request Item Reference are True.
- Add a SmartForms Client Event to the IT Tasks activity, and configure it as follows:
Field Value Name Additional IT Tasks Form Temporary Access Request Form State Use existing IT Tasks State Configure Item Reference (no changes, use default values) Specify Form Parameters (no changes, use default values) Configure Open Worklist Item Rule (no changes, use default values) Transfer Workflow Data to Form (no changes, use default values) Actions IT Tasks Completed Action Display Settings (no changes, use default values) Transfer Form Data to Workflow (no changes, use default values) Outcomes (no changes, use default values) Destination User Select a group of users, in this sample you will use Denallix\Operations. Or use your own username for testing purposes. Task Notification (Do not send a task notification) - Add a SmartForms Client Event to the HR Tasks activity, and configure it as follows:
Field Value Name Additional HR Tasks Form Temporary Access Request Form State Use existing HR Tasks State Configure Item Reference (no changes, use default values) Specify Form Parameters (no changes, use default values) Configure Open Worklist Item Rule (no changes, use default values) Transfer Workflow Data to Form (no changes, use default values) Actions HR Tasks Completed Action Display Settings (no changes, use default values) Transfer Form Data to Workflow (no changes, use default values) Outcomes (no changes, use default values) Destination User Select a group of users, in this sample you will use Denallix\Human Resources. Or use your own username for testing purposes. Task Notification (Do not send a task notification)
- Select the Activity Wizards pane, then drag and drop two activities onto the design canvas. Name the activities as follows:
IT Tasks
HR Tasks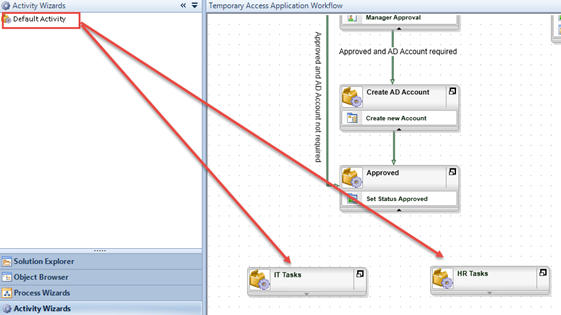
- Draw two lines to connect the Approved activity with the two new activities. (Right-click in the first activity and drag down into the second activity to draw a line.) Double-click the lines to add line labels as follows:
IT Tasks Required
HR Tasks Required - Right-click the IT Tasks Required line and select Properties.
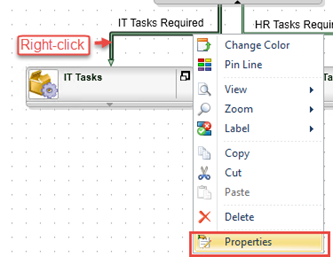
- Select the Line Rule icon, then click the Add button.
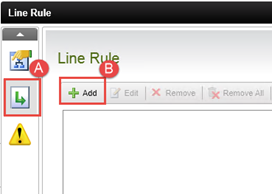
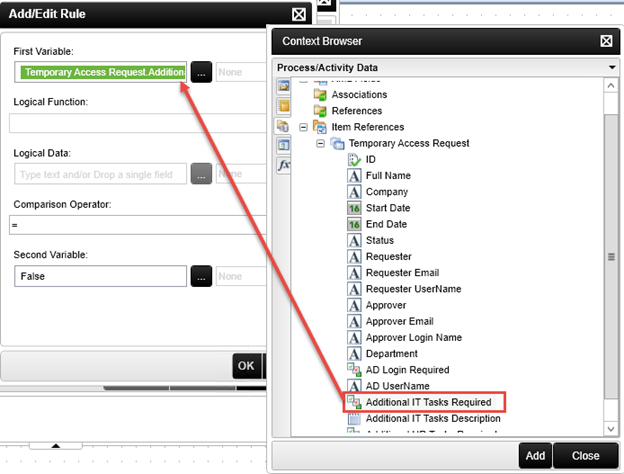
- Configure the Line rule as follows:
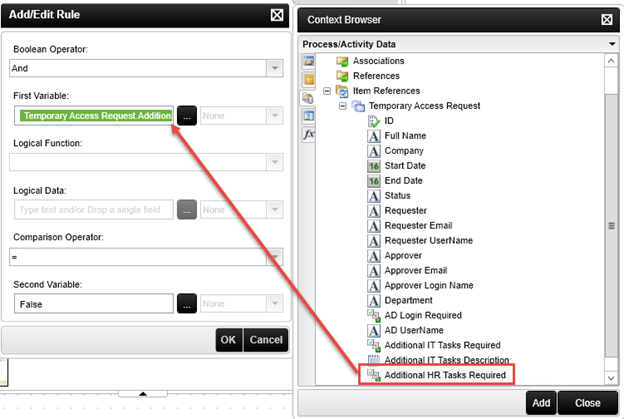
First Variable: Item References > Temporary Access Request > Additional IT Tasks Required
Comparison Operator: =
Second Variable: True
then click OK and Close the context browser and click Finish. The line will now be followed if the Additional IT Tasks option was selected on the request form.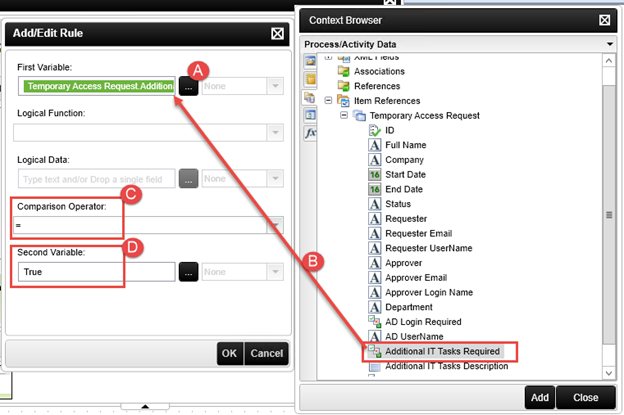
- Next you will set up the HR Tasks line. Using the same steps as before, right-click the HR Tasks Required line, and configure the line rule as follows:
First Variable: Item References > Temporary Access Request > Additional HR Tasks Required
Comparison Operator: =
Second Variable: True
then click OK and then Close the context browser and click Finish. The line will now be followed if the Additional HR Tasks option was selected on the request form.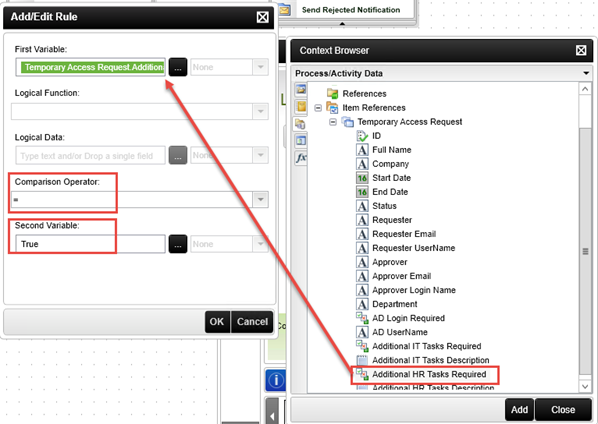
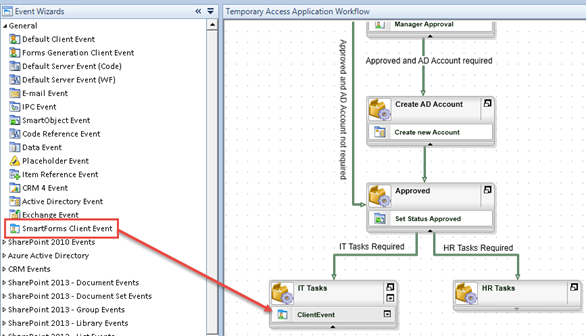
Now that you have set up the rules for your parallel lines, you will add user tasks to both the IT Tasks and HR Tasks activities. The user tasks will require a user from each group to action the task before the workflow can continue. (This is, of course, dependent on whether or not the additional task options where selected on the request form.) - Switch to the Event Wizards pane, then drag and drop a SmartForms Client Event into the IT Tasks activity. Click Next on the wizard welcome page.
- On the Select Form and State screen, rename the event to
Additional IT Tasks
and use the ellipsis button to locate and select the Temporary Access Request Form.
Configure the state options to Use an existing State and select the IT Tasks state, then click Next.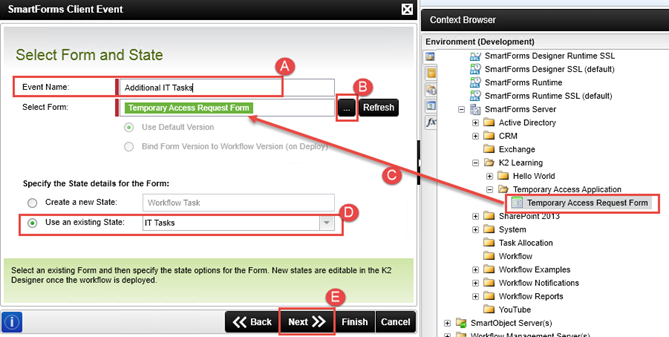
- Click Next to skip over the Configure Item Reference screen.
- Click Next to skip over the Specify Form Parameters screen.
- The Configure Open Worklist Item Rule should be configured correctly to open the worklist item When the Form is Initializing, so click Next to continue.
- Click Next to skip over the Transfer Workflow Data to Form screen.
- On the Configure Actions screen, add one Action called
IT Tasks Completed
then click OK, then Next.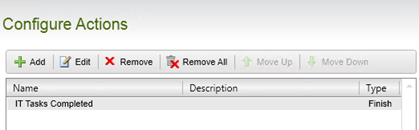
- Leave the Action Display Settings page as-is, and click Next.
- Click Next to skip over the Transfer Form Data to Workflow screen.
- Click Next to skip over the Configure Outcomes screen.
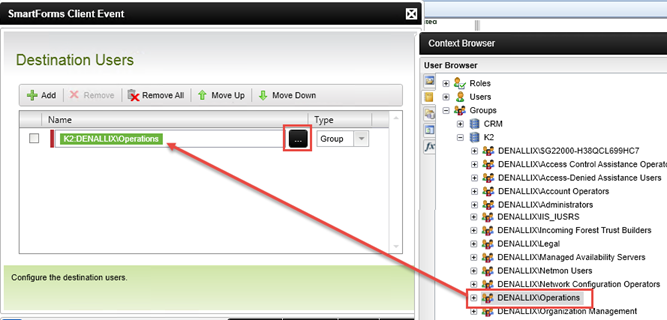
- On the Destination Users screen, click the Add button to add a new destination user, then use the ellipsis button to select the user or group that will perform the IT tasks. In this sample, you will use the Denallix\Operations AD Group, but you may need to select a different group or user if you are using your own environment for this tutorial. You can also select the Originator value found in the Workflow Context Browser > Process Instance node to route the task back to you for convenience in testing, if you prefer. Click Next to continue.
- To save time you won’t send a notification for this task, so click Finish to complete the wizard. (If you wish, you can select the notify option and customize the notification message or come back to the activity later and add a custom notification. Remember that you can use item references to further customize your message body.)
You have completed the IT Tasks user task step. Next, you will add the HR Tasks user task step following a similar procedure. You should be familiar enough now with the wizard screens, so we will just provide the configuration values for the wizard screens in a table. If you need navigation help to work through the screens, follow the same steps you just completed in configuring the IT Tasks event. - Drag and drop a SmartForms Client Event into the HR Tasks Activity, and configure the wizard screens using the table below as a guide.
Screen Field Value Select Form and State Name Additional HR Tasks Form Temporary Access Request Form State Use existing HR Tasks State Configure Item Reference (no changes, use default values) Specify Form Parameters (no changes, use default values) Configure Open Worklist Item Rule (no changes, use default values) Transfer Workflow Data to Form (no changes, use default values) Configure Actions Actions HR Tasks Completed Action Display Settings (no changes, use default values) Transfer Form Data to Workflow (no changes, use default values) Outcomes (no changes, use default values) Destination User Select a group of users, in this sample you will use Denallix\Human Resources.
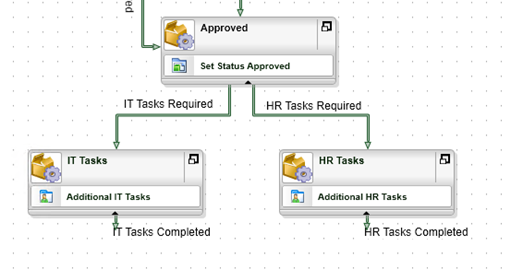
Or use the Originator property found in the Workflow Context Browser to route the task back to you for testing convenience.Task Notification (Do not send a task notification) - Your workflow should now look like the image below. Save your work.
Now you will configure the line rules so that the lines will only be followed if the requester selected the associated option when filling out the form.
Step 7 Review
In this step you defined conditional line rules to determine the flow of a workflow. In this case, the workflow will go to the IT Tasks, HR Tasks, or both, depending on the options selected by the requester in the original form. You learned how to define a line rule to conditionally follow a path in the workflow based on data instead of a user's task decision.
Next you will do some work to handle the parallel execution (in other words what happens if both HR and IT tasks were selected) and also add a line to define what happens if neither HR or IT tasks were selected.
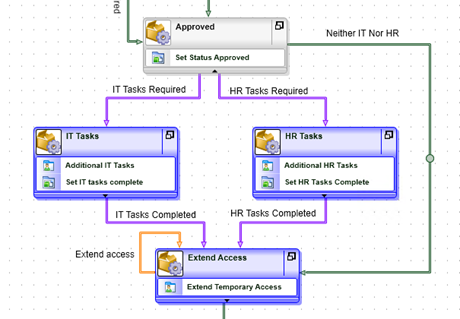
In this step you will add a merge activity that will determine whether it needs to wait for IT Tasks, HR Tasks, or both to be completed. You will also add a line for the workflow to follow if neither IT nor HR tasks were selected. When building workflows with parallel paths, you need to add an activity that will act as the merging point for the parallel lines. This activity will have rules that tell K2 to wait until both parallel activities have completed, before continuing on. If only one additional task was selected (either IT or HR), then the merging activity will simply continue on after the task has completed.
Step 8 Tasks
- Add a new activity called
Extend Access
then connect the IT Tasks Completed and HR Tasks Completed lines to the new activity. - Draw a line that goes from Approved to Extend Access, and configure the line rule so that it is followed if BOTH the Additional IT Tasks and Additional HR Tasks properties of the Temporary Access Request Item Reference are False.
- Define a preceding rule on the Extend Access activity as follows:
Item Reference > Temporary Access Request > Additional IT Tasks Required
=
False
AND
Item Reference > Temporary Access Request > Additional HR Tasks Required
=
False - Add a SmartObject event to the IT Tasks activity to set the value of the Additional IT Tasks Required property to
False - Add a SmartObject event to the HR Tasks activity to set the value of the Additional HR Tasks Required property to
False
so that the preceding rule will execute correctly.
- Add a new activity called
Extend Access
then grab and drag the line arrow-heads to connect the IT Tasks Completed and HR Tasks Completed to the new activity.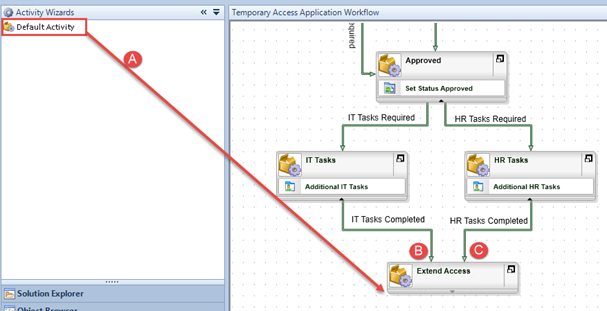
This activity will contain a user task so that the original requester can decide whether to extend the temporary access or not. Conveniently, it will also act as the merging activity for the IT Tasks and HR Tasks, if they were run in parallel. Once again, you need a merging activity so that you can configure a condition to wait for both the IT Tasks and HR Tasks to complete before moving forward with the workflow. - You also need to cater for cases where neither the Additional HR Tasks nor the Additional IT Tasks options were selected. Draw a line that goes from the Approved activity to the Extend Access activity. This is the line you will follow if neither IT nor HR tasks were selected. Double-click the line and set the label to
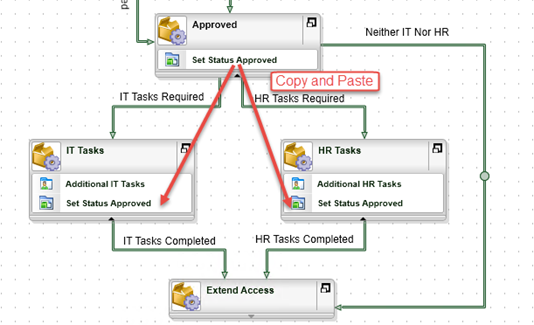
Neither IT Nor HR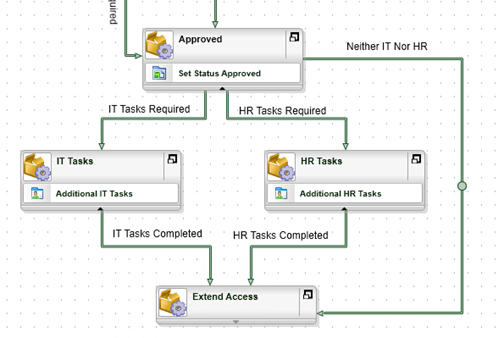 You can use the Pin Line function to add a draggable pin to the line. This allows you to grab the pinned handle and drag the line to a different place on the canvas. In the example below, you are dragging the line so that it creates an outer loop of sorts around the HR Tasks activity. (Hint: once you have added the pins, click and drag the handles fairly quickly. It can take a few attempts to get the hang of it.)
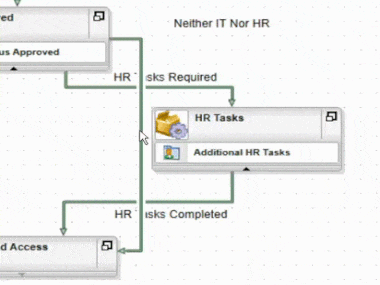
- Right-click the new line and add a line rule as follows
First Variable: Item Reference > Temporary Access Request > Additional HR Tasks Required
Comparison Operator: =
Second Variable: False
Boolean Operator: AND
First Variable: Item Reference > Temporary Access Request > Additional IT Tasks Required
Comparison Operator: =
Second Variable: False
See the screen shots for reference. Here you are simply telling K2 to follow this line if neither the Additional IT Tasks nor the Additional HR Tasks options were selected on the request form.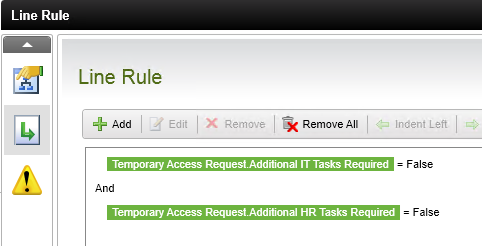

The new line you just added is necessary because the workflow would simply end after the Approved step if the user did not select either the Additional IT Tasks option nor the Additional HR Tasks option on the request form. - Right-click the Extend Access activity and select Properties.
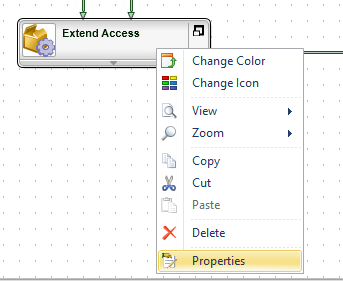
- Select the Preceding Rule tab, then click Add.
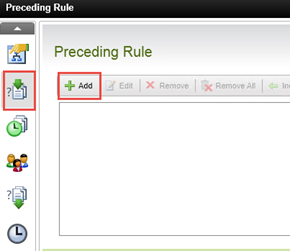
- Configure the rule as follows
First Variable: Item Reference > Temporary Access Request > Additional HR Tasks Required
Comparison Operator: =
Second Variable: False
Boolean Operator: AND
First Variable: Item Reference > Temporary Access Request > Additional IT Tasks Required
Comparison Operator: =
Second Variable: False
See the screen shots below for guidance. Click Finish to complete the rule definition.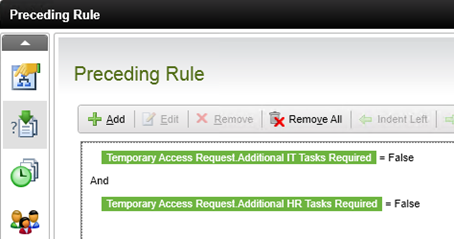

There is one more component to configuring successful parallel paths. When the IT Tasks are completed, you need to set the Additional IT Tasks back to false, and when the HR Tasks are completed, you need to set the Additional HR Tasks back to false as well. This essentially "tricks" K2 into thinking the two sets of tasks are not required, thus fulfilling the preceding rule you just set. But since you are making this setting after they have completed, the setting will not effect the tasks from running. You will do this by calling the Temporary Access Request SmartObject and updating those properties once the respective tasks are completed. - Copy and paste the Set Status Approved event into the IT Tasks and HR Tasks activities. Make sure the event is copied UNDERNEATH the existing user tasks, since you want these events to fire after the user tasks. (Once again, you are reusing workflow content that performs a similar task, to save time.)
- Rename the events to
Set IT Tasks Complete
Set HR Tasks complete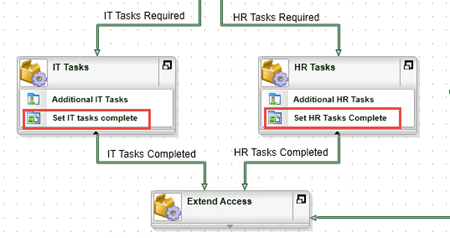
- Run the wizard for the copied Set IT Tasks Complete event, and set the value of the Additional IT Tasks Required property to
False
then click Finish to complete the wizard. (You can leave the other properties as is.)
- Run the wizard for the copied Set HR Tasks Complete event, and set the value of the Additional HR Tasks Required property to
False
then click Finish to complete the wizard. (You can leave the other properties as is.)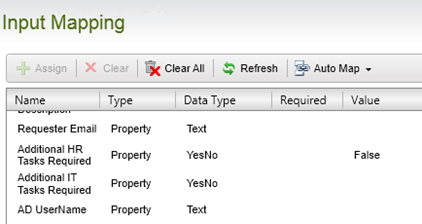
- Save your workflow.
Next you will configure the Extend Access task to only run when both IT Tasks and HR Tasks are complete. This is a requirement when you want to implement a parallel path in a workflow, otherwise the Extend Access task would start once after the IT Tasks are complete and once again when the HR Tasks are complete. You will be adding a preceding rule to the Extend Access task so that it checks that both IT Tasks and HR Tasks are complete before the Extend Access task is started.
Step 8 Review
In this step, you configured the Extend Access step to wait for both IT Tasks and HR Tasks to be completed before it starts. You accomplished this by setting the value of the Additional IT Tasks Required and Additional HR Tasks Required back to false after the respective tasks were completed. This will now allow for all combinations of IT Tasks and HR Tasks. What is important to note here is that for a parallel workflow that merges again later on, you need to define a preceding rule for the merging activity.
You also added a line that will be followed if neither IT nor HR Tasks are required. This way, the workflow will ultimately arrive at the Extend Access step regardless of the options selected by the requester.
In this step, you will add a workflow step for the requester to decide whether or not the temporary access should be extended. (For example, a project may be lasting longer than anticipated and therefore the temporary user needs access for longer.) You want this task to start one day before the temporary access is due to expire to prevent adding a task to the requester’s worklist until it is actually necessary to extend access. As a security measure, you also want this task to expire and the temporary access to expire if the requester forgets to action the task by one day after the end date of the access request.
Step 9 Tasks
- Define a start rule for the Extend Access activity so that it starts one day before the End Date.
- Add a SmartForms Client Event to the Extend Access and configure it as follows:
Field Value Name Extend Temporary Access Form Temporary Access Request Form State Use existing Extend state Configure Item Reference (no changes, use default values) Specify Form Parameters (no changes, use default values) Configure Open Worklist Item Rule (no changes, use default values) Transfer Workflow Data to Form (no changes, use default values) Actions Extend access
Do not extend accessAction Display Settings (no changes, use default values) Transfer Form Data to Workflow (no changes, use default values) Outcomes (no changes, use default values) Destination User Process Originator Task Notification (Do not send a task notification message) - Configure the Extend Access line so that it loops back to the same Extend Access activity.
- Add an activity called
Set Status Expired
and connect the Do not extend access line into this activity. - Add an escalation for the Extend Access activity that fires one day after the End Date, and configure it to Go To the Set Status Expired activity.
First you will add the rule that delays the start of the Extend Access step until one day before the Access End Date.
- Right-click the Extend Access activity and select Properties.
- Select the Start Rule tab, then select the Start option and expand the context browser on the right of the window. Open the Inline Functions tab.
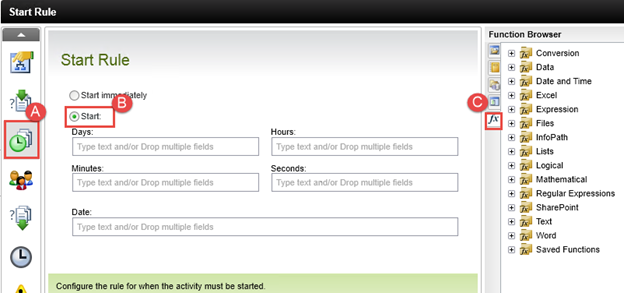
- Drag and drop the Date and Time > Add Days function into the Date textbox.
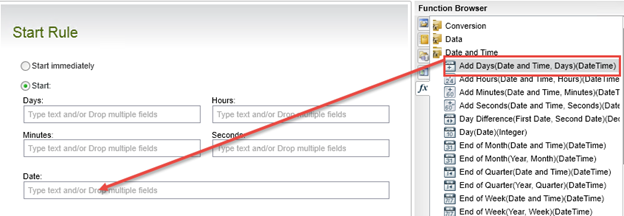
-
For the Days value, type (minus 1)
-1
then drag the Item References > Temporary Access Request > End Date property into the Date and Time Value text box, then click Finish. Click Finish once again to close the Extend Access Properties wizard.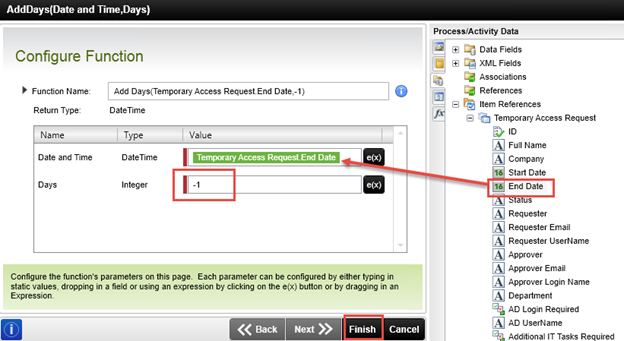
You want the Extend Access user task (that you will configure next) to fire off one day before the temporary access end date. The user task will be routed to the form originator, who must decide whether or not to extend the temporary access. Now you will add the user task and configure the lines that result from the user task. - Drag and drop a SmartForms Client event into the Extend Access activity from the Events Wizards pane. Click Next on the welcome page.
- As you did for the HR Tasks activity, you should be familiar enough with the SmartForms Client Event wizard screens to use the table below to configure the wizard:
Screen Field Value Select Form and State Name Extend Temporary Access Form Temporary Access Request Form State Use existing Extend state Configure Item Reference (no changes, use default values) Specify Form Parameters (no changes, use default values) Configure Open Worklist Item Rule (no changes, use default values) Transfer Workflow Data to Form (no changes, use default values) Configure Actions Actions Extend access
Do not extend accessAction Display Settings (no changes, use default values) Transfer Form Data to Workflow (no changes, use default values) Outcomes (no changes, use default values) Destination User Select the Process Instance > Originator from the Workflow Context tab 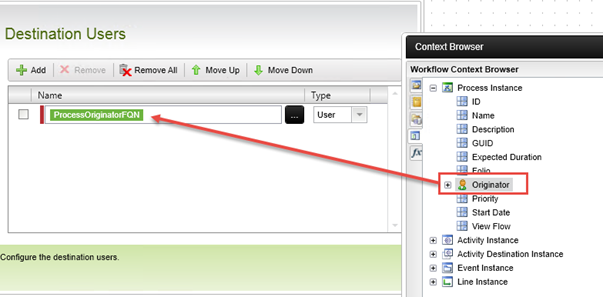
Task Notification (Do not send a task notification) - You should see two lines that flow out of the activity. Grab the arrow-head of the Extend Access line, and loop it back into the same activity. (It may take a few tries before the arrow will snap to the activity. Aim for the activity icon.) This step is creating a loop in the user task that will continue to loop until the user or system expires the event. If the originator chooses to extend the access, they will need to input a new end date. The workflow will then loop back and pause until one day before the new end date.

- Add a new activity called
Set Status Expired
to the workflow and then connect the Do not extend Access line to this new activity.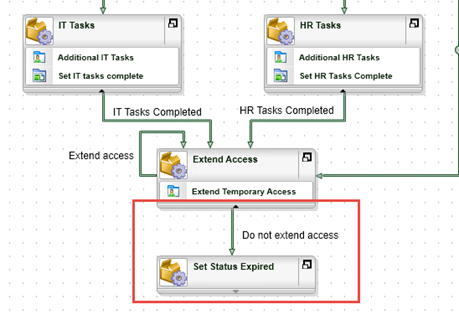
- Next you will define an escalation for the Extend Access step, so that the workflow will go to the Set Status Expired activity automatically one day after the end date of the access. This is a security measure, in case the requester forgets to action the task to extend the temporary access.
Right-click the Extend Access activity and select Properties, then open the Escalations tab.
- Add a new escalation and click Next on the welcome screen.
- Name the escalation
Expire Access
and click Next. - On the Rule Template screen, select Escalate On and click Next.
- You want the escalation to fire one day after the end date. On the Escalate On screen, select the Dynamic radio button, then use the ellipsis icon to drag and drop the Add Days inline function into the Date and Time text box.
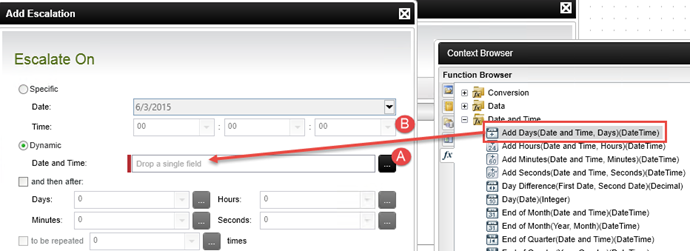
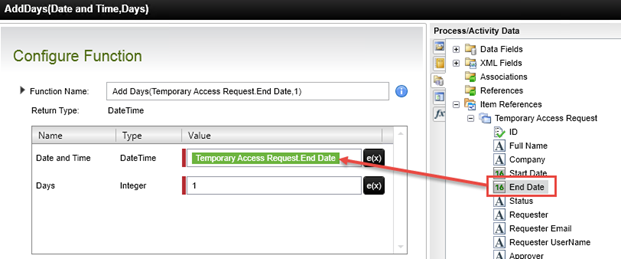
- Configure the function to add one day to the Item References > Temporary Access Request > End Date property, then click Finish. In this step, you are telling K2 that if you reach the end date (day), the wait one day and expire the task if the requester did not extend the end date.
- Click Next to go to the Working Hours screen and then select the None radio button. Click Next. (This escalation will not be associated with any working hours.)
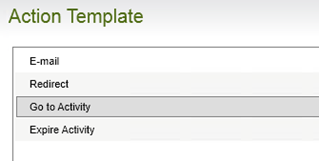
- For the Action Template, select Go To Activity and click Next.
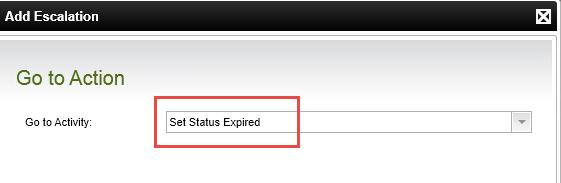
- On the Go to Action screen, select Set Status Expired, then click Next. Click Finish to complete the Escalation wizard, then click Finish to close the activity properties page.
Step 9 Review
In this step you configured a user task with a start rule (so that the task is delayed until a specific date) and an outcome that loops back to the same activity (so that the task is restarted on a later date if the user decided to extend access to a future date). You also added an escalation that will expire the active task and go to another activity in the workflow if the user does not action the task in time. You used inline functions to calculate the start date and escalation date.
In your scenario, this step is used so that the requester can extend the temporary access if needed, but if they forget to do so, the system will automatically expire the temporary access one day after the end date.
In this step you will add some additional server tasks that need to be performed at the end of the workflow. One task will update the status of the temporary access request and another will disable the AD account if one was created for the temporary user. You will define a conditional line that will check to see if an AD account was created.
Step 10 Tasks
- Add an event in the Set Status Expired activity to set the Status of the request to
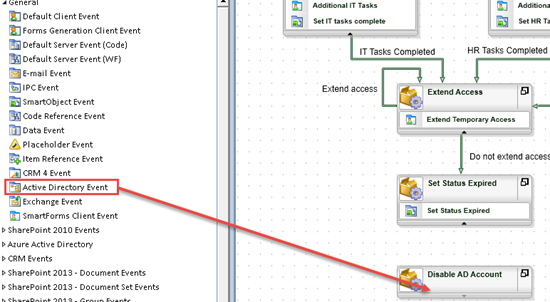
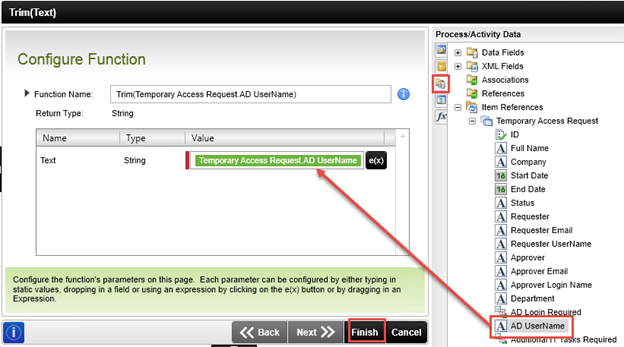
Expired. - Add a Disable AD Account activity to the workflow and add an Active Directory Event and configure it to disable the AD account using the Item References > Temporary Access Request > AD UserName property and the trim inline function.
- Add a line between the Set Status Expired activity and the Disable AD Account activity and configure the line rule to only execute if Item References > Temporary Access Request > AD Login Required property is
True
- Copy and paste the Set Status Approved event into the Set Status Expired activity. Rename the event to
Set Status Expired - Re-run the event wizard and configure the event to set the Status property to
Expired
Finish the wizard. - Add a new activity to the workflow and name it
Disable AD Account - Drag and drop an Active Directory Event into the Disable AD Account activity. Click Next on the welcome screen.
- Name the event
Disable user account
then select the Disable a User action and click Next.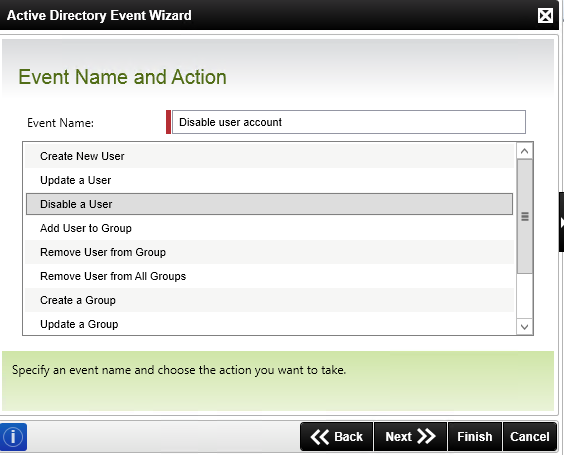
- On the Specify User to Disable screen, drag and drop the Trim inline function into the User Name field. (Once again, you are using the trim in-line function so that any extra spaces are removed, as Active Directory can be particular when it comes to extra spaces.)
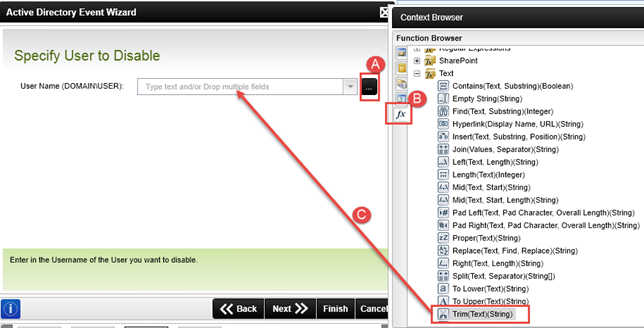
- Configure the Trim function to use the Item References > Temporary Access Request > AD UserName property, then click Finish.
- Click Finish to complete the wizard.
In this step, you added an event that will disable the account of the temporary user, using the AD UserName property to find the correct account.
Next you will add a line to the workflow that will only go to this activity if an account was created for the temporary user. - Draw a line between the Set Status Expired activity and the Disable AD Account activity.
- Right-click the new line and click the Line Rule tab from the line properties.

- Add a new rule to the line and configure it so that the line is only followed if the Item References > Temporary Access Request > AD Login Required property is
True
Click Finish to close the line properties window.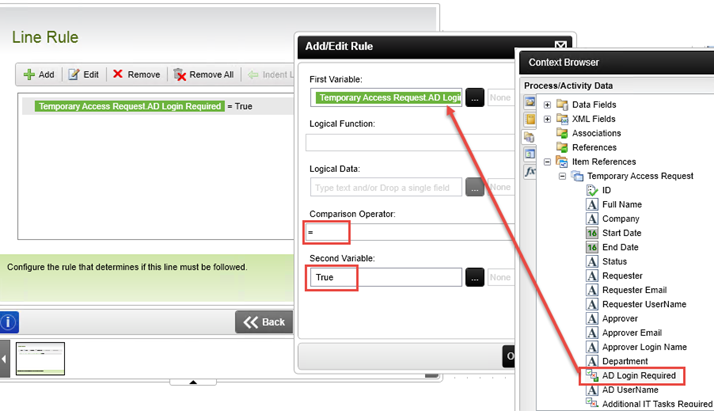
- Add a line label that indicates that the line will only be followed if the create account value was true.
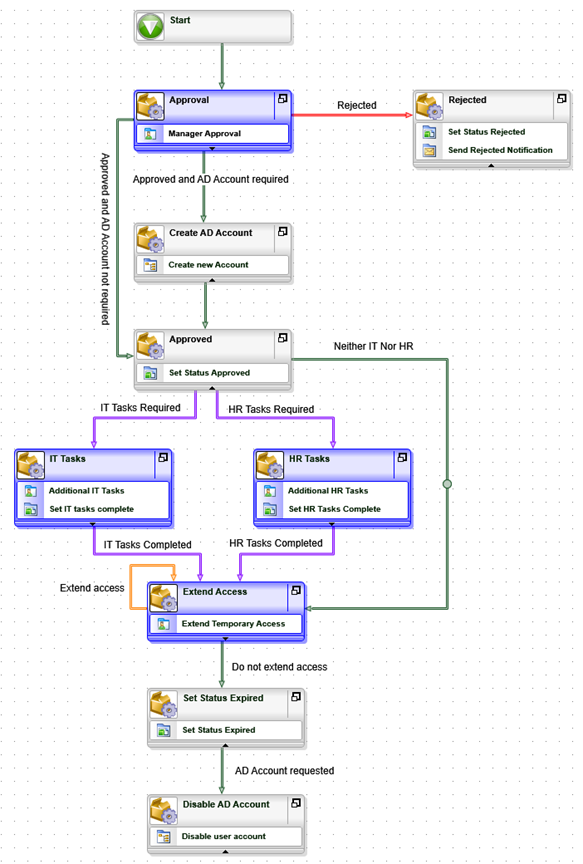
Your workflow should look like the image below.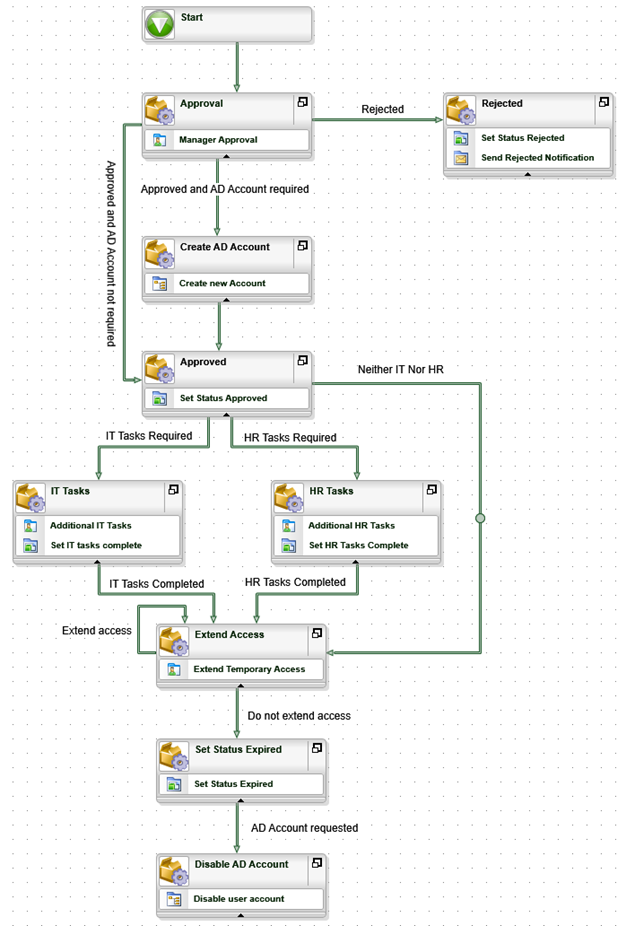
- Save your workflow
Now you will add an event that will disable the AD account if one was created.
Step 10 Review
In this step you added a SmartObject method to set the status of the request to expired. You also added a new event to disable the AD account and configured a line rule so that the account is only disabled if an account was created in the first place.
Using colors in your workflow can help you visually distinguish user tasks from system tasks and outcome line actions. This is especially useful for larger processes.
Step 11 Tasks
- Change the activity colors for activities that contain user tasks to blue.
-
Change line colors as follows
Rejected – red
Looping Extend access – orange
Parallel paths – purple - Align activities and move them around so that the workflow is easy to read. See the screenshot in the walkthrough for a sample layout.
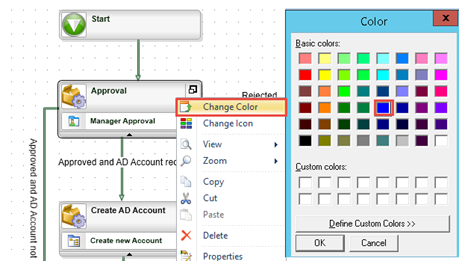
- First you will change the color of all user activities to blue, so that you can easily distinguish activities that require user input from activities that are performed by the K2 server only. Right-click the Approval activity and select the Change Color option. Change the color of the activity to blue.
- Use the same approach to change the color of the IT Tasks, HR Tasks and Extend Access activities to blue. Now it is easy to see which tasks in the workflow require user action.
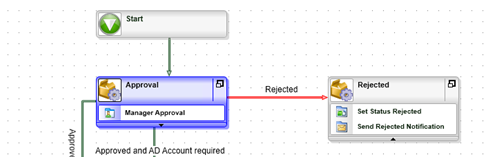
- You can also use color-coding to illustrate the different paths that may be followed (for example, to illustrate the exception path of a workflow). Right-click the Rejected line and change its color to red to indicate that this is the exception path.
- Change the color of the loop-back Extend Access line to orange to indicate that this is an optional path, then change the color of the IT Tasks Required and HR Tasks required lines to purple to indicate that they are parallel paths.
If necessary, move activities around and use the alignment functions so that activities are nicely aligned and separated from one another. Try not to have any activities overlap, and try to lay the workflow out so that lines do not cross over each other. It won’t affect the operation of the workflow if they do, but following these guidelines just makes for an easy-to-understand workflow.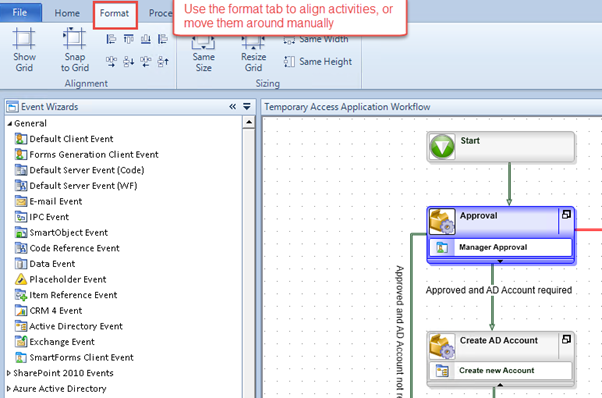
An example of how you might organize your workflow.
Step 11 Review
In this step, you just explored some formatting options for workflows. Applying some consistent and logical formatting language to a workflow will make it easier to understand visually.
In this step, you will briefly explore the process properties, deploy the workflow to your K2 environment and then give the users in your organization permission to start and report on the workflow.
Step 12 Tasks
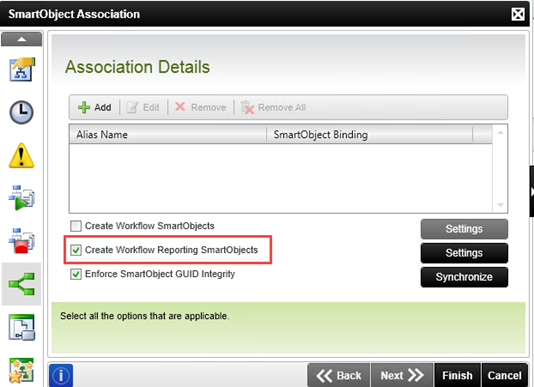
- Confirm that the Create Workflow Reporting SmartObjects option is selected.
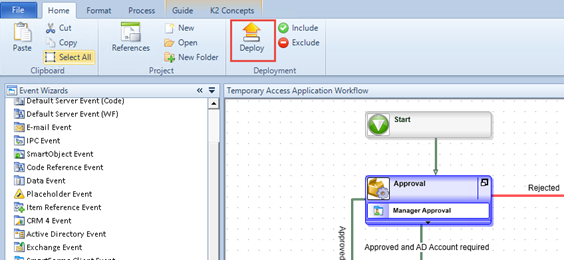
- Deploy the workflow.
- Give domain users start and view rights to the workflow (from the K2 Management site).
- First you will make sure that the workflow will generate reporting SmartObjects when it is deployed. You will be using these SmartObjects in Part 4 of this tutorial.
Right-click anywhere in the canvas of the workflow and select Properties.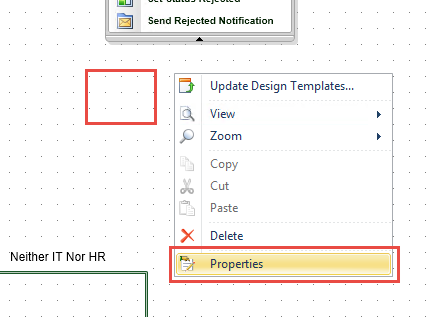
-
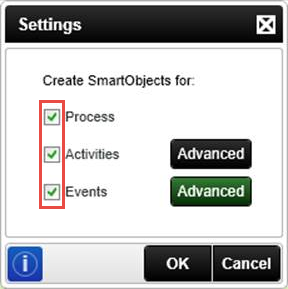
Open the Association tab and confirm that the Create Workflow Reporting SmartObjects option is selected. If it is not selected, CHECK the box to select it, then click the Settings button to the right of that line. CHECK all three options (Process, Activities, Events) then click OK. Click Finish.
- From the Deployment pane in the ribbon bar, select Deploy.
- Wait for the project compilation to finish and then on the deployment wizard welcome screen click Next.
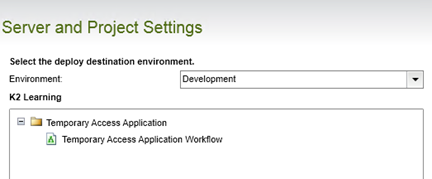
- In the Server and Project Settings screen, select Development and click Next.
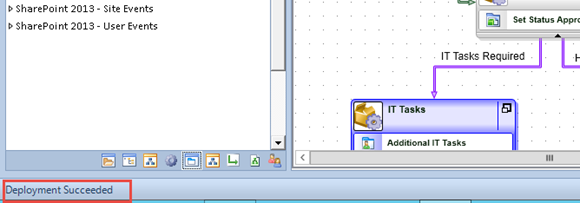
- Click Finish to start deploying the workflow. It may take a few seconds for the workflow to finish deploying. Once the deployment is done, you should see a Deployment Succeeded message in the status bar.
- Save your workflow.
- Next you will give all of the users in your domain rights to start the workflow and view the workflow reports.
Launch the K2 Management site (Start > All Programs > K2 blackpearl > K2 Management).
(If the K2 Management site link is not in your menu, ask your K2 administrator for the URL to the site. If you do not have administrator rights on your K2 environment, your K2 administrator will need to assign the process rights described below.)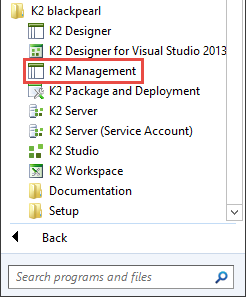
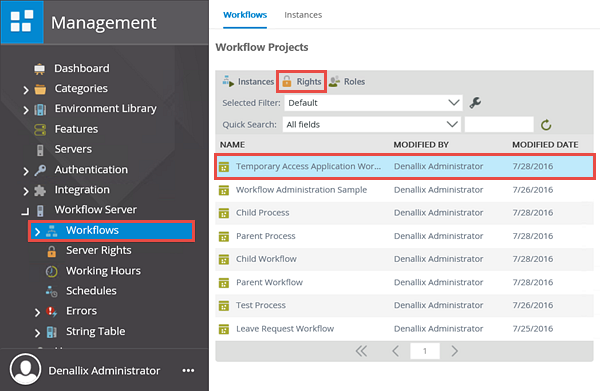
- From the Management menu, expand the Workflow Server node, then click on Workflows. All of the current workflow projects will be displayed in the central pane. Locate the Temporary Access Application Workflow project, then click it so that it is highlighted. Click the Rights button in the top toolbar.
- On the Workflow Rights screen, notice that the deploying user already has ADMIN rights. K2 assigns the admin process rights automatically to the user that deploys the workflow. Click Add.
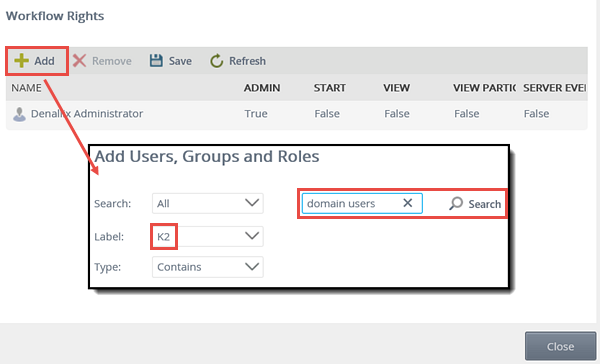
- On the Add Users, Groups and Roles screen, change the Label to K2 (if necessary), then enter
domain users
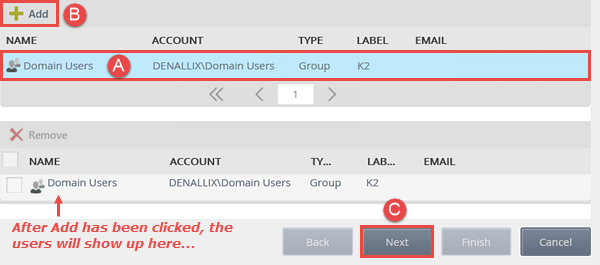
into the search text box and click the spyglass or Search button. - The results pane on the Add Users, Groups and Roles screen will display any search results that K2 finds. Click to highlight the Domain Users search result, then click Add once again to select the domain users. Click Next.
- CHECK the boxes for START and VIEW. Click Finish.
This setting tells K2 whether or not to gather reporting data for each workflow process and process instance. If you select this option, K2 will create reporting SmartObjects specific to this workflow. If you know for certain you don't need reporting data on a process, you can turn this option off, to keep server performance optimized.

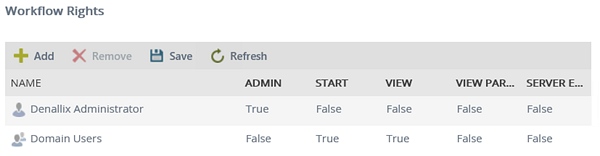
You should see that the deploying user has ADMIN rights on the workflow, and domain users now have START and VIEW rights.
Leave the K2 Management site open as you will return to it in later steps.
Step 12 Review
In this step you reviewed the process properties, specifically ensuring that K2 will create reporting SmartObjects for this workflow. You will be using the reporting objects later to build a composite SmartObject. You also deployed the workflow and then set permissions so that users in your domain can start the workflow and run reports against the workflow.
The solution is now ready to test!
Part 2 Review
In this part of the tutorial you learned how to implement more advanced workflow concepts like conditional lines, evaluating user data and business data in a line, escalations, loop-back lines and more. You also learned how to format a workflow for clarity and then deployed the finished workflow to the K2 environment.
The application is now ready to test, which you can do by following Part 3: Testing the Application.