
Available only with Enterprise Edition
You can create relationships that group similar types of data together in tables in your output documents.
For example, you might want to group product line items on the Opportunity object by sales price. Here a product line has been added to the Edge Installation opportunity, part of the default records that come with every Salesforce organization. In your output document, each product with the same sales price will appear in a table. If you have five sales prices, you will have five different tables.
To group data with a Salesforce Object relationship, you setup the relationship, then tag the template.
Relationships you can use with grouping
Grouping is only available for certain types of relationships.
|
Relationship |
Description |
|---|---|
| Salesforce Object | Grouping is only available for parent relationships (related lists). |
| Apex Data | Select a Copy Type of Group. |
|
Unrelated Data |
Select a Copy Type of Group. |
Templates types you can use with grouping
Grouping is only available for certain types of templates:
-
Microsoft Word
-
Microsoft PowerPoint
Set up the grouping relationship
You can set up a relationship for grouping by editing an existing DocGen Package. The following procedure uses the example of grouping product line items on the Opportunity object with a Salesforce Object relationship, but this is not a requirement. You can use any object with a parent-child relationship to another object to create a grouping relationship.
Tip: You cannot set up a grouping relationship from the DocGen Package Wizard.
To add a grouping relationship to an existing DocGen Package
-
From the Force.com app menu, select Nintex DocGen, and then click DocGen Packages.
Tip: You can also select this from Lightning with the
 App Launcher.
 -
Select a DocGen Package.
-
From Relationships, click New Relationship.

-
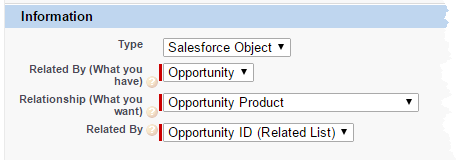
In Type , under Information, ensure Salesforce Object has been selected.
-
In Related by (what you have), select the object on which you based your DocGen Package.
To group product line items on the Opportunity object, select Opportunity.
-
In Relationship (what you want), select the object you want to relate to your existing DocGen Package object.
To group product line items on the Opportunity object, select Opportunity Product.
-
In Related by, select an item that defines how Related by and Relationship will work. In our example, Opportunity ID (Related List) is the only choice because it describes the parent-child relationship between Opportunity object and its products.
-
In Relationship Alias, type an alias. This string is used in your tags. Salesforce field name validation rules apply.
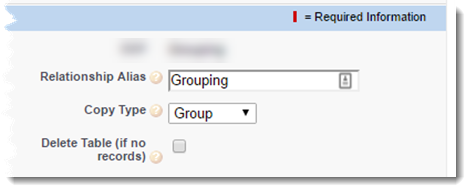
For our example, type Grouping.
-
In Copy Type, select Group.
-
(Optional) Select Delete Table (if no records), if you want to suppress tables with no records from output documents. If you want empty tables in output documents, unselect Delete Table (if no records).
-
Under Group Relationship by, select the field from which you want to group the data.

For our example, you select Sales Price.
-
(Optional) In Sorted by, select a sort option.
-
Click Save.
Tag the grouping template
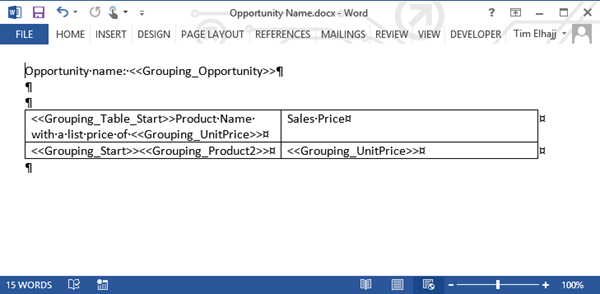
You tag the template with tags that include the alias you created in the relationship, then upload the template into the DocGen Package and generate the documents. The tags use table and row replication. The following sample is an example of how the tags would appear in your Microsoft Word template.
This is an example of the tags for grouping in a Microsoft Word template.
Example of grouping tags
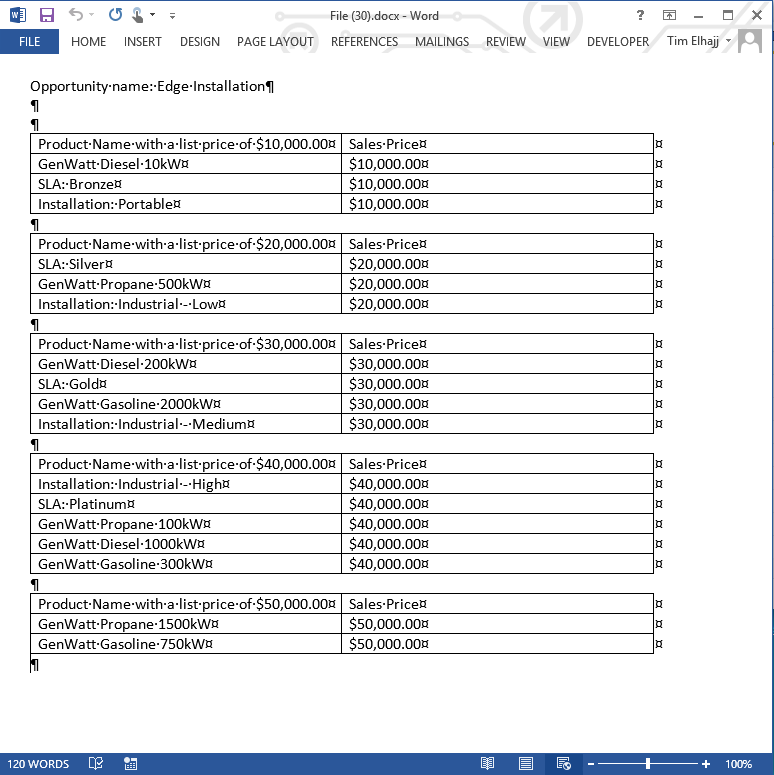
From the grouping template comes the following output document.
To tag the grouping template
-
From DocGen Packages, open the DocGen Package where you created the grouping relationship.
-
Click Field Tagger.
-
In Filed Tagger, from Main Object, select the same object you picked for Relationship (what you want) when you created the grouping relationship. (Step 4 in To add a grouping relationship to an existing DocGen Package).
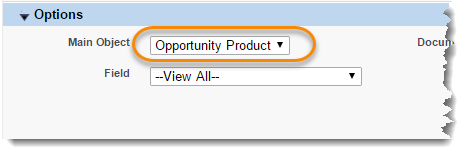
For our example, you'll select Opportunity Product.
-
In Alias, select the value you typed in Relationship Alias when you created the grouping relationship. (Step 7 in To add a grouping relationship to an existing DocGen Package).
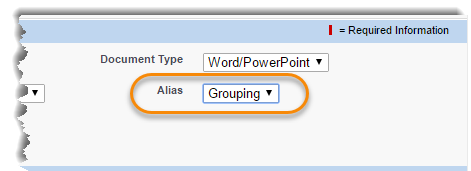
For out example, you'll select Grouping.The special tags you need with the grouping alias appear in the Field Tagger.
-
In the template, add the grouping start tag in the header row of your table.
For example, <<Grouping_Table_Start>> goes inside the table header.
-
In the template, add the row start tag in the first non-header row in the table, then add any additional tags for the row.
For example, <<Grouping_Start>> goes into the first non-header row in our template, followed by the data tags for each row <<Grouping_Product2>> and <<Grouping_UnitPrice>>.
For more information on row and table replication, see Row replication in Microsoft Word or Row replication in Microsoft PowerPoint.
-
Upload the template to the DocGen Package.
For more information, see Adding template files to DocGen Packages.
Generate documents with data grouped into tables
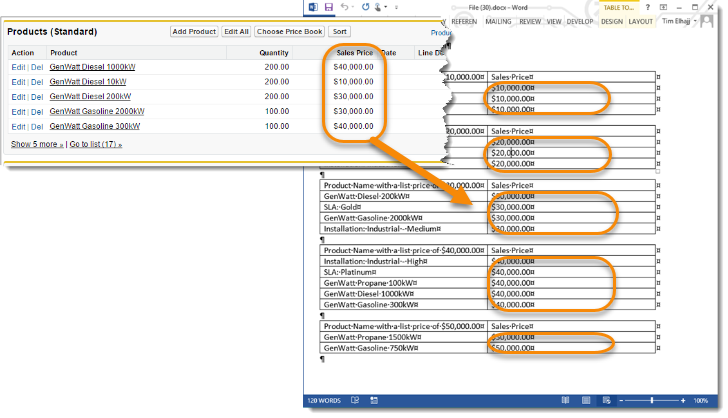
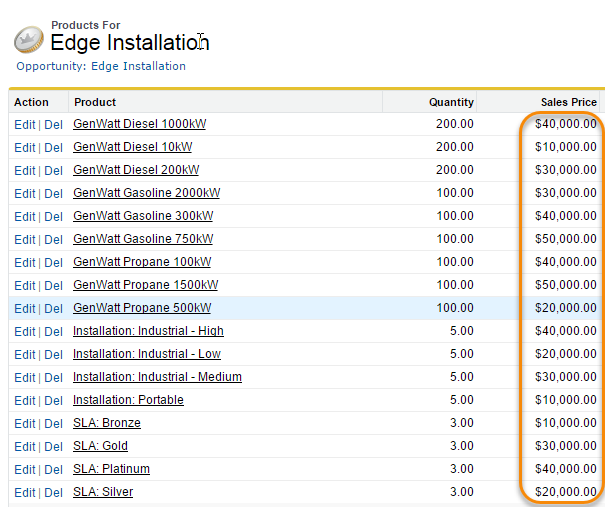
With the relationship and template created, you are ready to generate a document that group product line items from the Opportunity object by sales price. Here is a list of products and sales prices on the Edge Installation opportunity.
To generate documents with data grouped into tables
-
From the DocGen Packages, open the DocGen Package where you created the grouping relationship and added the template.
-
From Test DocGen Package, click Select Record.
-
Satisfy the requirements for generating your document.
For more information, see DocGen Package object testing
For our example, select Edge Installation, None, and Download.
-
Click Test DocGen Package.
In our output document, each product with the same sales price appears in a group in a table. Since we have five different sales prices, our output document has five different tables or groups.
