Post Installation Configuration
After installing K2 connect a few manual configuration steps are required before you can start creating and deploying Service Objects. Follow these step-by-step instructions:
Follow these configuration steps after a K2 connect standalone installation:
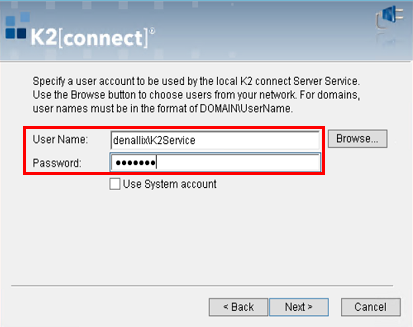
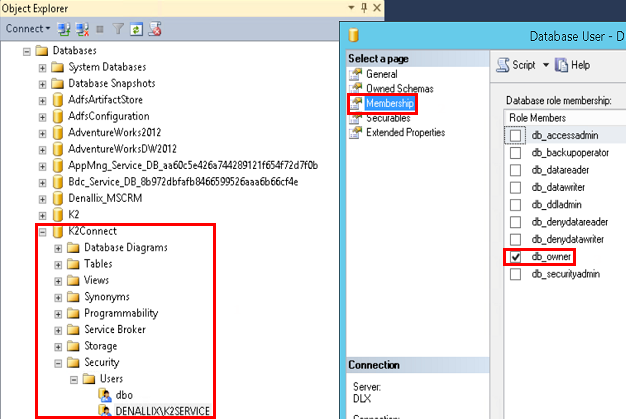
- Add db_owner rights for the account used in the installation on the K2 connect database in SQL. Failing to do so will result in an authentication failure when caching credentials. Use these images as reference:
- Go to Start > All Programs > K2 connect for SAP > K2 connect Administration. Click on Settings and then Licensing.
- Add a valid license key. The license key can be requested from http://portal.k2workflow.com.
- Click on Configure Destinations.
- Right click on Connectors and select Connectors > Add.
- Type a name for the connector and click on the browse button for the Connector Path. Select SourceCode.ServiceObjectModel.ERP.Connect.dll as the path.
- When prompted to import shared destinations, click No if this is a new setup.
- Right click on the new connector and select Systems> Add.
- Type a name for the System.
- Right click on the new System and select Destinations> Add.
-
Type a name for the Destination and enter the SAP connection string. It should be in the following format:
-
ASHOST=<Server IP> SYSNR=00 CLIENT=800 LANG=EN USER=<User ID> PASSWD=<PWD>
-
Make sure User ID and Password are uppercase.
-
- Click OK and test the connection using "Predefined User Credentials".
- Restart K2 blackpearl Host Server service.
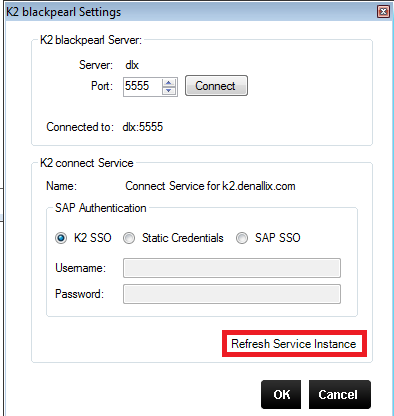
- Under K2 blackpearl settings, click on Register Service Instance.
- If the connection test passes, the setup was done correctly. The K2 connect Designer can now be used to design K2 connect Service Objects and then map these objects to SmartObjects for usage.
Follow these configuration steps after a K2 connect distributed installation:
- Add db_owner rights for the account used in the installation on the K2 connect database in SQL. Complete this step on the SQL Server in the distributed environment. Failing to do so will result in an authentication failure when caching credentials. Use these images as reference:


- From the machine where the first K2 connect Server was installed, which is your primary node, go to Start > All Programs > K2 connect for SAP > K2 connect Administration. Click on Settings and then Licensing.
- Add a valid license key. The license key can be requested from http://portal.k2workflow.com.
- Click on Configure Destinations to set up a shared Destination for the all the K2 connect Servers in the environment.
- Right click on Connectors and select Connectors > Add.
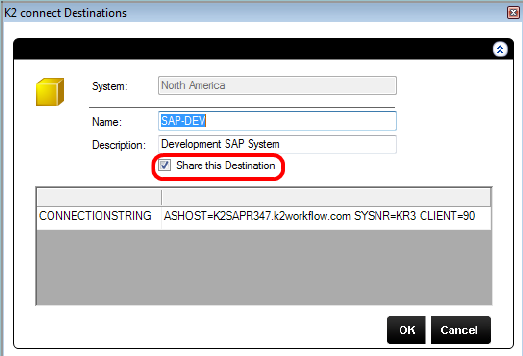
- Type a name and description for the Connector and enable the Share this Destination option.
- Click on the browse button for the Connector Path. Select SourceCode.ServiceObjectModel.ERP.Connect.dll as the path.
- When prompted to import shared destinations, click No as this is your primary node.
- Right click on the new Connector and select Systems> Add.
- Type a name for the System.
- Right click on the new System and select Destinations> Add.
-
Type a name for the Destination and enter the SAP connection string. It should be in the following format:
-
ASHOST=<Server IP> SYSNR=00 CLIENT=800 LANG=EN USER=<User ID> PASSWD=<PWD>
-
Make sure User ID and Password are uppercase.
-
- Click OK and test the connection using "Predefined User Credentials".
- Restart K2 blackpearl Host Server service.
- Under K2 blackpearl settings, click on Register Service Instance.
- If the connection test passes, the setup was done correctly. The secondary nodes can now be configured.
- From the secondary node, follow the same steps as above to License the K2 connect Server.
- Open the K2 connect Administration tool and click on Configure Destinations to connect to a shared Destination created on the first K2 connect Server in the environment.
- Right click on Connectors and select Connectors > Add.
- Type a name and description for the Connector.
- Click on the browse button for the Connector Path. Select SourceCode.ServiceObjectModel.ERP.Connect.dll as the path.
- When prompted to import shared destinations, click Yes as you want to make use of the destination configured on the first K2 connect Server.
- Enter the machine name of the primary node and click OK.
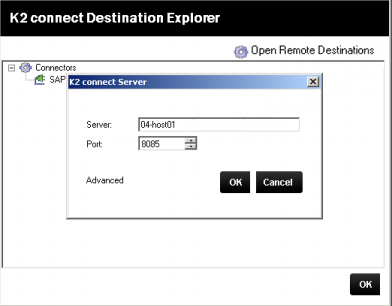
- Expand the System node, select the Destination on the right and drag and drop it on the local machine System node on the left.
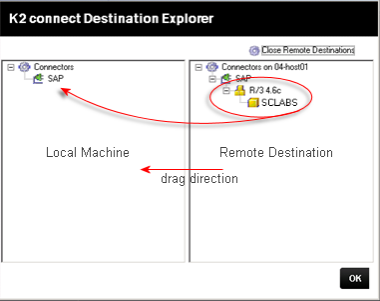
- The image below shows that the local machine has a replicated instance of the Destination configured on the primary node.
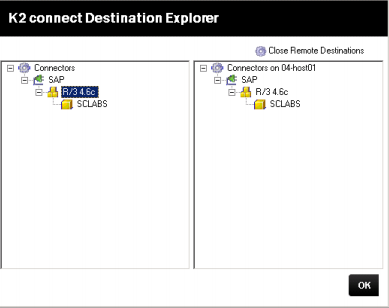
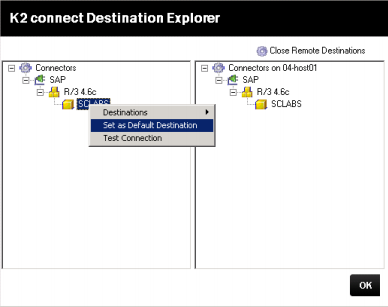
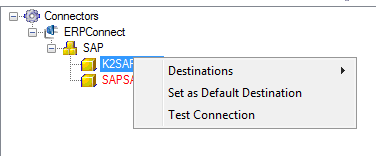
- Right click on the Destination and select Set as Default Destination.
- Click OK.
It is possible to have a single K2 connect installation for multiple SAP instances. However this requires some manual configuration. It is important to know that the out-of-the-box integration via Visual Studio and the K2 connect Administration tool is making use of one Service Instance. That Service Instance can point to any single destination (but only one). It is determined by the default destination at the time the Service Instance is refreshed. It will also create a Security Label which corresponds to the Destination.
You can manually register another K2 connect Service Instance which points to the same K2 connect Service Object Repository and set the security provider to a different label, if that label has already been created.
When you publish new objects to the K2 connect Server that is meant for the manual Service Instance you will need to manually refresh it to describe the new objects. This manual refresh is not required for the out-of-the-box Service Instance.
To use K2 connect with multiple SAP instances, there are two main steps required. The first is a once off configuration to link K2 connect to a SAP instance. This is required for each SAP instance that you would like to use K2 connect with. The second is part of the process to set up and configure K2 connect Service Objects. These Service Objects are required for K2 SmartObjects to interact with relevant SAP data. The sections below describes these required steps.
The table below illustrates steps to configure K2 connect to link with one or more SAP instances. These steps are configured once for each additional SAP instance.
| Step | Effort per Number of SAP Instance | ||
|---|---|---|---|
| 1 | 2 | ||
| 1 | Configure a K2 connect destination. | Required | Required |
| 2a | Register Service Instance. See Register Service Instance for more details. | Required | Required: See Adding Additional SAP instance |
| 2b | Specify typemapping field value on Service Instance registration screen. | None | Required: See Adding Additional SAP instance |
The table below illustrates steps to add a new Service Object.
| Step | Effort per Number of SAP Instance | ||
|---|---|---|---|
| 1 | 2 | ||
| 1 | Create Service Object using SAP BAPI from respective SAP instance. | Required | Required* |
| 2 | Deploy Service Object. | Required | Required |
| 3 | Refresh service instance to retrieve deployed Service Object. | None | Refresh Service Instance# |
If you are modifying an existing Service Object, you would perform similar steps to the above. The additional step required if you have more than one SAP instance is step 3.
* As K2 connect service instance refers to the same Service Object Repository, it is recommended to provide an identifiable Service Object name when creating new service object. For example: a prefix naming convention – [SAPInstanceName]-[ServiceObjectName]
# Upon successful deployment of a new or modified Service Object, use the SmartObject Service Tester Tool to refresh all additional K2 connect service instances.
Follow these steps to register an additional service instance. This is a once off configuration for each additional SAP instance.
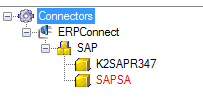
- Once a new destination has been added for a SAP instance, set the SAP instance destination as Default Destination and refresh the service instance from the K2 connect Administration tool.
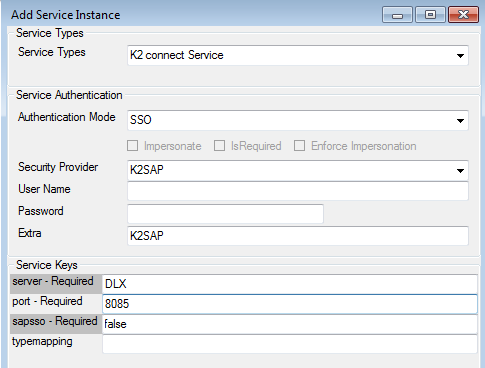
- Create a new service instance using SmartObject Service Tester tool.
- Set the Authentication Mode to SSO and enter the name of the Destination in the Security Provider and Extra fields.
- For the typemapping field, use the following value :
<object type="SourceCode.SmartObjects.Services.ServiceSDK.Objects.TypeMappings"><typemappings><mapping name="system.datetime" sotype="datetime" /><mapping name="system.uint64" sotype="number" /><mapping name="system.byte" sotype="number" /><mapping name="system.decimal" sotype="decimal" /><mapping name="system.int64" sotype="number" /><mapping name="system.sbyte" sotype="number" /><mapping name="system.uint32" sotype="number" /><mapping name="system.uint16" sotype="number" /><mapping name="system.string" sotype="text" /> <mapping name="system.boolean" sotype="yesno" /><mapping name="system.single" sotype="decimal" /><mapping name="system.int32" sotype="number" /><mapping name="system.double" sotype="decimal" /></typemappings></object>
- Once the new service instance is registered successfully, you will be able to create Service Objects in Visual Studio by using a BAPI from the respective SAP instance.
Single Sign On (SSO) refers to a single user identity that is shared across multiple systems requiring a user to only have to sign on to one system one time. This authentication method is used when one system needs to manage a user’s identity across other systems. For example, when using K2 connect the user must be able to access both K2 connect and the SAP back-end for BAPI calls.
In practice there are several methods for implementing SSO. In the K2 connect context, the K2 service passes a connection string to the SAP back-end that contains the user name and password which has rights to the BAPIs. The advantage of SSO for the K2 user or developer is that once they have logged in, a second login is not required.
When a K2 user logs on to a K2 application, e.g. K2 Workspace and K2 Designer for Visual Studio, the user establishes a primary login from the K2 perspective.
The user's primary login is derived from the default security Label which may be the Active Directory account, SQLUM or an custom user manager. Secondary login credentials are then cached and passed to the secondary or back-end systems. The secondary credentials are linked to the primary credentials and are used to authenticate the user on the secondary or back-end systems
The advantage of SSO for the K2 User or Developer is that once they have logged in, a second login would not be required.
The secondary set of user credentials are cached against a security label. The various security labels, including the security label are available from within K2 Workspace > User Settings > Single Sign On.
This Step is a requirement and is only performed automatically by the system once a Service Object has been published to a Service Object repository that is associated with a destination.
A security label is required for each SAP Destination. Security Labels are added automatically by the system when a Service Object is published to the Service Object repository and associated with a SAP Instance / Destination.
- Restart the K2 Server.
- Before deployment or use of the process:
- Open K2 Workspace.
- Locate the User Settings > Single Sign On Page and select it.
- Click on the Security Label for the SAP instance that has now been registered with a security label.
- Cache user credentials, or the Forms User would need to cache credentials as required.
The following Knowledge Base Article is available for reference: Cache Credentials. If the link does not open, copy and paste the following URL into your browser http://help.k2.com/KB000360.aspx.
Follow these steps to add individual users to the security label that has the same name as a K2 connect service instance:
- Open K2 Workspace.
- Go to User Settings > Single Sign-On.

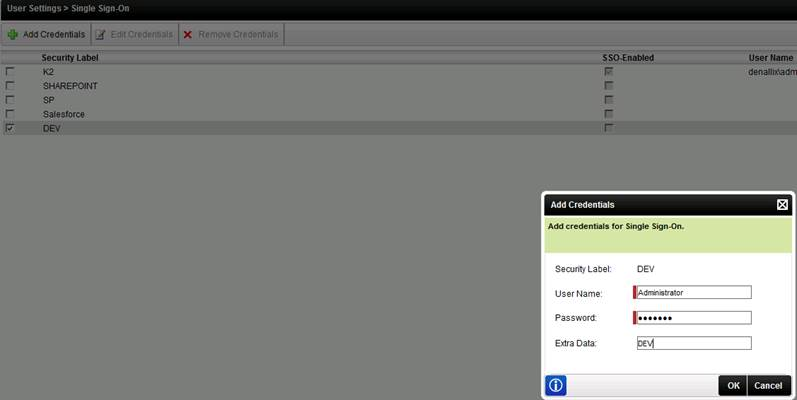
- Select the security label with the same name as your K2 connect destination name and click Add Credentials.
- Specify the SAP credentials for the logged in user. Note that Extra Data is the Destination Name.
