Unlock
The Unlock action unlocks a locked computer using a botflow A file that stores the actions and variables designed to automate tasks.. The Nintex RPA Unlocker installs a DLL file that allows Nintex RPA to use the Unlock action to unlock the machine if it is locked (for example, if a user uses CTL+ALT+DEL to lock their PC for security reasons). There is both a 64-bit and 32-bit version of the Nintex RPA Unlocker installer (depending on the bit version of the PC).
Using the Unlock action, you can:
- Periodically check a computer to ensure it is online.
- Unlock a computer as a troubleshooting step.
- Unlock a computer at a predetermined time.
- Unlock an idle computer in preparation for running a botflow.
-
The Unlock action can only unlock a locked computer, such as a computer that is set to automatically lock after a set period of inactivity. It cannot perform the initial log in to the computer.
-
The Unlocker installation installs DLL files that Nintex Bot uses to unlock the machine while it is on the locked screen (when someone locks the PC, but does not log out of the machine). Administrator permissions are required to install the Unlocker.
-
The Nintex Bot machine must remain logged into the machine and then lock the machine in order for the Unlock action to work. It must be logged in using the same username and password associated with the Unlock action being executed.
-
Nintex Bot must be set up to run as an administrator.
-
Find the Foxtrot.exe file in the installation folder: C:\Program Files (x86)\Nintex\RPA\Foxtrot.exe
-
Right-click on Foxtrot.exe and select Properties.
-
Click the Compatibility tab.
-
Select Run this program as an administrator.
-
Click OK.
-
-
The Nintex Bot machine must have User Access Control (UAC) turned OFF.
-
In the Type here to search text box on the Windows 10 task bar, type UAC and select Change User Account Control settings.
-
Select the Never notify me when setting and click OK.
-
-
When connecting to a machine through RDP, do not log out of the machine; instead, disconnect from it. Additionally, follow these steps for handling RDP:
 Handling RDP
If you are using Remote Desktop to connect to a remote computer, closing Remote Desktop will lock the computer and display the login screen. In the locked mode, the computer does not have a UI, so any currently running or scheduled bots will fail.
To avoid problems with bots, use the tscon utility to disconnect from Remote Desktop. tscon returns the control to the original local session on the remote computer, bypassing the login screen. All programs on the remote computer continue running normally, including the bots.
Note that the screen resolution might change. Therefore, ensure that you resize all of your windows to appropriate sizes (such as 1000 x 500) to make sure that the windows are always the same size and fit the resolution at all times.
You may need to disable the Windows 10 lock screen prior to using the Unlock action with RDP. After disabling it, you can lock your computer or put it to sleep, and when you unlock or wake it up, you will no longer see the lock screen, and instead you will see the login screen. Disabling the lock screen does not disable the bootup lock screen; if you shut down your computer, you will still see the lock screen when it first boots up.
To disable the Windows 10 lock screen:
-
Find the C:\Windows\SystemAppsand locate the LockApp_cw5n1h2txyewy folder.
-
Rename the folder by adding .bak to the end of it and press Enter. If you cannot rename the folder, follow these instructions to disable the lock screen.
You can make a batch file to run, which will properly disconnect you from the remote computer. You can also call this batch file at the beginning of your tests (if the bot is running as an administrator). Create a batch file with this code (simply copy and paste it). You must run this file as an administrator, so make sure to right-click on the file and select to run as an administrator when disconnecting.
for /f "skip=1 tokens=3" %%s in ('query user %USERNAME%') do (
%windir%\System32\tscon.exe %%s /dest:console
)
To set the batch file to always run as an administrator:
-
On the Start menu, locate the file that you want to always run as an administrator.
-
Right-click on the file and select Create shortcut.
-
Right-click on the shortcut and select Properties.
-
Click the Compatibility tab.
-
Apply one of the following settings:
-
To apply the setting to the currently logged-on user, select Run This Program As An Administrator, and then click OK.
-
To apply the setting to all users on the computer regardless of which shortcut is used to start the application, click Change Setting For All Users, select Run This Program As An Administrator, and then click OK.
-
When you need to disconnect from Remote Desktop, double-click the shortcut that you created on the remote computer in the Remote Desktop window. The file will now always run using an administrator access token. Keep in mind that if you are using a standard account and prompting is disabled, the application will fail to run.
Note: You cannot set system applications or processes to always run with administrator privileges. Only non-system applications and processes can be set to always run at this level. If the Run This Program As An Administrator option is not available, it means that the application is blocked from always running at an elevated level, the application does not require administrator credentials to run, or you are not logged on as an administrator.
Known Unlocker bug:
In Windows 10, when executing the Unlock action, if the machine is already unlocked, Nintex Bot attempts to unlock the machine anyway (sending CTL+ALT+DEL) and displays a screen with the options for Lock, Switch User, Sign out, Change a password, and Task Manager.
Workaround: Insert a Lock action before the Unlock action.
-
The following requirements must be met before an Unlock action can be used on a computer:
- The Nintex Bot Unlocker must be installed on the computer. Download the Unlocker in the latest Nintex Bot release notes.
- The user running the Unlock action must have local administrator rights on the computer.
- If the User Access Control (UAC) feature in Microsoft Windows is turned on (typical), you must start Nintex Bot with the Run as administrator option when creating the Unlock action.
- On the Actions List, click Computer and then click Unlock from the Workstation list.
- Set the Unlock settings.
- Username: The username of the active user logged into Microsoft Windows displays. This cannot be changed because the Unlock action unlocks the computer using the active username.
- Credential: Create a credential using the username and password required to unlock the computer.
- Confirm: Type the password required to unlock the computer. You must enter the password each time the Unlock action is opened for an edit.
- Pause (secs): (Optional) Type the number of seconds to pause the Unlock action or use the Expression Builder to build the action settings using variables or other token values. This allows the computer to fully start after it is unlocked.
- Test: Click to test the Unlock action. Click OK in the Warning window to continue. The Unlock action locks the computer, pauses for 5 seconds, and then unlocks the computer. If the test fails, manually unlock the computer.
- Click Add
Item (
 ) on the
Botflow Pane.
 - Click Credential.
- Type a Name for the credential.
- Type a unique Username.Note:
- The username cannot match the name of any other credential in the botflow.
- For email, the username is the email address.
- Type the value of the Password and confirm it to ensure that the correct value has been submitted.
- (Optional) Select Never save protected values with botflow.
- (Optional) Type Notes to document any special instructions or functionality.
- Click OK to save the credential.
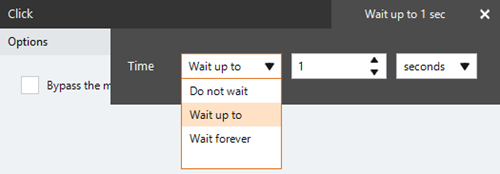
- Click Wait up to 1 sec.
- Open the Time drop-down list and select the required setting:
- Do not wait: Immediately attempts to execute the action and applies any error settings or rules.
- Wait up to: Waits up to one (1) second to execute the action per any configured rules. The time specified is the wait time prior to continuing the botflow. In the event of an application being unavailable, the action adheres to the error settings. Time units include numeric settings for seconds, minutes, and hours.
- Wait forever: Waits until the target application is in a ready state and applies any error settings or rules.
- Click X to close the drop-down list and save the setting.
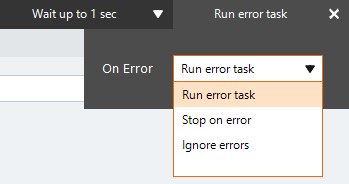
- Click Run error task.
- Open the On Error drop-down list and select the required setting:
- Run error task: A botflow containing an error task automatically runs the error task in the event of an error. If the botflow does not contain an error task, the botflow stops in the event of an error.
- Stop on error: The botflow stops in the event of an error.
- Ignore errors: The action is skipped in the event of an error and the botflow attempts to execute the next action
- Click X to close the drop-down and save the setting.
- Run: To run the action automatically when you click OK, turn the toggle to Run.
- Don't Run: If you do not want to run the action automatically when you click OK, turn the toggle to Don't Run.
- Click OK to add the Unlock action to the botflow.
| Field or button | Description |
|---|---|
| General |
|
| Credential |
To create a credential: Note: In compliance with companies that have a policy against saved passwords, when selected, neither the password nor any of the Additional Field values are saved in the botflow. This option is for use in an attended bot situation where the user must first enter the password and/or Additional Field values before botflow runs, either by using the Credential Prompt action or by manually setting those values. |
| Timing Settings |
Some actions have timing settings and vary based on the targeted application. The timing settings of a targeted application element are configured and saved with the action. The timing settings are then used to control when the action starts.
|
| Run error task |
|
| Note |
(Optional) Type a Note to document any special instructions or functionality.
|
| Run Switch |
The Run Switch toggle controls how Nintex RPA LE runs an action when adding or editing an action in a botflow.
|


