This documentation is in maintenance status and may not reflect the latest product updates. Please see the release notes for product updates.
Format List Column
The Format
List Column formats a list column in a .
Using the Format List Column action, you can create a format a list column:
- To prepare the list for the import of new data.
- On a network drive in the network domain.
- In a database.
Some examples of using the Format List Column action with lists are:
Add a Format List Column action to a botflow
This example provides the steps necessary to add a Format List Column action to a botflow.
To add a Format List Column action to a botflow:
- On the Actions List, click Lists and then click Format List Column from the Column list.
The Action Builder window for Format List Column displays.
- Set the Format List Column settings:
- List: Enter a list name in the List field.
- Column: Select a column setting from the Column drop-down.
- Include headers: Check the box to include list column headers for formatting.
- Formula: Use the Formula drop-down to select to format the selected list columns with either a math or text formula.
- If needed, adjust the Run Error Task settings to fine tune how the action runs.
- If needed, adjust the Run Switch setting to create the action without running it.
- Optionally, add an action note.
- Click OK to add the Format List Column action to the botflow.
Format List Column Action Builder field and button descriptions
Format List Column Options/Settings |
General
Options
- Formula: Use the Formula drop-down to select to format the selected list columns with either a math or text formula.
- Math: Select to add, multiply, divide, or subtract from values in a list column.
- Number: Enter a number to add, multiply, divide, or subtract from values in a list column or use the Expression Builder to build the action settings using variables or other token values.
- Text: Select a text format option from the Text drop-down.
- Between: Returns the text found between two values. The Between formula builder is located in the Expression Builder at Formula -> Text -> Between.
- Start value: Enter a start value in the Start value field or use the Expression Builder to build the action settings using variables or other token values.
- End value: Enter an end value in the End value field or use the Expression Builder to build the action settings using variables or other token values.
- Clean: Removes all non-printing characters for selected columns.
- Left: Returns a specified number of characters from the left side of a string. The Left formula builder is located in the Expression Builder at Formula -> Text -> Left.
- Length: Enter an length value in the Length field or use the Expression Builder to build the action settings using variables or other token values.
- LeftOf: Returns the text to the left of a specified value. The LeftOf formula builder is located in the Expression Builder at Formula -> Text -> LeftOf.
- End value: Enter a value in the End value field or use the Expression Builder to build the action settings using variables or other token values.
- Replace: Replaces a specified part of a string with another string a specified number of times. The Replace formula builder is located in the Expression Builder at Formula -> Text -> Replace.
- Find: Enter a value in the Find field or use the Expression Builder to build the action settings using variables or other token values.
- Replace with: Enter a value in the Replace with field or use the Expression Builder to build the action settings using variables or other token values.
- Right: Returns a specified number of characters from the right side of a string. The Right formula builder is located in the Expression Builder at Formula -> Text -> Right.
- Length: Enter an length value in the Length field or use the Expression Builder to build the action settings using variables or other token values.
- RightOf: Returns the text to the right of a specified value. The RightOf formula builder is located in the Expression Builder at Formula -> Text -> RightOf.
- Start value: Enter a value in the Start value field or use the Expression Builder to build the action settings using variables or other token values.
- Trim: Removes all leading or trailing spaces for selected columns.
|
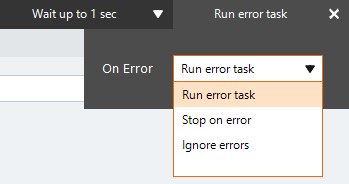
Run error task |
- Click Run error task.
- Open the On Error drop-down list and select the required setting:
- Run error task: A botflow containing an error task automatically runs the error task in the event of an error. If the botflow does not contain an error task, the botflow stops in the event of an error.
- Stop on error: The botflow stops in the event of an error.
- Ignore errors: The action is skipped in the event of an error and the botflow attempts to execute the next action
- Click X to close the drop-down and save the setting.
|
Note |
(Optional) Type a Note to document
any special instructions or functionality.
|
Run Switch |
The Run Switch toggle controls how Nintex RPA runs an
action when adding or editing an action in a botflow.
- Run: To run the action automatically when you click OK, turn the toggle to Run.
- Don't Run: If you do not want to run the action automatically when you click OK, turn the toggle to Don't Run.
|
OK/Cancel |
Click OK to save the action or click Cancel to discard the action or any changes. |