Workflow
Nintex Workflow is a cloud-based capability on the Nintex CE Platform where you can design workflows to automate simple to complex processes using drag-and-drop interactions without writing any code.
Review the Nintex Workflow help documentation to learn more about Nintex Workflow.
Workflow connections are used to connect Nintex Foxtrot RPA to your Nintex CE Platform tenant to run workflows. Before Nintex Foxtrot RPA can run a workflow in Nintex Workflow, you must create a Workflow connection. Each Workflow connection is identified using a connection letter Rest method used to retrieve information from a web server.. Each Workflow Action added to your botflow Automated steps that you can design for each bot that will run. is linked to one (1) Workflow connection.
Obtain a Nintex Workflow personal access token
- Sign in to your Nintex CE Platform tenant.
- Go to Settings > Environment.
- Click Service apps and tokens from the options on the left of the browser window.
- Click the Personal access tokens tab.
- Find your Personal access token, click the ellipsis, and then select View.
- Click Copy (
 ).
).
Note: If no tokens are assigned, click Add token on the right side of the browser window. See the Nintex CE Platform help documentation about Personal access tokens for more information.
Important: Be sure not to use an expired or revoked Personal access token.
Add a Workflow connection
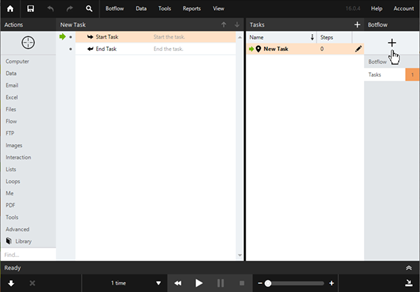
- Click Add Item (
 ) on the Botflow Pane.
 - Click Workflow.
- Select a connection Letter used to identify the Workflow connection.
- Type a unique name for the Workflow connection in the Name field.
- Enter the Access Token obtained from your Nintex CE Platform tenant.
- Select a region for Nintex CE Platform tenant from the Region drop-down list:
- North America
- Europe
- APAC
- Optionally, enter a Note describing the Workflow Botflow Pane item.
- Click OK to create the Workflow Botflow Pane item.
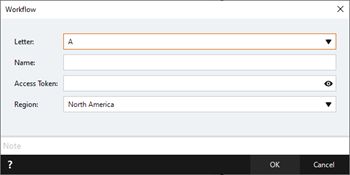
Note: Accepting the default letter will ensure that the same letter is not used when creating multiple Workflow connections in the same botflow.
Important: Use the region listed in your Nintex CE Platform tenant or the connection will fail. You can find this information in Nintex CE Platform Settings > Environment > Tenant details.
Manage Workflow connections
- Navigate to the Workflow connection on the Botflow Pane.
- Right-click the Workflow connection.
- Use the Context Menu to add, edit, and delete Workflow connections.
The Context Menu displays.
Note: It is not possible to duplicate Workflow connections because of the use of unique access tokens.
 Workflow field descriptions
| Field or button | Description | |
|---|---|---|
| Letter | Select a connection Letter Rest method used to retrieve information from a web server. used to identify the Workflow connection. | |
| Name | Enter a name to identify the Workflow connection. | |
| Access Token | Enter the Access Token obtained from your Nintex CE Platform tenant. | |
| Region |
Select a region for Nintex CE Platform tenant from the Region drop-down list:
Important: Use the region listed in your Nintex CE Platform tenant or the connection will fail. You can find this information in Nintex CE Platform Settings > Environment > Tenant details. |