Screenshot
This article provides information on the following topics:
Note: The Actions Quick Reference provides a complete list of actions that you can print for easy reference.
What is the Screenshot Action?
The Screenshot Action captures a screenshot of a target and saves it to a file.
Creating a Screenshot Action
Drag and drop the Target Selector![]() onto the target to display
the Target Preview
onto the target to display
the Target Preview ![]() .
Choose the Screenshot
.
Choose the Screenshot ![]() Action to display the Action Builder.
Action to display the Action Builder.
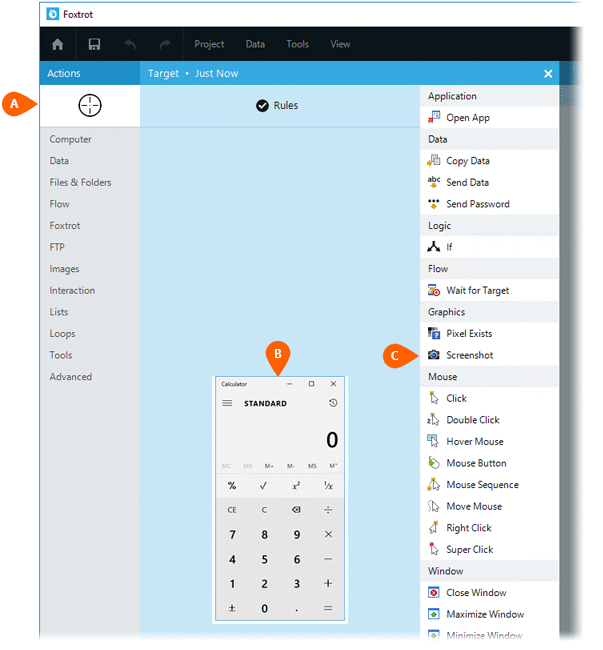
Select the Rules
 to modify how Nintex Bot will find the target.
Both the Timing
to modify how Nintex Bot will find the target.
Both the Timing  and
Error
and
Error  settings
for this action may be configured to fine tune the how the Action will
run.
settings
for this action may be configured to fine tune the how the Action will
run.
Note: For more information about the timing and error settings, go to Action Builder.
Choose the desired image format . Select the Destination
 . If the File
option is selected, you must enter the desired file
name
. If the File
option is selected, you must enter the desired file
name  . If the Image
Editor option is selected, the screenshot will not be saved and
instead displayed in the Image
Editor. Use this option is additional image manipulation needs
to occur before it is saved. To save the image in the Image Editor, use
a Save Image
Action.
. If the Image
Editor option is selected, the screenshot will not be saved and
instead displayed in the Image
Editor. Use this option is additional image manipulation needs
to occur before it is saved. To save the image in the Image Editor, use
a Save Image
Action.
Note: Read the Image Editor article to learn more about working with images, including image types and their Rules..
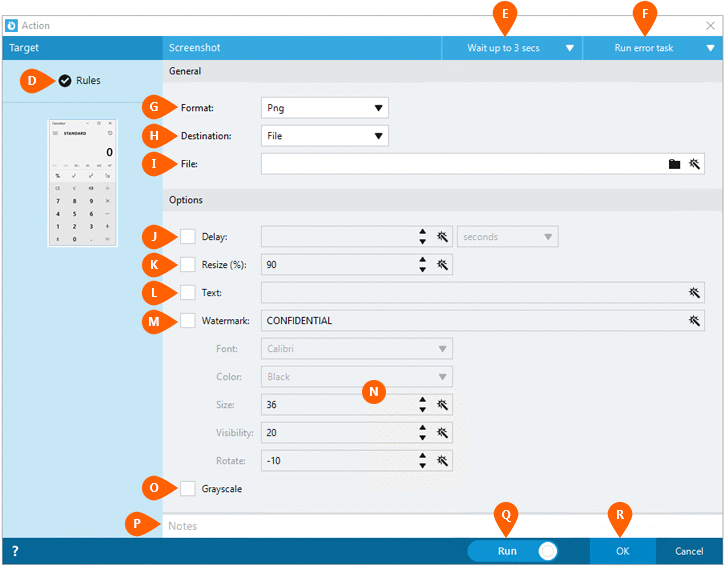
The Delay option
 allows you to force a delay before the screenshot
it taken. This is especially useful in scenarios when the target
needs time to refresh on the screen before the screenshot is taken. If
the screenshot results in a solid white or black box, try turning this
option on to allow the target to refresh itself before the screenshot
is taken.
allows you to force a delay before the screenshot
it taken. This is especially useful in scenarios when the target
needs time to refresh on the screen before the screenshot is taken. If
the screenshot results in a solid white or black box, try turning this
option on to allow the target to refresh itself before the screenshot
is taken.
The Resize option
 allows you to control the size of the screenshot.
The smaller the percentage entered, the smaller the image will be
which results in a smaller file size. Entering a value greater than
100% will cause the images to be zoomed and enlarged. For example,
entering 200% will double the size of the image. This can be especially
helpful if the screenshot will be used in a Question
Action. Enlarging the image makes it easier to view.
allows you to control the size of the screenshot.
The smaller the percentage entered, the smaller the image will be
which results in a smaller file size. Entering a value greater than
100% will cause the images to be zoomed and enlarged. For example,
entering 200% will double the size of the image. This can be especially
helpful if the screenshot will be used in a Question
Action. Enlarging the image makes it easier to view.
The Text
option  adds text to the bottom the screenshot. It
adds a white border around the image and includes a larger white area
below the image with the specified text included. This is handy
if you want to store identifying information as part of the image itself,
such as an account number or other identifying information.
adds text to the bottom the screenshot. It
adds a white border around the image and includes a larger white area
below the image with the specified text included. This is handy
if you want to store identifying information as part of the image itself,
such as an account number or other identifying information.
The Watermark
option  allows you to stamp a custom watermark on the
screenshot. Additional Watermark Options
allows you to stamp a custom watermark on the
screenshot. Additional Watermark Options
 will appear only when the Watermark Action is enabled.
The Grayscale
option  will cause the image to be saved in grayscale.
Using this option generally reduces the file size, except for BMP
files.
will cause the image to be saved in grayscale.
Using this option generally reduces the file size, except for BMP
files.
Optionally add Notes
 to the Action to document any special instructions
or functionality. When the Run Switch
to the Action to document any special instructions
or functionality. When the Run Switch is set to Run, the action
will be executed after clicking OK.
is set to Run, the action
will be executed after clicking OK.
Note: The run switch is set to Run by default. To create or modify this action without executing it, click the slider to change the option to Don't Run. For more information, go to Action Builder.
Click the OK
button  to
save the Action.
to
save the Action.