Microsoft Exchange Online - New calendar item
Use the Microsoft Exchange Online - New calendar item start event An event that triggers a workflow to run when it occurs. An example is Box - New file, which triggers the workflow to run when a new file is uploaded to the specified folder. to start your workflow whenever a new calendar item is created on a specified Microsoft Exchange Online account.
Microsoft Exchange Online has other start events as well as actions. For more information, see Microsoft Exchange Online.
Microsoft Exchange Online is a hosted messaging solution for Office 365 and Microsoft 365, that delivers the capabilities of Microsoft Exchange Server as a cloud-based service. It gives users access to email, calendar, contacts, and tasks from any cloud connected device.
For more information on Microsoft Exchange Online, see the company website.
In the context of Nintex Workflow, Microsoft Exchange Online is a connector A software component that allows seamless integration with third-party services, business applications, and content stores. Examples include Salesforce, Box, and Microsoft SharePoint. Connectors are used to create connections required for workflow actions and start events..
Variables allow you to store and manipulate data and files in your workflows. They can be created by start events, forms, tasks, workflow actions, or automatically created when a workflow is run. For more information, see Variables.
You can start a workflow whenever a new or updated file is detected (example: Box - New file), upload files on start or at any point in the workflow, generate documents from tagged templates, send and receive files via email, and manipulate files. You can set up file handling in your workflow start event An event that triggers a workflow to run when it occurs. An example is Box - New file, which triggers the workflow to run when a new file is uploaded to the specified folder. and actions A tool for building the processes, logic, and direction within workflows. Actions are the steps the workflow performs to complete a process..
Note: Your tenancy's default file storage location must be configured to hold files for later reference by the workflow. This location is used for uploaded files and for files stored as output from actions.
- Start your workflow when a new or updated file is detected in a service; for example, see Box - New file and Connectors.
 Store a file reference for use later in the workflow (file share connector start events)
File share connector start events, such as Box - New file, require you to add each start event variable that you want to reference later in the workflow. The variables provided vary by start event. See Connectors.
On the Designer canvas, click Start event.
Select a connector from the Start from drop-down list.
Select an event from the Event drop-down list.
- Click Add variables.
- Select the predefined variables that you want to add to your workflow. If you know the variable and you want to find it faster, type the variable name in the Filter options field. To select all variables, click Select All.
- Click Add.
Note: If you want to edit the selection of variables, hover over the variable, click
 , and then click Show Details. Edit the variable name in the Name field or click
  .
.
- Upload files when filling in a form from:
-
Programmatically upload files for a Component workflow A workflow that can be started from outside the tenancy; the workflow uses the "Component workflow" start event.; see Nintex - Component workflow
- Generate documents from tagged templates using Generate document
- Send and receive files via email; for example, see Assign a task to multiple users
- Manipulate files in services (see Connectors):
- Get, store, move, copy, or delete files using file share connector actions A workflow action that interacts with a third-party application to perform a basic operation, such as adding a record or retrieving a file from Salesforce or Box., such as Box - Move a file
- Get and attach files in Salesforce
- Get and store files in SharePoint
- Get signatures: Get and store signed documents using DocuSign or Adobe Sign.
-
Store a file for use later in the workflow
For example, store any email attachments received by the task assignee.
- On the Designer canvas, click the action you want to configure.
-
Find the output field for storing the file or set of files.
For example, to store attachments received in task assignee email replies when they may attach multiple files, use the Assign a task to multiple users Multiple file attachments option for the Store output field.
- In the output field, select a variable or specify a file path:
Select a variable. For outputs storing multiple files, select a collection variable. For outputs storing a single file, select a file variable.
Specify a file path. You can use any combination of text and variables, beginning with the root folder. If available, use the folder browse icon
 on the right of the path field to navigate to the folder and any subfolders that you want, and then edit the path as desired to include variables and different text.
The availability of variable or path options for storing files varies by action. For more information, see Connectors and Workflow actions.
-
Reference a stored file
For example, reference the new Box file that started the workflow to attach it to a task email notification or reference an image received by the task assignee to generate an invoice document.
- On the Designer canvas, click the action you want to configure.
- Find the field where you want to reference the stored file select a variable or specify a file path:
Select the file variable associated with the stored file. For example, select the variable for the new Box file that started the workflow or select the variable storing Multiple file attachments output from a task action.
Specify the file path where the file is stored. You can use any combination of text and variables, beginning with the root folder. If available, use the folder browse icon
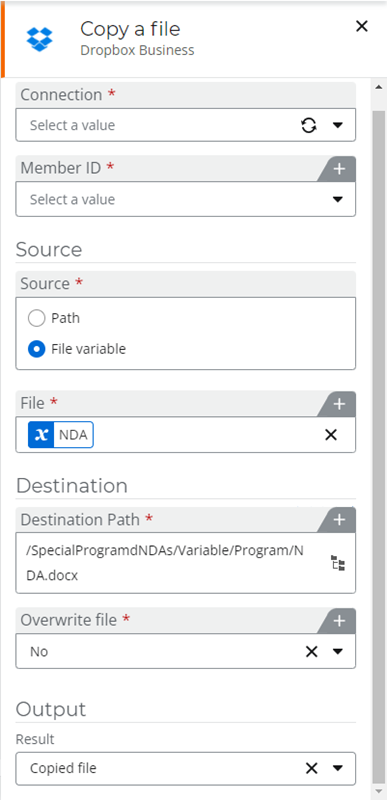
on the right of the path field to navigate to the folder and any subfolders that you want, and then edit the path as desired to include variables and different text.View exampleBoth a file variable and a file path are used in the example image below for the Dropbox Business - Copy a file action. A file variable is selected for Source and a file path is specified for Destination.
The variables "CountryVariable" and "Program" insert the values into the file path as determined by earlier workflow logic (in this case, fields in a submitted form). For example, if the person submitting the form selects Australia for country and specifies Inspire2017 for program, then the resulting file path is "/SpecialProgramNDAs/Australia/Inspire2017NDA.docx."
Select the Microsoft Exchange Online - New calendar item start event
In the Designer page:
- Open your workflow and in the designer canvas, click Start event. The configuration panel is displayed.
- In the Start from drop-down list, under CONNECTORS, select Microsoft Exchange Online. The Event field is displayed.
-
For Event, select Microsoft Exchange Online - New calendar item.
The Configuration section is displayed to configure the start event.
Configure the Microsoft Exchange Online - New calendar item start event
The Microsoft Exchange Online - New calendar item start event fields and settings table describes all the required and optional configuration fields. The steps required to configure the start event are given below:
- In the Configuration section, select a Microsoft Exchange Online Connection.
-
In the drop-down list for Connection, select Add new connection.
A new window appears, prompting you for a connection name.
- Type a user-friendly Connection name.
- Click Connect.
-
Enter your Microsoft credentials if prompted.
Upon successful log in, a window appears where you can assign owner and user permissions to the connection. Add Owners and Users, if required. For more guidance on connection permissions, see Permissions.
- Click Save permissions.
The entered name is validated for uniqueness. If credentials are not stored in the browser for the selected connector service, then you are prompted for credentials. For more guidance on connections, see Connectors.
Your newly added connection now appears in the Connection field.
Microsoft Exchange Online - New calendar item start event variables
You can view the start event variables automatically added to the workflow.
- In the designer canvas, click Start event to open the configuration panel.
- Click Show variables. The Variables pane opens.
- Calendar items: (Collection) that includes the following variables for the workflow:
- URL: (Text) The unique URL of the new calendar item
The following start event variables are available in an object called Start variable:
Note: These are the variables displayed for a list with the default columns available when you create a new list in Microsoft Exchange Online. If the list you select has additional columns there will be more start event variables displayed depending on the columns.
Microsoft Exchange Online - New calendar item start event fields and settings
| Section | Field | Description |
|---|---|---|
| Start event | Show variables | Displays variables that are available to use throughout the workflow. Variables are classified based on how they are created or generated. |
| Hide variables | Closes the Variables pane. | |
| (unlabeled) | Start from |
Lists the Nintex and third-party connectors, such as Microsoft Exchange Online, Salesforce, and Dropbox Business. |
| Event | The event that must occur in the selected connector to trigger the workflow. | |
|
Configuration |
Microsoft Exchange Online connection to access the Microsoft Exchange Online site containing the Exchange account to be monitored. To refresh the available connections, click |