
|
 |
|
 |
|
 |
|

|
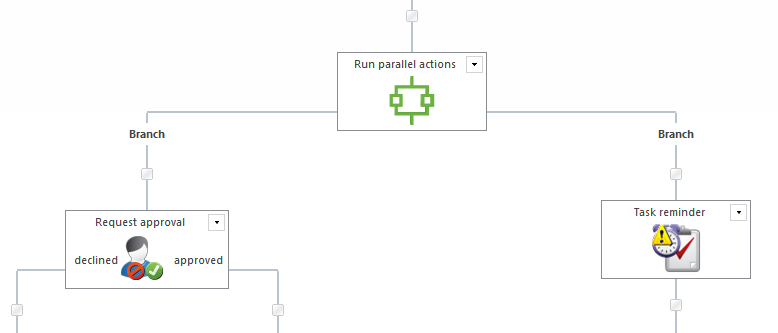
This workflow action will send notifications to the approvers or reviewers of an outstanding task. This allows for reminder scenarios as seen below.
In this example, an approval task is assigned to a set of users and after a configured delay, if any approvers are still required to respond, they will receive a notification. The approval task will repeat waiting and sending messages 3 times. If the original approval task allows LazyApproval, the reminder notification will include the LazyApproval token in the subject to allow the workflow replies send to it.
To use the workflow action:
-
Locate the action in Workflow Actions Toolbox (located on the left hand-side);
-
Click on the Category listings to reveal the actions; OR
-
Search for the action using a keyword.
-
Select the action, drag it onto the design canvas and drop it onto a design pearl.
Alternatively
-
Left-clicking the pearl, mouse-over Insert Action and then the Categories to reveal the actions, click the required action from the list.
To change the settings used by the action:
-
On the action’s title click the down arrow to activate a drop-down
-
Select Configure; OR
-
Double-click the action's icon.
For more information on the other options in the drop-down, please refer to the Getting started with the Nintex Workflow designer.
Options within the action
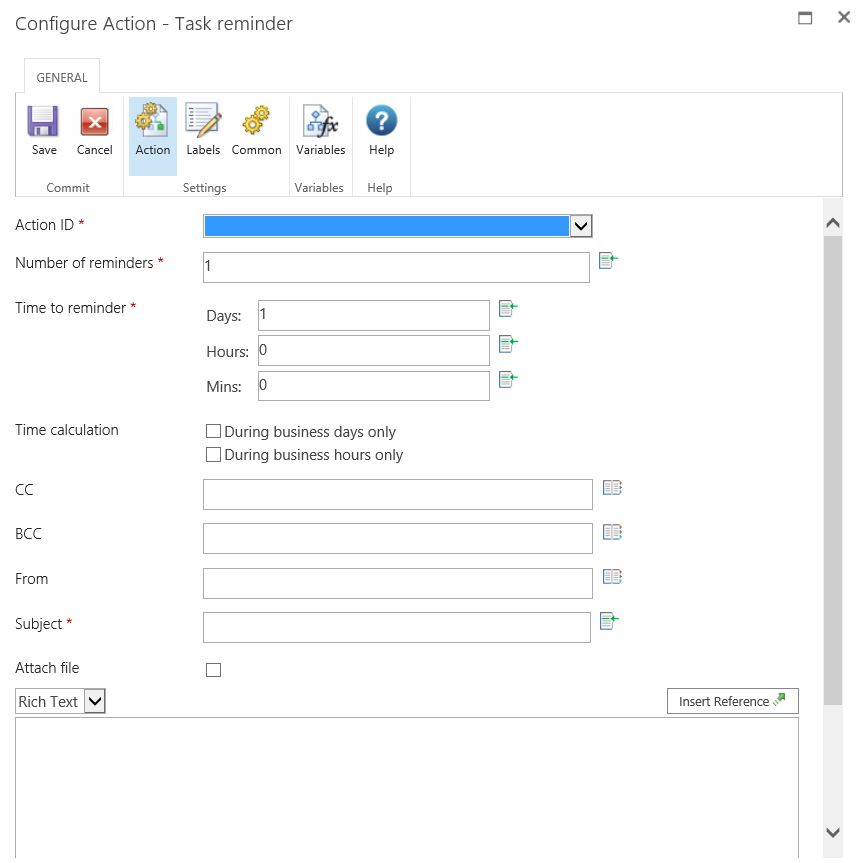
Action ID
Specify this workflow variable to nominate which request approval/review/data action to send reminders regarding.
When configuring a Request Approval, Request Review or Request Data action, nominate a workflow variable of type Action ID to store the assigned workflow action ID.
Number of reminders
The action will repeat the delay and notifications this number of times.
Time to reminder
The delay the action will wait inbetween sending each reminder.
Time calculation
Specifies whether or not hours outside the work week should be included when counting down to send a reminder.During business days only
The During business days only option will specify that weekends or holidays are not included in the count down, but after hours on a business day are.Example:
- A reminder starts counting down Friday morning and is configured to wait 1 day (the work week is defined as Monday to Friday).
- A reminder will be sent Monday morning, weekends are not included in the count down.
During business hours only
The During business hours only option specifies that only business hours are used in the count down.Example:
- A reminder starts counting down Wednesday at 4pm and is configured to wait 4 hours (the work day is defined as Monday to Friday, 8am to 5pm).
- A reminder will be sent at 11am on Thursday, after business hours are not included in the count down.
Neither option
If neither option is selected, all hours will be included in the count down.Examples:
- A reminder starts counting down Friday morning and is configured to wait 1 day.
- A reminder will be sent Saturday morning, weekends are included in the count down.
- A reminder starts counting down Wednesday at 4pm and is configured to wait 4 hours.
- A reminder will be sent at 8pm on Wednesday, after business hours are included in the count down.
CC
The CC field sets read only users who will receive the notification. CC recipients are not able to respond to the tasks.
 to open the Select People and Groups configuration dialog.
 BCC
From
The From field sets the user or domain group that will appear as the sender of the message.
This setting applies to emails only. If no From user or domain group is specified, the From address configured in Global Settings will be used.
Subject
The subject field of the notification.
Attach file
Allows file attachments to be added to the notification.
Format
This sets the format of the email.
Selecting:
-
Rich Text enables italicize, bold, underline and indent information within the email using simple HTML styles provided by the SharePoint rich text tool bar.
-
Plain Text is simply the text without any stylized formatting.
Notification body
Delivery type
Delivery type is the method of delivering the notification to the recipients.
Available delivery options; Email, User preference or Instant Message (if enable on the server). For information on User preference, please refer to the Configuring user preferences.
Please note: Nintex does not provide support for troubleshooting email, SMS or LCS systems.