Configuring Export to Excel
The Export to Excel feature allows you to download your List view or Editable List view as a Microsoft Excel (.xlsx) file. Use this if you want to analyze view data in Excel. You must configure the feature using an existing control when you're designing the view and then configure a rule using an event on the control or the view to execute the view's export method.
You can configure a control, such as the Toolbar Button control or standard Button control, to execute the Export to Excel action. When using the control at runtime, you click a button to save the view to an Excel file. At design time, you see a visual representation of the control that you use to configure it, including setting the number of rows (records) or all pages to export.

Follow the steps below to configure a scenario where the Toolbar Button control is used on a view.
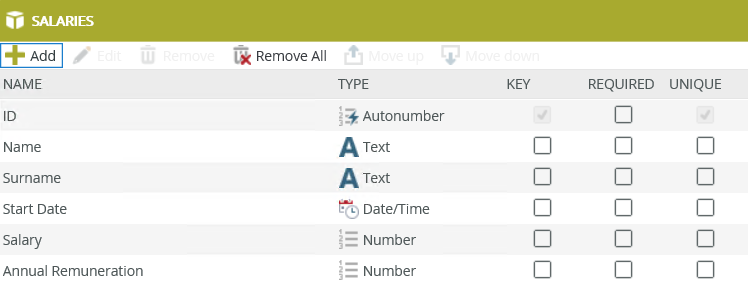
- Create a Salaries SmartObject to act as a database containing employee information.

- Auto-generate a List view and Item view from the SmartObject.
- Run the Item view and add a few entries.
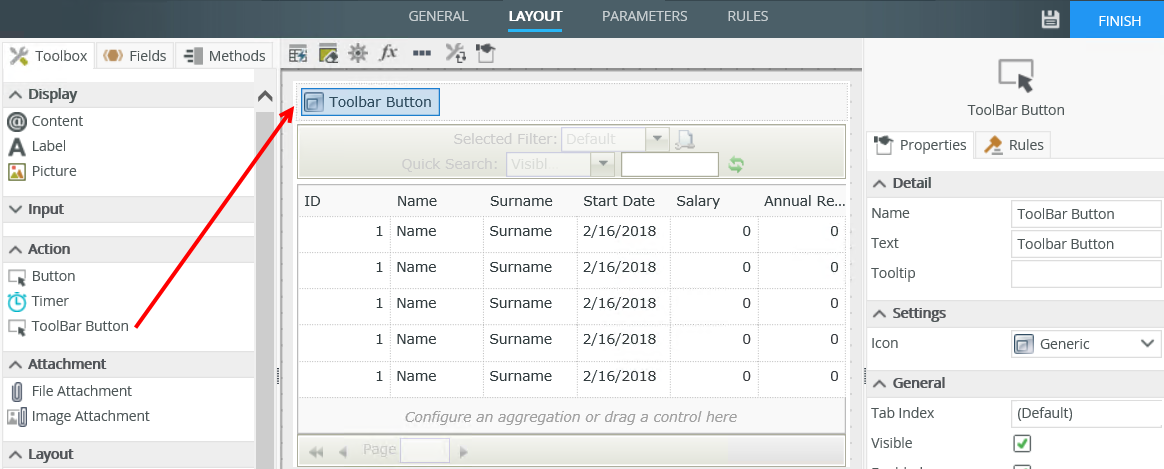
- Edit the List view and drag the Toolbar Button control onto the canvas. The control is available in the Action section of the Toolbox.

- Change the Name and Text in the properties of the control, and select the Excel Document icon:

- Navigate to the rules and add the following rule. Note: Use the Execute a method on the View action.

- Configure the method as follows. The configuration exports all pages when you click the button. See Rules, Events and Actions for information on configuring the input properties of this method.

- Finish the rule and the view.
- Check in the view and then run it.
The control is available in the Action section of the Toolbox.

| Properties | Description | Can be set in runtime using rules? |
|---|---|---|
| Detail | ||
| Name | A unique identifier for the control. This property is required and defaults to the name of the control. | No |
| Text | Specify text to use when displaying the control at runtime, for example Export to Excel. Eliminate this value if you want to only show the icon. | Yes, see Configure the Set a Control's Properties Action for more information. |
| Tooltip | The value to display when you hover over the control. | Yes, see Configure the Set a Control's Properties Action for more information. |
| Settings | ||
| Icon | A drop-down list containing the icons that you can use with the control. | Yes, see Configure the Set a Control's Properties Action for more information. |
| General | ||
| Tab Index | Defines a sequence that users follow when they use the Tab key to navigate through a page at runtime. | Yes, see Configure the Set a Control's Properties Action for more information. |
| Visible | Shows or hides the control. | Yes, see Configure the Set a Control's Properties Action for more information. |
| Enabled | Enables or disables the control. If the control is disabled, you won't be able to use it. | Yes, see Configure the Set a Control's Properties Action for more information. |
| Format | Opens the Format page where you can configure formatting and style features such as format, font, borders, padding and margins. See the Format topic for more information. | No |
| Conditional Format | Opens the Conditional Formatting page. You can add conditional formatting to apply a specific format or style when a condition you set is True. Use conditional format on its own or with the Format feature. See Conditional Format for more information. Click the ellipsis to open the Conditional Formatting page. | No |
The control interacts with other controls through rules. When you bind properties between different controls, you can use the data to populate properties or set values in runtime. Use the following examples for when to use the control with other controls through rules:
- Set a control’s properties - You can configure the settable properties of the control with this action
- Data Transfer - You can transfer data from items listed in the context browser to the control
- Execute a method on the view - You can configure the control's method using this action
View Method:
- Execute a method on the View: Exports the list to Excel. You can configure the input properties of the method to limit the number of rows exported and specify if all pages are to be exported.

Properties Description Can be set in runtime using rules? Detail Row Limit Specify the limit for the number of rows to export. Type a whole number or drag a pre-configured value from the Context Browser. See Setting Row Limit at Runtime, Considerations and Export Lists to Excel for more information. Yes All Pages Exports all pages to Excel. Select the option, then select Yes or No, or type a value of Yes/No, 1/0, or True/False. You can also drag a pre-configured value from the Context Browser. See Setting Row Limit at Runtime, Considerations and Export Lists to Excel for more information. Yes
If you want to set the row limit while you work with the view at runtime, you can use a control to set the value of the property. Follow the steps below to configure a view containing a text box in which you type the number of rows you want to export, and then download a spreadsheet containing those rows.
- Follow the steps in Configuring the Control to create a workable scenario and add entries to work with.
- Check out and edit the List view, then navigate to the Layout page.
- Drag a Text Box control onto the canvas.

- Navigate to the Rules page and edit the When Export to Excel Button is Clicked rule.
- Click configure next to the method and drag the Text Box control from the Context Browser into the Row Limit input property.

- Finish the rule and the view.
- Check in the view and then run it.
- Enter a value in the text box and click the Export to Excel button. Save the spreadsheet and then open it. See Considerations for information on when you use the Row Limit, All Pages and List view paging configurations and Export Lists to Excel for information on how to use the feature at runtime.
-
When you use this feature to export a large number of records, the limit you can export at a time is 5000. Otherwise, the "Page Unresponsive" error occurs
- When you configure the Row Limit and All Pages input properties of the Execute the Export to Excel method, the List view paging setting can impact what is exported.

Consider the following behaviors when configuring the paging, Row Limit and All Pages settings.- Row limit precedence:
- When you use List view paging of 1 item per page, specify a Row Limit of 7, and you deselect the All Pages option, the row limit takes precedence. Example: Your list has 12 entries, Row Limit = 7, All Pages = Deselected, only 7 entries are exported.
- When you use List view paging of 5 items per page, specify a Row Limit of 3 and you deselect the All Pages option, the row limit of 3 takes precedence. Example: Your list has 12 entries, Row Limit = 3, All Pages = Deselected, only 3 entries are exported.
- When you use List view paging of 5 items per page, specify a Row Limit of 15 and you select the All Pages option and specify Yes, the row limit of 15 takes precedence. Example: Your list has 12 entries, Row Limit = 15, All Pages = Selected and Yes specified, 12 entries are exported.
- Paging precedence:
- When you use List view paging of 5 items per page, specify a Row Limit of 7 and you select the All Pages option and specify No, the paging limit of 5 takes precedence. Example: Your list has 12 entries, Row Limit = 7, All Pages = Selected and No specified, 5 entries are exported.
- When you use List view paging of 5 items per page, specify a Row Limit of 15 and you select the All Pages option and specify No, the paging limit of 5 takes precedence. Example: Your list has 12 entries, Row Limit = 15, All Pages = Selected and No specified, 5 entries are exported.
- Row limit precedence: