How To: Create a Workflow with DocuSign Events
This topic shows you how to create an end-to-end solution with DocuSign functionality to automate the signing of a document stored in SharePoint.
The DocuSign service type allows K2 to integrate with DocuSign. For more information on how to enable this integration see DocuSign Feature Activation.
This How To assumes that you are familiar with DocuSign and K2 for SharePoint.
Runtime example of part of the signing process in DocuSign

Scenario
Your company uses a SharePoint library called Purchase Orders to store purchase orders and related information. The document contains details such as the customer name, document name, and the total amount of the purchase order. The library is integrated with K2 for SharePoint and a workflow starts when documents are added to the library. As part of the process a task is sent for approval which starts the DocuSign signing process.
To do this you add DocuSign steps to your workflow that route the document to a recipient for signing.
Steps
In this scenario, you begin by creating a custom SharePoint library.
Next you create a workflow that contains Task, DocuSign, and End steps. You use the Create Envelope, Add Document, Add Recipient, Create Tab in Document and Send Envelope steps to configure the DocuSign signing process.
Finally, you deploy the workflow and test the solution.
Setup Steps
The following steps set up the scenario from start to finish.
- Create a SharePoint Custom Library that contains purchase order properties and add custom columns Customer (text) and Total (number) to the library. You also integrate the library with K2 for SharePoint.
- In SharePoint, create a custom library. Name the library
Purchase Orders.
- Select the Purchase Orders library and click Create Column. Create the following columns: Customer (Single line of text) and Total (Number).

- On the Library tab, click the K2 Application button to integrate the library with K2 for SharePoint. You may need to switch to Classic SharePoint mode. For more information see SharePoint Online User Interface Changes.

- On the Create K2 Application page, select the Create SmartForms check box as shown below.

- In the Create Workflow section, check the check box and ensure the When a SmartForm is submitted option is selected.

- Click OK to complete the integration and create a K2 application for the Purchase Orders library. After integrating the library with K2, the K2 Workflow Designer automatically shows.

If you are not taken to the K2 Workflow Designer automatically, select the Purchase Orders Workflowon the K2 artifacts page and click Edit to launch the workflow designer.
- In SharePoint, create a custom library. Name the library
- Access and configure the Purchase Orders Workflow workflow. In this step, you start building the K2 workflow by adding and configuring the Task step.
- Select the Start step. Notice that the Edit Document form is automatically added to the Start step but the start rule action is not configured. To edit the start rule action, click Edit.

- The Start Workflow from a Form page shows. Click Next.

- In the Start Rule section, select the Do it for me! option and click Next.

- The Almost Done page shows. This page contains all changes to the form. Click Save and Finish.

- On the Success page click OK.

- The start rule is configured.

- Click the expand / collapse toggle to expand the Context Browser. From the Variables section, click Add.

- Use information from the table below to create the five variables:
Variable Name Description Type EnvID Stores the Envelope ID. Text RecID Stores the Recipient ID. Text Status Stores the status of the workflow. Example: In Progress. Text TabID Stores the Tab ID. Text DocID Stores the unique Document ID. Text - The variables show as follows:

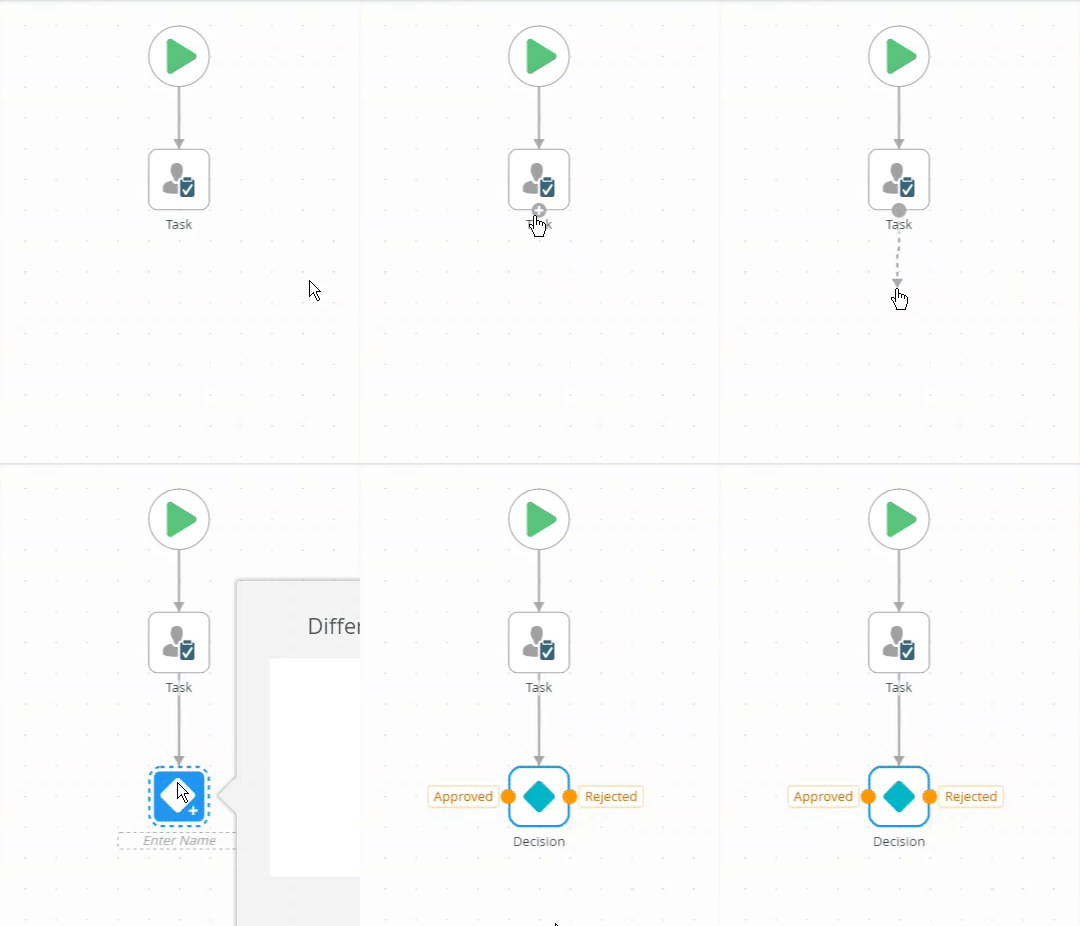
- From the Toolbox, click the Basic category and drag the Task step onto the canvas. Select the Task tab and create two task actions (Approve and Reject).

- Select the Forms tab. From the Form Type drop down menu select the SmartForm option. Select Edit Document from the Form menu. Step through the Open Task on a Form wizard and select Do it for Me!.

- Select the Recipients tab. Ensure that the Originator is the recipient. If not, add them.

- Drag a line from the Task step to add the Decision step.

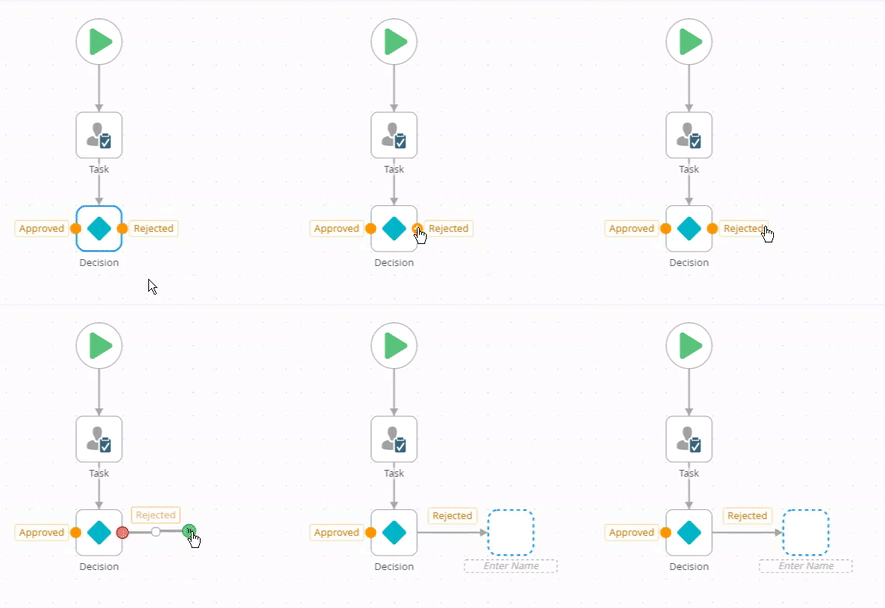
- Drag a line from the Reject action port to create a blank Placeholder step.

- Select the Start step. Notice that the Edit Document form is automatically added to the Start step but the start rule action is not configured. To edit the start rule action, click Edit.
- Add the Create Envelope step to the workflow. In this step, you add and configure the Create Envelope step. This step starts the DocuSign automation.
- From the Toolbox click the DocuSign category, the Envelope category and then drag the Create Envelope step onto the canvas. Connect the step to the Approved task action.

- Select the step and click the expand / collapse toggle to expand the Configuration Panel. You can also double click the step to expand the panel. Select the Create Envelope tab to configure the DocuSign service instance, envelope type, envelope, and the return property mappings. From the DocuSign Service menu, select the service instance. In this example, select the Standard Envelope.

- Configure the Notification. In the Subject field, type Purchase Order. In the Body field, type Approve the Purchase Order for and then drag the Customer property from the Purchase Orders reference into the notification body. This adds the customer name to the notification. You can find the reference in the Context Browser, References section and then expand the Purchase Orders reference.

For more information about References, see the References topic.
- Configure the Return Property Mappings. Click the add button and add the ID and Status properties. From the menu select EnvID and Status.

- From the Toolbox click the DocuSign category, the Envelope category and then drag the Create Envelope step onto the canvas. Connect the step to the Approved task action.
- Add the Add Document step to the workflow. In this step, you add and configure the Add Document step.
- From the Toolbox, click the DocuSign category, the Document category, and then drag the Add Document step onto the canvas. Connect the step to the Create Envelope step.

- Select the step and click the expand / collapse toggle to expand the Configuration Panel. You can also double click the step to expand the panel. Select the Add Document tab to configure the DocuSign service instance, envelope ID, document, document ID, and the return property mappings. From the DocuSign Service drop down menu, select the service instance. From the Variables section, drag the EnvID property into the Envelope ID field.

- Configure the Document section. From the Purchase Orders reference, drag the Document property into the Document field.

- Configure the Document ID. From the Purchase Orders reference, drag the ID property into the Document ID field.

- Configure the Return Property Mappings. Click the add button and add the Status property. From the menu select Status

- From the Toolbox, click the DocuSign category, the Document category, and then drag the Add Document step onto the canvas. Connect the step to the Create Envelope step.
- Add the Add Recipient step to the workflow. In this step, you add and configure the Add Recipient step by adding the recipient to the envelope.
- From the Toolbox, click the DocuSign category, the Recipient category and then drag the Add Recipient step onto the canvas. Connect the step to the Add Document step.

- Select the step and click the expand / collapse toggle to expand the Configuration Panel. You can also double click the step to expand the panel. Select the Add Recipient tab to configure the DocuSign service instance, envelope ID, envelope type, recipient options, and the return property mappings. From the DocuSign Service menu, select the service instance. From the Variables section, drag the EnvID property into the Envelope ID field.

- Configure the Recipient Option section. In the Routing Order field type 1. From the Recipient Type menu select the Signer option. Type the recipient name and email address in the Recipient Name and Recipient Email Address fields. If you are using a K2-provided VM, use Bob and bob@denallix.com. Otherwise choose a recipient from your organization.

- Configure the Return Property Mappings. Click the add button and add the ID and Status properties. From the menu select RecID and Status.

- From the Toolbox, click the DocuSign category, the Recipient category and then drag the Add Recipient step onto the canvas. Connect the step to the Add Document step.
- Add the Create Tab in Document step to the workflow. In this step, you add and configure the Create Tab in Document step to specify the spot where the recipient signs the document.
- From the Toolbox, click the DocuSign category, the Document category and then drag the Create Tab in Document step onto the canvas. Connect the step to the Add Recipient step.

- Select the step and click the expand / collapse toggle to expand the Configuration Panel. You can also double click the step to expand the panel. Select the Create Tab tab to configure the DocuSign service instance, envelope ID, recipient ID, tab details, tab positioning, and the return property mappings. From the DocuSign Service menu, select the service instance. From the Variables section, drag the EnvID property into the Envelope ID field.

- Configure the Recipient section. From the Variables section, drag the RecID property into the Recipient ID field.

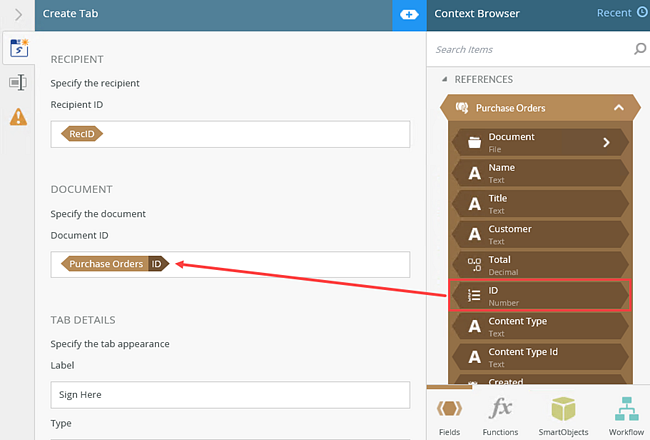
- Configure the Document section. From the Purchase Orders reference, drag the ID property into the Document ID field.

- Configure the Tab Details section. In the Label field, type Sign Here and select the Sign Here option from the Type menu.

- Configure the Tab Positioning section. In the Anchor String field type Signature. The purpose of this field is to specify where the DocuSign tab is added to the document. In this example, the tab is added close to the Signature text in the document.


- Configure the Return Property Mappings. Click the add button and add the ID property. From the menu select TabID.

- From the Toolbox, click the DocuSign category, the Document category and then drag the Create Tab in Document step onto the canvas. Connect the step to the Add Recipient step.
- Add the Send Envelope step to the workflow. In this step, you add and configure the Send Envelope step to send the item to the recipient for signature.
- From the Toolbox, click the DocuSign category, the Envelope category and then drag the Send Envelope step onto the canvas. Connect the step to the Create Tab step.

- Select the step and click the expand / collapse toggle to expand the Configuration Panel. You can also double click the step to expand the panel. Select the Send Envelope tab to configure the DocuSign service instance, envelope ID, recipient ID, tab details, tab positioning, and the return property mappings. From the DocuSign Service menu, select the service instance. From the Variables section, drag the EnvID property into the Envelope ID field.

- Configure the Return Property Mappings. Click the add button and add the Status property. From the menu select Status.

- From the Toolbox, click the DocuSign category, the Envelope category and then drag the Send Envelope step onto the canvas. Connect the step to the Create Tab step.
- Configure and complete the rest of the workflow. In this step you also deploy the workflow.
- From the Toolbox, click the Logic category, and drag the End step onto the canvas. Connect the step to the Send Envelope step.

- Deploy the workflow.

For more information on deploying the workflow, see the Deploy a Workflow topic.
- From the Toolbox, click the Logic category, and drag the End step onto the canvas. Connect the step to the Send Envelope step.
- Test the solution. In this step you add a document to a form and then submit it to the Purchase Orders library which starts the Purchase Orders workflow. As the originator you approve the task from the K2 Worklist on your SharePoint site. This starts the DocuSign signing process. Bob receives an email from DocuSign which he then signs.
- After successful deployment, click File and Close to close the workflow and exit the K2 Workflow Designer.
- Browse to the Purchase Orders document library. Click the new document link to add a new document to the library and start the workflow.

- On the Add a document page, click Browse and select the document to add to the library. In this example, select Purchase Order.docx. Click OK.

- Enter the information to the form and click Save.


- Browse to the K2 worklist . In this example, the worklist is on the home page of the K2 Learning subsite. Click the task and select Approve.

- The recipient (Bob) receives an email from DocuSign. From the email, click the Review Document link.

- The DocuSign page opens. Check I agree to use electronic records and signatures and click Continue.

- Click the Start link and then the Sign tab to sign the document with an electronic signature.

- Click Finish to complete.

Review
You learned how to use DocuSign steps in a workflow to create an end-to-end solution with DocuSign functionality to automate the signing of a document stored in SharePoint.
- You can replace the Placeholder step on the Rejectedaction, with a Send Email step. Configure the email message to inform the originator that their document was not approved.
- If the DocuSign feature is not activated you will not see the DocuSign steps in the K2 Workflow Designer. Check with your K2 administrator to ensure the feature is activated and that you are running the correct version of K2.
- When setting up DocuSign you typically activate it using a developer account. If you or your company already have a DocuSign account, you may use that instead. Check with your DocuSign representative for more information on how to configure the K2 DocuSign feature or see the DocuSign Feature Activation topic.
- Once you have created your K2 workflow, you can deploy it to a production environment. For more information see the following Knowledge Base article for the deployment steps. KB001689 - How To: Deploy a DocuSign integrated workflow