Send Email Step
Use the Send Email step to send an email in workflow step. Emails can have formatting, links, attachments, and data from the workflow, SmartObjects and other systems.
Use the Send Email step in the following example scenarios:
- To provide feedback and workflow status updates
- Send instructions, summary information, and documents
- Send the recipient's manager an email
Note that you should use escalations to send task reminders and expiration notices instead of using the Send Email step, but there may be scenarios where using the Send Email step is a better option.
Drag the Send Email step from the Basic category, Favorites bar, or the Recent category onto the canvas.
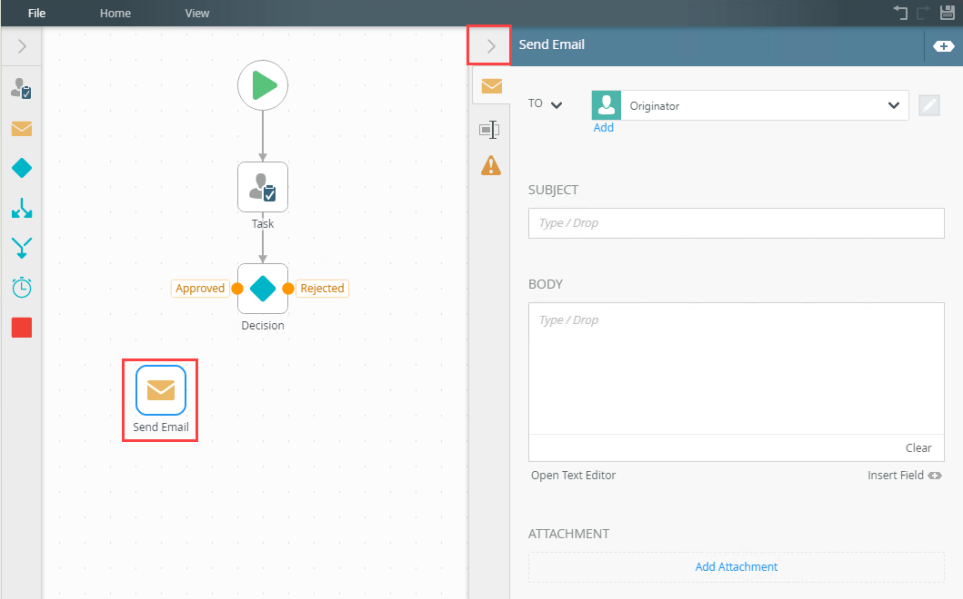
Example of a Send Email step in a workflow

- From the Toolbox click the Basic category, then drag the Send Email step onto the canvas.

- Select the Send Email step and expand the Configuration Panel.

- Select the Send Email tab. Customize the email message by adding a subject line, additional recipients, and message text.

- Drag and drop inline functions and field properties (from the Context Browser) into the field to create dynamic functions
- Manually type a descriptive subject
- Drag and drop inline functions and field properties (from the Context Browser) into the field to create dynamic functions
- Manually type a descriptive subject
- To select a recipient click the To drop down menu. By default, the workflow originator is selected. Other options in this drop down include Originator Manager, Browse, and Type/Construct my own.

For more information on dynamic recipients, see the Create a Dynamic Recipient topic. - To add another recipient click the Add link.

- From the drop down menu, select the Browse option.

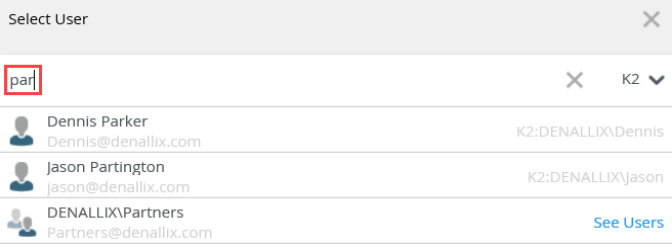
- The Select User page displays. In the Search Items field, type the name of the user. Use the drop down menu to choose which label to search.

Use any of these methods to search for a user, role and group:
- Select the user and click OK.

- To remove a recipient, select one and click the Trash bin icon.

- Use the send email type drop down menu to include From, CC or Bcc recipients to the email.

- From, Cc and Bcc recipients added.

- In this example, the email is sent to the Originator. It informs the workflow originator that the task was approved.

- Click the Subject field and type a value or use inline functions or dynamic fields by clicking the expand or collapse toggle to expand the Context Browser. Within the Context Browser, select inline functions from the Functions, Fields, SmartObjects or the Workflow categories to define your function. Click and drag the function on to the field.

- Type content into the Body field or to customize the body of the email, click the Open Text Editor link.

- The Text Editor Panel displays.

- Type the email body. Make use of the text formatting tools such as Font, Font size, Bold, Italic, Underline and Align. You can also make use of the Context Browser to drag fields and functions to define the email body.
Click the I'm Done! link to complete editing the email body. The Text Editor Panel collapses automatically.

- To clear the formatting from the body of the mail click the Clear link. Click the Insert Field link to expand the Context Browser.

- To link attachments to the email notification, click the Add Attachment link..

-
You can use a reference, a function, and a SmartObject that returns a file in the Attachment field. In this example, the original leave application document is attached to the email using a reference to where it is stored in a SharePoint library.

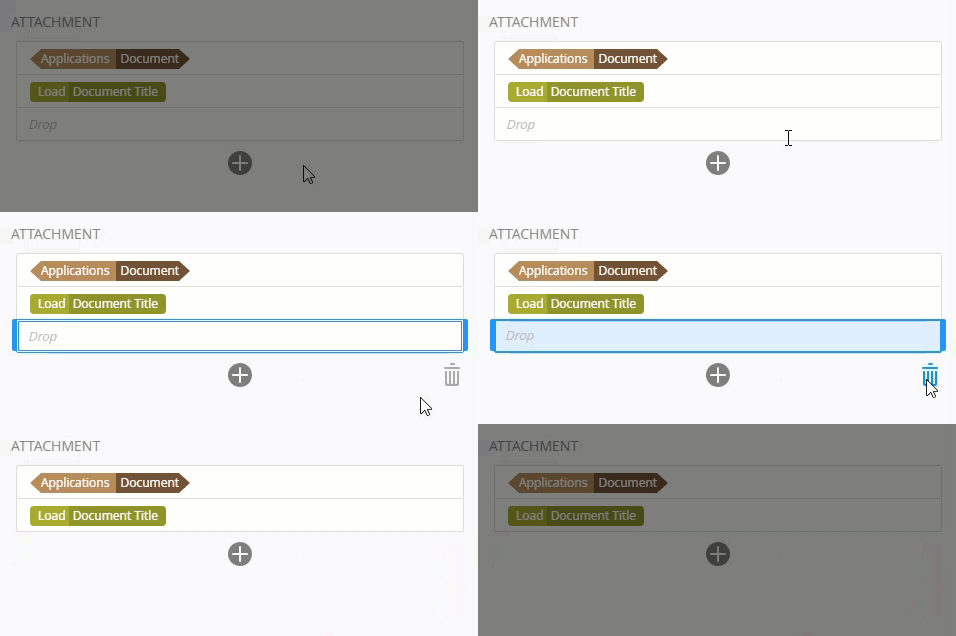
- Click the Add (+) icon to add additional attachments.

In this example, two attachments are attached to the email by clicking the Add (+) icon to configure the second attachment. The first document is the original application document and is attached using a reference to its location in a SharePoint library. The second attachment is the terms and conditions document which is stored in a SmartObject.
 The SmartForm Integration (Start step) only returns the document submitted. A Create Reference step is required to return a specific document. When using the Get File from Content inline function, remember to add the file type extension. When using a SmartObject you must use the Smartfield Composer to configure the ID of the document to retrieve the correct one. When you use a SmartObject to return a file, make sure the attachment property is set to File type. For more information on different SmartObject property types, see Properties.
 - To remove an attachment, select it and click the Trash bin.

- With the step selected, select the Properties tab. Use this tab to change and add more detail.
Use the Name, Description and Notes fields to add a unique information. You can also select the priority level for the task.

- Click the Errors tab.

-
Your changes are automatically saved.
The following table explains the available options:
| Option | Explanation | How to Use |
|---|---|---|
| To |
Allows you to specify which user or group is to receive the email. The Originator is added by default. Use the drop down to include From, CC, and BCC recipients. You can select to add one or all email send types. You can add additional recipient to the BCC and CC send types. You can only specify one sender in the From email send type field. When you add the sender's email address in the From email send type field, make sure that this person has the correct sharing permissions to send an email on someone's behalf.Delegate Access is granted to individuals to allow them to manage certain aspects of Microsoft Outlook on behalf of another person. Example, Codi assigns Bob as a delegate on her Outlook which allows Bob to send emails on her behalf. If Bob does not have the correct sharing permissions in Outlook, the email fails with an error message. For more information on Delegate Access, see the Allow someone else to manage your mail and calendar article from the Microsoft Office support site.
|
Select a user or group from the drop down menu. Click the drop down menu and check the relevant check box. To remove an email send type, uncheck the check box. Select a user or group from the drop down menu. Click the Edit button to type / construct your own user. Click the Add link to add additional recipients. The following applies to the added email send type fields: |
| Subject |
Allows you to specify a subject. You can use a combination of inline functions, data fields, SmartObjects, and workflow context data from the Context Browser to create a unique subject line. |
The following applies to the Subject field: |
| Body |
Allows you to create the body of the email. You can select a standard template or create a custom message. As with the subject, you can create dynamic content using items from the Context Browser. |
Drag and drop inline functions and field properties (from the Context Browser) into the field to create dynamic functions. Manually type the email message. Click the Open Text Editor link to open the rich text panel to edit font type, size and alignment. Click the Insert Field link to expend the Context Browser. Click the Clear link to clear all text, inline functions, and field properties from the body. |
| Attachment |
Allows you to add attachments to the email. You can use a reference, a function, or a SmartObject that returns a file in the Attachment field. You can add multiple attachments to the Send Email step. When you use a SmartObject to return a file, make sure the attachment property is set to File type. For more information on different SmartObject property types, see Properties.
|
Click the Add button to add attachments fields. Drag and drop the reference, function, or SmartObject method to add the attachment to the email. |
For more information on how to send an email to users based on a Get List SmartObject, see the How to: Use the All items as a collection topic.
The following table explains the options available on this tab:
| Option | Explanation | How to Use |
|---|---|---|
| Title / Name | By default, each step on the canvas has a step title. You can change this title to suit your workflow logic and show it on the canvas by checking the Show Label box. | Enter a value into the Title field. |
| Reset link | Use the link to reset any changes to the title. | Click the Reset link to reset the Title field to default value. |
| Show Label | Allows you to see the step label on the canvas. The label shows the value of the title. | Check the check box to display step label on the canvas. |
| Description | Allows you to add a detailed description for the step. | Enter a value into the Description field. |
| Notes | Allows you to add additional notes for the step. | Enter a value into the Notes field. |
Different types of exceptions can occur on a step, such as:
| Type | Description |
|---|---|
| Known exceptions | Any SmartWizard or standard wizard that has Boolean options for handling known exceptions have these options displayed as check boxes in the Known exceptions section of the Exceptions tab. |
| Unhandled exceptions | Any unknown runtime exceptions. |
The tab contains the following unhandled exception:
| Exception | Explanation | How to Use |
|---|---|---|
| Log Exception | Logs the exception to the error log. | Check the box to log the exception. |
When working with the Send Email step keep in mind the following considerations:
- Multiple Send Email steps can be added into a multi-step
- The From Address is a valid or a do-not-reply address
- The Send Email step has to have at least one incoming and one outgoing line
- When the Send Email step is dragged onto the canvas, it requires no further configuration in order to deploy. By default, a blank email is sent to the workflow originator


