How To: Add and View Workflow Comments
This topic shows you how to add and view comments in a form that are associated with a workflow instance.
Example

Scenario
As part of a leave process, you want to add and view comments about the workflow instance. In this scenario, an employee submits a leave form and adds a comment on the form. For the approval task, comments are shown and the approver can add additional comments. You use the out-of-the-box Workflow Comments SmartObject to add and view comments in the leave form. The Leave Approval form contains three views: The Leave Request view contains leave information linked to a Leave SmartObject, the Comments view is used to show a list of the previous comments for the workflow instance, and the Add Comment view is an Item view based on the Workflow Comment SmartObject. You use rules to integrate the form with the workflow and hide the Comments view from the employee when they complete the form.
If you want to add and view attachments associated with a workflow instance, you can follow a similar procedure using the Workflow Attachments SmartObject.
When you use the Workflow Attachment and Workflow Comment SmartObjects, attachments and comments are added on a process instance level and not on a worklist item level, which means that you need process rights to use these SmartObjects. If you have an active worklist item without any process rights, you cannot add or view comments and attachments. You need the following Process Rights to add or view attachments and comments of a workflow instance.
| Start | View | View Participate | Admin | Server Event | All | |
|---|---|---|---|---|---|---|
| Workflow Attachment | ||||||
| Get List | Deny |
Allow |
Conditional Allow |
Allow |
Deny |
Allow |
| Add Attachment |
Allow |
Allow |
Conditional Allow |
Allow |
Deny |
Allow |
| Get Attachment | Deny |
Allow |
Conditional Allow |
Allow |
Deny |
Allow |
| Workflow Comment | ||||||
| Add Comment | Allow |
Allow |
Conditional Allow |
Allow |
Deny |
Allow |
| Get List | Deny |
Allow |
Conditional Allow |
Allow |
Deny |
Allow |
You can find the Workflow Attachment and Workflow Comment SmartObjects in the System > Workflow folder in the K2 Designer. You may need to select the show System Objects option to see the SmartObjects in the Designer.

The process instance ID of the workflow is necessary to work with the Workflow Attachment and Workflow Comment SmartObjects. This is because it's the value that ties an attachment or comment to a workflow instance. You do this by mapping the Process Instance ID in the methods you use to add or retrieve attachments or comments. If you use SmartForms, you need to add the integration with the SmartObjects as described below. These SmartObjects can be used in multiple ways to add and show attachments and comments. The key is using the Process Instance ID in every method of these SmartObjects
In this step, you create a SmartObject with leave details.
- Create a SmartObject called Leave with the following properties:

Leave Request SmartObject Type Key Required Unique ID Autonumber Yes No Yes Employee Name Text No No No Leave Type Text No No No Start Date Date No No No End Date Date No No No
In this step, you use the generate function to create an Item view for the Leave SmartObject.
- From the category tree, right-click the Leave SmartObject and click Generate Views.

- On the Generate Options page, in the Views section, make sure that the views are generated in the correct category. In this example they are generated in the Employees\Leave category. Check the Item check box for the Leave SmartObject and type Leave Request, then click OK.

- The view shows in the Employees\Leave category.

- From the K2 Designer, locate and right-click the Leave Request view and select Edit.

- On the Layout page, select the
Leave Type text box, click the Change Control icon, select Drop-Down List, and then click OK.

- Click the ellipsis next to Type in the control's properties, select Use a static list of values in the control, and click the ellipsis next to List Items as shown below.

- Click Add and type the values as shown below.
Click OK.

- Click OK on the Configure Data Source page and then click Finish to save the view.
In this step, you create views to add and show comments.
- From the category tree, click the All link and check the System Objects check box.

- Go to the System > Workflow > Comments folder, right-click the Workflow Comment SmartObject and click Design View.

- In the Name field type Add Comment as the name for this view, make sure Item View is selected, and then click Create.

- On the Layout page, drag the Comment field onto the canvas and then click Finish.

- Go to the System > Workflow > Comments folder, right-click the Workflow Comment SmartObject and then click Design View.

- In the Name field type Comments as the name for this view, select List View, and deselect Call this method when the form loads. Click Create.

- On the Layout page, click Create Labels and Controls and select the Comment, Created By and Created Date fields. Click OK and then click Finish to save the view.

In this step, you create a form to use with your workflow.
- From the category tree, right-click the Leave Request view and click Generate Forms.

- On the Generate Form page, make sure that the form is generated in the correct category. In this example it is generated in the Employees\Leave category. Change the Form Name to Leave Approval and then click OK.

- From the K2 Designer, locate and right-click the Leave Approval form and select Edit.

- On the Layout page, go to System > Workflow > Comments on the Views tab and drag the Add Comment and Comments views onto the canvas as shown below.

- Go to the Parameters tab and click Add Parameter.
Type ProcInstID in the Name field and select Number as the data type. This parameter is used to load the comments associated with the workflow instance as well as for saving any new comments. Click Finish to save the view.

In this step, you configure the Start step and add and configure the Task step.
- From the K2 Designer, right-click the Leave Approval form and select Design Workflow.

- In the K2 Workflow Designer type Leave Approval and click Create.

- Click Close if you see the Toolbox tips pop up.

- Click Got It if you see the Step tips pop up.

- Double-click the Start step. Notice that the Leave Approval form is automatically added to the Start step but the start rule action is not configured. To edit the start rule action, click the Edit link.

- The Start Workflow from a Form page shows. Click Next.

- In the Start Rule section, select the Help me configure it option and click Next.

- Click Next on this page.
You use the Leave Approval state when you configure the form with the workflow.

- In the Form Rules section, select On Leave Request, when Create Button is Clicked and click Next.
Onthou om image te update met regte
- The Almost Done page shows. This page contains all changes to the form. Click Save and Finish.

- On the Success page click OK.

- The start rule is now configured.

- From the Toolbox, drag the Task step onto the canvas. Select the Task tab and create two task actions (Approve and Reject).

- Select the Forms tab, then select SmartForm from the Form Type drop down. Click the drop down in the Form menu and select the Leave Approval form.

- Step through the Open Task on a Form wizard and select the Do it for Me! option.
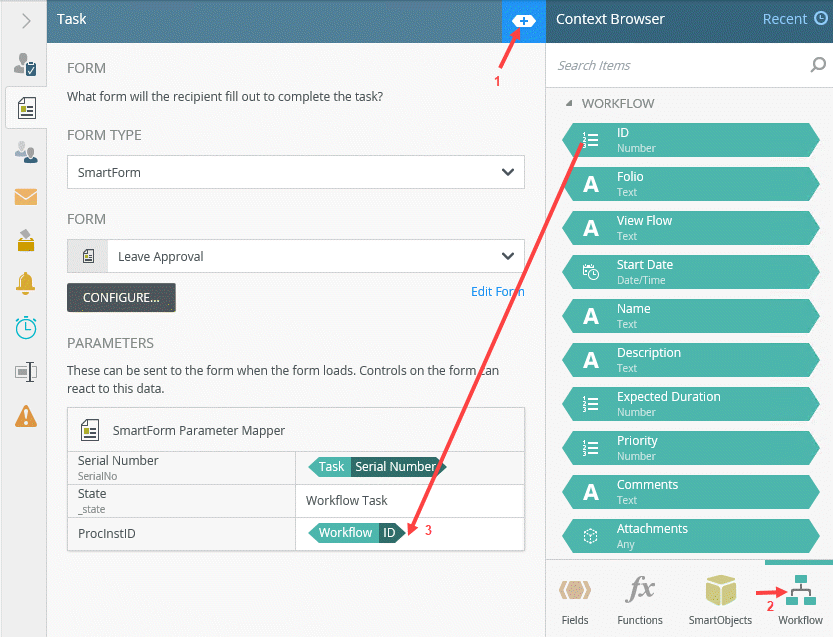
- Expand the Context Browser, click Workflow and then drag the Workflow ID into the ProcInstID parameter.
- Select the Recipients tab. Click the drop-down for Originator and select Browse.

- Enter the name of the person to whom you want to send the task and then select them.
Click OK.

- Drag a line from the Task step to add the Decision step.
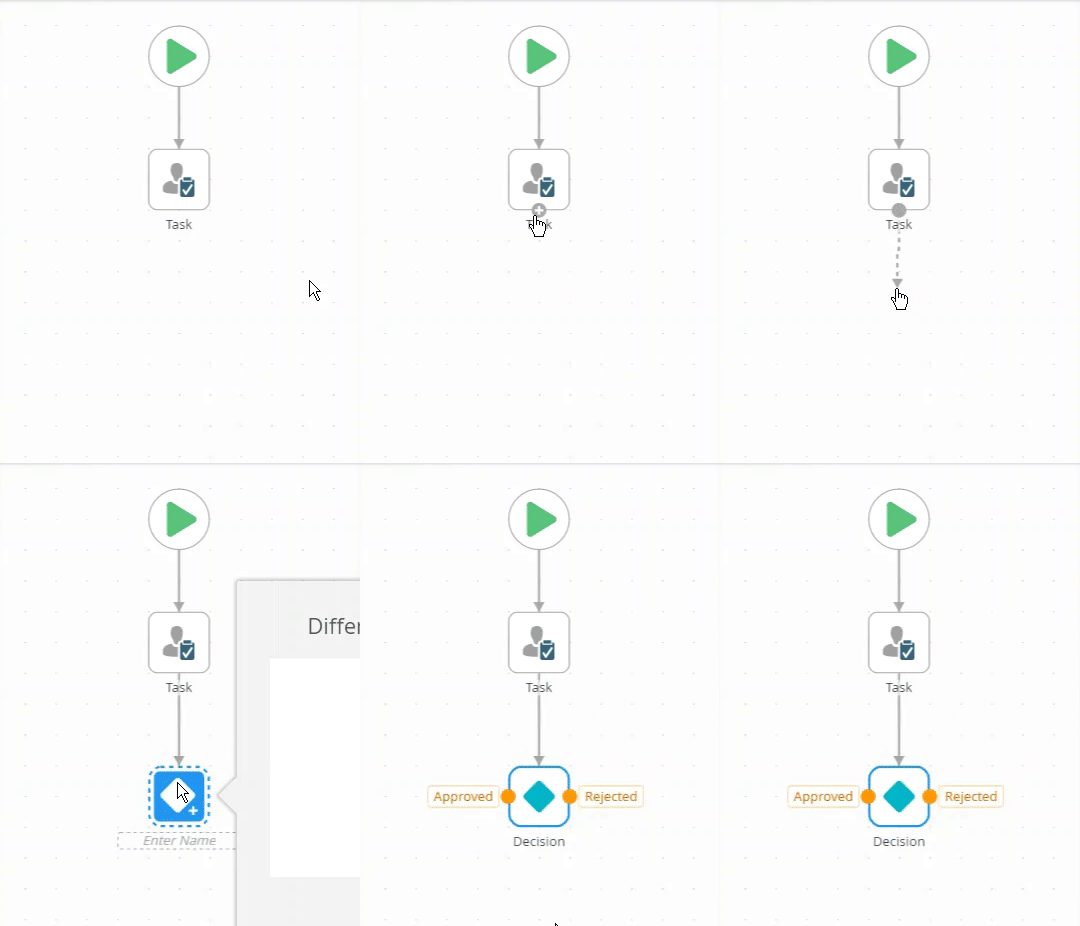
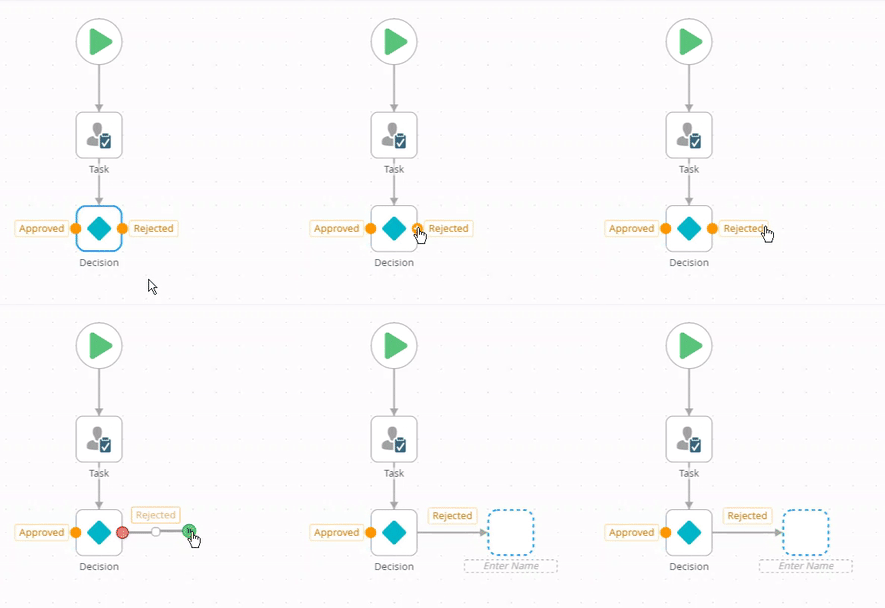
- Drag a line from the Rejected action port to create a Placeholder step.
Do the same for the Approved action. You can add more tasks here if you want. For the purpose of this exercise, you leave these as placeholders.
- Deploy the workflow.

In this step, you configure the Leave Approval form for workflow integration.
- From the K2 Designer, right-click the Leave Approval form and select Edit.

- On the Rules tab, select the Leave Approval state, select the When the Form is Initializing rule, and then click Edit Rule.

- In the Actions tab, click Hide a View and select the Comments view. Click OK. This is to hide the Comments view when the form is submitted as there are no comments yet.

- Select the On Leave Request, when Create Button is Clicked rule and click Edit Rule.

- Click configure next to the start the workflow action.

- Go to the Output Mappings tab and drag the Workflow ID from the Context Browser to the ProcInstID parameter. The Comments SmartObject requires the workflow instance ID as this is the value that ties a comment to a workflow instance.
Click Finish.

- Select the Conditions tab, click a control on a View contains a value, and select the Add Comment view and Comment Text Area control. This ensures that the comment is only saved if a comment is made.

- Select the Actions tab, click Execute a View method, and select the Add Comment view and Add Comment method. Click configure next to the action.

- Drag the ProcInstID parameter from the Context Browser to the Process Instance ID input property and the Comment Text Area control of the Add Comment view to the Comment input property. This is used to save a comment on the form before the workflow is started.

- Click Finish and then click OK.
- Select the Workflow Task state, select the When the Form is Initializing rule, and click Edit Rule.

- Select the Actions tab, click Execute a View method, and select the Comments view and Get List method. Click configure next to the action.

- Drag the ProcInstID parameter into the Process Instance ID input property. This ensures the correct comments for the instance show on the form. Click Finish and then click OK.

- Create a rule to save the comment entered by the approver. Click Add Rule and click After the Workflow action was submitted in the Events tab.

- Select the Conditions tab, click a control on a View contains a value, and then select the Add Comment view and Comment Text Area control.

- Select the Actions tab, click Execute a View method, and then select the Add Comment view and Add Comment method. Click configure next to the action.

- Drag the ProcInstID parameter from the Context Browser to the Process Instance ID input property and the Comment Text Area control of the Add Comment view to the Comment input property. This is used to save a comment on the form after the workflow action is submitted.

- Click Finish and then click OK to save the rule.
- Click Finish to save the form.
- From the K2 Designer, right-click the Leave Approval form and select Check In.
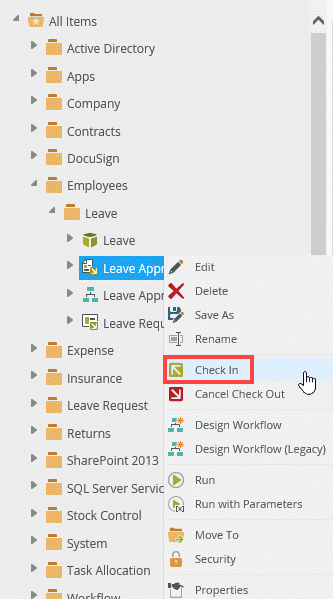
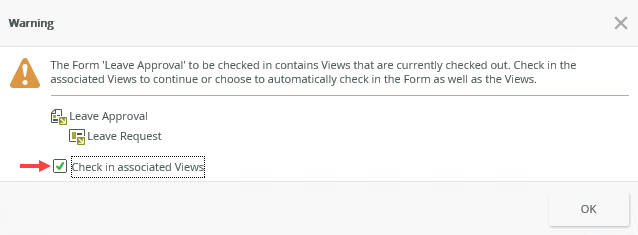
- Select Check in associated Views and click OK. This ensures everyone can access and submit the form.
In this step, you run the Leave Approval form as an employee, add leave details, and click the Create button to submit the form. You then open the form in K2 Workspace as the approver to view the comments.
- Sign in as Codi (the employee). From the K2 Designer, locate the Leave Approval form and click the Runtime URL link.

- Complete the form as shown below (remember to add a comment). Click Create.

- Sign in as the user who is the approver of the task, in this case Bob. Go to K2 Workspace to see the Task created for Bob in the Inbox.

- Click the task to open it. You can see the comment added by Codi when she submitted the form. The approver (Bob) now has the option to add another comment.
