Worklist control
The Worklist control shows a list of workflow tasks assigned to you. You can create custom task lists by adding the control to a view or form to enable opening or actioning workflow tasks. You can customize the control in the Designer by configuring items such as the layout to change the display of the columns, add filters to show tasks related to a specific workflow, and configure sort options. You use the Worklist at runtime to perform actions such as share, redirect or sleep tasks. You can also configure out of office settings to share your tasks with other people while you are out of office. The functionality of the Worklist control is similar to the task list found in Workspace (Desktop). For more information on the features of the Workspace Task List, see the My Tasks topic.

- Create a view or a form.
- Drag the control onto the canvas. You can find the control in the Worklist section of the Toolbox.
- Configure the rest of the properties as necessary.
- Run the view or form.
When you click the ellipsis next to the Filter property, the Filter and Sorting Options dialog opens. You can configure one or more filters at design time to create worklists based on tasks related to a specific workflow or set of workflows, or where the status matches a particular value. You can also change the filter while using the control. This represents a personal filter, and applies only to you, not others who may have the form open. If you open a new browser session and browse to the same form containing the worklist, the filter that you created still applies.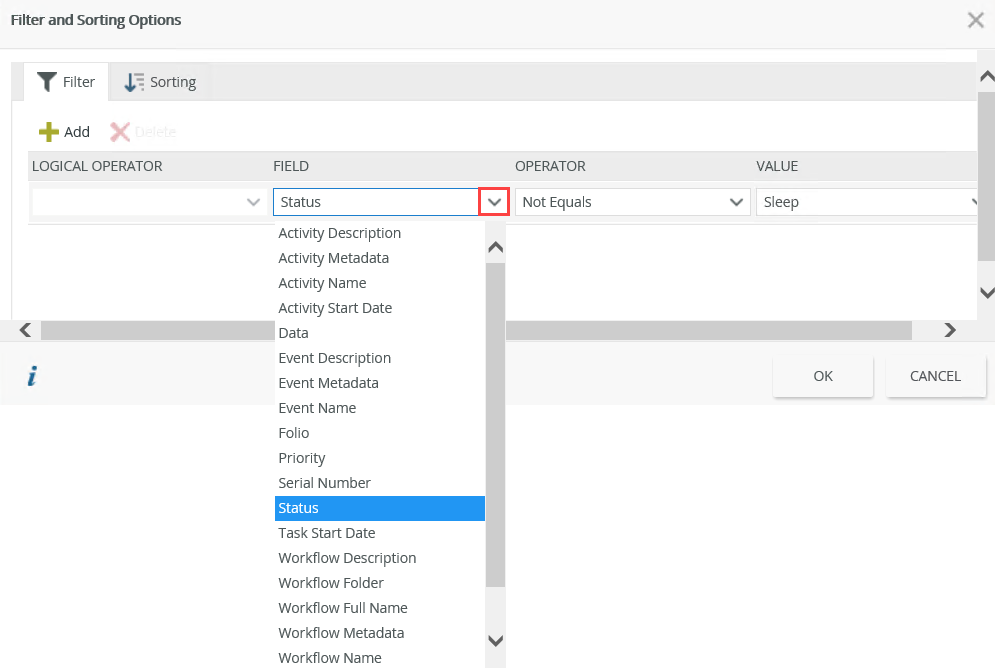
When you select the Sorting tab of the dialog, you can configure one or more sorting options. The sorting is applied in the order listed, so the first one is the primary sort applied, the second one is secondary, and so on.

When you click the ellipsis next to the Layout property, the Layout Configuration dialog opens. The Simple option displays the Activity Name, Folio, Task Start Date and Workflow Name columns. To customize the display of the columns, select the Grid option to add and remove columns. Reorder columns using the Move Up and Move Down buttons. You can add an additional column such as the Original Destination. This column allows you to differentiate between your worklist items and someone's shared worklist items allocated to you.
Select the column, click the blue arrow facing right, and click OK.

You can specify the width for each column of the control. Below is an example of using a combination of percentage, pixel and integer values for specifying widths.

| Feature | Description |
|---|---|
| Width | Specify the width for each column of the control. The width can be one or a combination of the following:
|
You can change column widths in runtime by dragging column borders with your mouse. Move the mouse pointer to the right hand border of the column you wish to change. The mouse pointer changes shape to a left and right pointing arrow as shown below. Click and drag the mouse to adjust the column width. Auto-resize the column width by double clicking.

When you add the Due Date column, you can sort worklist tasks according to the date they should be completed. See Task Tab Due Date. You can sort the column in ascending or descending order by clicking the arrow as shown below. Sorting it ascending allows you to see the tasks that you should complete first. The Due Date displays the name of the day for the current week with the exception of today which shows only the time. Tasks with a due date outside of the current week show in date format. When you hover over a current week task, you see the date in the tooltip. The following example shows a worklist when the current day is a Tuesday and the list is sorted ascending: 
Use the table below for more information about the Available Columns and how to configure them in the Workflow Designer:
| Column | Description | Where do I configure this in the Workflow Designer? |
|---|---|---|
| Activity Name | The name of the Task | Configure this in the Task properties tab |
| Folio | This is a unique label for each instance of a workflow | Configure the value in the Set Folio step |
| Workflow Name | The name of the workflow | Configure this when you create your workflow |
| Original Destination | Allows you to differentiate between your worklist items and an absent (out of office) user's worklist items | Configure recipients of a task in the Recipients tab |
| Activity Start Date | This date is automatically generated when the Task is started | Not applicable |
| Priority | The priority of the workflow instance | Configure this in the Start step of the workflow |
| Workflow Description | The description of the workflow | Configure this in the Start step of the workflow |
| Workflow Expected Duration | Legacy column, see footnote* | |
| Workflow Folder | This is the folder in the category system where the workflow is created | Configure this when you create your workflow |
| Workflow Full Name | This is the full name of the workflow and is automatically generated when you create your workflow. The value contains the folder name and workflow name, for example Customer\New Customer | This value is system generated when you create your workflow |
| Workflow GUID | This is an automatically-generated GUID (globally unique identifier) for the workflow and is shown in string format | Not applicable |
| Workflow Metadata | Legacy column, see footnote* | |
| Workflow Start Date | This date is automatically generated when the workflow is started | Not applicable |
| Workflow Status | Legacy column, see footnote* | |
| Serial Number | The serial number for the Task. This number is automatically generated when the Task is started. | Not applicable |
| Status | The status of the Task such as Available, Open and Allocated. See Using Task Recipients and Responses for different scenarios using Task Recipients and Task Result Rules, and how they impact the status of aTask. | Not applicable |
| Due Date | The date at which a Task should be completed | Configure this in the Task Tab of the workflow |
| Event Description | Legacy column, see footnote* | |
| Event Expected Duration | Legacy column, see footnote* | |
| Event Metadata | Legacy column, see footnote* | |
| Event Name | Legacy column, see footnote* | |
| Task Start Date | The date is automatically generated when the Task is started | Not applicable |
| Activity Description | The description for the Task | Configure this in the Task properties tab |
| Activity Expected Duration | Legacy column, see footnote* | |
| Activity Instance Overdue | Legacy column, see footnote* | |
| Activity Metadata | Legacy column, see footnote* |
* Legacy columns may or may not work as expected, even in workflows designed with legacy tools (such as K2 Studio or K2 for Visual Studio).
Select the Show Out of Office property of the control to enable the out of office feature for everyone.
See the Out of Office section for information on how to configure out of office.
You can find the control in the Worklist section of the Toolbox.

| Properties | Description | Can be set in runtime using rules? |
|---|---|---|
| Detail | ||
| Name | A unique identifier for the selected control. This property is required and defaults to the name of the control. | No |
| Title | The title of the control. | Yes, see Configure the Set a Control's Properties Action for more information. |
| Watermark | Specify the text to display when the control is not populated. | No |
| Settings | ||
| Filter | Enables you to filter and sort tasks. | Yes, see Configure the Set a Control's Properties Action for more information. |
| Layout | Enables you to configure the layout of the control. | Yes, see Configure the Set a Control's Properties Action for more information. |
| Refresh Interval | The time before the worklist refreshes. The value is in seconds and the default setting is 300. Type an interval, such as 600 (10 minutes). | Yes, see Configure the Set a Control's Properties Action for more information. |
| Show Toolbar | Shows or hides the toolbar. | Yes, see Configure the Set a Control's Properties Action for more information. |
| Show Filter | Shows or hides the filter and sorting icon. You can change the filter and sorting while using the control, and applies only to you. If you open a new browser session, the filter that you created still applies. You can also configure filter and sort options when you configure the control, which would make these settings apply to everyone using the form containing the control. | Yes, see Configure the Set a Control's Properties Action for more information. |
| Show Search | Shows or hides the search toolbar. | Yes, see Configure the Set a Control's Properties Action for more information. |
| Enable Search | Shows or hides the search icon. | Yes, see Configure the Set a Control's Properties Action for more information. |
| Show Out of Office | Shows the Out of Office icon. | Yes, see Configure the Set a Control's Properties Action for more information. |
| Rows | The number of work items to display on the page. If more items exist than you specify, a Show more icon allows you to increase the load with the same number of items. | Yes, see Configure the Set a Control's Properties Action for more information. |
| Action Menu Items |
Allows you to configure the action menu items that you want to use with a worklist item. Click the ellipsis next to Action Menu Items to select the actions you want to make available.
|
Yes, see Configure the Set a Control's Properties Action for more information. |
| General | ||
| Height | Adjusts the height of the control. You can enter any whole number or pixel value (maximum of 32767px). | Yes, see Configure the Set a Control's Properties Action for more information. |
| Width | Adjusts the width of the control. You can enter any whole percentage up to 100%, whole number, or pixel value (maximum of 32767px). | Yes, see Configure the Set a Control's Properties Action for more information. |
| Visible | Shows or hides the control. | Yes, see Configure the Set a Control's Properties Action for more information. |
| Format | Opens the Format page where you can configure formatting and style features such as format, font, borders, padding and margins. See the Format topic for more information. | No |
| Conditional Format | Opens the Conditional Formatting page. You can add conditional formatting to apply a specific format or style when a condition you set is True. Use conditional format on its own or with the Format feature. See Conditional Format for more information. Click the ellipsis to open the Conditional Formatting page. | No |
- Set a control’s properties: You can configure the settable properties of the control with this action
- Show/Hide: The Visible property allows you to show or hide the control through rules
The following events and methods are available on the control:
Rule Events:
- When [control] is Actioned: This event executes when a task is actioned such as Approved or Declined. You can use this event to trigger actions when the task is actioned, for example show a message or open a subview.
- When [control] is Clicked: You can execute a rule condition or action when a worklist item is highlighted in the Worklist, for example if the current workflow activity is Approval, then open the Manager Approval subform.
- When [control] is Double-Clicked: You can execute a rule condition or action when a worklist item is double-clicked in the Worklist, for example if the current workflow activity is Approval, then open the Manager Approval subform.
- When [control] is Redirected: You can execute a rule condition or action when a worklist item is redirected, for example show a message.
- When [control] is Refreshed: You can execute a rule condition or action when the Worklist control is refreshed, for example set focus to the control.
- When [control] is Released: You can execute a rule condition or action when a worklist item is released, for example send an e-mail or set the properties of another control.
- When [control] is Shared: You can execute a rule condition or action when a worklist item is shared, for example show a message.
- When [control] is Sleeping: This event executes when the Sleep action is executed on a worklist item. You can execute a rule condition or action when the Sleep action is executed, for example send an email.
Control Methods:
- Execute a control's Execute Action method: Executes an action on a task such as Approve or Decline. You can use this method for example to action a button that is outside the Worklist control on the view or form. Configure the control's Serial Number and Action Name parameters to do this.
- Execute a control's Redirect method: Redirects a worklist item to someone else. You can use this method for example to send a worklist item to someone else when an advanced condition is true. Configure the control's Serial Number and User Name parameters to do this.
- Execute a control's Refresh method: Refreshes the Worklist control. You can use this method for example to refresh the control when you navigate to a tab containing the Worklist control.
- Execute a control's Release method: Releases a worklist item. You can use this method for example to release a worklist item that was opened by you and make it available for other people to action when an advanced condition is true. Configure the control's Serial Number parameter to do this.
- Execute a control's Share method: Shares a worklist item with one or more people. You can use this method for example to share a worklist item when an advanced condition is true. Configure the control's Serial Number and User Names (semicolon delimited list) parameters to do this.
- Execute a control's Sleep method: Sleeps a worklist item. You can use this method for example to sleep a worklist item when a button is clicked. Configure the control's Serial Number and Sleep Duration parameters to do this. The Sleep Duration format is date or date/time but it must be the same format as your browser culture. Type a date or date/time, such as 01/01/2019, 2019/01/01 or 19/01/01.
When you work with a worklist item, you can perform actions such as redirect and sleep to manage the worklist item. Select an action by clicking the drop-down arrow next to the worklist item:

| Feature | Icon | Description |
|---|---|---|
| Open Form | Opens the worklist item. | |
| Action(s) | Displays the actions available on the task such as Approved or Review. | |
| View Flow | Shows a detailed view of the current status of a workflow instance and the path followed. | |
| Release |

|
Releases a worklist item that you opened and makes it available for other people to action. |
| Sleep |

|
Pauses or suspends a worklist item for a period of time. The worklist item is visible but you cannot action it. By sleeping an item, you allocate the item to yourself to work on later. If the worklist item is configured for more than one recipient using a custom rule, the item may also show as allocated on other recipient worklists if there is only one allocation slot for the group.
|
| Redirect |

|
Allows you to send the worklist item to someone else. The worklist item is removed from your Worklist and appears in the other person's Worklist. |
| Share |

|
Allows you to share the worklist item with someone else. The worklist item appears in your Worklist and the new participant's Worklist. The first person to open the worklist item can take action on it. |
To learn about task recipients (destination) planning, including specific examples based on scenarios, see Using Task Recipients and Responses.
The Sleep action allows you to pause or suspend a worklist item for a period of time. When an item is slept, it is visible but cannot be actioned. To pause or suspend a worklist item click the sleep icon  and select an option.

| Feature | Description |
|---|---|
| Basic | |
| Breakfast Tomorrow | Pauses the item until 8 AM the following day. |
| Lunch Tomorrow | Pauses the item until 1 PM the following day. |
| In a week from now | Pauses the item until 8 AM the following week. |
| Date | |
| Date | Allows you to specify a date to wake the item. |
The Redirect action allows you to assign a worklist item to another person. When you redirect a worklist item, the item is no longer available on your Worklist and appears on the other person's Worklist who can open and complete the item. Click the Redirect icon  and search for a person.

| Feature | Description |
|---|---|
| Search | Type part or the full name of the user you want to redirect the task to and click the Search icon. |
| Match | The match operator to use with the search such as Contains or Equals. |
| Label | The security label to use in the search, such as K2, Azure Active Directory or SharePoint. |
| Search Result | Displays the names returned from the search. Select the person you want to redirect the item to. |
The Share action allows you to share a worklist item with another person. When you share the item, it is still available on your worklist and it appears on the other person's worklist. Either of you may open and complete the item.
Click the Share icon  and search for a person.
Use the Add button to add multiple people.
| Feature | Description |
|---|---|
| Add | Adds a person. You can add multiple people. |
| Remove | Removes a person from the list. |
| Shared with | Displays your list of people to share task with. |
When you click the Add button, you can search for a person to share the item.

| Feature | Description |
|---|---|
| Search | Type a person's name in the search box. |
| Match | The match operator to use with the search such as Contains or Equals. |
| Label | The security label to use in the search, such as K2, Azure Active Directory or SharePoint. |
| Recent | Displays the names returned from the search. Select the person you want to share the item with. |
The View Flow action provides you with a graphical view of the actions taken during the workflow instance.
Click the View Flow menu item to view the steps of the workflow and which route the workflow instance followed.

Use the following guidelines to understand what you're seeing in the View Flow:
- Line rules that evaluate to true and are successful display in green
- Lines rules that evaluate to false and are not successful display in red
- Skipped lines or not yet evaluated lines remain gray
The Out of Office feature allows you to share specific tasks or all tasks assigned to you with people you designate, or you can alternatively create exception rules for specific worklist items when you are out of office. When other people share their out of office worklist items with you, you can use the worklist's Original Destination column to differentiate between your own worklist items and out of office tasks shared with you.
When you configure the out of office settings, you need to assign people to receive your existing and new worklist items. You can configure the out of office settings yourself, or it can be done by your manager or an administrator who has the permissions to do so.
The Configure Out of Office icon displays in your Worklist toolbar.

Use the following guidelines to interpret the out of office statuses:
- The icon of a person who is out of the office contains a border around the icon,
- The icon of a user who is in the office has no border,
Follow the steps below to configure your out of office settings.
- Click the Configure Out of Office icon.

- Select the Out of the office option.

- Click the search icon next to Forward all work items to. Search for and select a person to forward the worklist items to. You can add more than one person. All tasks are forwarded to the people you select unless you specify an exception rule. Click OK.

- Optional: If you want to assign a specific activities' tasks to another person, create an exception rule by clicking Add in the Exception Rules section of the configuration dialog.

- Type a rule name, select a workflow, select an activity of the workflow, and assign a person who receives the activity's tasks while you are out of the office.
Click OK. You can add more than one exception rule.

- In the configuration below, all worklist items are assigned to John while you are out of the office, except for the My Workflow Task worklist items which are assigned to Codi.

| Feature | What it does |
|---|---|
| In the office | Changes the Out of Office icon to show that you are in the office. You can configure your out of office settings, but it only applies when you select the Out of the office setting. |
| Out of the office | Changes the Out of Office icon to show that you are out of the office and applies the out of office configuration settings. |
| Forward all work items to | Displays the people that can open and action your worklist items while you are out of the office. |
| Exception Rules |
Use this to create an exception rule to route specific activities' tasks to someone other than those in the list above. |
You can identify, open and action out of office worklist items that have been shared with you. You can access and action these items in the same way as your own worklist items. Use the Original Destination column in the Worklist to see who the item belongs to. All shared worklist items display with the person's name who is out of office. You have the same rights to these tasks as the out of office person. When you action a shared worklist item, you do so on behalf of the out of office person while he or she is absent. When that person returns and deactivates the out of office feature, all remaining shared worklist items are removed from your worklist.
The image below shows Barry's worklist and the one worklist item
that has been shared with him by John.

Out of office is designed to allow the administrator and the manager to configure a person's out of office settings on their behalf. This is used in instances where an employee is absent from work and items can be shared with colleagues, ensuring that the work is processed in line with the business requirements.
From an administrative perspective, a person with rights to view the worklist items of other people has access to an out of office node that queries a person's availability status (Out of the office or In the office). You can access the Out of Office configuration page using the Management > Users > Out of Office node. This provides an administrative view of all people out of office. An administrator can configure people's out of office settings.
A person with administrative rights on the Workflow Server is an Out Of
Office administrator as well.

| Feature | What it does |
|---|---|
| Add | Opens the Select a user to add to the Out of Office list search page. Search for a person to add to the list and display the current out of office setting. |
| Edit | Edits a person's out of office settings. Click on a person's name and select the Configure Settings button from the menu. |
| Out Of Office check box | Allows the administrator to activate a person's out of office settings. |
| Save | Saves the current configuration settings to the database. |
| Remove | Removes the current configuration settings from the database. |
| Refresh | Refreshes the current configuration settings from the database. |
To add Out of Office settings for a person, follow the steps below:
- On the Out of Office page, click Add.

- The Add Out of Office User page opens.
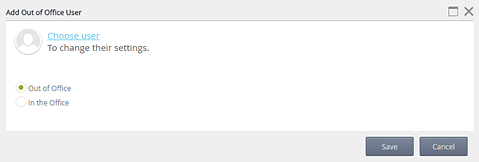
- Click the user icon or Choose user link and the Find User page opens.
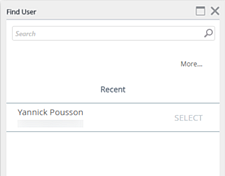
- On the Find User page you can search for a user or select the most recent user.
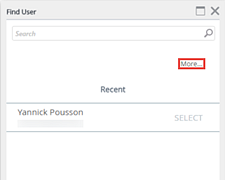
- Clicking on the More... link provides more search options.
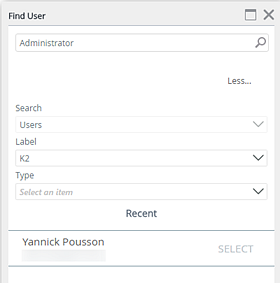
- Enter the person's name and click the search button.
- Select the user from the search results by clicking on the Select link.
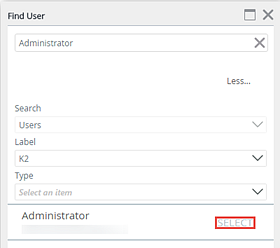
- You can now edit the out of office settings such as Forward To and Exceptions.
The Out of Office (OOF) Notification allows all forwarded users to receive an e-mail notification regarding delegated tasks when a specific user is out of office. Take note of the following considerations:
- The notification sent to the forwarded (delegated) users is not customizable.
- The notification is only sent to forwarded users if the task is sent while the original user's out of office setting is turned on.
Example
The following example illustrates the Out of Office functionality using a multiple approval step workflow for a Customer Onboarding process. A user’s tasks are delegated to multiple users when they are out of office.

- When a new customer is created via a form, the workflow starts and the task is sent to the appropriate users in the first approval step. For this example the task is sent to Ashley.
- Ashley receives an email notification that she has a new task. Since Ashley is currently out of the office, her tasks are forwarded to two other users, Barry and Codi. The figures below show all three email notifications sent by the server.
Ashley's

Barry's

Codi's

- The task is approved by Codi and she receives an approval email.
- The workflow moves to the second approval step containing an out of office exception rule that forwards the tasks to three other users. For the purpose of this example, the notifications are sent to Dennis, Eric and Holly via the exception rule. Any of the three forwarded users can action the task by responding to the notification or opening the task from their Worklist.
Dennis's

Eric's

Holly's

You can change the way the View Flow works by editing its web.config file, found at the following location:
"%ProgramFiles%\K2\WebServices\ViewFlow\web.config"
View Flow Refresh Interval
You can change the interval to refresh the View Flow by editing the value in the following node:
The value is in seconds and it defaults to 30. The minimum value that you can set is 15 seconds. If you specify a 0 or -1, the value defaults to 30. You do not need to reset Internet Information Services (IIS) or the server after making this change.
View Flow Payload Size
If you see a maximum size error such as the following when you try to open a View Flow, you can change the payload size.
Error message: The View Flow cannot be displayed because the size of this workflow instance (4514400 bytes) exceeds the maximum size this server (1000000 bytes) is currently configured to display.
To change the limit, edit the value in the following node:
The value is stored in bytes and the default value is 1000000. This limit is configured to prevent large workflow instances from impacting performance of the View Flow site. You do not need to reset Internet Information Services (IIS) or the server after making this change.
- The control is also available when designing forms.
- When you apply a filter while using the control, it overrides the filter configured in design time.
- When you use custom themes, be sure to specify the CSS classes for the elements.
- The control uses the default value for the current environment for the Web Service URL field. The hostname, rather than IP address, is used to check for work items. If the hostname is not mapped to any IP address, no tasks are returned.
- You can sort items according to their status by clicking the arrow as highlighted here. Available items display with a blue dot and open items have no dots.

-
The Task Start Date displays in days for the last week, with the exception of current date which displays only as the time. When you hover over the task, the date shows. Tasks started prior to a week before display in date format. The example shows if the current date is a Thursday:
Monday
Tuesday
Yesterday (Wednesday)
11:28 PM (current date, Thursday)
-
Configuring the width of your columns:
- A scrollbar shows if the total width values of all columns exceed the control's cell width


- If the total percentage value of all columns is less than 100%, the remainder percentage applies to the last column. For example, if the total value of all columns equals 60%, the remainder of 40% is added to the last column.


- If the total pixel value is less than the pixel value of the cell, the remainder pixel value applies to the last column.
- If you do not specify any values, automatic calculated sizes apply to the columns.
- You cannot use rules to configure the width of the columns in runtime.
- A scrollbar shows if the total width values of all columns exceed the control's cell width