Building custom reports in K2 Workspace
In the Standard Reports tutorial, we explored the out-of-the-box reports available with K2 blackpearl installations. In this tutorial, we will look at the Report Designer in K2 Workspace and build our own custom report. This report will be based off of the Activity Instance SmartObject (you can refer back to the Exploring the Workflow Reporting SmartObjects to learn more about the available reporting SmartObjects). This SmartObject has a number of associations that allow for a report that's flexible with a wide variety of reporting options.
In this step, we will create a custom report, choosing our fields from the Reporting SmartObjects. We will customize the report layout, rename the column titles, add two filters and change the font style.
Step 1 Tasks
- Using Report Designer in K2 Workspace, create a custom Summary report and name it
Open Leave Requests. - Select Workflow Reports > Workflow General > Activity Instance as the Primary Data Source.
- After the Activity Instance SmartObject has been added, adjust the Related Data properties as follows:
- For the Activity Instance SmartObject, CHECK (only) the following properties:
- Activity Name, Start Date, Status
- Locate the Event Instance SmartObject and CHECK the following properties:
- Destination, Event Name, Status
- Locate the Process Instance SmartObject and CHECK the following properties:
- Folio, Originator, Process Name
- For the Activity Instance SmartObject, CHECK (only) the following properties:
- Add the following data source properties for the report Columns:
- Activity Instance > Activity Name, Activity Instance > Start Date
- Event Instance > Event Name, Event Instance > Status, Event Instance > Destination
- Process Instance > Originator
- Rename each column with user-friendly names. Use the names below as an option.
- Activity Name > Date Started > Current Event > Status of Event > Destination > Originator
- Group the report content by the Folio.
- Add two Filters. The first should be the Process Name (Equals)
Leave Request Workflow
then the Activity Instance Status (Equals)
Active - Edit the 'Group By' style so that the Font is larger, bold and a different color.
- View the Report, then Export the report content to Excel.
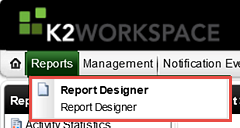
- Launch K2 Workspace (Start > All Programs > K2 blackpearl > K2 blackpearl Workspace). Open the Report Designer.
- When the Report Designer loads, click the Create Report button found in the lower right corner of the screen.
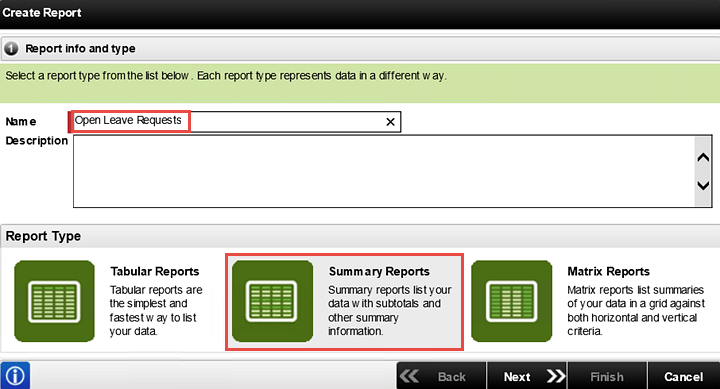
- On the Report info and type screen, Name the report
Open Leave Requests
then select the Summary Reports option. Click Next. - Scroll to the bottom of the data source options and expand the Workflow Reports category, then Workflow General. Click the Activity Instance SmartObject to add it to the Related Data pane.
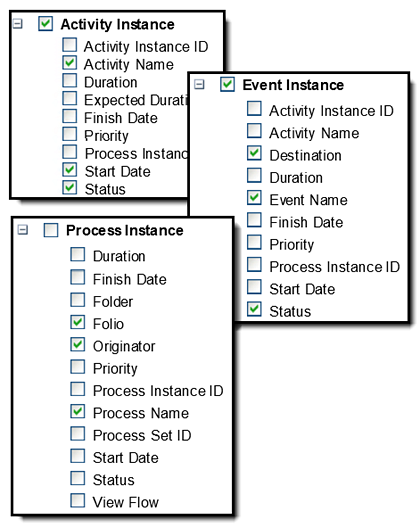
- For the Activity Instance SmartObject, CHECK (only) the following properties:
- Activity Name, Start Date, Status
- Locate the Event Instance SmartObject and CHECK the following properties:
- Destination, Event Name, Status
- Locate the Process Instance SmartObject and CHECK the following properties:
- Folio, Originator, Process Name
- Expand the Activity Instance SmartObject, then drag the Activity Name into the first column (DROP HERE) box. After you drop the property into its place, notice that new column box appears.
- Continue dragging properties until you have all of the following properties represented as columns in your report:
- Activity Instance > Activity Name, Activity Instance > Start Date
- Event Instance > Event Name, Event Instance > Status, Event Instance > Destination
- Process Instance > Originator
- Double-click the first column name (Activity_Instance.Activity Name) and using your keyboard Delete button, delete the default name. When the name is deleted, enter
Activity Name
in its place. - Repeat this process for each of the column titles until you have the following column titles for your report:
Activity Name > Date Started > Current Event > Status of Event > Destination > Originator
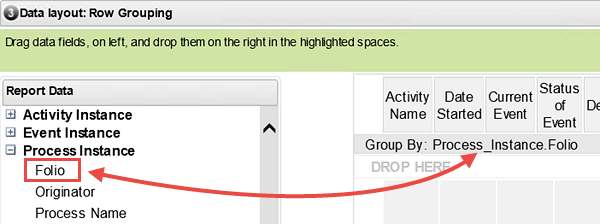
Click Next to continue. - On the Data layout: Row Grouping screen, drag the Process Instance > Folio property into the DROP HERE box on the design canvas. Click Next to continue.
- We will not have any Summary Filters for this report, so click Next.
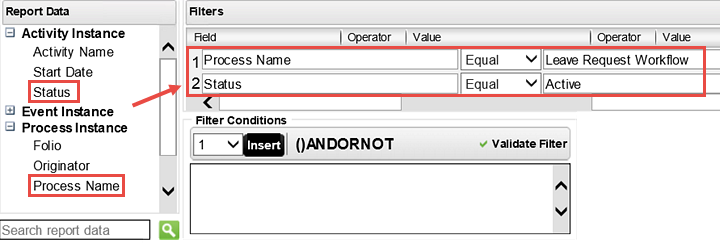
- On the Filter the data screen, expand the Process Instance category and drag the Process Name property into the DROP HERE Field box. Leave the Operator with its default Equal value, then enter
Leave Request Workflow
for the Value. (You may have to scroll to the right depending on your screen size.) - Add a second filter by dragging the Activity Instance > Status property into the second line. Keep the default (Equal) Operator and for the Value, enter
Active
Click Next to continue. - There are no Parameters for this report, so click Next to continue.
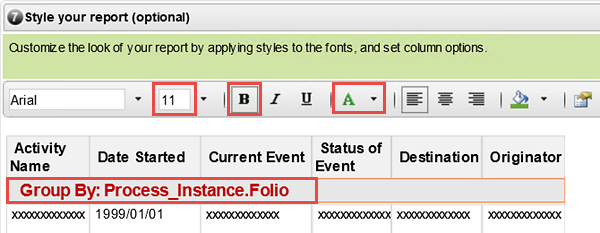
- On the Style your report screen, click the Group By title to highlight it. Then adjust the Font size to 11pt, make the Font weight bold, then change the Font color to dark red. Click Next to continue.
- We are now ready to view our Custom Report. On the Finish screen, click the View my report link to run the report.
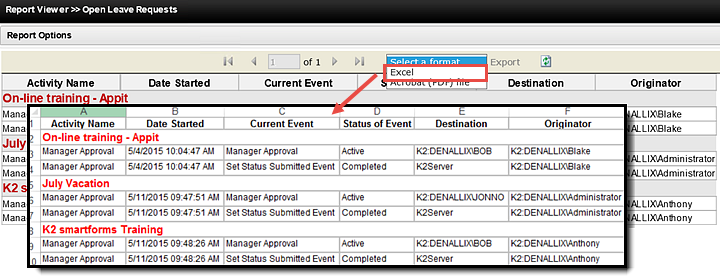
- In the Standard Reports tutorial, we exported the Process Overview Report to Excel. You can export custom reports as well to Excel or in a PDF file format. This allows you to combine reporting data over time, or share reports with your users. From the Report Viewer > Open Leave Requests screen, Export this report to Excel.
Reports are built from SmartObjects, or data sources. Notice the left column that shows all of the Primary Data Source options available. We are going to build our report from the Activity Instance data source, but you could build a report based off of the Leave Request SmartObject, found under the K2 Learning category if you wanted to. Notice too, that the reporting data source options are identical to what we observed with the SmartObject Tester.
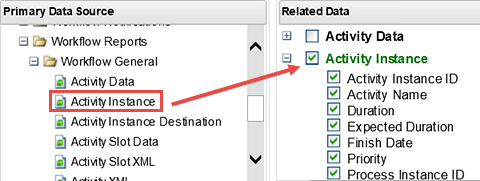
Scroll through the Related Data pane and notice how K2 has added a number of SmartObjects in addition to the Activity Instance SmartObject. These are all associated SmartObjects of Activity Instance. These associations allow you a great deal of flexibility in building your custom report. Notice too, how K2 has automatically selected every property in the Activity Instance SmartObject by default. We are going to adjust which properties we want, plus we are going to add a few other properties found in associated SmartObjects. Behind the scenes, K2 takes care of the SmartObject associations, allowing us to choose any property found in the Related Data SmartObjects for our report.
Your Related Data selections should reflect the image below. Click Next to continue.
On the Data layout: Report columns screen, we are going to add the SmartObject properties that we want for our report columns. We will simply drag and drop the properties onto the design canvas, then rename the column titles so that they are user friendly.
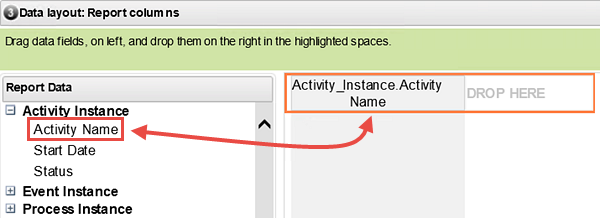
Notice the column names are not user friendly. In this next step, we will take a minute to edit each column name so that they are in a format that is easy to read and understand.

Now, we are going to group our report results by the Folio. Recall that the Folio is the Leave Request Title (that the form originator entered). This will group all of the Activity Instance results under their Folio name.
At this point, our report will return all Activity Instance data that has been saved to the K2 database. We just want to see the data from the Leave Request Workflow Activity Instances, and we only want to see the data from Activity Instances that are still Active. To achieve this, we will apply two filters to our report.
The final adjustment we want to make for our report is to edit the Group By: Process_Instance Folio font so that it stands out and is easier to read.

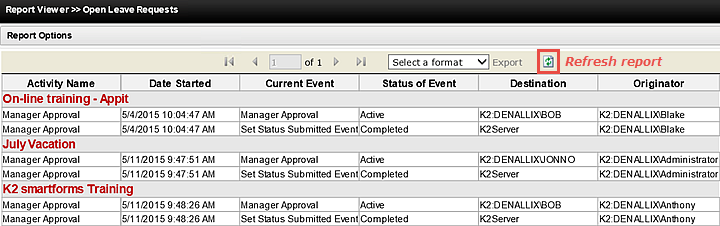
After your custom report is generated, you should see results similar to the image below. (If you do not have any results, or very few results, consider submitting a few more Leave Request Forms (without taking any action on them), then refresh the report by clicking the Refresh icon just right of the 'Select a format' Export option.)
STEP 1 REVIEW
In this step, we used Report Designer to create and style a custom K2 report. We added the Activity Instance SmartObject as the primary data source for our report, then observed how K2 automatically added any SmartObjects that have associations with Activity Instance. Behind the scenes, K2 maintains the SmartObject associations which allow us to simply pick from multiple SmartObject properties to add to our report. We included an option to group our results, using the Folio as the grouping property. Adding Filters allowed us to narrow our reporting results to just one Process and finally, we included some simple Font formatting to make our report stand out. As you build reports in your own environment, you can save them for reuse later.