Exploring the Workflow Reporting SmartObjects
K2 Reports are exposed as Workflow Reporting SmartObjects that are installed by default in K2 blackpearl installations. Because they are SmartObjects, they can be used in multiple places, including Standard and Custom Reports. The same permissions required for Standard Reports are also required for Custom Reports. At a minimum, users require Start and View rights for Processes they wish to report on. Users with K2 Server Admin rights have full-control over reporting tools.
In this step, we are going to open the SmartObject Tester and observe the structure of the Workflow Reporting SmartObjects.
Step 1 Tasks
- Launch the SmartObject Tester tool.
("C:\Program Files (x86)\K2 blackpearl\Bin\SmartObject Service Tester.exe") - Navigate to the Process Overview SmartObject found under the Workflow Reports > Workflow General nodes. Execute the Process Overview SmartObject and observe the results returned. (Make a note of one of the Process Names that are returned.)
- Execute the Process Instance SmartObject using the Process Name noted above as the Process Name parameter. Observe the results returned.
- Launch the SmartObject Tester tool.
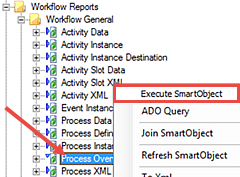
("C:\Program Files (x86)\K2 blackpearl\Bin\SmartObject Service Tester.exe") - Expand SmartObject Explorer > Workflow Reports > Workflow General > Process Overview.
- Right-click the Process Overview SmartObject and select Execute SmartObject.
- Click the Execute button. Notice the Results that are returned at the bottom of the screen. All of the deployed Processes (workflows) are listed. Notice the Leave Request Workflow Process and in particular, the Process Set ID (3) for the Leave Request Workflow. In the next step, we will Execute the Process Instance SmartObject, with the Leave Request Workflow as a parameter. Exit the Execute SmartObject screen.
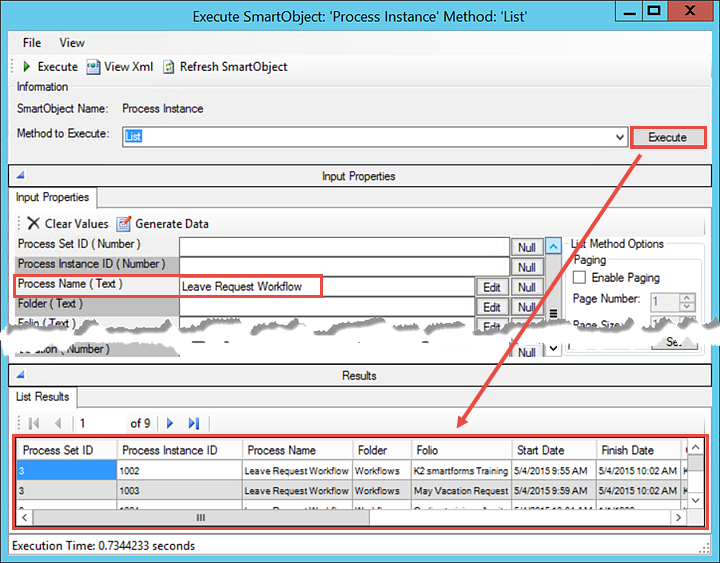
- Right-click the Process Instance SmartObject and select Execute SmartObject. Enter the following parameter for the Process Name:
Leave Request Workflow
(Or, any of the other Process Names that you observed in the previous step.) Click Execute. - Exit the Execute SmartObject screen. Exit the SmartObject Tester.
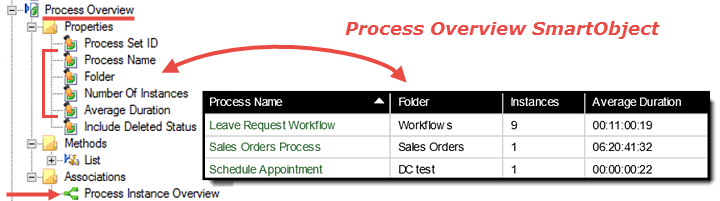
The Process Overview SmartObject is the basis for the Process Overview Report we worked with in the Standard Reports tutorial. Notice the SmartObject Properties that are the Report columns. The Process Overview Report is simply a representation of the objects found in its SmartObject. Notice too, this SmartObject has an Association called Process Instance Overview. If we look at the Association properties, we see that the referenced SmartObject is Process Instance.
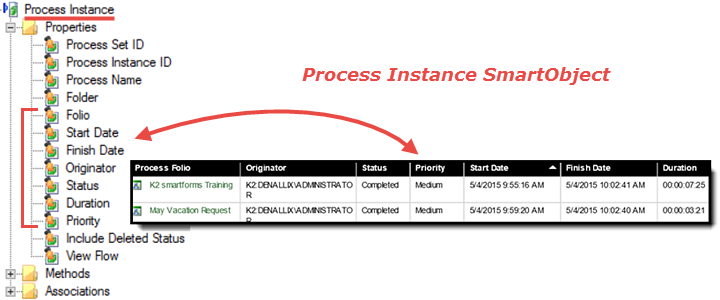
Expand the Process Instance SmartObject. In the Process Overview Report > Process Instances view, we now see the SmartObject Properties as object (columns) for this report.
Now we will demonstrate the SmartObject actually retrieving report data from the K2 database.

Now the results display all of the Process Instances for the Leave Request Workflow Process. Notice again, the Process Set ID is the same for each record, and for the Process Overview we executed in the previous step. The Process Set ID is the common factor between both sets of records and is how they are associated with each other.
If you are familiar with queries and JOIN statements, the associated SmartObject concept should be relatively straightforward. If you are not familiar, just know that K2 reports are actually the contents of the Workflow Reporting SmartObjects that are associated with each other to create a parent/child set of records.
STEP 1 REVIEW
In this step we demonstrated how K2 reports are actually just an execution of Workflow Reporting SmartObjects. The SmartObject Tester allows us to see the properties, methods and associations for the SmartObjects. The parent/child relationships that are formed from the associations translate into the Standard Report drill-down functionality. For Custom Reports, we will pull properties from several associated SmartObjects to build our report.
This concludes exploring the Reporting SmartObjects tutorial. .