Managing Processes and Process Instances
Recall that workflows are known as processes in K2 and process instances are a single occurrence of a process. Throughout this tutorial, both sets of terms will be used. Just know that workflows are processes, and workflow instances are process instances.
The most common tasks for the K2 administrator are starting and stopping (pausing) process instances, managing task lists and assigning rights, or permissions. When managing task lists, the administrator might have a request to redirect a task from one user to another, or manage Out of Office settings. In this part, you will explore these tasks using the features in the K2 Management site.
As a precursor to your tutorial steps, you need to generate several process instances of the Workflow Administration Sample process. In the real world, new process instances are most likely created when a user submits a form (and starts the workflow). Because you are not working with forms, you will start process instances from the K2 Management site. You could also use this tool for testing and troubleshooting your workflows without having to open and submit forms.
Step 1 Tasks
- Start six instances of the Workflow Administration Sample process, using the following entries for each Folio parameter.
- TaskRedirect
- GoToActivity
- StartStop
- Deleted
- Normal Execution 1
- Normal Execution 2
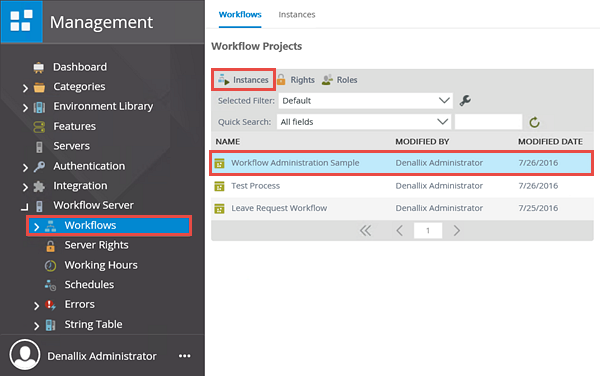
- In the K2 Management site, expand the Workflow Server node, then click the Workflows node (if it is not already expanded from the previous exercise). Click to highlight the Workflow Administration Sample process, then click the Instances button.
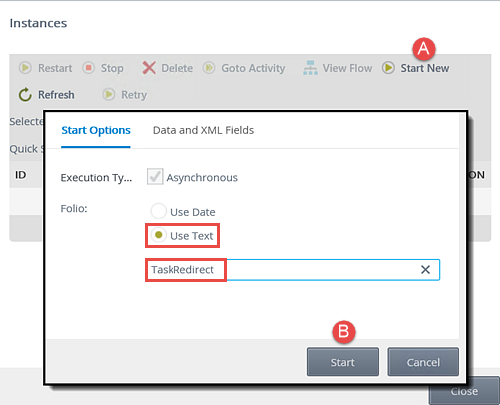
- Click the Start New button found in the menu bar. For the Folio value, click the Use Text option. In the text box that is exposed, enter
TaskRedirect
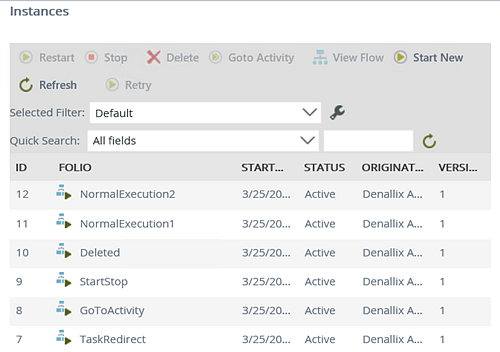
then click Start. Click OK when you see the success confirmation dialogue. - You need to create several more process instances for future tutorial steps. Using the same steps as above, Start New process instances using the following entries for each Folio property:
- GoToActivity
- StartStop
- Deleted
- Normal Execution1
- Normal Execution2
The Instances screen opens in the central pane. Notice there are no instances shown. This is telling you that this process (Workflow Administration Sample) does not have any active process instances at this time. It could be a newly deployed process, or simply mean that any process instances for this workflow have completed or have been removed.
Notice now, you have one active process instance. Notice too, the Folio value is the TaskRedirect property you just entered. The Active status indicates that K2 is actively processing this workflow and the workflow is waiting for input of some kind before proceeding.
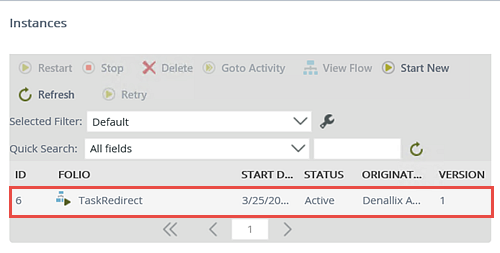
Your screen should now look like the image below. Each process instance shows a status of Active, wherein the workflow is now waiting for the next workflow step to take place. The Instances screen also shows us who started the workflow (Originator) and when it was started.
STEP 1 REVIEW
In this step, you started a number of process instances of the Workflow Administration Sample process. You set the Folio property for your process instances using manually entered values. In the real world, you will likely assign a form field value as the Folio during the workflow build (such as the form originator's name or any other key value from the form or workflow context). The Folio is not a required value and there are some instances where you will not assign any value (leaving it blank). Because it helps make each process instance unique, you will find that using the Folio provides useful information later on when managing your process instances.
Now, you will use the Instances tools to stop (pause), then start (resume) a process instance. There are number of reasons why you might want to stop, or pause a workflow. One example might be if the workflow is currently waiting for a user to action a task of some kind. Suppose that user is unavailable and will be for a long period of time. If it's not feasible to redirect the task to another user, you might just stop it, then restart it when the user is once again available. Or perhaps you have workflows that need to query some external system that will be offline for a while. To prevent errors, you can pause these workflow instances until that system is back online and then resume the workflows. Stopping workflows suspends all workflow tasks (system and user), then immediately starts those tasks up again when the process instance is restarted. In this step, you will also remove a process instance.
Step 2 Tasks
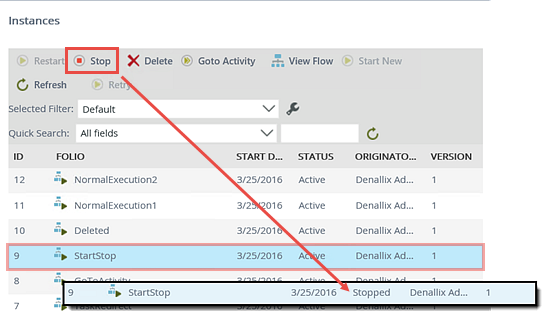
- Stop, then Restart, the StartStop process instance, observing the Status values after each action.
- Open the Process Overview Report (in K2 Workspace) and confirm you can see the Deleted process instance for the Workflow Administration Sample process.
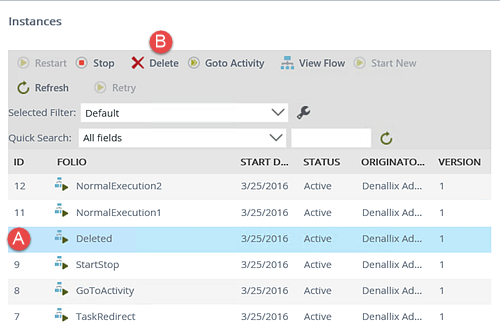
- Returning to the Instances screen, delete the Deleted process instance.
- Open the Process Overview Report, then confirm that the Deleted process instance is no longer shown.
- In the Instances screen, click to highlight the StartStop process instance. Click the Stop button found in the navigation bar. Click OK for the confirmation message. Notice the Status value after you have stopped the instance.
- Select the StartStop process instance once again and Restart it. Notice the Status value.
- Launch K2 Workspace.
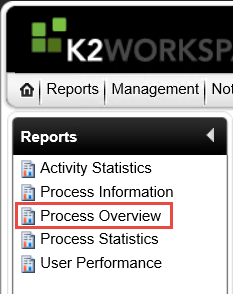
(Start > All Programs > K2 blackpearl > K2 Workspace) If you do not see the link in your start menu, contact your K2 Administrator to obtain the URL of the K2 Workspace in your environment. - From the landing page, click the Process Overview Report link found in the Reports pane. (It may take a while for the report to open depending on your environment.)
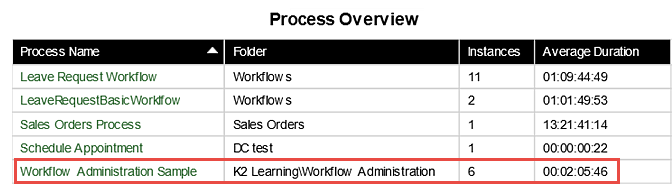
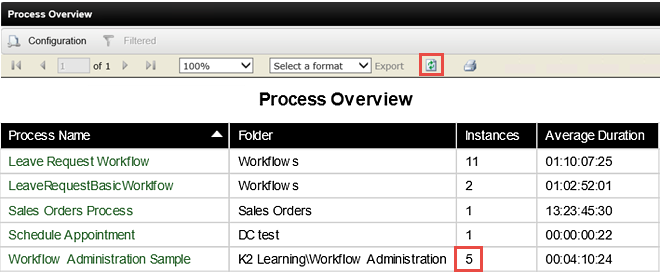
- When the Process Overview Report opens, you will first see a list of all processes that have been deployed, along with the number of process instances that have been started for each process. (Your screen will not match the image below exactly.) Notice the Workflow Administration Sample Process indicates the 6 instances you started in the previous steps. Click on the Workflow Administration Sample process to drill-down into its Process Instances report.
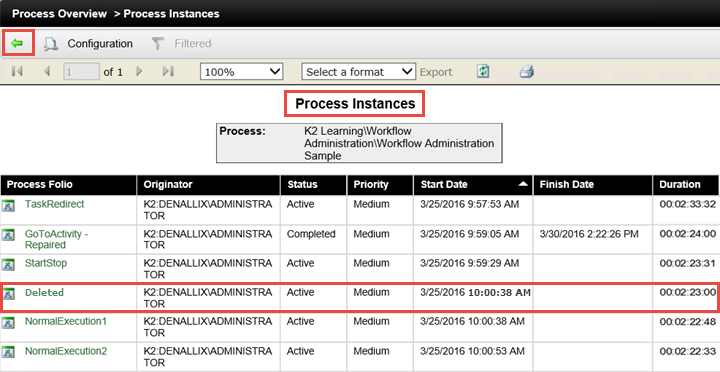
- On the Process Instances screen you will see a list of all the instances for this process. This list will include instances that are currently active, as well as instances that historical (completed). Confirm that the Deleted process instance is shown and is currently Active. Click the green back arrow in the Process Instances navigation bar to return to the Process Overview page.
- Return to the K2 Management site. (This should just be a matter of clicking the Management tab in your browser if you still have the site open.) If the Instances screen isn't still open, click the Workflow Server > Workflows node to expose the active processes. Click to highlight the Workflow Administration Sample process, then click the Instances button to open the Instances screen.
- Click to highlight the Deleted process instance, then click Delete. Click OK when you see the confirmation dialogue.
- Return to K2 Workspace (it should be a tab in your browser). You should be on the Process Overview page. Notice there are now five (5) process instances indicated for the Workflow Administration Sample process. (Click the refresh icon in the navigation bar if necessary.)
- Click the Workflow Administration Sample process to drill down into the process instances. Confirm the Deleted process instance is no longer there.
Now you are going to delete a process instance, which will permanently remove it from K2. (You cannot retrieve a process instance if you have deleted it.) To demonstrate this, you will first open the Process Overview report and observe the Deleted process instance's current workflow step. The Process Overview report contains current, as well as historical data for process instances. (To learn more about the Process Overview report, access the Reporting in K2 tutorials.)
Now you will return to the K2 Management site and remove the Deleted process instance from the Instances screen. Once deleted, you will return to the Process Overview report in K2 Workspace and confirm the instance is no longer shown.
Here is an example of why you might want to remove a process instance. Perhaps you have a user that has submitted a workflow and the workflow is currently waiting approval from some destination user. The originator decides at some point they want to cancel the workflow (and hopefully after having informed the destination user they are canceling), so they ask you if you can delete the workflow. You can accomplish this by removing the process instance. This is also another example of how the Folio might be very helpful in locating the correct process instance to remove, if there are many.
The Deleted process instance should no longer be shown on the Instances screen. To confirm the process instance has been completely removed from K2, you will return to the Process Overview reports in K2 Workspace.
Leave K2 Workspace open (on the Process Instances page).
STEP 2 REVIEW
In this step, you stopped, or paused, the StartStop process instance. Stopping a process instance does not remove it, it merely puts it 'on hold' until the instance is either restarted or deleted. If there are any tasks that have been fired off when the instance was stopped, they will immediately fire off again when the instance is restarted. To permanently delete a process instance from K2, choose the Delete option. Once you delete a process instance, there is no way to retrieve it.
In this step, you will choose the Go To Activity option to send a process instance to another workflow step. For example, suppose a user has submitted a workflow. They contact you at some point to say they need to make a change to their form entry and want to know if there is any possibility of retrieving the form/workflow. This can be accomplished by using the Go To Activity option. The Go To Activity allows you to send the process instance to any of the steps in the workflow.
Step 3 Tasks
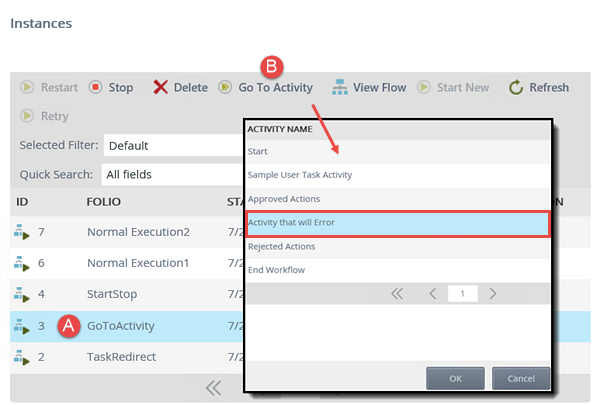
- Return to the K2 Management site. Using the Go To Activity option, redirect the GoToActivity process instance to the Activity that will Error step.
- Return once again to the K2 Management site. You should still be on the Instances screen for the Workflow Administration Sample process. (If you are not, click Workflow Server > Workflows, then click the Workflow Administration Sample process from the central pane, then the Instances button in the navigation bar.) Click to highlight the GoToActivity process instance, then click the Go To Activity button in the navigation bar. Select the Activity that will Error activity. Click OK, then click OK when you see the confirmation dialogue. Click OK once again to close the success dialogue.
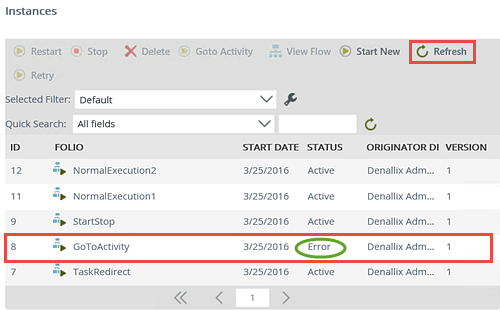
- Refresh the Instances screen by clicking the Refresh button in the navigation bar. (If you use the refresh button on your browser, you will be redirected back to the Workflow Projects screen. If this happens, simply navigate back to the Instances screen by highlighting the Workflow Administration Sample process, then click the Instances button.)
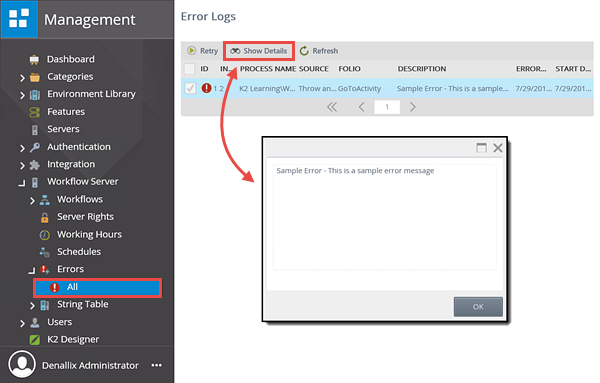
- In the left column, still under the Workflow Server node, expand the Errors option, then click All. In this screen, you can view all of the process instances (for all processes) that are in an error state. (Remember, this applies to those processes for which you have permissions.) By selecting the error, then clicking Show Details, you will be able to see the full error description. This will give you a starting point for troubleshooting the issue.
Notice the Status is now showing Error. (You deliberately sent this process instance to a step that will throw an error so that you can see how to repair a failed workflow in a future step.) The Instances screen is one area in the K2 Management site that indicates if a process instance is in an error state. You can also view process instances that are in an error state by accessing the Errors option also located under the Workflow Server node.
STEP 3 REVIEW
In this step, you used the Go To Activity option to redirect a process instance to a different step in the workflow. You will find this tool very useful for sending workflows back to originators or any other users that need to make a change or addition to their form input. You purposely sent this process instance to a step that will throw an error to demonstrate how the Status column updates to indicate the process instance is in an error state. The Instances screen is one area in the K2 Management site that indicates if a process instance is in an error state. You can also view all process instances that are in an Error state by accessing the Errors screen. Here you will find details about the error that you can use as a starting point in troubleshooting the issue.
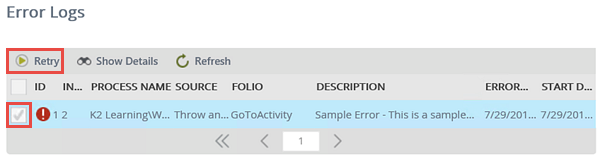
Still on the Errors (All) screen, you will now retry the instance to see if you can repair it. For this tutorial, the Error step has been specifically coded to repair itself the second time it is run. A real-world example however, might be if a task was assigned to a new employee, who did not have an email account set up yet. The error might read something like 'destination user not found'. In this case, you could confirm the email account has been set up, then retry the step. K2 would 'see' the user and move the workflow along.
Step 4 Tasks
- Retry the K2 Learning\Workflow Administration\Workflow Administration Sample > GoToActivity process instance.
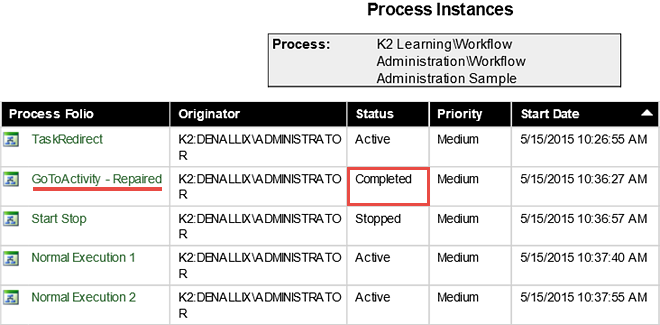
- Access the Process Overview report and confirm the GoToActivity process has been repaired and has completed.
- On the Error Logs screen, CHECK the box to the left of the K2 Learning\Workflow Administration\Workflow Administration Sample process > GoToActivity process instance, then click the Retry button. (Depending on your screen size, you may not be able to see the entire process name, but you should be able to see enough of the name to know which process to select. This is also assuming there is more than one process listed.)
- Switch back to K2 Workspace. On the Process Instances page, click the Refresh icon.
- Note that the GoToActivity process instance is shown as repaired and completed. (Depending on your screen size, you may not be able to see the entire name or status.)
The process should no longer be shown on the Error Logs screen. Now you want to confirm the process has completed. You will do that by returning to the Process Instances report to view the details for this instance.

STEP 4 REVIEW
In this step, you repaired a process instance that was in an error state by using the retry option found on the Error Logs central pane. Retrying the error will execute the same event where the error occurred. Use caution when retrying events as you may have unexpected, and possibly duplicate, results based on what the event was designed to do.
Continue on to the next section, Managing Task Lists, when you are ready.