Available only with Enterprise Edition
You can add images to output documents from Salesforce records, and even resize the image (if necessary). You set up a field to hold images on records, then reference the field with a tag in your template. When the user generates documents, the app adds the image to output documents.
Tip: If you want to add images to Microsoft Word templates for email messages, use the procedure in Email templates.
Pull images from a Salesforce record into output documents
First you set up Salesforce, then you configure your template. The steps for configuring the template are a little different depending on the Microsoft Office program you're using, but this process works across all the supported Microsoft products. Here is a high level overview of the steps.
-
Add a Rich Text field to an object
-
Add an image to a record
-
Configure the template
-
Generate documents
Note: Microsoft Word, Microsoft Excel and Microsoft PowerPoint templates support this method of inserting images.
Add a Rich Text field to an object
In Salesforce, you add a Rich Text field to the object from which you want to generate documents.
To add a Rich Text field to an object in Salesforce Classic
- From Setup, take one of the following actions:
If you're working with a standard object, type the name of the object in the Quick Find box, then click Fields.
For example, if you wanted to add a Rich Text field to the Account object, you would click Fields under Accounts.
If you're working with a custom object.
Type Objects in the Quick Find box, then click Objects.
Click the custom object you want to work with.
For example, if you wanted to work with a custom object named Call, you would click Call.
-
In Custom Fields & Relationships, click New.
Note: If you're working with a standard object, the name of the object appears in the Custom Fields & Relationships label. For example, Account Custom Fields & Relationships.
-
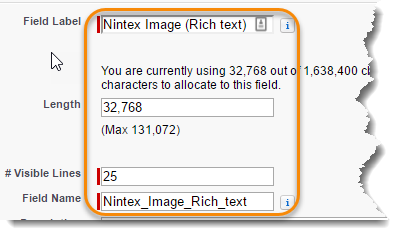
In Data Type, select Text Area (Rich) and click Next.
-
Add required fields (Field Label, # Visible Lines, Field Name), any optional fields, and then click Next.
-
(Optional) Add field-level security and then click Next.
-
Select one or more page layouts on which to add the Rich Text field.
-
Click Save.
For more information about adding a custom field, see Create Custom Fields in Salesforce Help.
Add an image to a record
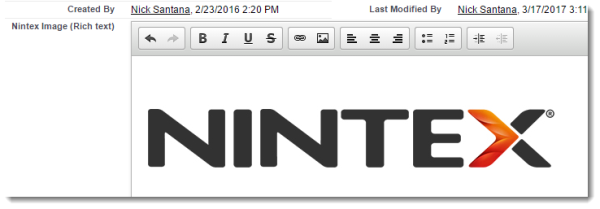
Add an image to the Rich Text field, so that you can have the image pulled into the template when users generate documents. You can upload an image from your computer or link to an online image with a URL.
To add an image to a Rich Text field in Salesforce Classic
-
On the object to which you added the Rich Text field, open a record.
For example, from Accounts, click Burlington Textiles Crop of America.
-
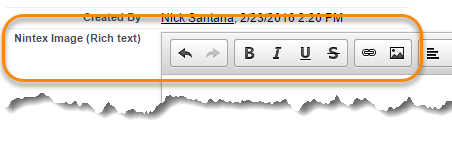
In Account Detail, click on the Rich Text field you added to open it in edit mode.
For example, click NIntex Image (Rich text).
-
Click the image icon.
The Insert Image dialog box opens.
-
In Insert Image, take one of the following actions:
-
If you want to upload an image from your computer, click Choose File, select an image from your computer, and then click Open.
-
If you want to add an online image, click Web Address and type the URL to the image into URL.
-
-
Click Insert.
-
Click Save.
Configure the template
You add a placeholder image to your template. When the user generates documents, the app replaces the placeholder with the image from the record. If the image on the record is a different size than the placeholder image, the app sizes the image from the record to match the size of the placeholder.
Note: You can configure a Microsoft Word, Microsoft Excel, or Microsoft PowerPoint template.
To configure a Microsoft Word template
-
In Microsoft Word, place the cursor where you want the image from the Rich Text field in to appear.
Note: You can add images to the header in Microsoft Word.
-
Click Insert and then click Pictures.
-
Select a placeholder image and click Insert.
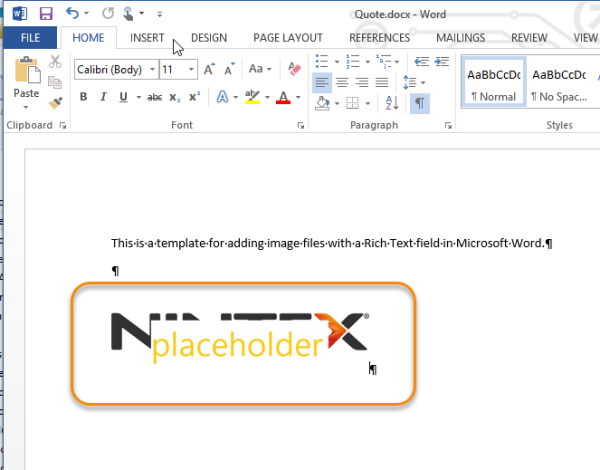
Tip: To prevent a skewed image, the placeholder image should be the same orientation and aspect ratio of the image in Salesforce.
-
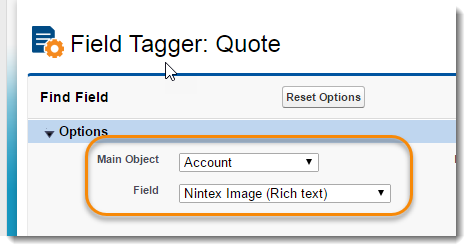
From the Field tagger on a DocGen Package in Salesforce, in Main Object, select the object to which you added the Rich Text field, and then select the Rich Text field you added to the object.
For example, in Main Object select Account and in Field select Nintex Image (Rich text).
-
In Document Type, select Word/PowerPoint.
-
Copy the tag in Tag to the clipboard of your computer.
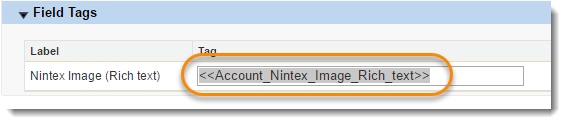
For example, on Microsoft Windows, select the tag and press Control and C. On a Mac, press Command and C.
-
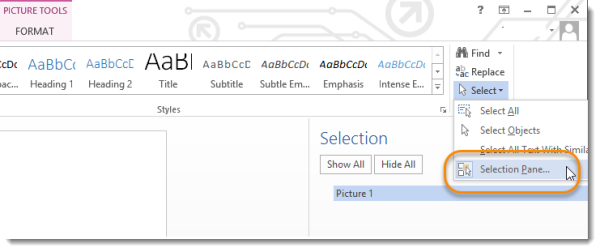
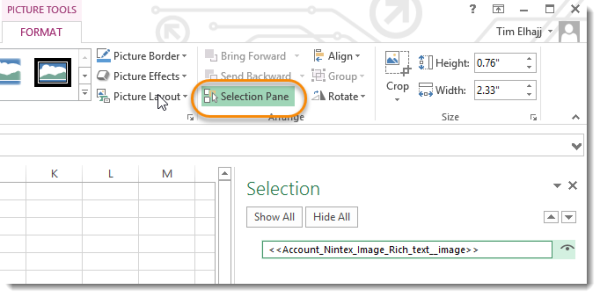
In Microsoft Word, double click the placeholder image.
-
Click Select, and then click Selection Pane.
-
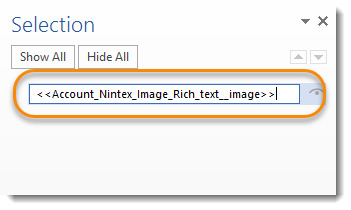
In Selection, double-click the reference to the placeholder image, paste the tag from your clipboard, then edit the tag to include
__imageinside the angle brackets.For example:
-
Before
<<Account_Nintex_Image_Rich_text>> -
After
<<Account_Nintex_Image_Rich_text__image>>
-
-
Save your template then add the updated template to the DocGen Package.
For more information on adding a template to a DocGen Package, see Adding template files to DocGen Packages.
To configure a Microsoft Excel template
-
In Microsoft Excel, place the cursor where you want the image from the Rich Text field in to appear.
-
Click Insert and then click Pictures.
-
Select a placeholder image and click Insert.
Tip: To prevent a skewed image, the placeholder image should be the same orientation and aspect ratio of the image in Salesforce.
-
From the Field tagger on a DocGen Package in Salesforce, in Main Object, select the object to which you added the Rich Text field, and then select the Rich Text field you added to the object.
For example, in Main Object select Account and in Field select Nintex Image (Rich text).
-
In Document Type, select Word/PowerPoint.
Caution: Typically you would select a Excel/PDF as the Document Type, but to tag images in placeholders in Microsoft Excel, you must use angle bracket tags.
-
Copy the tag in Tag to the clipboard of your computer.
For example, on Microsoft Windows, select the tag and press Control and C. On a Mac, press Command and C.
-
In Microsoft Excel, double-click the placeholder image, and then click Selection Pane.
-
In Selection, double-click the reference to the placeholder image, paste the tag from your clipboard, then edit the tag to include
__imageinside the angle brackets.For example:
-
Before
<<Account_Nintex_Image_Rich_text>> -
After
<<Account_Nintex_Image_Rich_text__image>>
-
-
Save your template then add the updated template to the DocGen Package.
For more information on adding a template to a DocGen Package, see Adding template files to DocGen Packages.
To configure a Microsoft PowerPoint template
-
In Microsoft PowerPoint, place the cursor where you want the image from the Rich Text field in to appear.
-
Click Insert and then click Pictures.
-
Select a placeholder image and click Insert.
Tip: To prevent a skewed image, the placeholder image should be the same orientation and aspect ratio of the image in Salesforce.
-
From the Field tagger on a DocGen Package in Salesforce, in Main Object, select the object to which you added the Rich Text field, and then select the Rich Text field you added to the object.
For example, in Main Object select Account and in Field select Nintex Image (Rich text).
-
In Document Type, select Word/PowerPoint.
-
Copy the tag in Tag to the clipboard of your computer.
For example, on Microsoft Windows, select the tag and press Control and C. On a Mac, press Command and C.
-
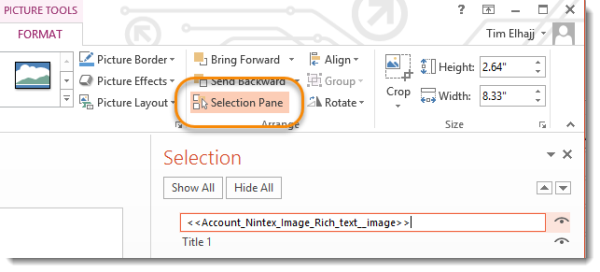
In Microsoft PowerPoint, double click the placeholder image and then click Selection Pane.
-
In Selection, double-click the reference to the placeholder image, paste the tag from your clipboard, then edit the tag to include
__imageinside the angle brackets.For example:
-
Before
<<Account_Nintex_Image_Rich_text>> -
After
<<Account_Nintex_Image_Rich_text__image>>
-
-
Save your template then add the updated template to the DocGen Package.
For more information on adding a template to a DocGen Package, see Adding template files to DocGen Packages.
Generate documents with images from the record
You can generate documents and the app replaces the placeholder images with the image in the Rich Text field. The image in the Rich Text field appears in the output documents, sized to whatever the size of the placeholder image had been.
To generate documents with images from a Rich Text field
-
Click Select Record from a DocGen Package that contains templates with tags for images pulled from a Rich Text field, select the record, contact, and then select the Test Download. For more information, see DocGen Package object testing
-
Click Run DocGen Package.
-
Download the output file. The placeholder image has been replaced with the image from the Rich Text field.