Available only with Enterprise Edition
You can use a button parameter to add images from Salesforce records, and even resize the image (if necessary). You add an image to Salesforce, then create a custom button that references that image. When the user generates documents with the button, the app merges the image into output documents.
Tip: If you want to add images to Microsoft Word templates for email messages, use the procedure in Email templates.
Add images into output documents with a button parameter
First you set up Salesforce, then you configure your template. Here is a high-level overview of the steps.
-
Add an image to Salesforce
-
Configure a button
-
Configure the template
-
Generate documents
Note: Microsoft Word and Microsoft PowerPoint templates support this method of inserting images.
Add an image to Salesforce
You add an image to the Documents object, then get the Salesforce Id for the image.
To add an image to the Documents object in Salesforce Classic
-
From Documents, click New.
-
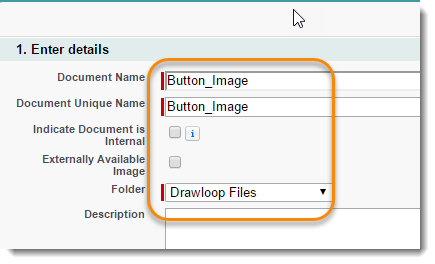
In Enter details, add the required name fields (Document Name and Document Unique Name) , select a shared folder in Folder, and fill in any optional fields.
-
In Select the File, take one of the following actions.
-
Click Enter the path of the file or click browse to find the file and then click Choose File to select a file from your computer.
-
Click Create a reference link to the file. and then, in Path/URL to reference, type a URL.
-
-
Click Save.
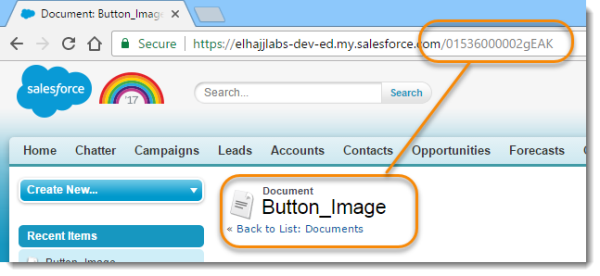
Salesforce saves the image to Documents and the detail page appears with the Salesforce id for the image in the URL.
-
In the browser, note the Salesforce Id for the image in the URL. In the next procedure, you will add this Id to the custom button.
Configure the button
You configure a button so that the image is assigned to a parameter when the user clicks the button. When you configure the template in the next section, you will use this parameter to create the tag for the template.
To configure a button to add an image parameter
-
From the Force.com app menu, select Nintex DocGen, and then click DocGen Admin. You can also select this from Lightning with the
 App Launcher.
 -
On DocGen Admin, click Create Advanced Buttons.
-
In DocGen Package Starting Object, take one of the following actions.
-
If the object on which you added the text field is listed, select it.
For example, select Accounts.
-
If the object on which you added the text filed is not listed, select Other and then select the object on which you added the text field.
-
-
(Optional) In Button Name, type a name.
For example, type Run DocGen Package with image.
-
Click Create Button.
The New Button or Link settings page appears.
-
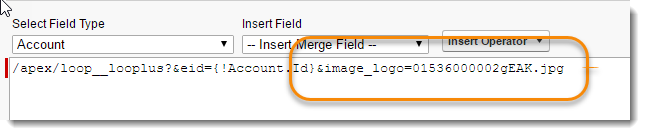
In the Custom Button or Link Editor, type all of the following
-
an ampersand (&)
-
the word "image"
-
any unique string ("_logo")
-
an equal sign (=)
-
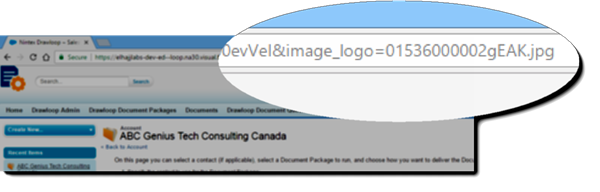
the case sensitive Salesforce Id of the image ("01536000002gEAK" )
-
the file extension of the image (".jpg")
For example, type &image_logo=01536000002gEAK.jpg
The keyword image and the string make up the parameter. For example, image_logo is the parameter. This is the reference for the tag that will go into the template in the next procedure.
-
-
(Optional) Click Check Syntax.
-
Click Save.
You are prompted about adding the button to page layouts.
-
On the page layout screen for your object, select Edit to add the button to a page layout.
-
In the page layout editor, click Buttons, then drag the button onto the page.
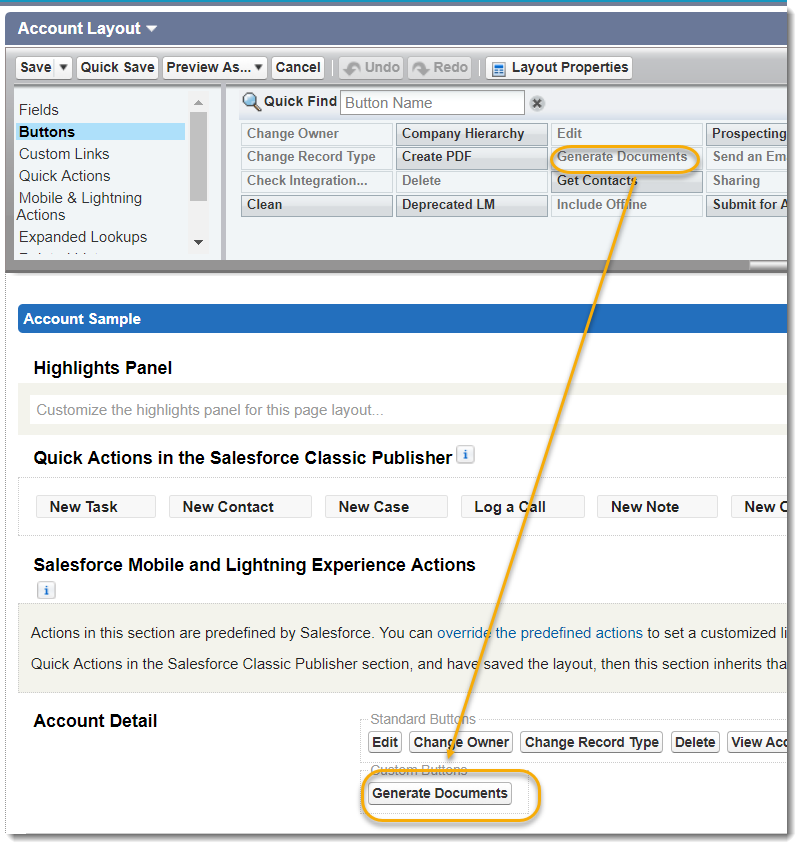
-
Click Save.
Configure the template
You add a placeholder image to your template. When the user generates documents, the app replaces the placeholder with the image from the record. If the image on the record is a different size than the placeholder image, the app sizes the image from the record to match the size of the placeholder.
Note: You can configure a Microsoft Word or Microsoft PowerPoint template.
To configure a Microsoft Word template
-
In Microsoft Word, place the cursor where you want the image from the button parameter to appear.
Note: You can add images to the header in Microsoft Word.
-
Click Insert and then click Pictures.
-
Select a placeholder image and click Insert.
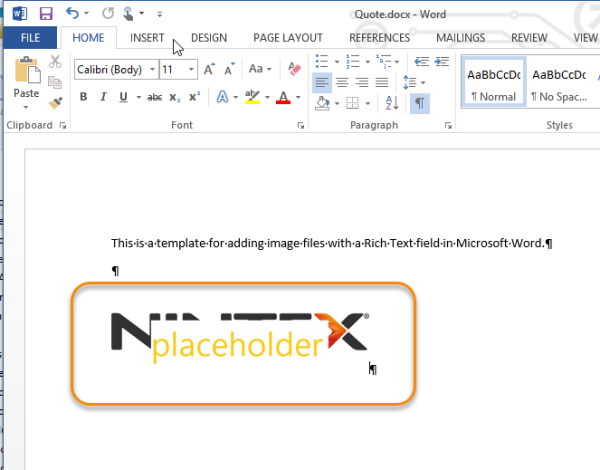
Tip: To prevent a skewed image, the placeholder image should be the same orientation and aspect ratio of the image in Salesforce.
-
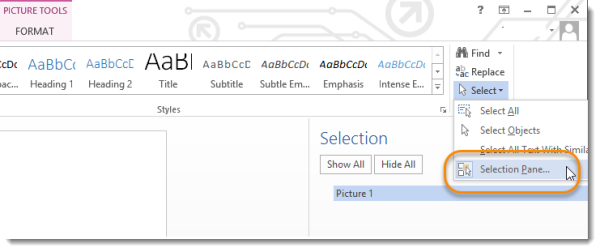
Double click the placeholder image.
-
Click Select, and then click Selection Pane.
-
In Selection, double-click the reference to the placeholder image and type the image parameter you created for the button.
For example, type
<<image_logo>>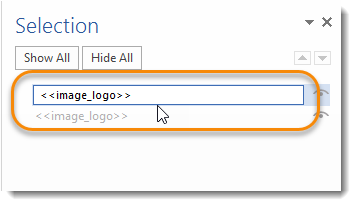
-
Save your template then add the updated template to the DocGen Package.
For more information on adding a template to a DocGen Package, see Adding template files to DocGen Packages.
To configure a Microsoft PowerPoint template
-
In Microsoft PowerPoint, place the cursor where you want the image from the Rich Text field in to appear.
-
Click Insert and then click Pictures.
-
Select a placeholder image and click Insert.
Tip: To prevent a skewed image, the placeholder image should be the same orientation and aspect ratio of the image in Salesforce.
-
In Microsoft PowerPoint, double click the placeholder image and then click Selection Pane.
-
In Selection, double-click the reference to the placeholder image and type the image parameter you created for the button.
For example, type
<<image_logo>>
-
Save your template then add the updated template to the DocGen Package.
For more information on adding a template to a DocGen Package, see Adding template files to DocGen Packages.
Generate documents with the button
You must generate documents using the button you created. When you generate documents, the app replaces the placeholder images with the image referenced in the parameter. The image on the Documents object appears in the output documents, sized to whatever the size of the placeholder image had been.
-
From a record on the object that has the button, click the button with the image parameter code.
For example, on Accounts open a record and click Run DocGen Package with image.
-
On the Run DocGen Package page, satisfy the requirements of the DocGen Package and then click Run. In the address field of your browser, you can see the image parameter assigned to the Salesforce Id of the image.
-
Download the output file. The placeholder image has been replaced with the image from the Documents object