Part 4: Workflows
In the following section, you will create a new workflow in K2 Studio, integrating the process with SmartForms. You will add one user task (Manager Approval) and a number of system tasks (updating the status property and sending an email). You will assign permissions, or workflow rights, so that users will be able to start the workflow and view process reports. Permissions are assigned in the K2 Management site. After you have completed the steps required in K2 Studio, you will return to K2 Designer and configure the start workflow rule so that it determines whether or not to start the workflow, based upon the total due value.
The last part of this section is to test the application, where you will submit two sales orders, the first with a total due value of less than $10,000. In this case, the workflow should not start. The second will have a total due value greater than $10,000 and in this case, the workflow should start.
In this part, you will learn:
- How to build a basic approval workflow using K2 Studio
- How to customize email notifications
- How to add SmartObject events that will update SmartObject properties
- How to add a rule that will evaluate a view control and proceed accordingly
- How to assign workflow permissions using the K2 Management site
If you have not completed Part 3: Forms of this tutorial yet, please do so now since you will be using the forms as part of the workflow configuration.
In this step, you will begin building your workflow using K2 Studio. If necessary, refer back to the Sales Orders flowchart at the beginning of the tutorial for a review of the workflow steps. The workflow will be integrated with Sales Orders Form that you created in the previous step.
Step 13 Tasks
- In K2 Studio, create a new Project and name it
Sales Orders
then create a new Process and name it
Sales Orders Process - Add and configure SmartForms Integration with the following settings:
- For the Form, use the Sales Orders Form created in Part 3.
- Create a new State and name it
Start Workflow
and make it the default state for the form. - Configure the workflow to Start when the submit button is clicked.
- Create an Item Reference and name it
Sales Orders
using the Sales Orders Header SmartObject. - On the Specify Data Bindings and Folio screen, add the Sales Person as the Folio value.
- Launch K2 Studio (Start > All Programs > K2 blackpearl > K2 Studio)
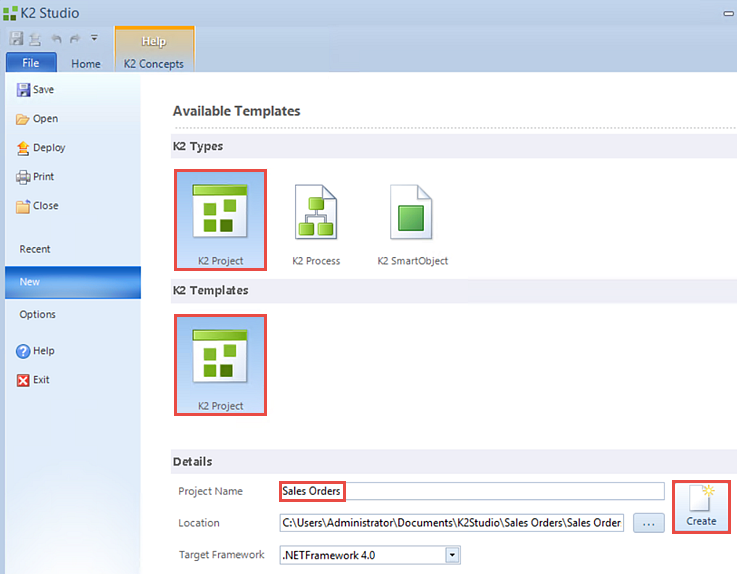
- Create a new project (File > New) using K2 Project for the type and K2 Project for the template. Name the project
Sales Orders
then click Create. - Next create a new process (File > New) using K2 Process for the type and Blank Process for the template. Name the new process
Sales Orders Process
and click Create. - Click on Process Wizards to expose the process wizard options. Drag the SmartForms Integration wizard into the Start box.
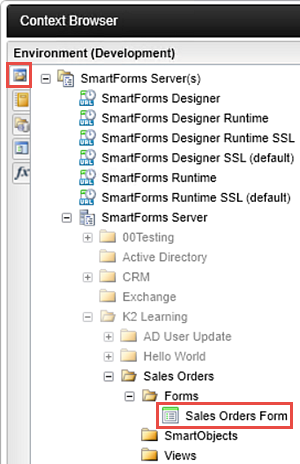
- The SmartForms Integration wizard opens. Click Next on the home screen. Select the form by clicking the ellipses to the right of the Form field to open the context browser. Open the Environmental (Development) node, expand the SmartForms Server(s) > SmartForms Server node. Navigate to the Sales Orders category until you can expand the Forms category and select the Sales Orders Form. Use the image below as a guide for expanding the context browser nodes. Click Add after highlighting the form name to add it to the wizard.
- Confirm the Create a new State button is checked and name the new state
Start Workflow
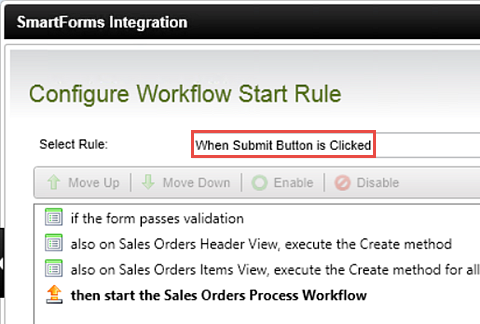
then CHECK the box to Make this State the default for the Form. Click Next to continue. - On the Configure Workflow Start Rule screen, select When Submit Button is Clicked. Click Next to continue. Here, you are simply telling K2 to start the workflow process when the submit button is clicked on the form.
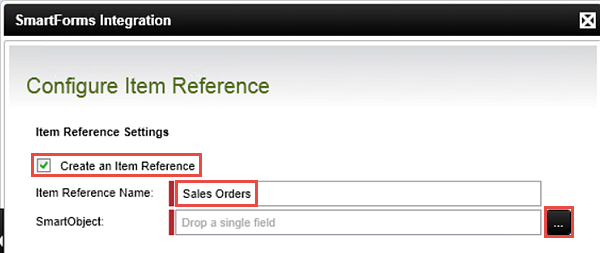
- On the Configure Item Reference screen, CHECK the box to Create an Item Reference and name it
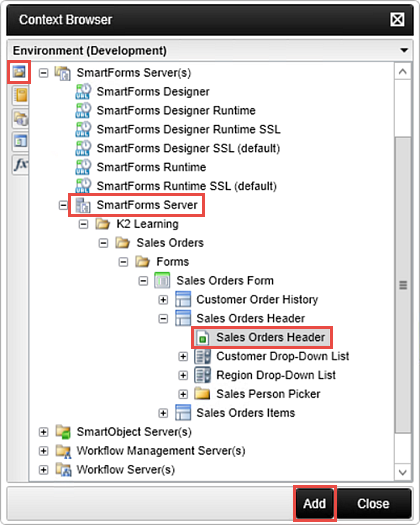
Sales Orders - For the SmartObject value, open the context browser. Expand the Environment (Development) node and navigate to the Sales Orders Header SmartObject associated with the Sales Orders Form. Use the image below as a reference for expanding the nodes. After clicking on the Sales Order Header SmartObject, click Add. Click Next to continue.
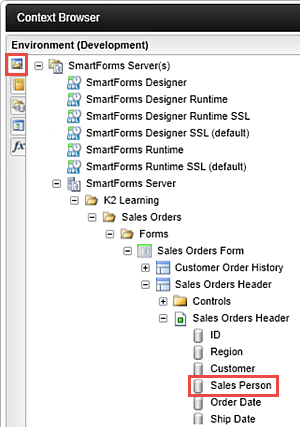
- On the Specify Data Bindings and Folio screen, you want to add the sales person as the folio. Following similar steps as above, navigate to the Sales Orders Header SmartObject. Expand the Sales Orders Header SmartObject and drag the Sales Person property into the Folio field. (See the image below the note box as a reference.) Click Next and then Finish to complete the SmartForms Integration wizard.
After the process build is complete, your screen should look like the image below. (Allow a minute or two for the project and process to build.)
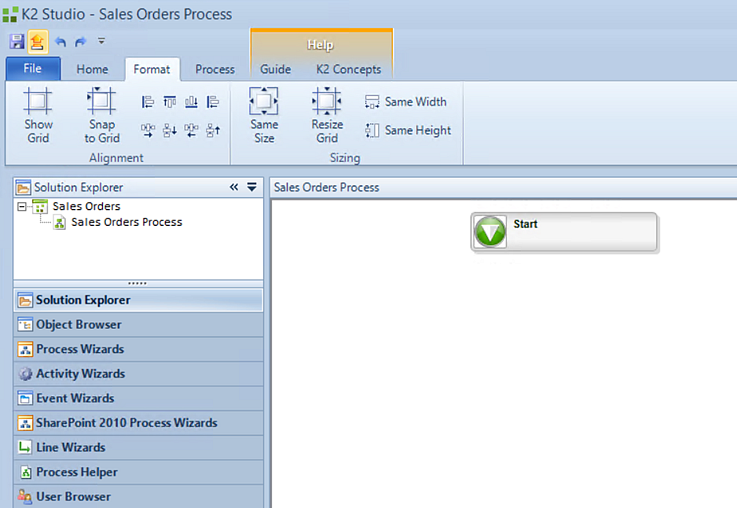
The first step in configuring your workflow so that it is associated with the Sales Orders Form you created in Part 3.
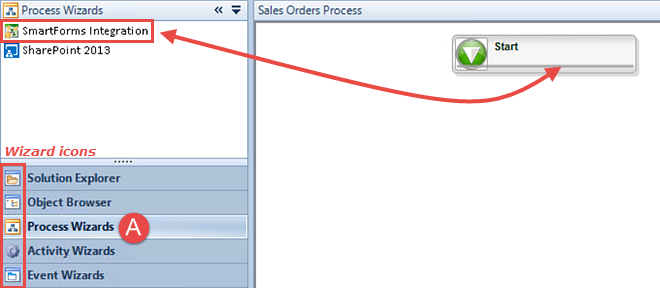
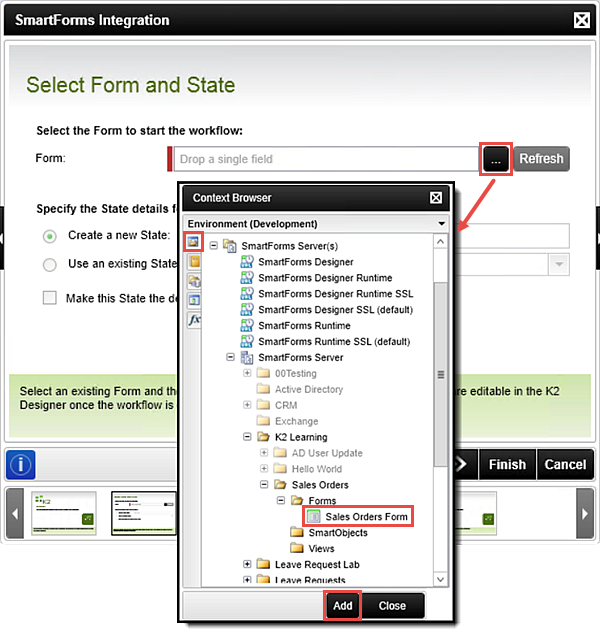
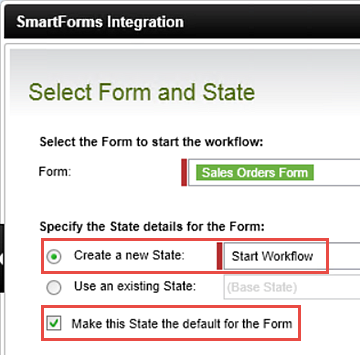
In the next step, you will create an item reference.
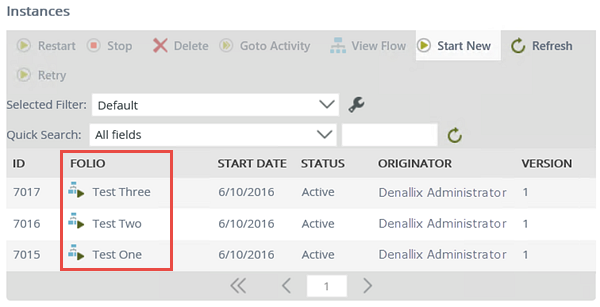
What is the Folio? The folio is a text field that is commonly used to distinguish one process instance from another process instance (of the same workflow). The folio is not required, nor does it have to be unique. Since all processes, or workflows, will have the same process name, using a unique folio value will aid in identifying the individual process instances of the workflow. This is especially useful when viewing workflow reports having many process instances.
To make the folio unique, you can use a combination of fields, such as a customer name combined with an order number. Setting the folio value typically comes from properties found in the context browser. The property values are variables that are replaced at runtime by actual content specific to the process instance.
You can also use the folio as a variable throughout your workflow. For example, if you assign a customer name as the folio, you can use the folio to customize emails so that the customer is referenced by their name.
Three instances of the same workflow showing unique folio values

STEP 13 REVIEW
In this step, you created the project and process for your Sales Orders Workflow. You integrated the workflow with the Sales Orders Form that was previously created using K2 Designer. You created the default state for your workflow as well as the item reference based on the Sales Orders Header SmartObject. While this workflow can be built using K2 Designer, this exercise demonstrates K2's seamless integration between platforms.
In this step, you will add and configure a user task, Manager Approval. This one-step approval will consist of a decision (approved or not approved) and you will customize the task notification email the manager will receive.
Step 14 Tasks
- Add a DefaultActivity to the workflow canvas and rename it
Manager Approval - Add a SmartForms Client Event to the Manager Approval activity and configure it as follows:
- Event name
Manager Decision - Use the Sales Orders Form
- Create a New State and name it
Manager Approval - Configure two actions
Approved
Not Approved
and generate the corresponding outcomes. - Configure the Action Display Settings so that the workflow view is at the bottom of the page and the message reads
Your decision has been sent! - For the destination user, add the form originator’s manager.
- Customize the event notification message by adding
Sales Order Approval for
to the subject line, then dragging the folio to the end of that line so that it reads
Sales Order Approval for [Folio]
- Event name
- Expand the Activities Wizards pane to expose the wizards. Drag a DefaultActivity onto the workflow canvas just below the Start box.
- Double-click the DefaultActivity title and change it to
Manager Approval - Click the Events Wizards and drag a SmartForms Client Event into the Manager Approval activity.
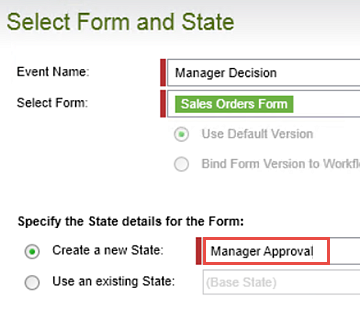
- On the SmartForms Client Event wizard home screen, click Next. Change the Event Name to
Manager Decision - Open the context browser to select the Sales Orders Form found in the SmartForms Server node. Add the form.
- Confirm the Create a new State button is selected and change the state name to
Manager Approval
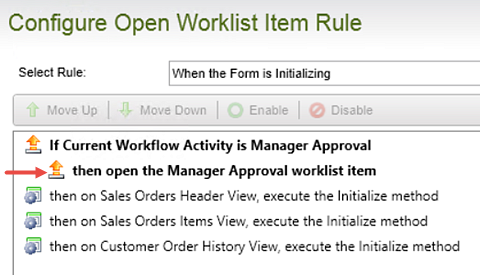
then click Next. - The item reference settings are fine as is, so click Next. The form parameters settings are fine as is, so click Next. On the Worklist Item Rule screen, notice that K2 has automatically added the manager approval worklist item to the form’s rules. Click Next. The worklist item contains the actions the manager will chose from.
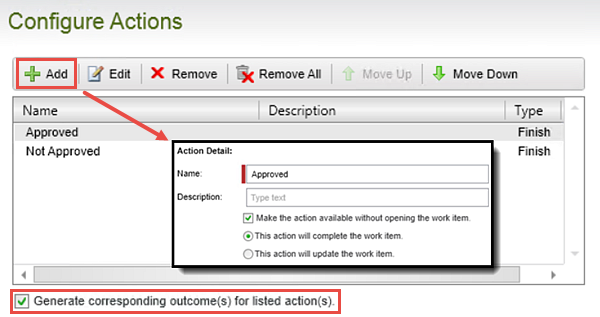
- There are no changes to the transfer workflow data settings, so click Next. On the Configure Actions screen, you need to configure two actions: approved and not approved. Click Add. In the Name field, enter
Approved
and click OK. Then Add the second action and enter
Not Approved
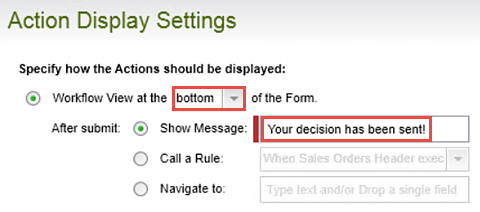
and click OK. Confirm the box to generate corresponding outcome(s) is CHECKED. Click Next to continue. (Actions are simply the decision options that the approving manager will have when the task is opened.) - On the Action Display Settings screen, change the Workflow View to the bottom of the form. Change the After submit message to
Your decision has been sent!
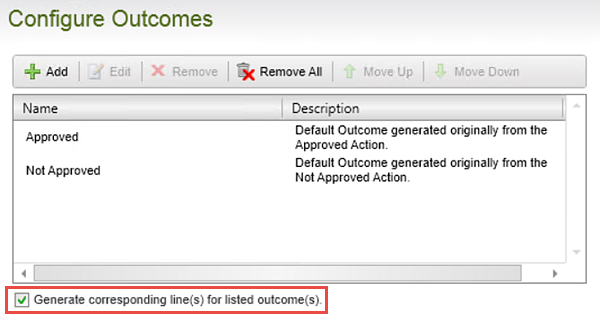
Click Next to continue. - There are no changes to the transfer form data to workflow settings, so click Next. Confirm the Configure Outcomes settings are as below and confirm the box to generate corresponding line(s) is CHECKED. Checking this setting will create the two action outcome lines from the Manager Approval activity. You will later add system tasks to each of the outcome lines to complete the workflow. Click Next.
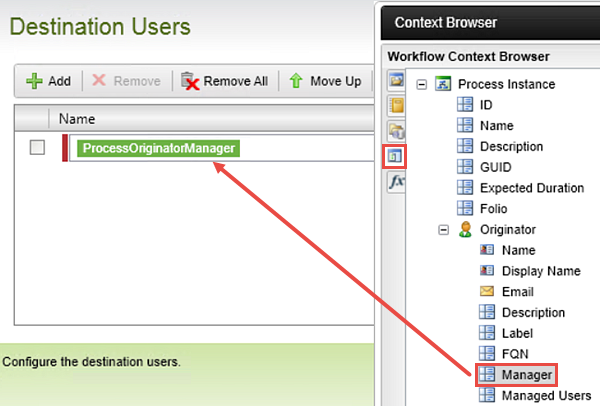
- On the Destination Users screen, click Add. Open the context browser for the Name field.
- In the context browser, expand the Workflow Context Browser and then expand the Process Instance node. Expand the Originator node and drag the Manager property into the Name field. Close the context browser and click Next.
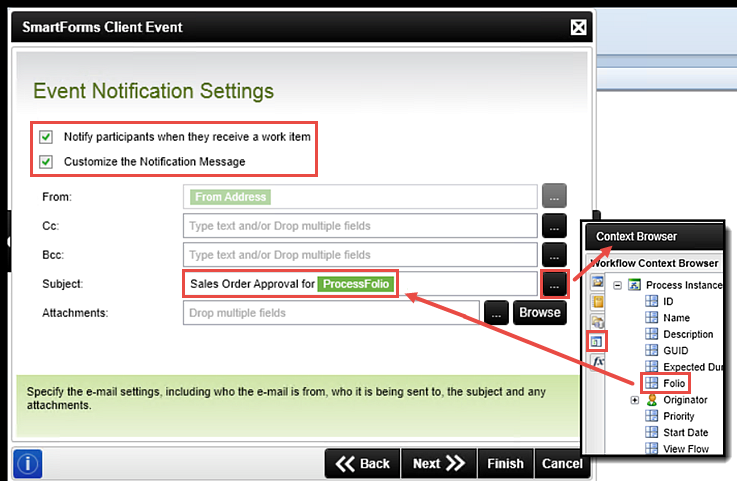
- CHECK the box to Notify participants when they receive a work item. CHECK the box to Customize the Notification Message. In the subject line enter
Sales Order Approval for [Folio]
where [Folio] will be a value you obtain from the same workflow context browser as the prior step. - Open the context browser for the Subject line and navigate to the Folio property in the Workflow Context Browser. Drag the folio to the end of the Subject line message. Click Next. You will leave the message with the default settings so click Next and then Finish to complete the Manager Approval task configuration.
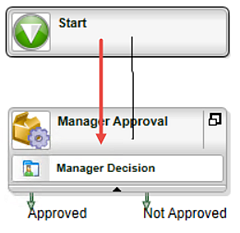
- The last item in this step is to connect the start box with the Manager Approval activity. Right-click inside of the Start box and hold+drag down into the Manager Approval activity.
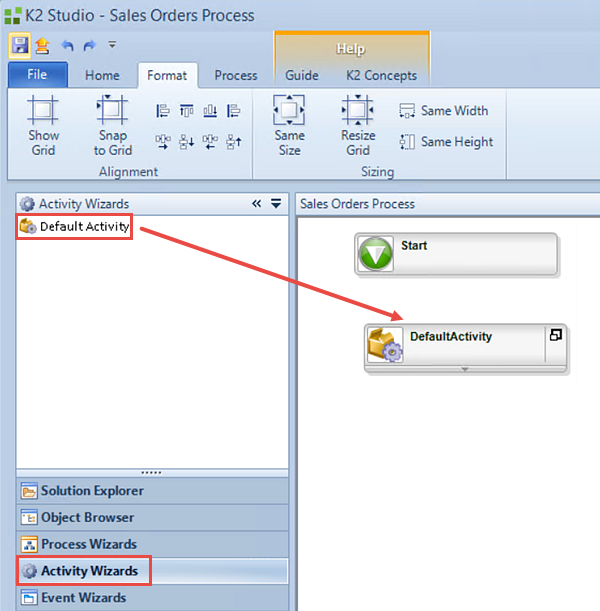


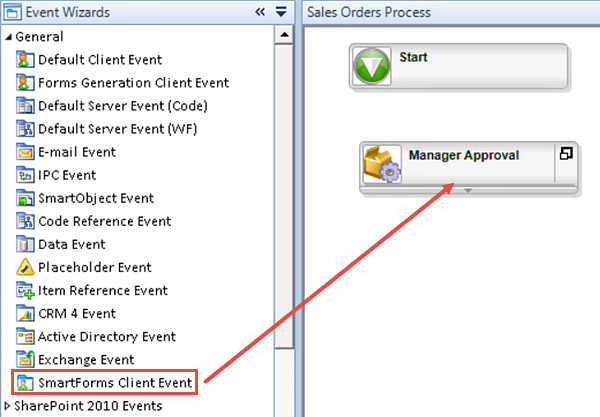
Recall that a state represents the configuration and behavior of a form at a given point in the workflow. In a previous step, you created the Start Workflow state, which you will use as the default configuration that the form originator will see. In this step, you are creating the Manager Approval state which will be the configuration and form behavior that the approving manager sees.
In a later step, you will return to K2 Designer and edit the form rules. You will see the same rules below in the rule designer. The rule designer is where you can add and edit rules to further customize your form's functionality.
The next screen is the Action Display Settings screen. When the manager opens the worklist item to either approve or not approve the sales order, they will see the Sales Orders Form with both the header view and the items view. K2 will add a third view, the workflow view, to the screen. This view contains a drop-down list with the actions you configured in the previous step. You can use the default settings or you can customize them. You are going to make a few minor adjustments.
The form originator’s manager will be assigned the manager approval task if a decision is required. Recall in your workflow flowchart, you will configure a rule on the form itself that evaluates the total due amount. That rule will determine whether to start the workflow or not.
The event notification settings are configurations for notifying the manager they have a task assigned to them. You are going to customize the notification by editing the e-mail subject line text and adding the folio. This will dynamically add the sales person's name to the end of the subject line content.
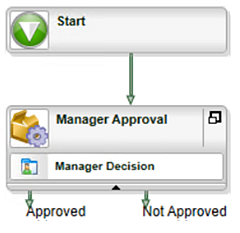
STEP 14 REVIEW
In this step, you added add a user task and associated it with the Sales Orders Form. You assigned the form originator's manager as the destination user, in other words, the person who must make a decision to approve or not approve the sales order. Last, you customized the task notification email subject line for the email that the manager will receive when they are assigned this task.
In this step, you will complete the build of the Sales Orders Workflow by adding three system tasks. The first system task will update the status property if the manager approves the sales order. The second system task will also updated the status property in the event the manager decides to reject the sales order. The last system task will send an email back to the form originator to let them know the sales order was not approved. System tasks are tasks performed by the K2 server, with no user interaction involved. This is in contrast to user tasks, where user interaction is required to complete the task.
Step 15 Tasks
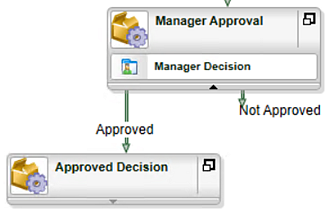
- Add a DefaultActivity to the workflow canvas and change thetitle to
Approved Decision
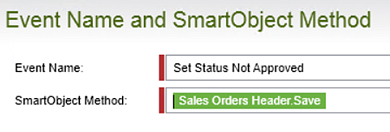
then connect the Approved outcome line to the new Approved Decision activity. - Add a SmartObject Event to the Approved Decision activity and name it
Set Status Approved
then call the Save method for the Sales Orders Header SmartObject and set the Status property to
Approved - Map the ID value to the item references, Sales Orders > ID property.
- Copy the Approved Decision activity and a paste it onto the workflow canvas. Change the title to
Not Approved Decision
then edit the Set Status Approved event and change the name to
Set Status Not Approved - Edit the Status name and change the value to
Not Approved - Connect the Not Approved outcome line to the Not Approved Decision activity.
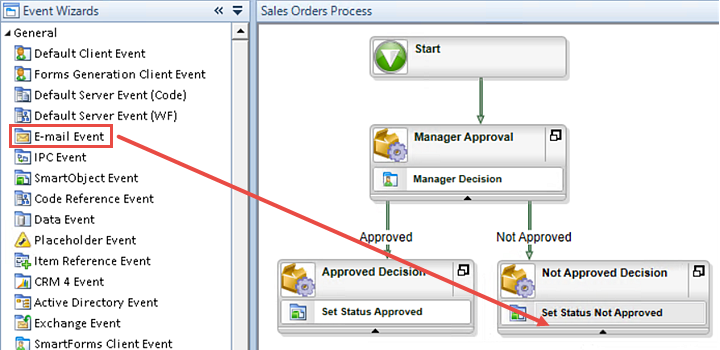
- Add an E-mail Event to the Not Approved Decision activity. Name the email event
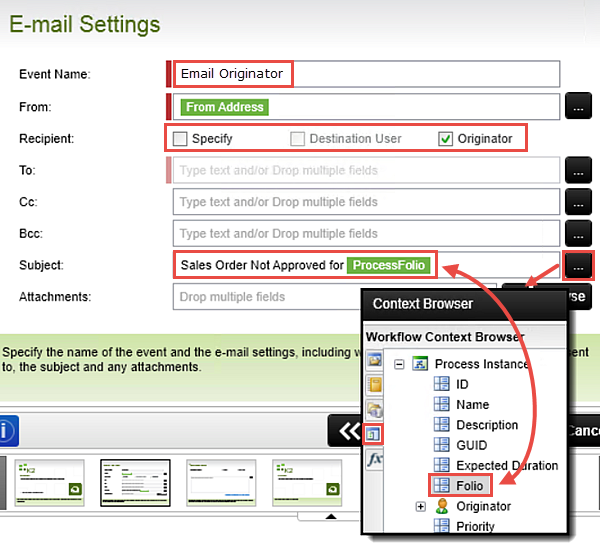
Email Originator
and specify the recipient to be the form’s originator. Then add the following to the subject line
Sales Order Not Approved for [Folio]
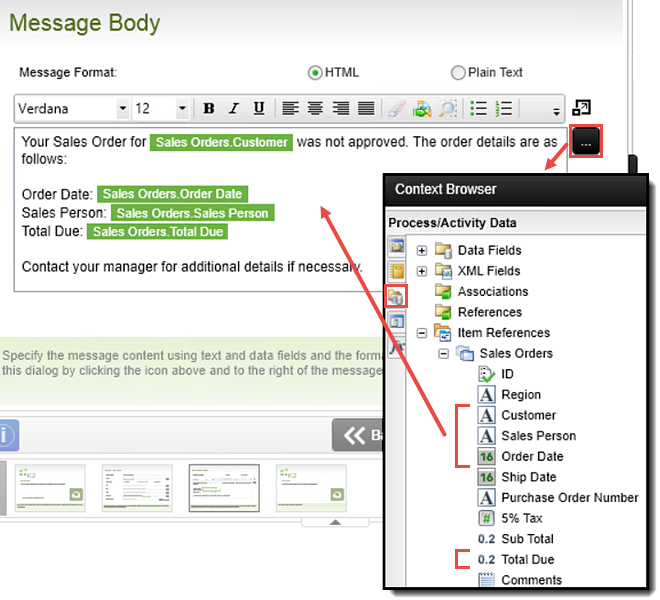
replacing [Folio] with the workflow folio found in the workflow context browser. - Enter the following message into the message body, replacing the [Value] with the correct item references.
Your Sales Order for [Customer] was not approved. The order details are as follows:
Order Date: [Order Date]
Sales Person: [Sales Person]
Total Due: [Total Due]
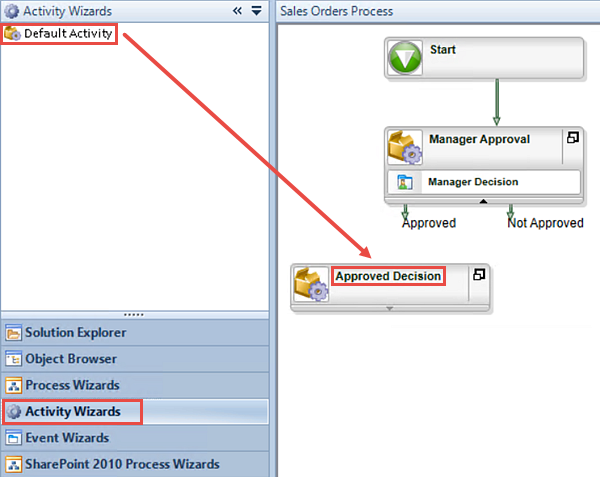
- Begin by clicking the Activity Wizards pane, then drag a DefaultActivity onto the workflow canvas just below the Approved outcome line. Double-click the DefaultActivity title and change it to
Approved Decision - Hover over the Approved outcome line until you see the hand icon. Click+drag the line into the Approved Decision activity to connect them.
- In the wizards pane, click on Event Wizards, then drag a SmartObject Event into the Approved Decision activity. The SmartObject Event can be found under the General heading.
- On the SmartObject Event home screen, click Next. Name the event
Set Status Approved
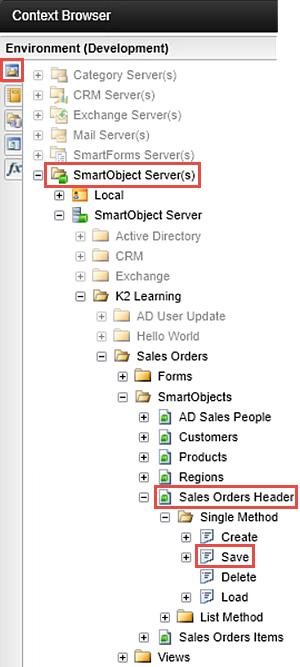
then open the context browser for the SmartObject Method. In the context browser, expand the Environment (Development) node and navigate to the Save method for the Sales Orders Header SmartObject. (Save is the equivalent of update.) Use the image below as a guide for navigating through the context browser nodes. Click Add. Click Next to continue. - On the Input Mappings screen, click to highlight the Status name and then click Assign.
- Enter
Approved
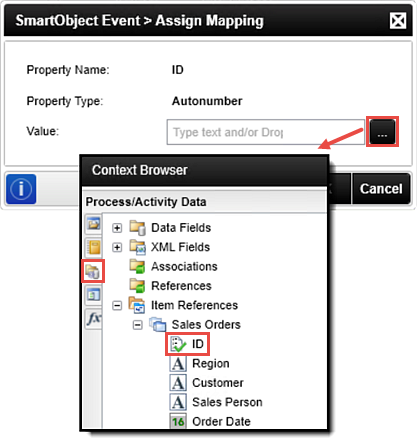
for the status value. - Click to highlight the ID name and click Assign. Open the context browser for the ID value, then expand the Process/Activity Data node and finally, the Item References (Sales Orders) node. Click the ID property and then Add. Click Next. There are no changes to the Return Mappings screen, so click Next and then Finish.
- Click the Approved Decision activity icon to highlight the activity. Press CTRL-C to copy it. Press CTRL-V to paste it into the workflow canvas. Align it under the Not Approved outcome line, then connect the not approved outcome line with the new activity. Double-click the Approved Decision1 title and change it to
Not Approved Decision
(Depending on your K2 version, the newly copied title may or may not contain the '1'.) - Hover over the Set Status Approved event title to expose the wizard icon. Click the wizard icon to open the wizard. Click Next on the SmartObject Event home screen.
- Change the event name to
Set Status Not Approved
and click Next. - On the Input Mappings screen, click to highlight the Status Name and click the Assign button. Change the value to
Not Approved
then click OK, then Finish. - With the Event Wizards pane still exposed, drag an E-mail Event into the Not Approved Decision activity, just below the Set Status Not Approved event.
- On the E-mail Event home screen, click Next. On the E-mail Settings screen, change the event name to
Email Originator
then UNCHECK Specify as the recipient, then CHECK Originator. In the subject line, enter
Sales Order Not Approved for [Folio]
and drag the folio to the end of the line. Click Next to continue. - For the message body, enter the following content, replacing values shown as [value] with the corresponding item references.
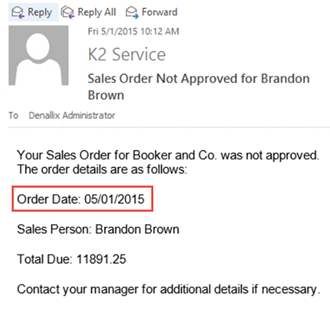
Your Sales Order for [Customer] was not approved. The order details are as follows:
Order Date: [Order Date]
Sales Person: [Sales Person]
Total Due: [Total Due]
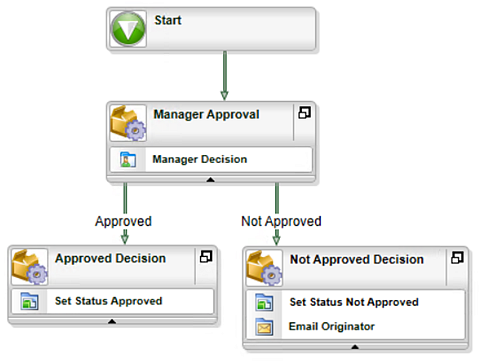
Contact your manager for additional details if necessary. - Click Next and then Finish. Save your workflow (File > Save). Your workflow should look like the image below.
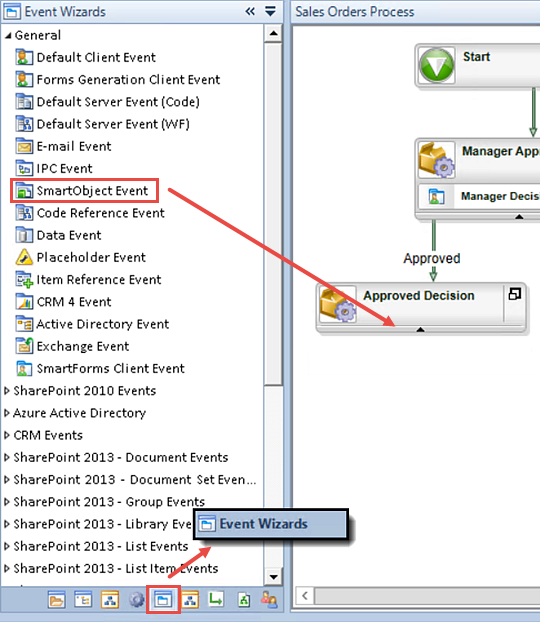


On the Input Mappings screen, you will assign values to the two properties required to update the status. The first will be the status property, for which you will manually update by typing in the approved decision. The next property will be the ID property. You must map the ID property as well or K2 will not know which record you want to update. (You want to update the current record.
Assigning the Item Reference > ID property simply tells K2 that you want to update the current record. Remember that item references are short-cuts to the SmartObject's current record.

The workflow is now complete for the approved outcome. Next, you’ll configure the final system tasks for the not approved outcome. Since you have already added an activity and SmartObejct Event for the approved outcome line, you can copy it and use it for the not approved outcome line.
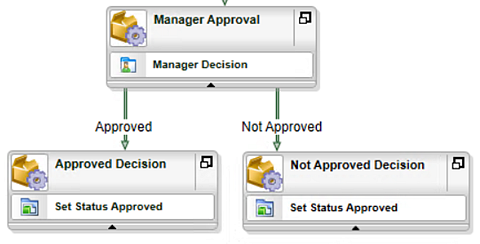
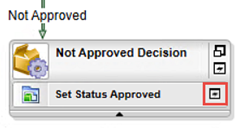
K2 makes reusing workflow activities and events very convenient by allowing you to copy and paste as needed. You can copy the entire activity as you did in this step, or you can copy single events and paste them into new or existing activities.
Recall the Sales Orders flowchart where you have added an additional system task to send an email notification back to the form’s originator for all not approved outcomes.
STEP 15 REVIEW
In this step, you completed your workflow by adding additional system tasks to update the status property in the Sales Orders Header SmartObject and in the event of the order not being approved, adding an email event to notify the form’s originator of the decision. While adding system tasks, you took advantage of K2’s ability to reuse content by copying and pasting the approval decision activity. With just a few minor adjustments, you had a complete activity configured for the not approved outcome line.
Before you can use the Sales Orders Workflow, it must be deployed to the K2 Server. Deploying the workflow publishes it so that it can be exposed to users. Keep in mind though, you still need to assign workflow rights, or permissions, to your users so that they can start the workflow. You will do that in later step.
Step 16 Tasks
- Deploy the workflow.
- Deploy the workflow by clicking File > Deploy.
- The build in progress bar will appear, followed by the Deploy Project wizard. On the Deploy Project wizard home screen, click Next. On the Server and Project Settings screen, click Next. Click Finish. As the workflow is deployed, you will see a deploy in progress bar. When the bar disappears, your project has been successfully deployed. You should also see a message in the status bar (in the lower left corner of the screen) that indicates the deployment succeeded.
STEP 16 REVIEW
In this step, you deployed the Sales Orders Workflow to the K2 server.
Recall in the Sales Orders flowchart, the first step after the form being submitted is for a form rule to check the total due amount. If the total due is greater than $10,000 (or the equivalent for your location) then the workflow is started. If it’s equal to or less, then a form rule will set the status field in the Sales Orders Header SmartObject to 'processed', and the workflow will not start. In this next step, you’ll return to K2 Designer and add the condition to check the total due amuount. You will then add three new rules that will populate the Sales Orders Header, Sales Orders Items and Customer Order History views with content for the Manager Approval state. Finally, you will hide the submit button on the Manager Approval state.
Step 17 Tasks
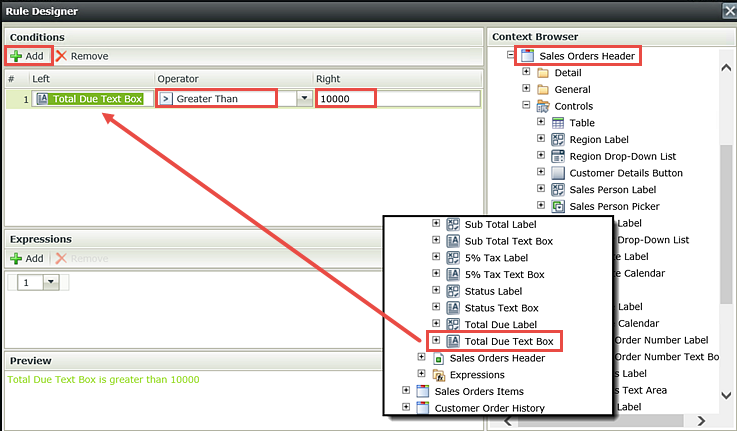
- In K2 Designer, edit the Submit button is Clicked rule for the Start Workflow state on the Sales Orders Form. Add an Advanced condition for when the Total Due Text Box value is greater than
10000
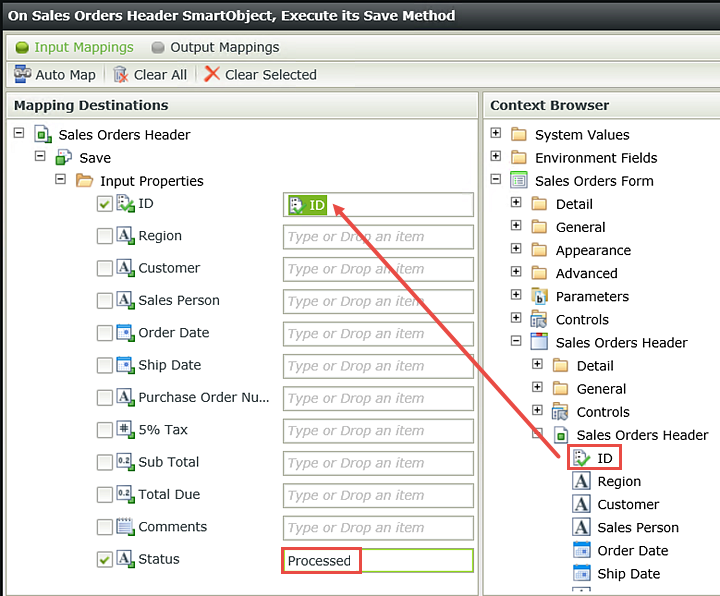
then move the advanced condition so that it fires before the start workflow rule. - Add an execute a SmartObject method action for the Sales Orders Header SmartObject, save method. Configure the Input Properties > ID field to be the Sales Orders Header SmartObject > ID property. Configure the Status field to read
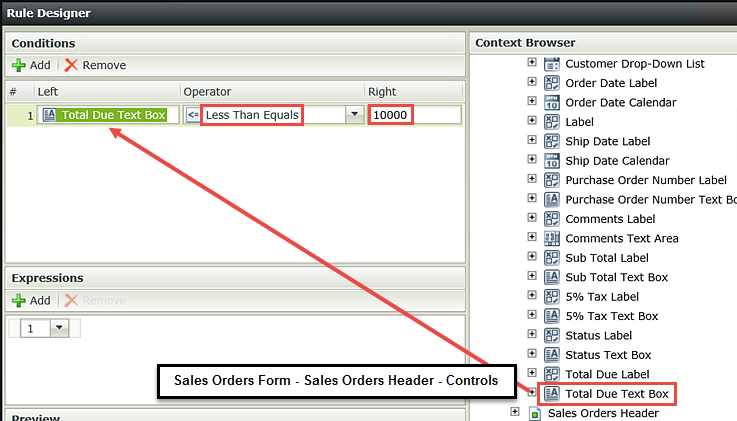
Processed - Add another Advanced condition and configure it the same as in the previous step, except make the operator Less than equals.
- Move the Save method action down so that it now resides under the second advance condition statement.
- Hide the Status Label and field for the Start Workflow state, form initialing rule.
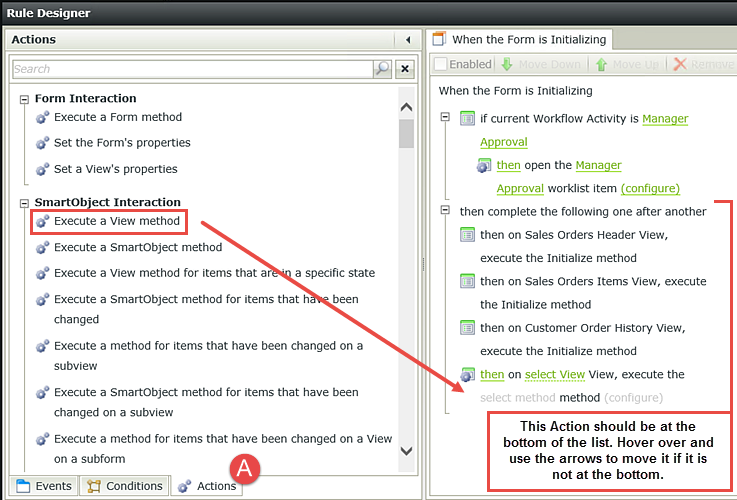
- Edit the Manager Approval state, form initializing rule and add an action to Execute a View method. Move the new action to the bottom of the list, if it isn’t already located there.
- Configure the action for the Sales Order Header > load method, and map the Sales Order Header SmartObject > ID to the Input Properties > ID field.
- Add another Execute a View method, making sure it is at the bottom of the list. Configure it for the Sales Orders Items view with the Get List method. Map the Sales Orders Header SmartObject > ID to the Input Properties > ID field.
- Add another Execute a View method, making sure it is at the bottom of the list. Configure it for the Customer Order History view with the Get List method. Map the Sales Orders Header SmartObject > Customer property to the Input Properties > ID field.
- Add an action to the Manager Approval state, form initializing rule to hide the Submit Button.

- In K2 Designer, check-out and edit the Sales Orders Form.
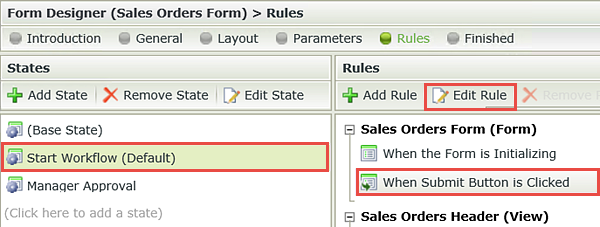
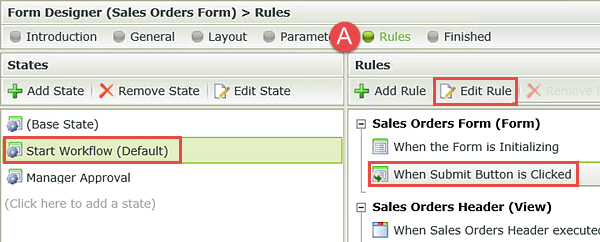
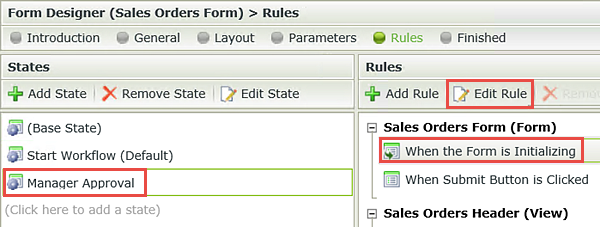
- Navigate to the Rules screen. Notice that K2 has added the two states from your workflow (Start Workflow and Manager Approval). Click the Start Workflow state to highlight it. In the rules pane, highlight the Submit Button is Clicked rule. Edit the rule.
- In the rule designer, click the Conditions tab. Search for
advanced
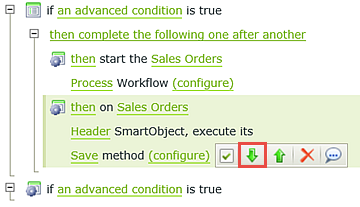
then click to add the rule, an advanced condition is true, to the rule definition pane. - Hover over the start workflow action until you see the line options. (You can also click to the far right of the action to expose the line options.) Click the down arrow to move the block down.
- Click the Advanced condition link to open the rule designer. Click Add. Expand the context browser and navigate to the Total Due Text Box found in the Sales Orders Header > Controls. Drag the Total Due Text Box into the left conditions box. Change the operator to Greater Than. In the right conditions box enter
10000
then click OK complete the advanced condition configuration. You should now be back on the rule definition screen. - Confirm the Actions tab is selected (if it isn’t already). Click Execute a SmartObject method to add it to the rule definition pane.
- Click the select SmartObject link and select the Sales Orders Header SmartObject. For the method, select Save. (Save is the equivalent of update.) Click the (configure) link. Drag the Sales Orders Header SmartObject > ID into the Input Properties > ID field. (Once again, this configuration tells K2 to update the current record.) For the status field, enter
Processed
There are no Output Mappings, so click Finish. Next, you’ll add the advanced condition for if the total due value is less than or equal to $10,000. - Click the Conditions tab and search for
advanced
then click an advanced condition is true to add it to the rule definition pane. - Hover over (or click to the far right of) the save method action you configured in step (g) and use the down arrow to move it into the new advanced condition bracket. (You’ll need to click the down arrow twice to move it under the advanced condition.) You now have your two advanced conditions configured for addressing the total due amount. If the amount is greater than $10,000, your workflow will start. If the amount is less than or equal to, the status property will be updated and the workflow will not start.
- Edit the form initialing rule for the Start Workflow (Default) state. (The form initializing rule is simply the rule that applies to the form that is loaded for the user.)
- Confirm the Actions tab is highlighted, then search for
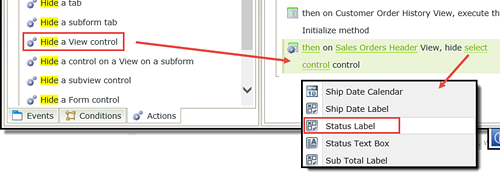
hide
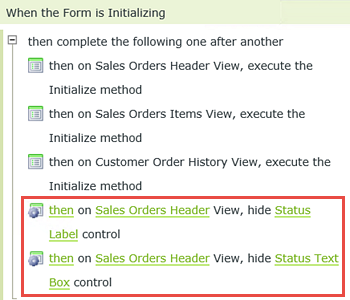
then click the Hide a View control action to add it to the rule definition pane. Click the select View link and select the Sales Orders Header view. Click the select control link and select the Status Label. - Repeat the previous step and hide the Status Text Box as well. Click OK when ready to return to the rules screen.
- Edit the form initializing rule for the Manager Approval state.
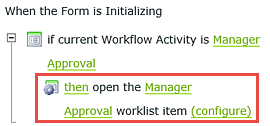
- Click the (configure) link for the worklist item action. K2 added this action automatically when you created the user task in the workflow.
- Click the Actions tab if it isn’t already highlighted. Add an Execute View method action to the rule definition pane. (If the action is not at the bottom of the list, use the arrows to move it.)
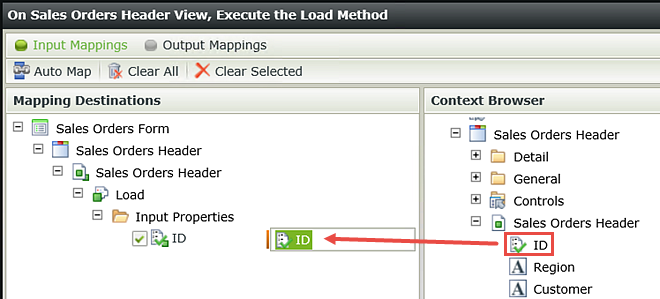
- Click the select View link and select Sales Orders Header. Click the select method link and select Load.
- Click the (configure) link. Drag the Sales Orders Header > Sales Orders Header SmartObject > ID into the Input Properties > ID field. There are no Output Mappings configurations to make so click Finish.
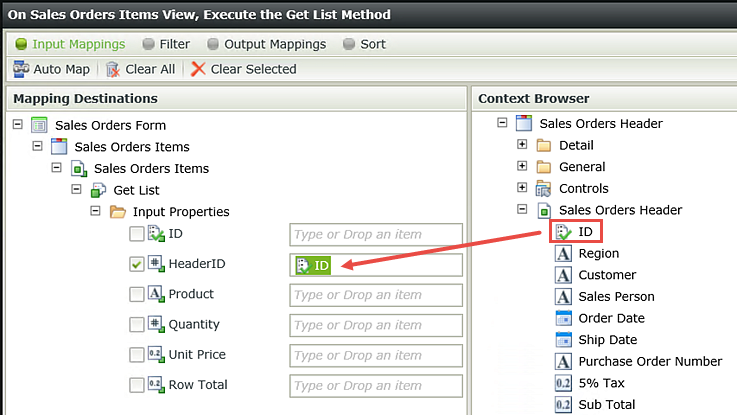
- Add another Action to Execute a View Method. Make sure it is at the bottom of the list. If it is not, then use the arrows to move it. Click the select View link and select Sales Orders Items. Click the select method link and select Get List.
- Click the (configure) link. Drag the Sales Orders Header SmartObject > ID into the Input Properties > HeaderID field. Recall that the HeaderID property is the child (items view) property that is bound to the parent (header view) ID property. There are no Output Mappings configurations, so click Finish.
- Add another Execute a View Method action. (Again, to the bottom of the list.) For the view, select Customer Order History. For the method, select Get List. Click the (configure) link. Drag the Sales Order Header SmartObject > Customer property into the Input Properties > ID field. There are no Output Mappings, so click Finish. Do not exit the rule designer just yet.
- Still on the Actions screen, search for
hide
then select the Hide a Form control action to add it to the rule definition pane. Select the Submit Button. Click OK, then Finish to complete the additional rule configurations. - Finish the form edits, then check in the form.
Recall that a state represents the configuration and behavior of the form at a particular point in the workflow. In this step, you are editing the form behavior at the point of the workflow starting (or just after the submit button is clicked.) You want K2 to evaluate the total due amount and then proceed according to that value.

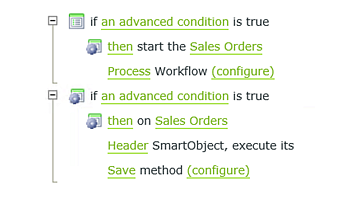
By default, K2 places the new condition at the bottom of the screen, just below the action, "then start the Sales Orders Process Workflow". The Sales Orders Process Workflow was automatically added to the form’s rules when you created the workflow and configured the SmartForms integration. For the Sales Orders application, you want the advanced condition to run before the workflow starts. After all, this is the condition that will determine whether or not you need to run the workflow in the first place! You need to move the advanced condition so that it runs before the start workflow action.

Hover and click the down arrow once again to set the start workflow action below the advanced condition.

Your screen should look like the image below as the final result. Depending on your K2 version, you may have to work with the up and down arrows a bit to achieve the final result. Ultimately, you want your screen to match the image so that the advance condition fires before the start workflow action.

You will configure the condition to check the total due amount. If the value is greater than $10,000, you need the workflow to fire. If it is equal to or less, you don't need to run the workflow. Instead, you will simply update the status property to indicate the sales order has been processed and the workflow will be complete.
In the next few steps, you will add actions for the less than or equal to $10,000 scenario. In this case, you will simply update the status property to indicate the sales order is complete. Because the amount is less than or equal to $10,000, you don't need the workflow to fire.
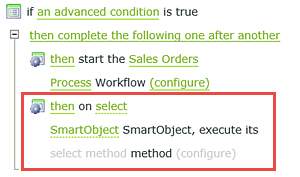
Notice that K2 added it to the advanced condition you previously configured. This is not what you want. This action will update the Sales Orders Header SmartObject > Status property if the workflow is not required. You will configure this action, then add another advanced condition (for less than or equal to), then move this action under the new advanced condition.
Configure the advanced condition as you did in step (e), except make the operator Less Than Equals.
You are done with this rule, so click OK when ready to return to the rules screen.

To keep your form neat and tidy, you will edit a rule so that the status label and text box are hidden from your users. These controls are not needed and could be confusing, so you will hide them.

Now you will continue with the workflow rules configuration. If the workflow does start, you will need to populate the header, items and customer history views with the form originator's data that has been saved in the header and items SmartObjects. Recall building the workflow. You created the Manager Approval state in conjunction with the Manager Approval user task. This state represents the form configuration and behavior you want the approving manager to see. So, in the next few steps, you will edit rules on the Manager Approval state to add the SmartObject methods that will populate your views with the saved SmartObject content.
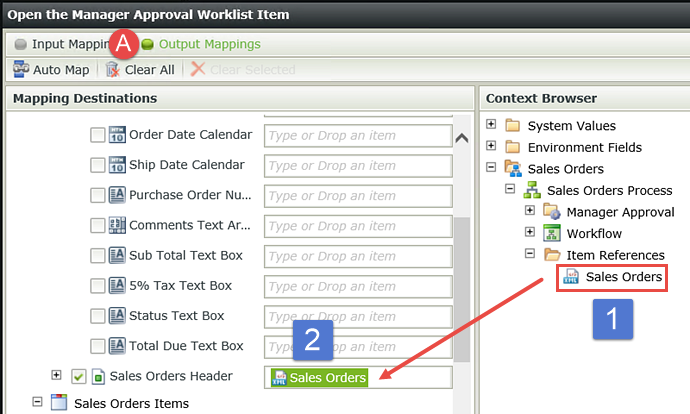
Click the Output Mappings button. In the context browser, expand the Item References node. Notice the Sales Orders Item Reference that is located under the Sales Orders > Sales Order Process node. (These are the project and process names of the workflow you just created in K2 Studio.) This was configured behind the scenes when you created the item reference in the workflow. On the left side of the screen, scroll down the mapping destinations until you find the Sales Orders Header SmartObject. Confirm the item reference is mapped to the SmartObject.
Click Finish to close this action.
In the next step, you will add an action to call the Sales Orders Header SmartObject and populate the Sales Orders Header view fields when the manager opens the worklist task (form).

In this step, you are simply telling K2 to return the properties from the current SmartObject record.
Now you will configure a SmartObject method to populate the Sales Orders Items view fields.
In this step, you are telling K2 to retrieve all of the Items view records that have a HeaderID which matches the Header view ID.
The last SmartObject action will populate the customer history view fields.
In this step, you are matching the customer from the header view with the customer from the Customers SmartObject.
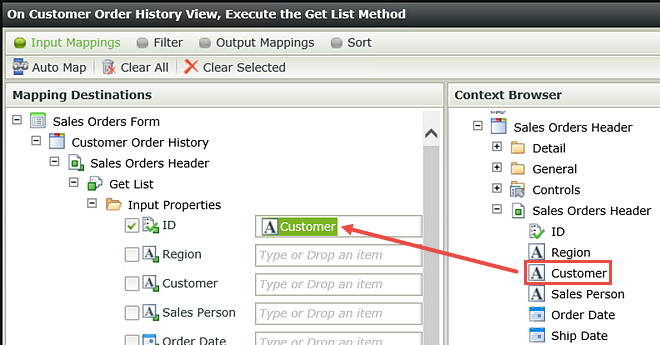
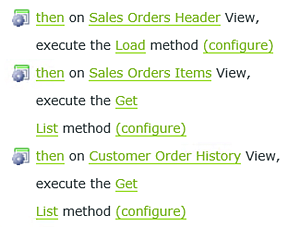
Your screen should look like the image below. (Representing the last three actions you just added.)
You have one final action to add to the Manager Approval state and that is to hide the form’s submit button. K2 will add an additional workflow view to the form that contains a drop-down list of actions (approved and not approved) and a submit button as well. The manager will use those controls for their decision and to submit the form. The original submit button would be confusing, so you will hide it for the manager.

STEP 17 REVIEW
In step 17 you returned to K2 Designer to complete the necessary configurations for your form and workflow. After completing the workflow configurations, you added an advanced condition to check the total due amount which will determine if the workflow should start. If the workflow is not started, then an action will update the Sales Orders Header status property. You then added additional actions to populate views on the Manager Approval state. It’s important to note here that the start rule placed on the total due field could have been configured in K2 Studio as a condition as well. The steps you completed were meant to show that you can set conditions and SmartObject properties in the form itself, again demonstrating the cross functionality of K2 Designer and K2 Studio.
Before you can begin testing your application, you need to assign process rights, or permissions, to start the workflow. You need to tell K2 who can start this workflow and to what extent their permissions cover. For this application, you will assign all domain users start and view rights, meaning all users can start the workflow and view reports on the workflow. K2 Studio does not have a mechanism for assigning workflow rights, so you must configure the permissions from the K2 Management site.
Step 18 Tasks
- From the K2 Management site, assign all domain user start and view rights for the Sales Orders Process workflow.
- Launch the K2 Management site if it is not already open. (Start > All Programs > K2 blackpearl > K2 Management)
- Expand the Workflow Server node, then click Workflows to expose the workflow projects in the central pane.
- Click on the Sales Orders Process workflow project. Click Rights.
- On the Manage Workflow Rights screen, click Add.
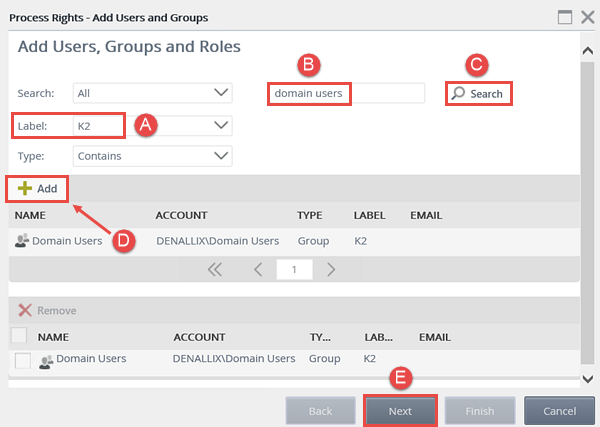
- On the Process Rights screen, change the Label to K2 (if necessary). Enter
domain users
into the search text box and click the spyglass. When you see Domain Users added, click to highlight the row, then click Add. Click Next. - On the Add Users, Groups and Roles screen, CHECK the boxes to Start and View, then click Finish.
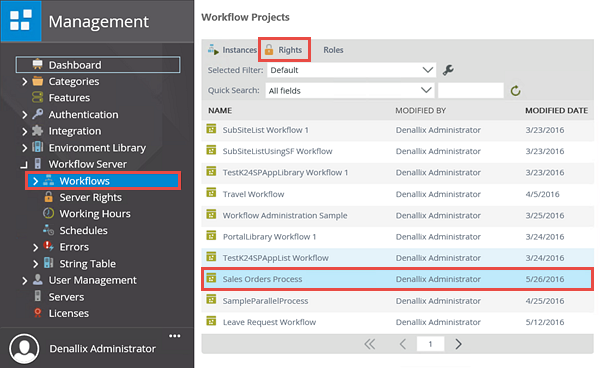

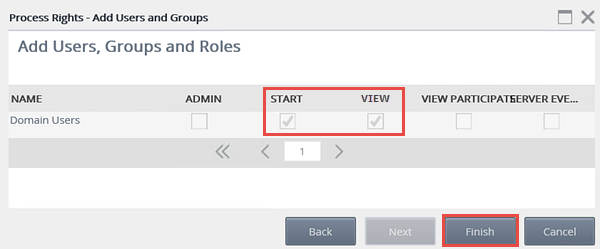
Your screen should look like the image below.
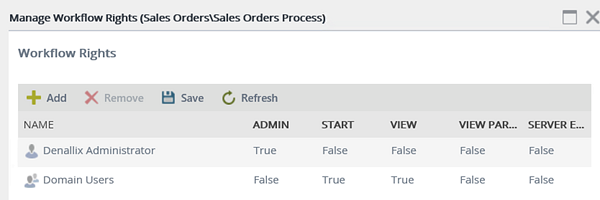
STEP 18 REVIEW
In this step you assigned workflow rights, or permissions, to the Sales Orders Process workflow. Domain users can now start the workflow and view any related workflow reports. Because K2 Studio does not have a wizard for workflow permissions, you assigned rights from the K2 Management site. On a side note, K2 Designer-created workflows have a built-in wizard for assigning process rights.
To test your application, you will submit at least two Sales Orders Forms. For the first form, you want to make sure your total due amount is less than $10,000. You will then confirm the workflow did not start. For the second submission, you will make sure the total due amount is greater than $10,000 and the workflow did start. In Part 5, you will be reporting on the application, so feel free to submit more Sales Orders Forms so that you have additional content for your reports (if time allows).
Step 19 Tasks
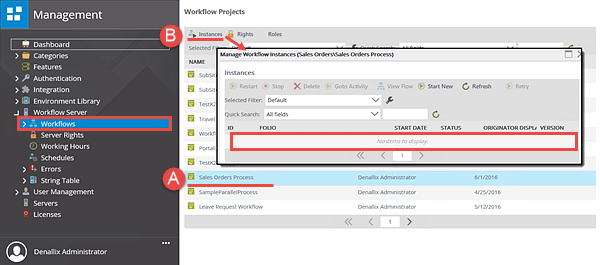
- Submit a Sales Orders Form with the total due less than $10,000. Navigate to the workflows instances screen in the K2 Management site and confirm the workflow did not start. (From the Management menu, navigate to Workflow Server > Workflows. Highlight the Sales Orders Process, then click the Instances button.)
- Submit a second form with the total due greater than $10,000. In the K2 Management site, confirm the workflow instance is shown. Open the manager’s Outlook and action the worklist item. (If you are using a K2-provided virtual environment, you are most likely logged on as Denallix Administrator. 'Jonno' is Administrator's manager.)
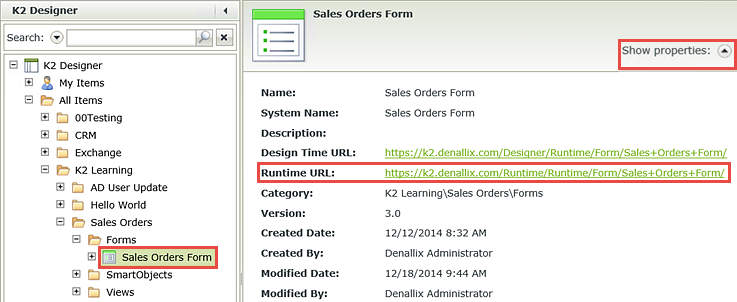
- In K2 Designer, highlight the Sales Orders Form and click the Runtime URL link located in the Properties pane. (You may need to click the Show Properties arrow to expose the form's properties and runtime URL.)
- Choose a Region, then a Customer. Click the Customer Details button and confirm the correct data is returned. For the Sales Person, enter
bran
then click enter. Confirm Brandon Brown is the sales person. (This is confirming that the picker control is searching the cached data retrieved from Active Directory. K2 will search keywords and partial keywords.) - In the Item Details view, add a few items. Be sure to enter the quantity for each item so that the row total is calculated. (After entering the quantity, press enter so that the row total updates.)
- In the Customer and Invoice Details view, confirm the Sub Total is the same as the Sum/Items Total and that the 5% Tax and Total Due fields are calculating.
- Enter a few more items, but make sure your Items Total does not exceed $10,000. Click Create Sales Order to submit the form.
- In the K2 Management site, expand the Workflow Server node, then click on Workflows. Locate the Sales Orders Process workflow project, then click the Instances button. Confirm there are no instances for this process. This is the correct behavior with your total due amount less than $10,000. Close the Instances screen.
- Submit another form. This time, make sure the total due amount is greater than $10,000. Return to K2 Management site > Workflows screen and once again, click to highlight the Sales Orders Process, then click the Instances button. Confirm that an entry now exists indicating that the workflow has started.
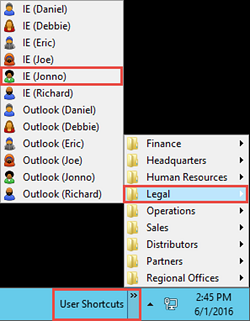
- Click on the User Shortcuts in the lower right corner of the task bar. Expand the Legal folder, then click on IE (Jonno). You may see a link to Jonno's Outlook, but be sure to click the link to IE instead. You will open Jonno's web-based Outlook (OWA).
- In the Favorites bar, click OWA.
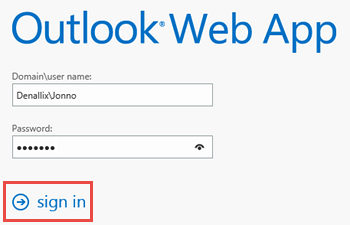
- Login in as Jonno.
Domain\user name: Denallix\Jonno
Password: K2pass!
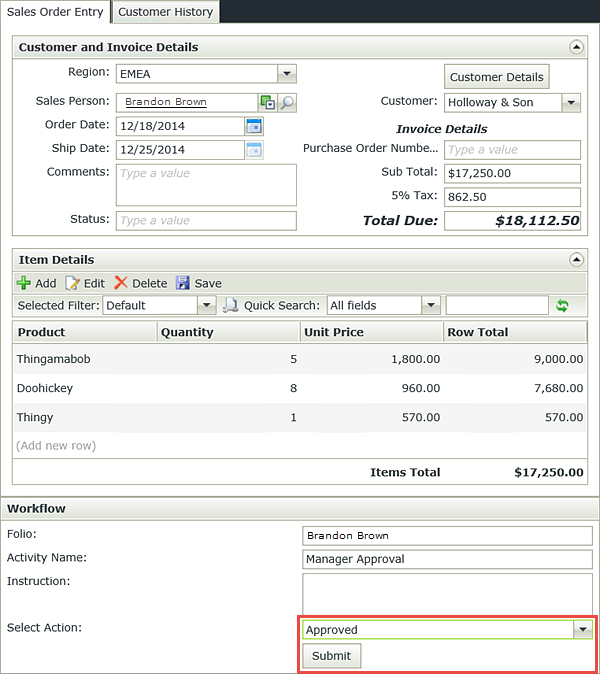
then click sign in. - Confirm there is a task notification for the sales order. Click on the Worklist item link to open the form. Confirm the header (Customer and Invoice Details) view and items (item details) view are populated with data. Notice that K2 has added an additional view to the bottom of the form, the workflow view. This is the view that is associated with the user task actions. Select one of the actions shown (Approved or Not Approved), then click Submit.
You will see a brief wheel spinning and then the form again. If there were no error messages, you can close the form.
Because your total due amount is less than $10,000, the workflow should not start. In this step, you will return to the K2 Management site and verify there are no active process instances. (Recall that a process instance is a single occurrence of a process, or workflow.)

Recall that you configured the manager approval user task to use the form originator’s manager as the destination user, or the person responsible for approving the sales order. In the next step, you’ll open the manager’s Outlook and confirm there is a task notification with a worklist item link.

STEP 19 REVIEW
In this step, you tested the application by submitting two (or more) forms. In K2 Workspace, you confirmed that a workflow started or didn’t start (depending on the Total Due value). You confirmed a task notification was received by the manager, then actioned the task to complete the workflow.
Congratulations! You have now completed a SmartForms - Intermediate application build! In the next section, Part 5: Reports, you will learn about the workflow reporting controls that can be applied to SmartForms for a dashboard-style report.
Challenge Steps
If time allows and you would like to challenge yourself before moving on to Part 5, work through the two challenge steps found in the next section.
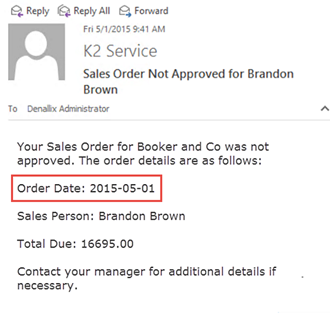
If the approving manager makes the decision to Not Approve the Sales Order, then a Send E-mail event notifies the form originator with this decision. The Order Date contained in the email may not be in a format that is used in your organization. Using the In-Line Functions found in the Context Browser, configure the date formats so that they are user-friendly.
Challenge 1 Tasks
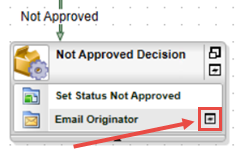
- Open the Sales Orders project in K2 Studio, then launch the Send E-mail wizard for the Email Originator event found in the Not Approved Decision Activity.
- Use the Context Browser > In-Line Functions > Date and Time > Format wizard to reformat the Order Date in the message body of the email. Reformat the date in a format that is appropriate for your organization. To achieve the format shown in the second image above, use the following date formula
MM/dd/yyyy
- In K2 Studio, open the Sales Orders project. Launch the Send E-mail wizard for the Email Originator event.
- Click Next twice so that you are on the Message Body screen. Delete the Sales Orders.Order Date item reference (click on it and then delete, making sure your cursor stays in the Order Date line).
- Open the Context Browser by clicking the ellipses located near to top right corner of the message body.
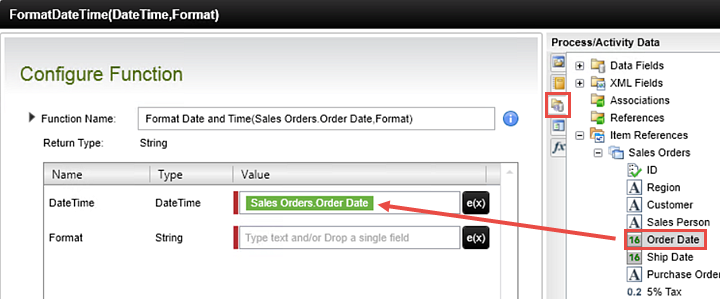
- Click the In-Line Functions icon (A below) to open the Functions Browser. Expand the Date and Time tree, then drag the Format Date and Tme function to the Order Date line. The editor will now open.
- Click the Process/Activity Data icon in the Context Browser, then expand Item References > Sales Orders node and drag the Order Date property into the DateTime field.
- In the Format field, enter a new format that is appropriate for your organization. In the sample shown at the beginning of this Challenge, you used the following format:
MM/dd/yyyy - Save, then Deploy your workflow.


When the Sales Orders Form is submitted, there is a brief spinning wheel that is indicative of the rules processing, but there is not a true visual confirmation to the user that their form has been submitted successfully. In this challenge, you are going to add a pop-up confirmation that lets the user know their form has been submitted successfully.
Challenge 2 Tasks
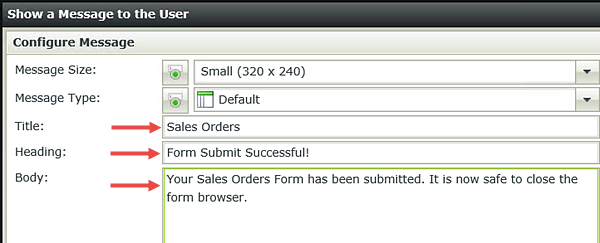
- Add a message to the Submit Button is Clicked rule for the Start Workflow state. Configure the message in any manner you like.
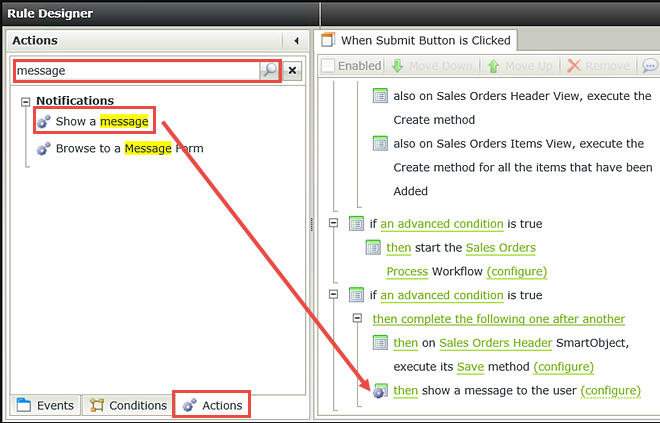
- In K2 Designer, Check Out and Edit the Sales Orders Form. Navigate to the Rules screen. Highlight the Start Workflow state and the Submit Button is Clicked rule, then Edit the rule.
- Add a Show a message Action to the rule definition pane.
- Configure the message in any manner you like.
- Save and Check In the Sales Orders Form.
