Part 3: Forms
In Part 3, you will create a form and add the two views built in Part 2. Additionally, you will create a new view and add it as a tabbed view to the main Sales Orders form. This view will display the customer history. Another new sub-view will display a specific customer's details. Finally, you will add a rule that will create the parent (Sales Orders Header) and child (Sales Orders Items) records in their corresponding SmartObjects.
In this part, you will learn:
- How to build a form, add views and add controls
- How to build a tabbed view and a sub-view
- How to configure rules for form validation, form load and submit actions
If you have not completed Part 2: Views of this tutorial yet, please do so now since you will be building upon the artifacts created in that step.
Now that you have your views created and formatted, you will create the application’s form. Recall that the form is the main container for all of the elements that make up the user interface. On their own, views are not accessible by users. They must be contained within a form and forms can have multiple views, along with additional controls, rules and expressions. You will apply a rule that populates the Sub Total field in the Header view with the Items Total value from the Items view, then you will add a rule to create the SmartObject records when the form is submitted.
Step 10 Tasks
- From the Forms category, add a New Form and name it
Sales Orders Form
then add the Sales Orders Header view to the top of the form canvas and the Sales Orders Items view to the bottom of the form canvas. - Add a Rule to Transfer data when the Items Total [Sum Data Label] value in the
Items view changes and transfer the data to the Sub Total Text Box in the Header
view. Change the rule name to
Update Sub Total - Add a Comment to the Update Sub Total rule that explains the purpose of the rule.
- Add a Submit Button to the
form canvas below the Items view and name it
Submit Button
then change the Text to
Create Sales Order - Add another Action to the submit button rule that executes a View method for items that are in a specific state. Configure it for the Create method and Added state.
- Do not auto-map the input mappings. Map the Sales Order Items SmartObjects into their corresponding fields. Do not map the ID field. You will map that in the next step.
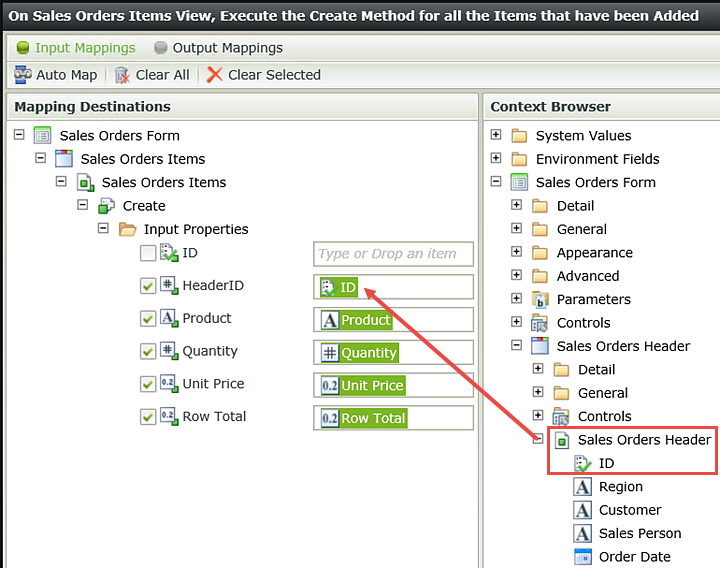
- Map the Sales Orders Header SmartObject > ID to the Input Mappings > HeaderID field.
- Change the start configuration for the two actions to Run as a batch and not one after another.
Add a Rule to the Submit Button for when it is clicked. Then add a Condition that requires the Region drop-down list, Sales Person picker and Customer drop-down list before the form can be submitted. Add an Execute View method action to Create the Header view record on the Sales Orders Header SmartObject.
Auto-Map the Input Mappings.
For the Output Mappings, map the Return Properties > ID field to the Sales Orders Header SmartObject > ID property.
- In the category browser, right-click the Forms category and select New Form. On the forms home screen, click Next (if the home screen is opened first).
- On the General settings screen, name
the form
Sales Orders Form
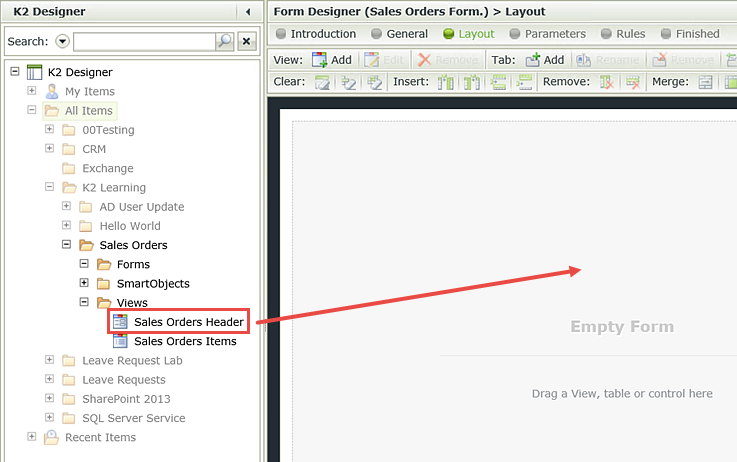
then click Next. - Drag the Sales Orders Header view onto the form canvas.
- Rename the (Enter View Title) to
Customer and Invoice Details - Drag the Sales
Orders Items view below the Header view. Rename the (Enter View Title) to
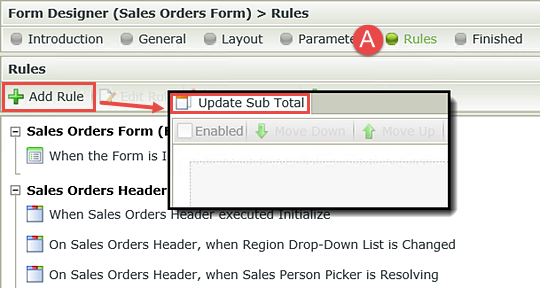
Item Details - Click the Rules button located in the breadcrumb bar. Click Add Rule. Double-click the (Enter Rule Name) title and change it to
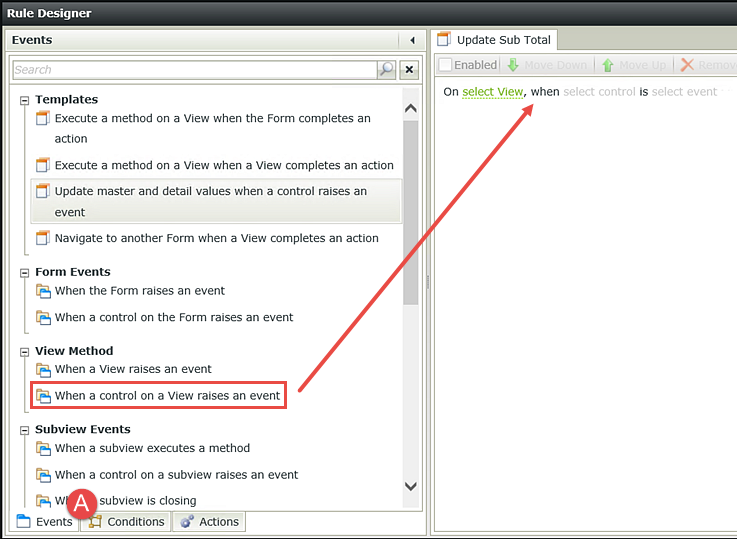
Update Sub Total - Confirm the Events tab is highlighted and click the When a control on a View raises an event option found under the View Method heading. Notice that the event has been added to the rule definition pane.
- Click the select View link and select the Sales Orders Items view.
- Click the select control link and select the Sum Data Label control. Notice that K2 has automatically configured the event as when the control is changed.
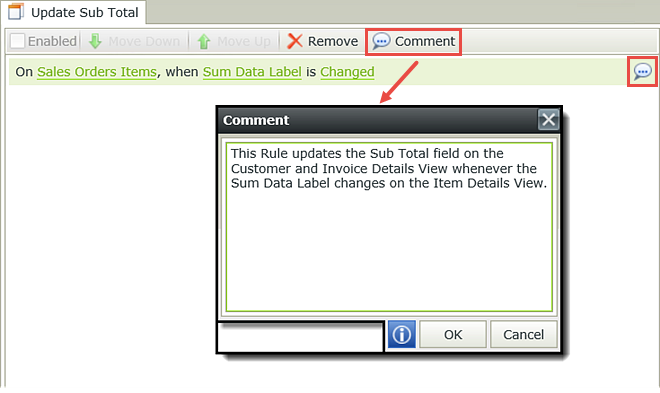
- Add a Comment to this event and enter the following (or if you prefer, your own content):
This rule updates the Sub Total field on the Customer and Invoice Details view whenever the Sum Data Label changes on the Item Details view. - Click the Actions tab then search for the data transfer action using the keyword
transfer
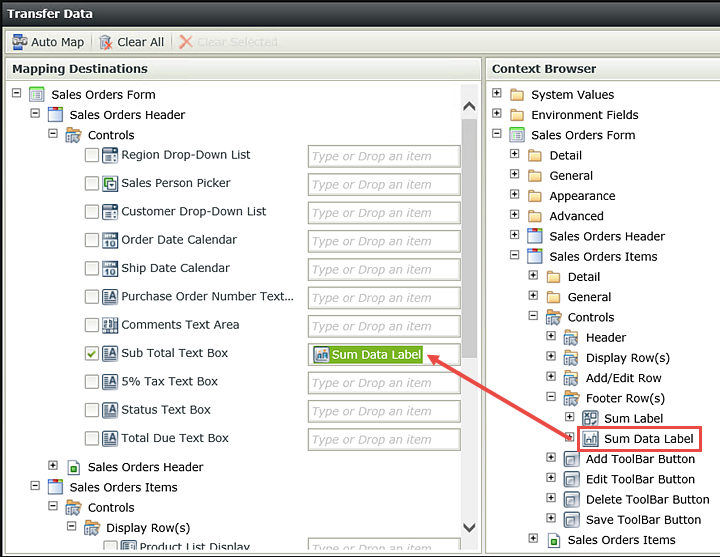
then click on Transfer data to add it to the rule definition pane. - Click the (configure) link. In the context browser, expand Sales Orders Items > Controls > Footer Row(s).
- Click the Layout button located in the breadcrumb bar (if it isn’t highlighted). Click the Controls tab in the context browser and drag a Button control to just below the Item Details view.
- Click the button control to highlight it. In the Properties pane, change the Name to
Submit Button
and change the Text to
Create Sales Order - With the Create Sales Order button still highlighted, click the control’s Rules tab at the bottom of the Properties pane. Click Add.
- Confirm the Events tab is highlighted, then navigate to and click the event, When a control on the Form raises an event to add it to the rule definition pane. Notice that K2 automatically configured the event for when the submit button is clicked. (This is because you had the button highlighted. You could still add the event without the button highlighted and configure the button control properties if you needed to.)
- Click the Conditions tab then search for
validation
and select the condition the Form passes validation to add it to the rule definition pane. Click the (configure) link and require the Region Drop-Down list, Sales Person Picker and Customer Drop-Down List. - Click the Actions tab. Click the Execute a View method action to add it to the rule definition pane. Click the select View link and select Sales Orders Header. Click the select SmartObject link and select the Sales Orders Header SmartObject. Select Create for the method.
- Click the (configure) link. On the Input Mappings screen, click Auto-Map. In this step, you are telling K2 to create the SmartObject record using the control values from the Header view.
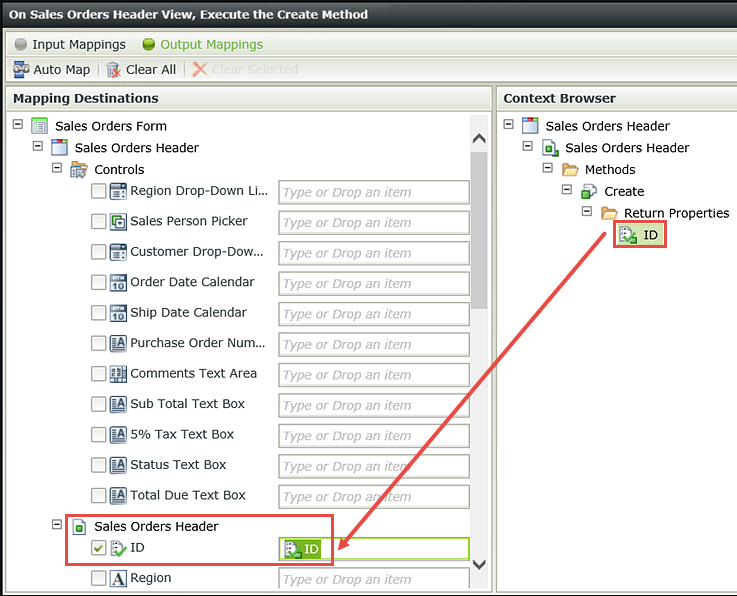
- Click the Output Mappings button at the top of the screen. Drag the Return Properties > ID into the Sales Orders Header SmartObject > ID field. Click Finish to close the configuration screen, but stay on the actions screen in the rule designer.
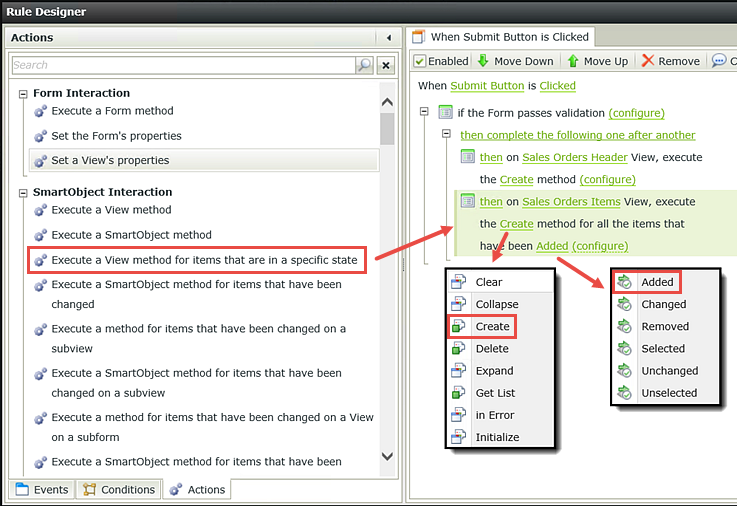
- Still on the Actions screen, click the Execute a View method for items that are in a specific state action to add it to the rule definition pane. Click the select View link and select Sales Orders Items. Click the select method link and select Create. Click the select item state and select Added.
- Click the (configure) link. On the Input Mappings screen, do not auto-map this time. Expand the Context Browser and drag the Sales Orders Items SmartObjects properties into their corresponding fields (EXCEPT for the HeaderID property).
- Expand the Sales Orders Header SmartObject and drag the ID into the Input Mappings HeaderID field. This is the ID you just saved in the previous step. The parent and child records are now bound by this ID. Finish the rule.
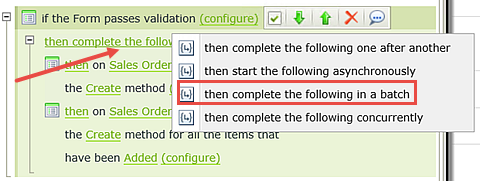
- Click on the link "then complete the following one after another" and change it to then complete the following in a batch.


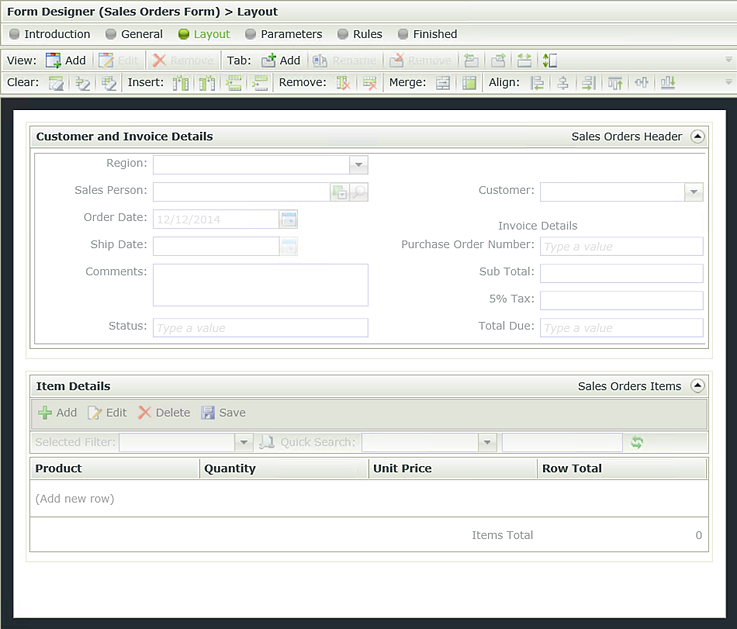
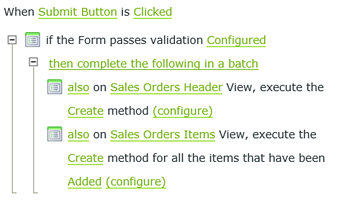
Your screen should look similar to the image below. (Your view formatting may be slightly different if you created your own styles. The form theme may be different depending on your K2 version.)
Next you will add a rule that will populate the Customer and Invoice Details: Sub Total field, with the Item Details: Items Total value. Recall in a previous step, you added the sum option to the Row Total column in the Items view and called it Items Total. The control name however, is Sum Data Label and you will see that value referred to in the next several steps. Just remember that Items Total and Sum Data Label refer to the same label/data label on the Items view.
After adding the comment, notice the comment icon that appears to the right of the event line.

In the next step, you will configure the action for updating the Sub Total field in the Header view whenever the Sum Data Label changes in the I items view.
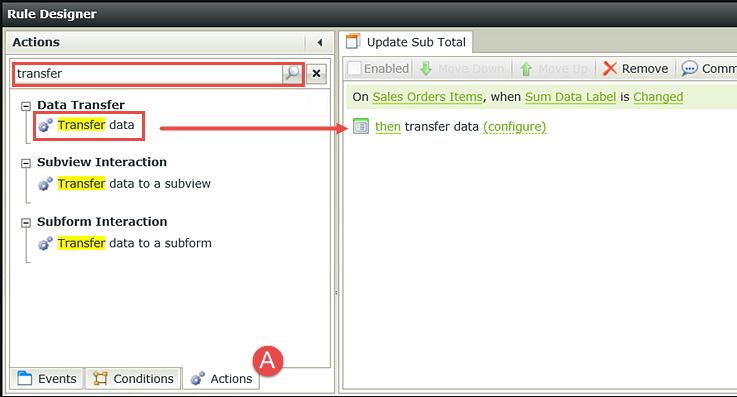
Recall in creating the Sales Orders Items view, when you added the sum option to the Row Total column, K2 created a new row below the list and added the Sum Label and Sum Data Label into the bottom row. K2 calls this the footer row and that’s where you’ll find the Sum Data Label control.
Drag the Sum Data Label control into the Sub Total Text Box field, under the Sales Orders Header view. Click OK twice to complete the rule configuration.

In the next few steps, you will add a submit button and configure a rule to create new records in the Sales Orders Header and Items SmartObjects. Remember, the Header record will be the parent record, while the Items records will be the child records. There may be several child records for each single parent record; one child record per item ordered. The parent and child records will be bound to one another by an ID value.
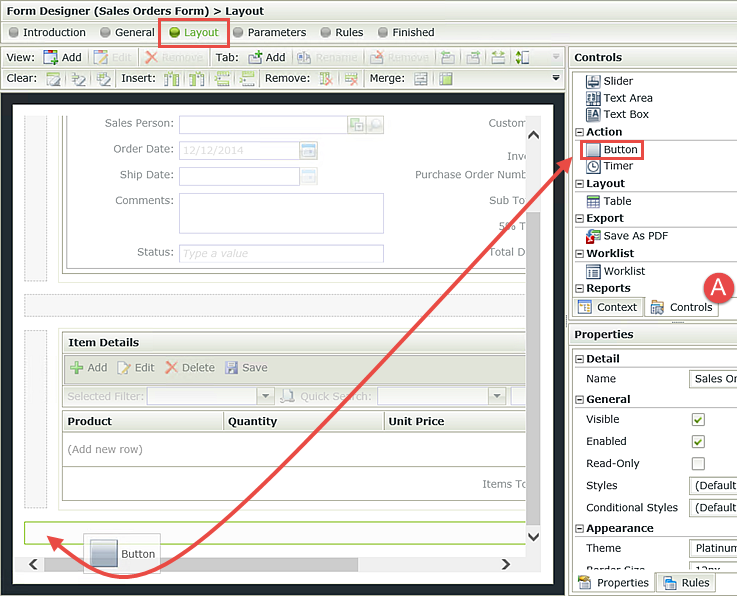

Next you’ll add a rule to the Create Sales Order button to create the Sales Orders Header SmartObject record. This record is the parent record. It is a single record containing the Header view content.
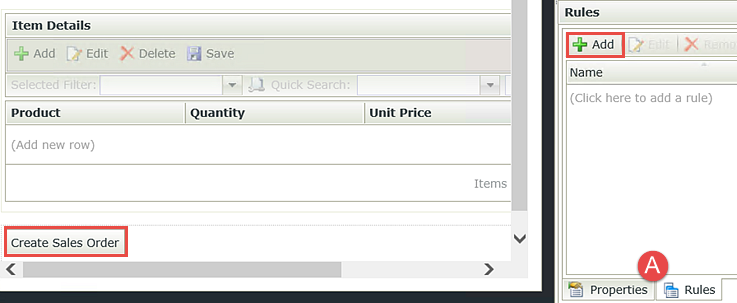
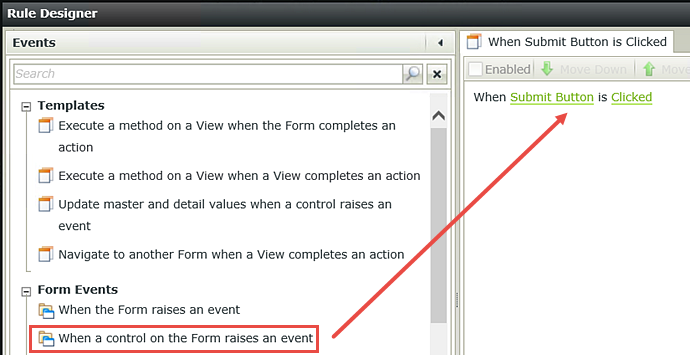
Now, you will add a form field validation that requires three fields on the form before the form can be submitted.
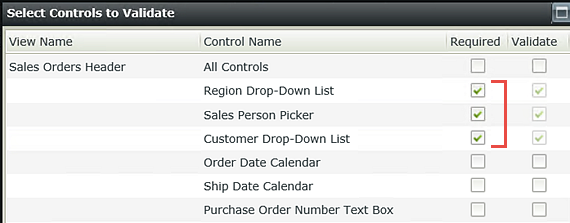
And now, if the form passes the field validation, the first (parent) record can be created.
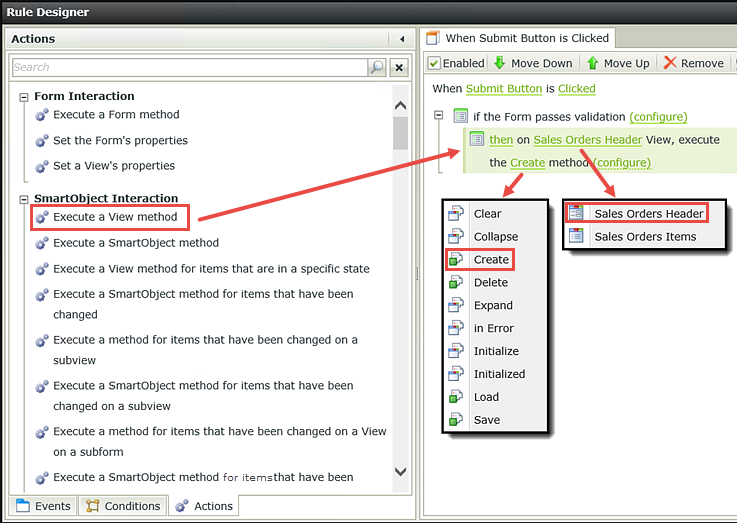
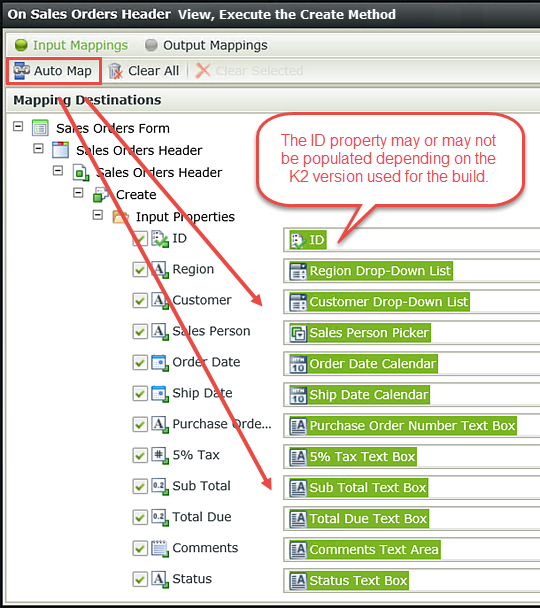
In this step, you are saving the ID of the new record (think SQL record ID since the SmartBox is a SQL table) as the Header SmartObject > ID. This ID will be used as the HeaderID value in the Items records. This is the common value between the parent (Header) record and its child (Items) records.
Now that you have created a single parent record containing the Sales Orders Header content, you will create individual child records from each of the items ordered. (Each item ordered will have its own record.) These records will be created in the Sales Orders Items SmartObject.
This is the action you use to perform a looping type save. K2 will loop through each of the items and create a separate record for each.
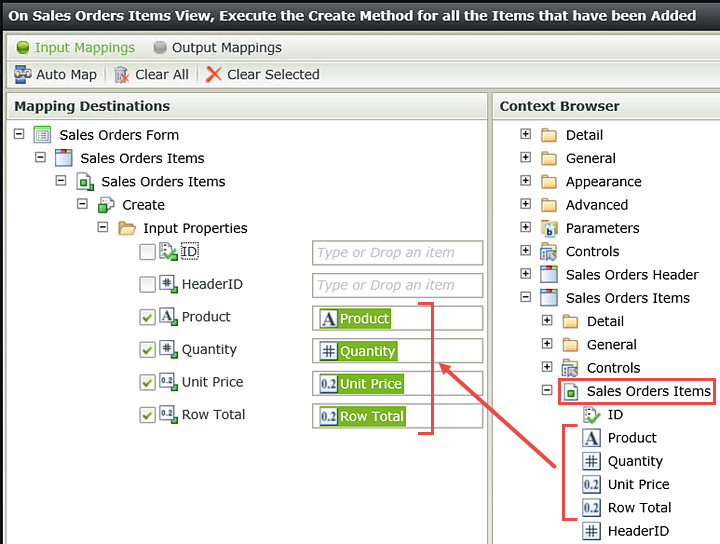
You will make one last adjustment to your create SmartObject actions. By default, the two actions are set to run one after another. You want them to run simultaneously so that each parent and child record is created together before K2 moves on to the next record or action. To do this, you must change the order to run as a batch.
Your rule definition pane should look like the image below. Finish the rule design to save it. Click OK to complete the Rule Designer, then Finish the form to save it and exit.
STEP 10 REVIEW
In this step you created the application’s form, or main container for all of the user interface elements. Your form contains two views, the Header view and the Items view, along with a submit button control. After adding the views, you configured a number of rules to transfer data from the I tems view (Items Total or Sum Data Label) to the Header view (Sub Total), then called the create methods for the Header SmartObject and the Items SmartObject. The Header content will become the parent record and the Items content will become the child records. You bound the two together by passing the ID field from the Header view to the HeaderID in the Items view. You need the parent and child records to be bound so that when you retrieve the records for the manager approval step, all associated records will be returned. Another important concept to remember is batch processing when the create record methods execute. This ensures the SmartObject records will be created at the same time, which is the faster and more efficient processing for parent/child records.
Tabbed forms are a mechanism for expanding the parent form to include additional form fields or content, in a convenient and organized manner. In Step 11, you will create an additional view that outputs the customer’s order history. You will add this view to the parent form via a second form tab, then configure a rule to update the order history with data from the customer currently selected.
Step 11 Tasks
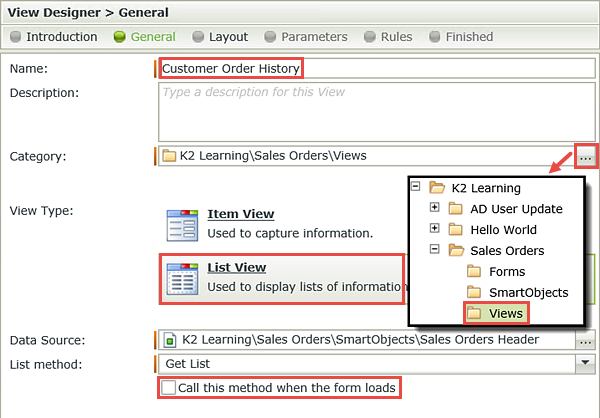
- Create a new List View from the Sales Orders Header SmartObject and name it
Customer Order History
and confirm the box to Call this method when the form loads is UNCHECKED. - Add a second Tab to the
Sales Orders Form and add the new Customer Order History
view to the new canvas. Name the parent view
Sales Order Entry
and name the new tabbed view
Customer History - Add a Rule to the
form and name it
Update Customer History List
with the following properties:
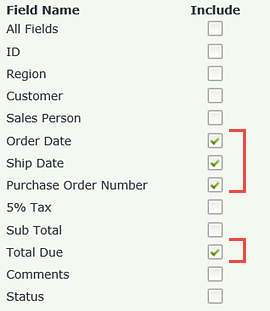
Create Labels and Controls for the new view with the following fields: Order Date, Ship Date, Purchase Order Number and Total Due. Do not allow the list to be edited or manually updated.
Event: When the customer drop-down list
changes on the Sales Orders Header view
Condition:
The customer drop-down list contains a value
Action: Call the Get
list method for the Sales Orders Header SmartObject
using the customer drop-down list control for the input property.
- Right-click the Sales Orders Header SmartObject and select Design View. Click Next on the view home screen (if it opens by default).
- On the General settings screen, name
the view
Customer Order History
then change the category to the Views category. Select List View for the view type and UNCHECK the box to Call this method when the form loads. Click Next to continue. - On the Layout screen, click Create Labels and Controls. Check the corresponding boxes to include the Order Date, Ship Date, Purchase Order Number and Total Due fields. Do not enable list editing or allow the user to manually refresh the list. Click OK, then Finish to complete the view. Check In the Customer Order History view.
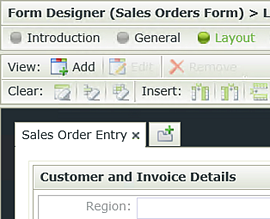
- Check out and edit the Sales Orders Form (if you checked it in the previous step). On the Layout screen, click the option arrow to the far right of the view menu and select Add Tab.
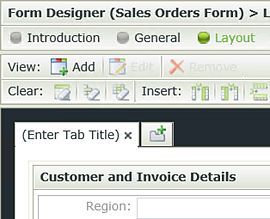
- Double-click (Enter Tab Title) and change it to
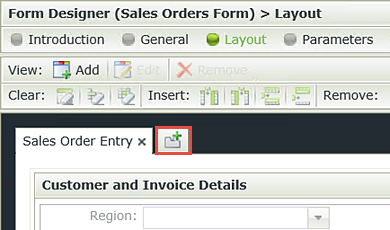
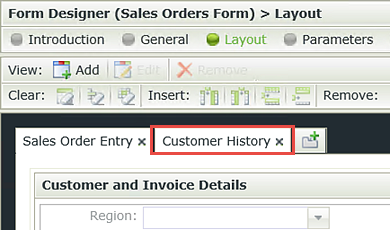
Sales Order Entry - Click the New Tab icon, then change (Enter Tab Title) to
Customer History - Drag the Customer
Order History view onto the form design canvas. Change (Enter View Title) to
Order History - Click the Rules button located in the breadcrumb bar, then click Add Rule.
- When the rule designer opens, confirm the Events tab is selected. Click the When a control on a View raises an event option found under View Method heading to add it to the
rule definition pane. Change the rule name to
Update Customer History List - Click the select View link and select Sales Orders Header. Click the select Control link and select Customer drop-down list. Click the select event link and select Changed.
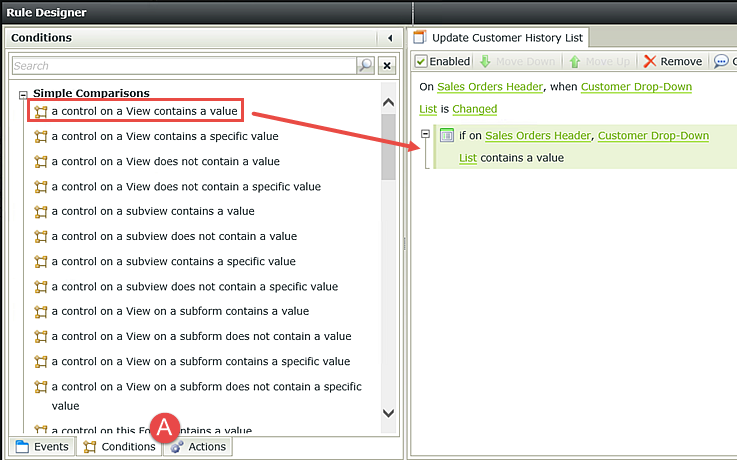
- Click the Conditions tab. Under the Simple Comparisons heading, click on a control on a View contains a value to add it to the rule definition pane. Click the select View link and select Sales Orders Header, then click the select control link and select Customer Drop-Down List.
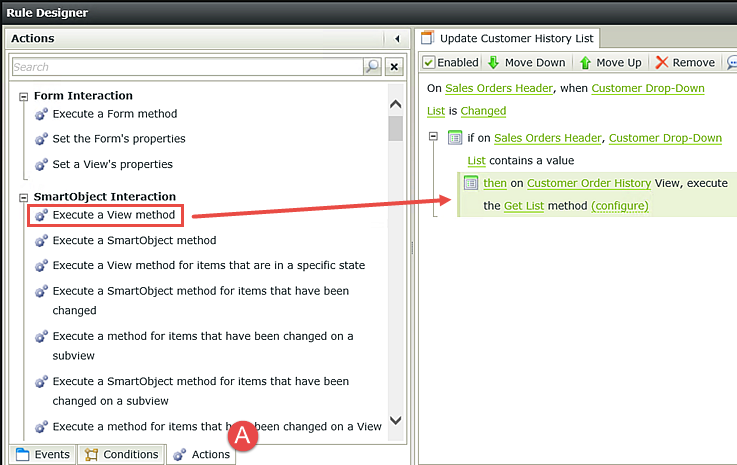
- Click on the Actions tab. Click on Execute a View method found under the SmartObject Interaction heading, to add it to the rule definition pane. Click the select View link and select Customer Order History. Click the select method link and select Get List.
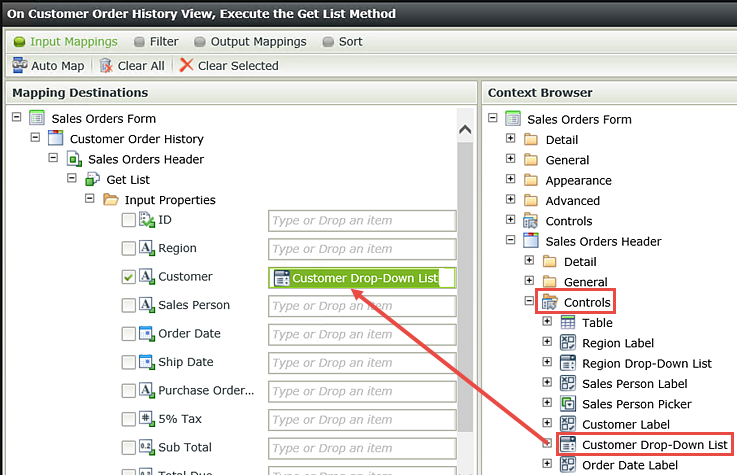
- Click the (configure) link. From the Input Mappings > Context Browser pane, expand the Sales Order Header view and drag the Customer Drop-Down List control into the Input Properties Customer field.
As the view content will be read-only, there is no need for the user to make any edits.
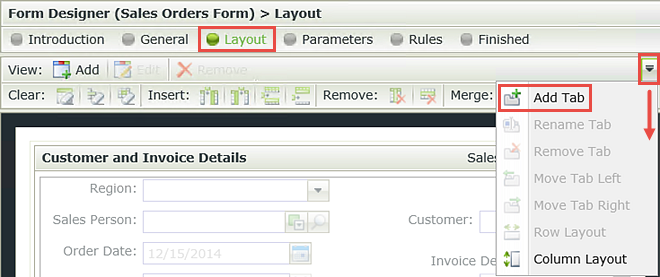
This tab will now be for the primary view. The second tab will be for the order history view.
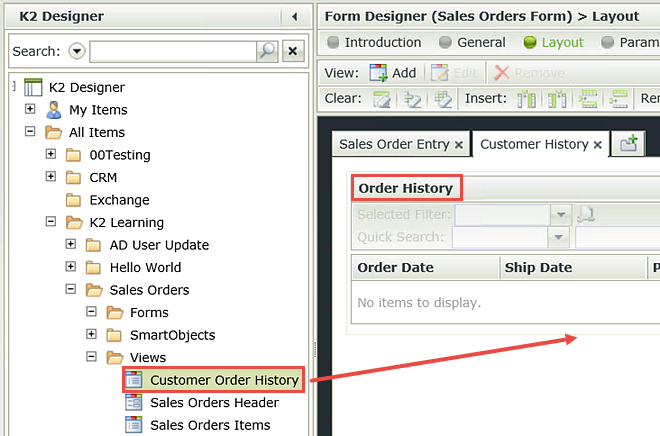
Now that you have added the Customer Order History view to the Customer History tab, you need to add a rule that will call the Get List method for the Sales Orders Header SmartObject when a customer is selected. This will populate the Customer Order History view with the records from the current customer.
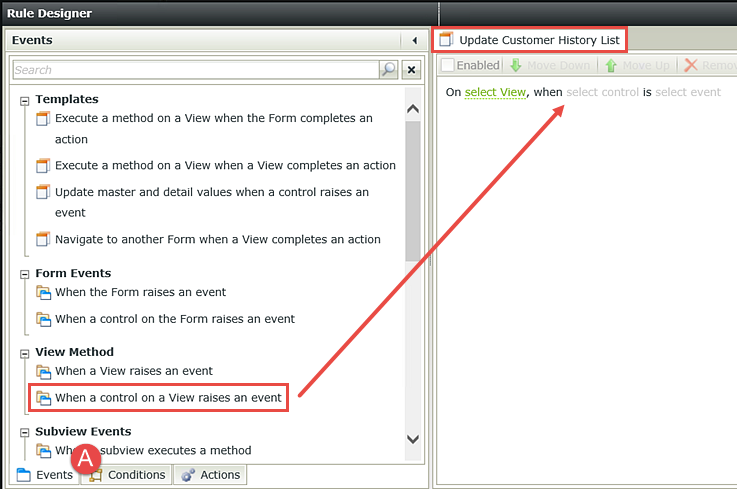
In this step, you have added an event that will trigger whenever the customer drop-down list is changed.
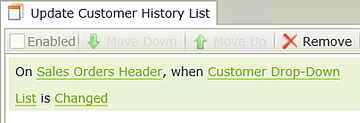
Now you want to add a condition so that the a Action won’t fire off unless there is an actual value in the customer drop-down list. This will prevent unnecessary calls to the server if there wasn't a customer selected.
You have configured your event (the customer drop-down list is changed) and condition (the drop-down list contains a value), so now you are ready to configure the action, which is to call the Sales Orders Header > Get list method and populate the Customer History view.
Here, you are simply assigning the customer drop-down list control as the control that will fire off your rule.

You do not need to configure Output Mappings for this rule, so click Finish, then OK to complete the rule configuration. Click Finish to complete the Customer Order History tab configuration. Check-in the form and all views.
STEP 11 REVIEW
Tabbed views can enhance the customer experience by providing additional information in a convenient and organized format. Tabbed content can include additional form fields and controls or informational content, as you built in this step. To maintain server performance, you included a condition that only makes the Get List call if a customer is actually selected.
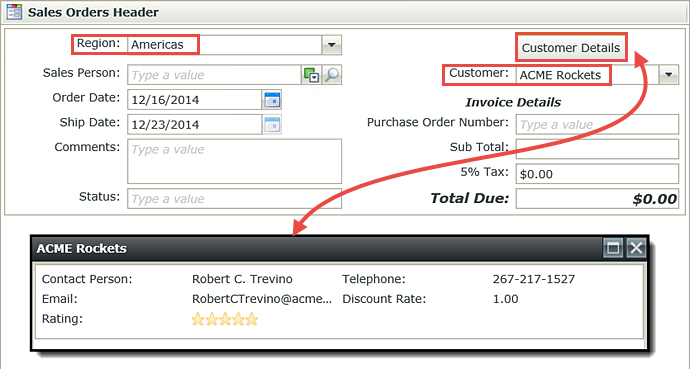
Another mechanism for providing additional information or controls to users is to create a sub-view. Where the tabbed view opens in the same browser as the parent form, a sub-view will open as a pop-up window. You can control the size of the pop-up, however the functionality is the same as a tabbed view. Sub-views are generally configured as a response to clicking a button or link.
Step 12 Tasks
- Create an Item v\View based on the Customers SmartObject and name it
Customer Details
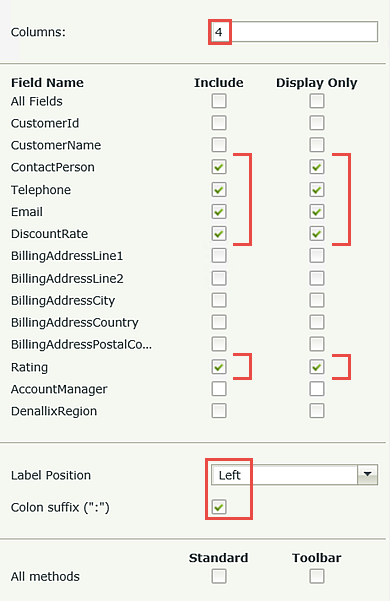
then change the category to the Views category. - Configure the Labels and Controls to display (Include AND Display only) the following: ContactPerson, Telephone, Email, DiscountRate, and Rating. Do not enable the buttons options. On the view design canvas, format the labels and controls in any manner you like.
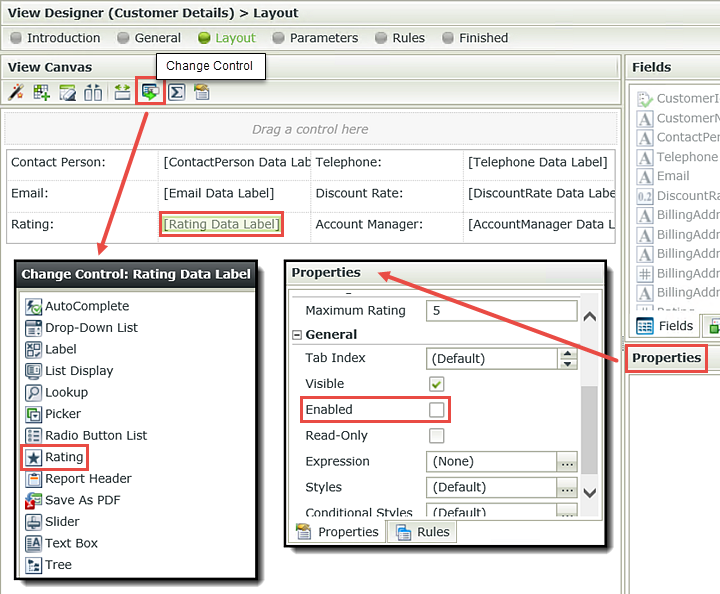
- Change the Rating Data Label to a Rating control and disable it.
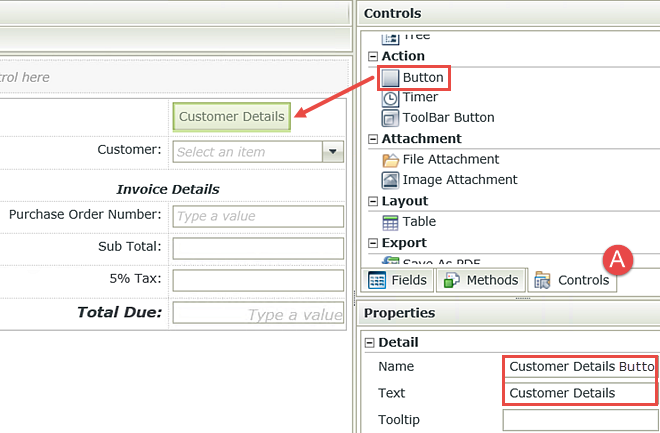
- Add a Button control to the Sales Orders Header
view to the cell above the Customer drop-down
list and name it
Customer Details Button
and change the Text to
Customer Details - Add a Rule to the Customer Details Button to Open a subview and execute a method. Configure the sub-view to be the Customer Details view and the method as List.
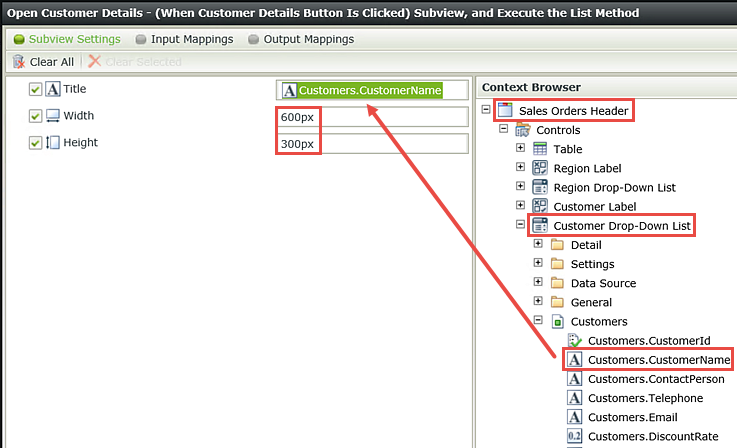
- Configure the Subview settings with the Customers.CustomerName for the title, then configure the width to be 600px and the height as 300px.
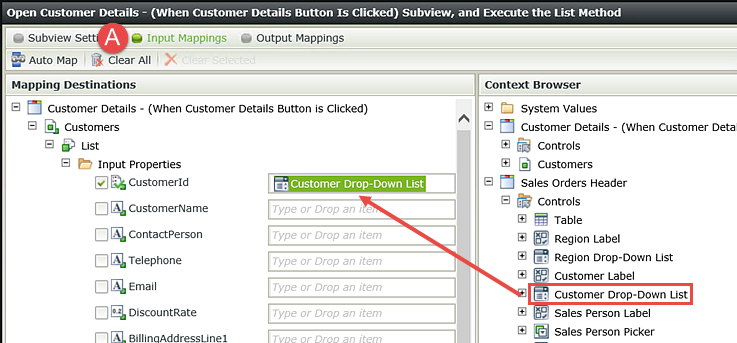
- Map the Customer Drop-Down List control to the CustomerId field for the Input Mappings.
- Map the corresponding Return Properties to the Control fields.
- Run the view and confirm the Customer Details is populated with the correct customer information.
- Right-click the Customers SmartObject and select Design View. On the views home screen, click Next (if it opens by default).
- Name the view
Customer Details
and change the category to the Views category. Confirm Item View is selected for the view type and click Next. - Click Create Labels and Controls. Change the number of columns to
4
and CHECK the Include AND Display Only boxes for the following fields: ContactPerson, Telephone, Email, DiscountRate, and Rating. Set the Label Position to Left with the Colon suffix. Leave the buttons methods boxes UNCHECKED. Click OK. - Click the Rating Data Label to highlight it. Change the control type to Rating. (A rating control looks like 5 stars that convey the rating number value to the number of stars that are highlighted.) With the rating control still highlighted, UNCHECK the Enabled box in the Properties pane found under the General heading. Click Finish to close the view designer. Check In the Customer Details view.
- Right-click and Check Out the Sales Orders Header view. Edit the view.
- Click on the Controls tab in the Context Browser. Drag a
button control into the cell directly above the
Customer drop-down list. Name the control
Customer Details Button
and for the Text, enter
Customer Details - With the Customer Details button still highlighted, click the control’s Rules tab. Click Add Rule.
- Click the Actions tab. Search for
open a subview
then click on Open a subview and execute a method to add it to the rule definition pane. (The image below reflects the action on the right side that should be added to the rule definition pane.) - Click the select View link and select the Customer Details view. Click the select method link and select List.
- Click the (configure) link. On the Subview Settings screen, expand the Context Browser > Sales Orders Header view node. Expand Controls > Customer Drop-Down List. Finally, expand the Customers SmartObject for that control. Drag the Customers.CustomerName into the Title Field. (Depending on your K2 version, the Customer SmartObject properties may be displayed without the SmartObject [table] object reference. For example, instead of Customers.CustomerName, you may just see CustomerName.)
- Click the Input Mappings button. Drag the Customer Drop-Down List control for the Sales Order Header into the CustomerId field. In this step, you are telling K2 that the customer selected from the drop-down list is the customer details you want to retrieve.
- Click the Output Mappings button. Drag the corresponding Return Properties into the Customer Details Controls fields. Click Finish and then OK to complete the Customer Details button rule.
- Run the Sales Orders Header view.
- First select a Region. Recall that the customer drop-down list is filtered according to the region selected, so you must select a region prior to selecting a customer. After you have selected a region, select a customer. Then click the Customer Details button.
- Confirm the customer you selected shows up as the pop-up title and the customer details are present.
- Click on the Sales Order Header view once again in the category browser to close the test view. Right-click and Check In the view.
Since this pop-up will be for information only, you don't want any of the controls to be active. You can disable them quickly at the same time you select them.
In the next step, you will change the Rating Data Label from a number value to a Rating control. You will then disable it so that the control continues to be Display Only like the other controls shown above.
Now that you have created the Customer Details view, you will make it accessible from your Sales Orders Header view. You will add a button control that when clicked, will call the Customer Details sub-view.
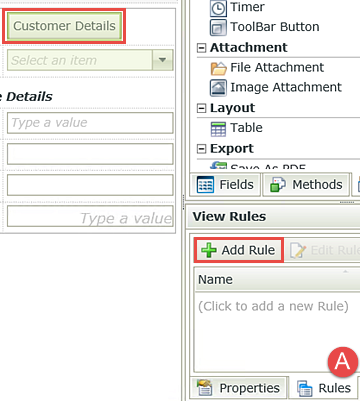
Because you had the Customer Details button highlighted, K2 knew which event to apply to the control and automatically created the ‘When the control is Clicked’ event in the rule definition pane.
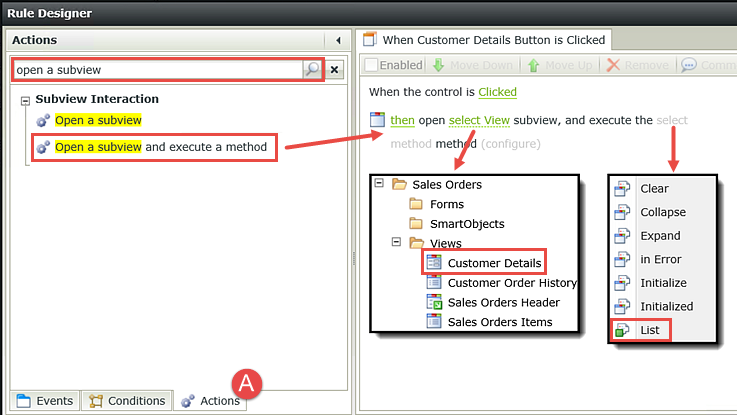
In this step, you are executing the list method, which behaves in the same manner as the get list method. It's retrieving the customer content from the Customers SmartObject to display in the Customer Details view.

For the Width enter
600px
and for the Height enter
300px
Here, you are formatting the size and the header for the sub-view pop-up the user will see. The header (in the image below, the header is the black bar that runs across the top of the image) will show the customer's name.


In this step, you are simply mapping the Customers SmartObject properties back to the Customer Details view fields. Output Mappings are what the user will see. In other words, when a customer is selected, K2 will fire off a rule that retrieves the selected customer's details and outputs them back to the Customer Details view.
When ready, click Finish to save and close the Sales Orders Header view.
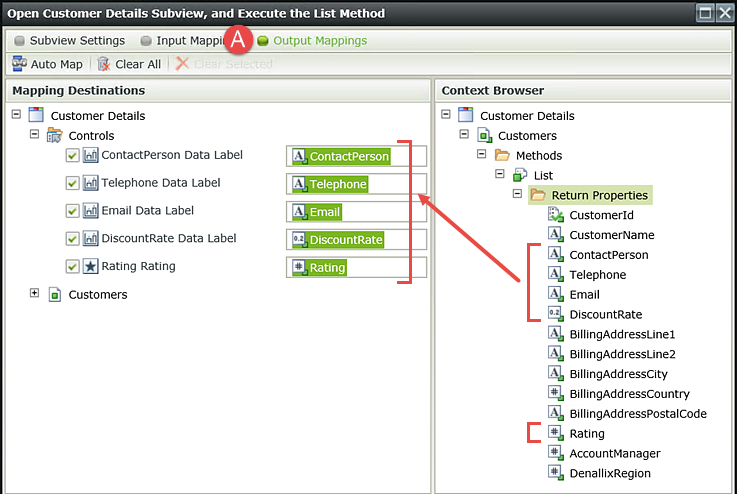
You have now completed the Customer Details view and configured a button control to call the view as a sub-view that is populated with content from the Customers SmartObject. In the next few steps, you’ll test the sub-view and confirm it is functioning as intended.
STEP 12 REVIEW
Presenting additional information as an option to the user enhances the overall experience. In this step, you learned about another tool for providing additional form content to the user by means of a sub-view. By adding a button control and applying a rule that leverages the Customers SmartObject, you are able to increase the form’s functionality and increase content available to your user.
This concludes the forms configuration for the Sales Orders application. In Part 4: Workflows, you will create a basic one-step approval workflow that will start only if a form rule determines the total due value requires approval.