Part 2: Views
In this section, you will build an item view based on the Sales Orders Header SmartObject and a list view based on the Sales Orders Items SmartObject. You will add expressions to several view controls that will provide automatic calculations for dates and sale item amounts. You will also add a filter to your customer control so that only customers associated with the region selected are exposed.
In this part, you will learn:
- How to build an item view, customize the formatting, then create a cascading drop-down list feature
- How to build a list view with expressions for field calculations, sorting functionality and field customization
If you have not completed Part 1: Data of this tutorial yet, please do so now since you will be using the SmartObjects created in Part 1 throughout this section.
You will begin your form and view construction by building the Sales Orders Header view. This view will contain the customer information along with the invoice information. This view's field entries will be ultimately saved to the Sales Orders Header SmartObject.
Step 7 Tasks
- Design a new Item View from the Sales Orders Header SmartObject and Name it
Sales Orders Header
then change the category to Views. - On the Create Labels and Controls screen, change the number of Columns to
4
and include the following fields: Region, Customer, Sales Person, Order Date, Ship Date, Purchase Order Number, 5% Tax, Sub Total, Total Due, Comments and Status.
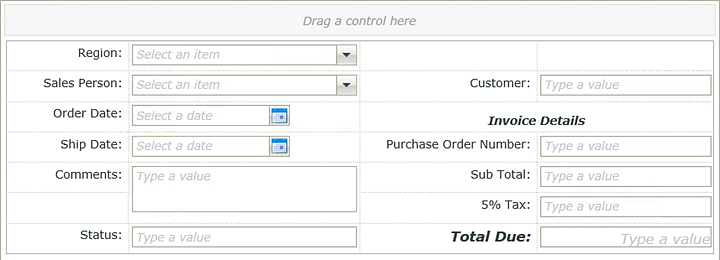
Change the Label position to left and include the Colon suffix. - Rearrange the fields into a more logical flow. The image below is an example of how you might format your view.
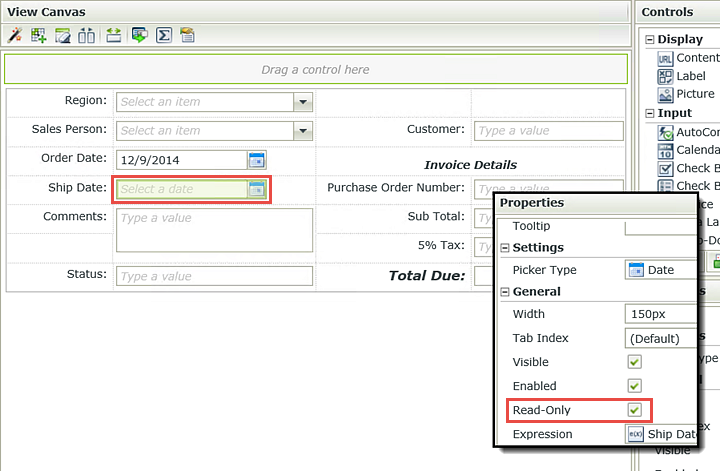
- Set the default value for the Order Date to Today (current date) and add an expression to the Ship Date so that it is seven days from the order date. Make the ship date read-only.
- Add an expression to the 5% Tax text box so that it equals 5% of the Sub Total text box. Change the format to currency and the style to right-aligned. Make the 5% text box read-only.
- Add an expression to the Total Due text box so that it equals the sum of the Sub Total text box plus the 5% Tax text box. Make the total due text box read-only. Change the format of the total due text box to currency. Style the total due label and text box to bold italic, 10pt font, right-aligned.
- Set the Sub Total text box to read-only and change the format to currency and the style to right-aligned.
- Make the status field read-only.
- In K2 Designer, expand the Sales Orders SmartObjects category. Right-click the Sales Orders Header SmartObject and select Design View. Click Next on the view home screen.
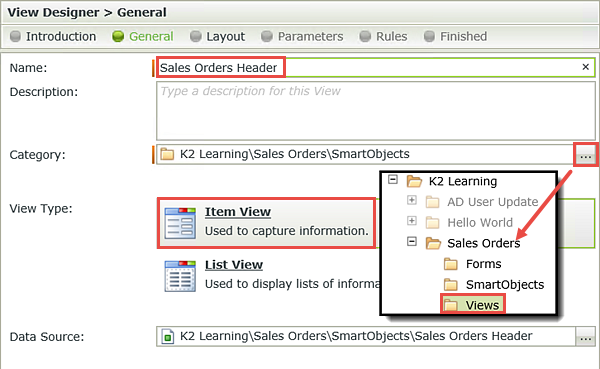
- Name the view
Sales Orders Header
and confirm the Item View option is selected.
Click the ellipses to the right of the Category field and change the category to Views. The data source setting is fine as it is, so click Next. - On the view canvas, click the Create Labels and Controls option.
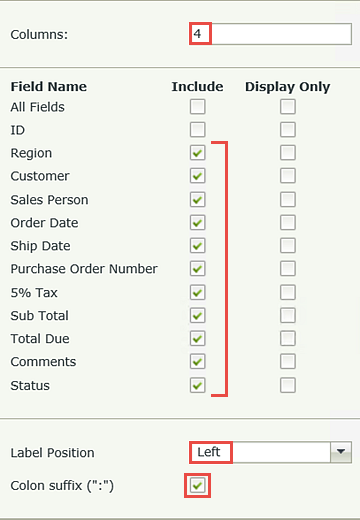
- On the Create Labels and Controls screen, change the number of Columns to
4
and include the following fields: Region, Customer, Sales Person, Order Date, Ship Date, Purchase Order Number, 5% Tax, Sub Total, Total Due, Comments and Status.
Change the Label Position to left and CHECK the box to include the Colon suffix. Click OK to continue. - Rearrange the form fields into a more logical flow. The image below is an example of how you might format your view. (A list of changes we’ve made can be found below the image.)
- Add a row beneath the Region row by clicking first in the Region Label cell, then click the Insert Row Below icon from the view canvas menu.
- Move labels and fields as shown in the sample image above.
- Adjust the width of the first column.
- Merge the Comments Memo cell with the cell below it.
- Right-align all of the label cells.
- Merge the third and fourth cells of the third row. Add a label control and change the Text (in the Properties pane) to
Invoice Details
then make it bold italic and center-align the cell (in the Properties pane, Style option). - Change the Order Date Text Box and Ship Date Text Box widths (Width) to
150px - Format the Total Due Label style so that it is bold italic and 10pt
- Save your work.
- Click the Order Date calendar box to highlight it. In the Properties pane, select Today (Current Date) as the default value.
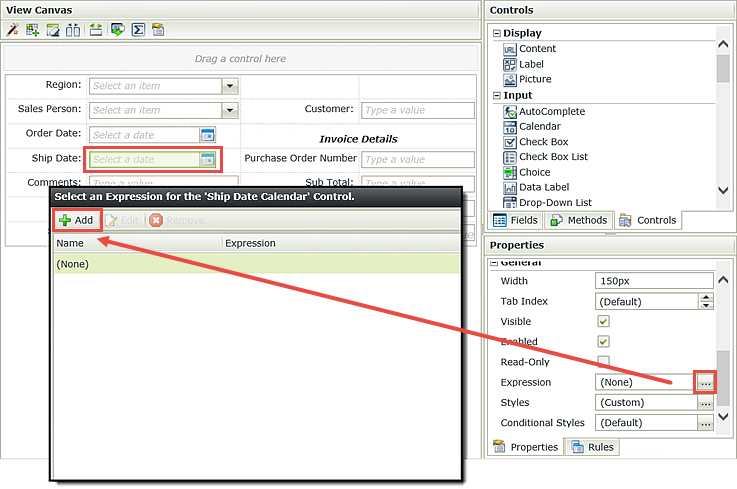
- Click the Ship Date calendar box to highlight it. In the Properties pane, open the Expression builder. Click Add.
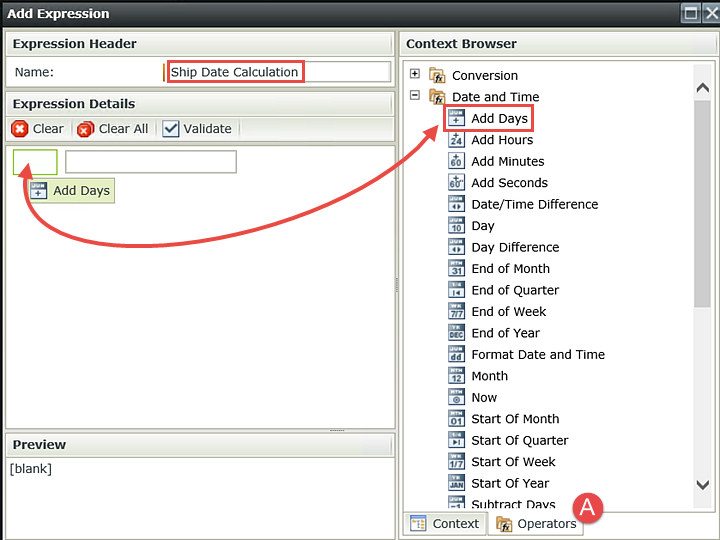
- Name the Expression
Ship Date Calculation
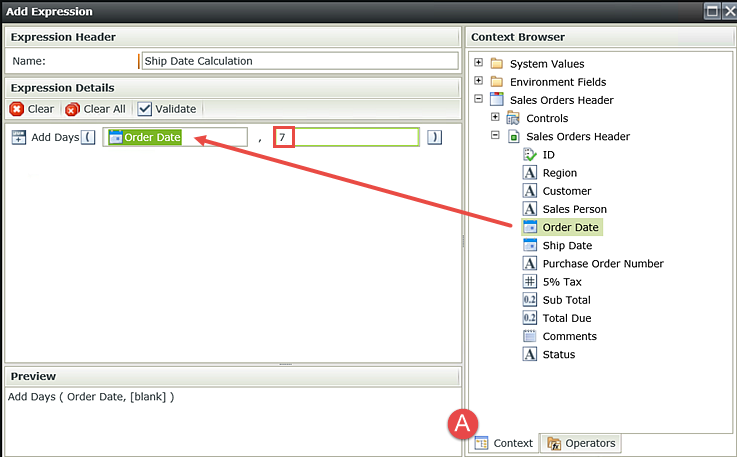
then click the Operators tab and expand the Date and Time node. Drag the Add Days operator onto the canvas to the left of the blank placeholder. A new placeholder will appear as you drag the operator into its place. - Click the Context tab and expand the Sales Orders Header > Sales Orders Header SmartObject node. Drag the Order Date property into the first expression placeholder. Type
7
into the second placeholder and click OK, then OK again to close the expression builder. - With the Ship Date still highlighted, CHECK the box in the Properties pane to make the field read-only.
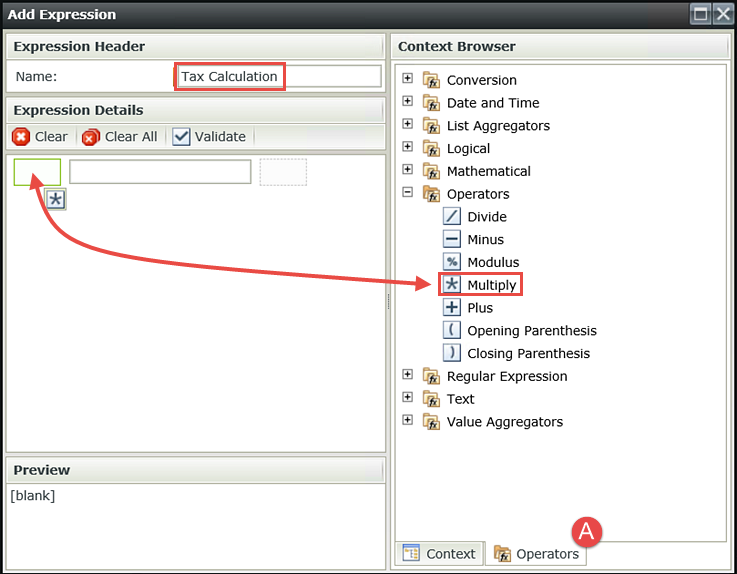
- Click the 5% Tax text box to highlight it. In the Properties pane, open the Expression builder, then click Add. Name the expression
Tax Calculation
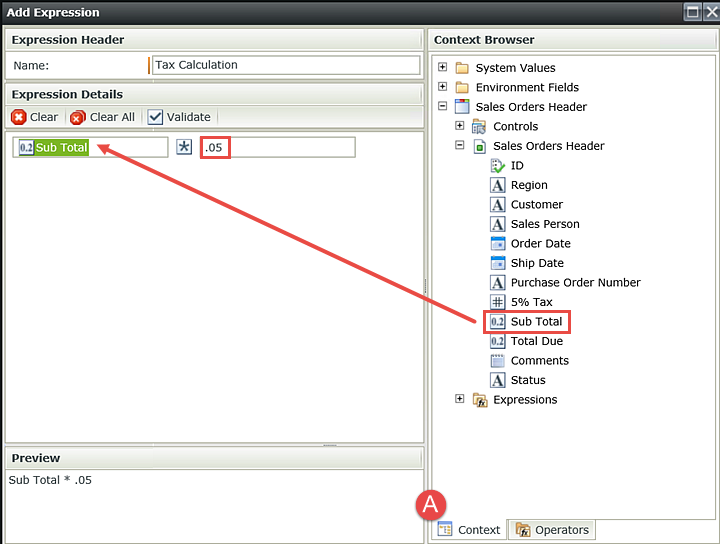
then click the Operators tab. - Click the Context tab and expand the Sales Orders Header > Sales Orders Header SmartObject node. Drag the Sub Total property into the first expression placeholder. Type
.05
into the second placeholder and click OK, then OK again to close the expression builder. - In the Properties pane, make the 5% Tax text box read-only. Open the Styles editor and change the format to currency. Change the font style to right-aligned. Click OK to complete the 5% Tax text box formatting and expressions.
- Highlight the Sub Total text box and then open the Styles editor. Change the format to currency, then change the font style to right-aligned. Click OK, then make the control read-only.
- Highlight the Total Due text box. Add an Expression and name it
Total Due Calculation
then click the Operators tab. Drag a Plus operator onto the expression canvas. - With the Total Due text box still highlighted, open the Styles editor and change the font style to bold italic, 10pt and right-aligned. Change the format to currency. Click OK to close the styles editor. In the Properties pane, make the Total Due text box read-only.
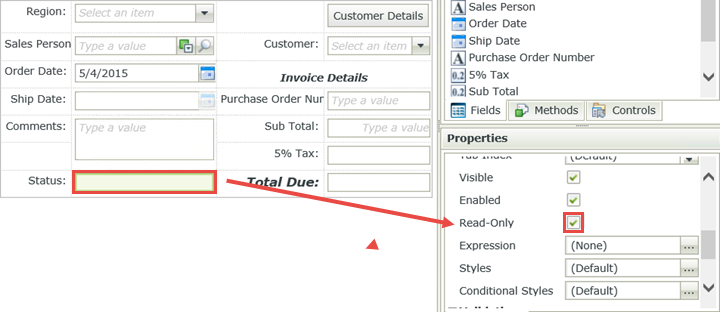
- Highlight the Status field and select read-only from the Properties pane.
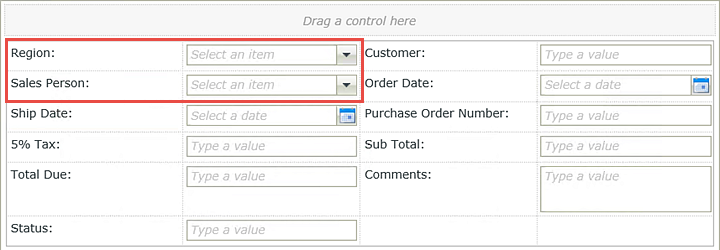
Notice the Region and Sales Person fields are drop-down lists. When you associated the Regions and AD Sales People SmartObjects with the Sales Orders Header SmartObject, K2 automatically generated the code to populate the controls as drop-down lists. In a later step, you will change the Sales Person drop-down to a picker control which will allow you to search for the sales person's name instead of selecting it from a long drop-down list.
Designing a form’s layout is 99% preference. As you build more applications, you will gain insight as to what works in your business environment.

Table format changes

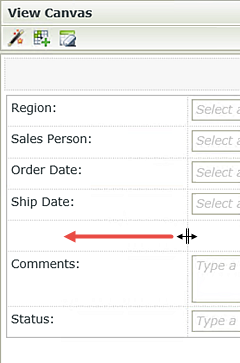

Now that you have applied basic formatting to your view, you will begin adding rules and expressions to several controls. You will assign a default value (today) to the Order Date, then add an expression that will automatically make the Ship Date seven days from the Order Date. You will then add expressions that will calculate the values of the 5% Tax, Sub Total and Total Due fields.
You will first set the default value for the Order Date so that it’s the current date.
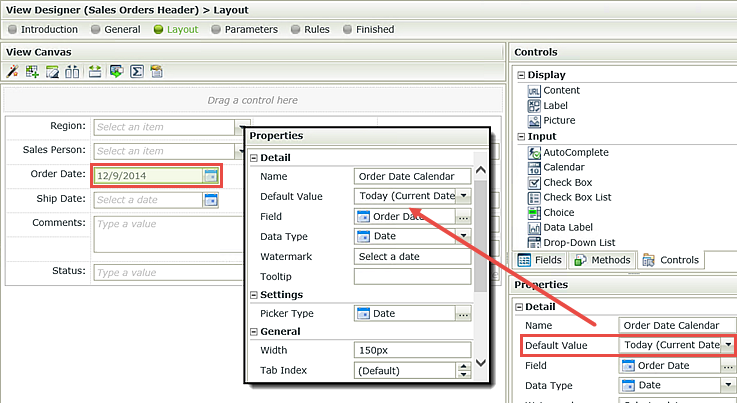
Now, you’ll configure an expression so that the ship date is automatically set to seven days after the order date. Expressions are basically calculations that K2 will perform behind-the-scenes. For the ship date, you are going to take the order date (today) and then add seven days. This will be the calculated value of the ship date.
The next expression you will configure will automatically calculate the 5% tax. You want to calculate a tax based on the sub total value. In a later step, you will configure the total due to be the sub total value plus the 5% tax value.
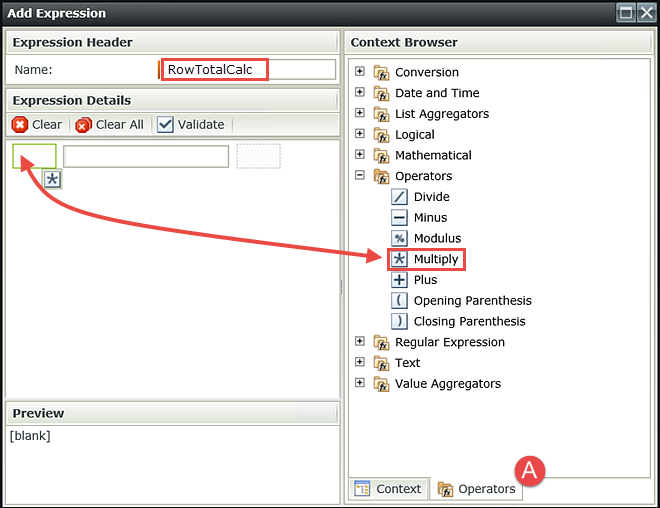
Expand the Operators node and drag the Multiply operator onto the expression canvas. A new placeholder will appear for the multiply operator.
The last expression you need to create is for the Total Due text box. This field value should equal the sum of the Sub Total and 5% Tax fields. You will apply some styling to the Total Due text box and label to complete your view formatting.
Click the Context tab and expand the Sales Orders Header > Sales Orders Header SmartObject node. Drag the Sub Total property into the first placeholder. Drag the 5% Tax property into the second placeholder. Click OK, then OK once again.
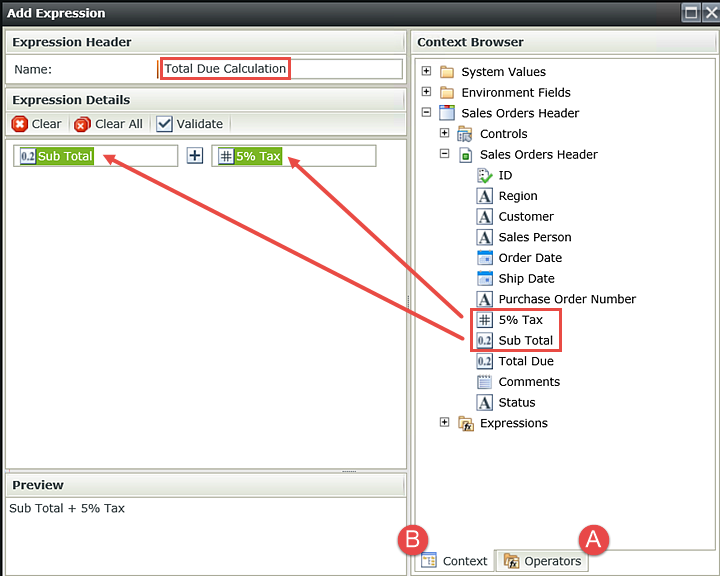
You have one last step and that is to make the Status field read-only. Since this value will be updated by a workflow system task, the user should not enter anything.
Save your work.
STEP 7 REVIEW
In this step you created the first of two views, an item view containing the customer and invoice information. Using the options found in the view canvas menu, you rearranged the labels and fields for a more user-friendly flow. With the expression builder, you added dynamic functionality to several controls by configuring custom calculations. Using the styles editor, you customized the font and number formatting for controls and labels as well.
The last few configurations provide dynamic interactively for your user. First, you will create a cascading drop-down list effect that filters the customers drop-down list based on the region that is selected. The second configuration changes the Sales Person drop-down to a picker control that allows the user to search for a person, rather than scroll through a potentially large list.
Step 8 Tasks
- Change the Customer text box to a Drop-Down list, then add the Customers SmartObject as the control’s data source.
- Change the Value to be the CustomerId and the Display to be the CustomerName.
- Add the Filter the data according to another control’s value option and configure the Parent Control to be the Region drop-down list. Configure the Child Join Property to be DenallixRegion.
- Change the Sales Person drop-down list to a Picker control. Disallow Allow Multiple (selections).
- To complete the data source configurations for the Sales Person control, select only the DisplayName for the filter properties and change the Display value to be the DisplayName. Be sure the Cache data option is selected.
- Test the cascading drop-down list configuration for the Region and Customer controls, then test the Sales Person picker control. (Run the view)
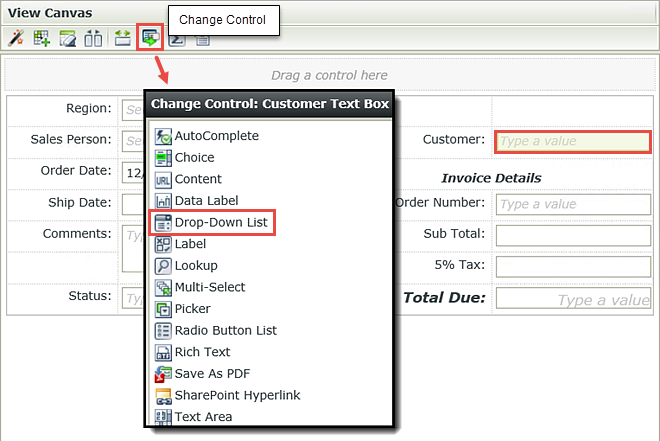
- Click the Customer text box to highlight it. Click the Change Control icon in the view canvas menu and select Drop-Down List from the change control options. Click OK to close the change control pop-up.
- With the Customer drop-down list highlighted, open the Data Source Configuration editor in the Properties pane and select the Customers SmartObject as the data source for this control. Click OK.
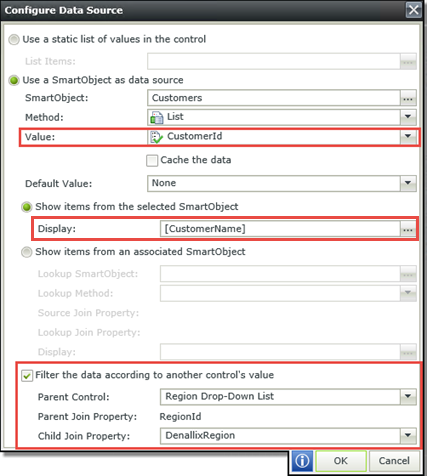
- On the Configure Data Source screen, change the Value to be the CustomerId (if it is not by default) and the Display to be the CustomerName (if it is not by default).
- Still on the Configure Data Source screen, CHECK the box to Filter the data according to another control’s value. For the Parent Control, select Region Drop-Down List. For the Child Join Property, select DenallixRegion. Click OK to continue.
- Click the Sales Person drop-down list to highlight it. Click the Change Control icon in the view canvas menu. Change the control to a Picker control. Click OK to continue.
- In the Properties pane, UNCHECK the option to Allow Multiple (selections) found under the Settings heading. This will ensure only one sales person per sales order is selected.
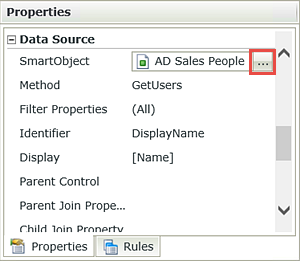
- In the Properties pane, open the SmartObject builder to expose the configurations for the AD Sales People SmartObject.
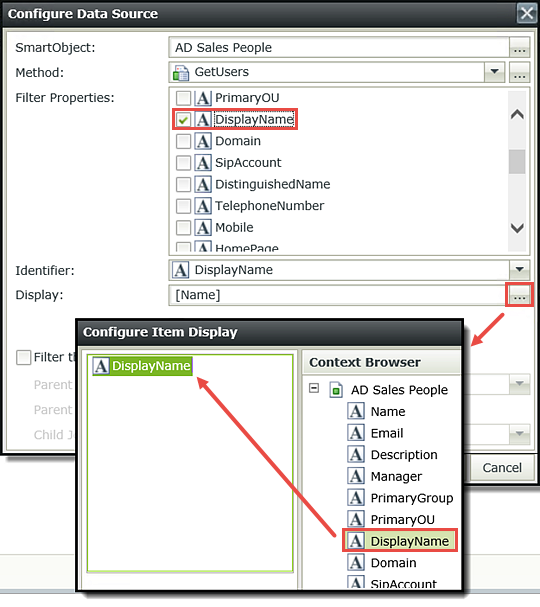
- Notice the Filter Properties. UNCHECK ALL of the boxes except the DisplayName box. The filters property is the property or properties that are searched when something is typed into the Sales Person field. Keeping in mind server performance, you only want to search relevant properties. Open the Display properties. Delete the Name value and drag the DisplayName property into its place. (To delete a value, click to the right of it and tap your backspace key.) In Active Directory, the DisplayName value consists of the account [First Name Last Name]. Click OK.
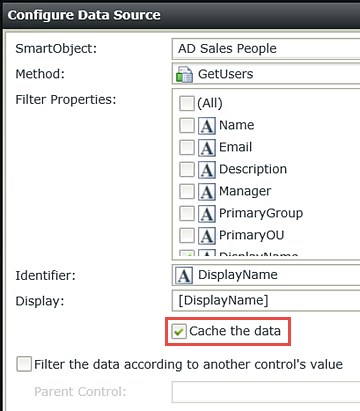
- Confirm the Cache the data box is CHECKED. Once the AD Sales People SmartObject loads (when the view is opened), K2 caches that data in a table to optimize calls to that data. Instead of repeatedly calling Active Directory, K2 searches the cached data, making the search quicker with minimal impact on resources. Click OK.
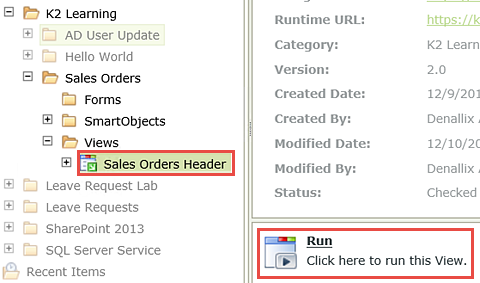
- Highlight the Sales Orders Header view if it is not already, then click Run found in the Properties pane.
- Confirm the following configurations:
- Select a Region, then observe the Customers returned. Select another region and confirm the customers changed accordingly.
- Confirm the Ship Date is seven days after the Order Date. Change the order date and confirm the ship date changes.
- Type
Bran
into the Sales Person field and click ENTER. Confirm Brandon Brown is reflected in the Sales Person picker. You only need to type a few characters as K2 is searching the cached data.
The first step is to configure the Customer text box as a cascading drop-down list. You only want to see the customers that are associated with the region selected. You’ll change the Customer control from a text box to a drop-down list, then add the Customers SmartObject as the data source for the control. Recall in Part 1, you associated the Regions SmartObject with the Sales Orders Header SmartObject which then automatically populates the Regions drop-down list with the values found in the Regions SmartObject. You could have associated the Customer SmartObject as well, however, the intent of this step is to demonstrate how to change a control from one type to another, and how to add a data source directly on a control, then configure it to filter its values based on another control. Again, this is often referred to as a cascading drop-down list.

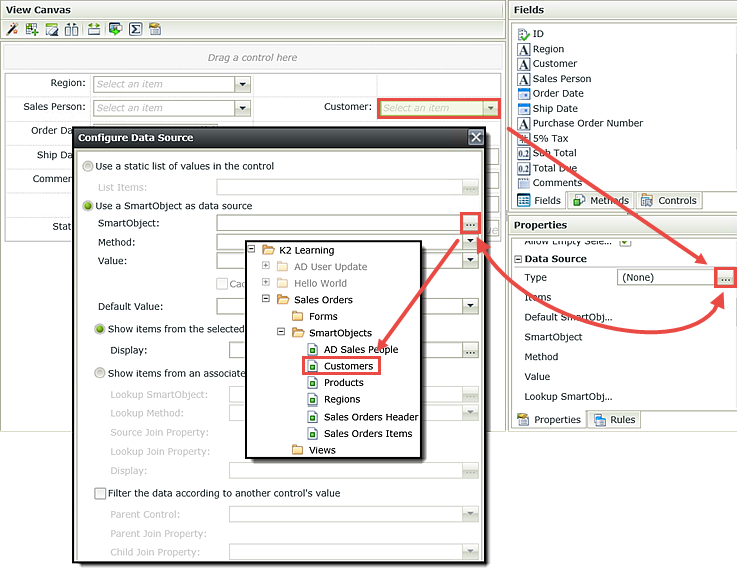
Let's break this down a little bit further. First, you are using your Customers SmartObject as the data source for the Customer drop-down list. The Customers SmartObject has a property called DenallixRegion (a number). Then you added a filter based on the Regions drop-down list value (RegionID, also a number). You want to compare the RegionID value with the DenallixRegion value, then populate the Customer drop-down list only with records that have matching RegionID/DenallixRegion values. In other words, when the selected region changes, show customers for the active region, based on the RegionId property.

Now you will configure the Sales Person control. You will change the control from a drop-down list to a picker control and change the display to [First Name Last Name]. A picker control will allow you to search for people instead of scrolling through a potentially long drop-down list.
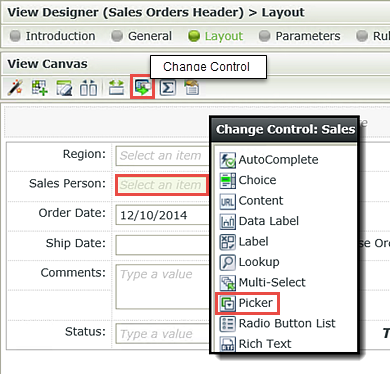
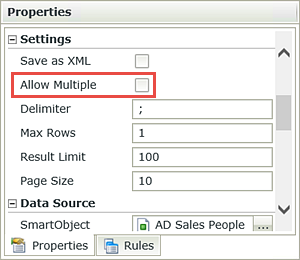
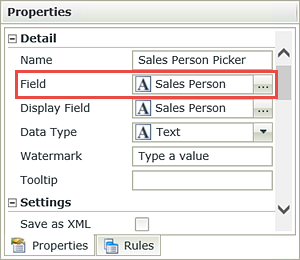
Still in the Properties pane, under the Detail heading, notice the Field property. This is the property from the Sales Orders Header SmartObject that will contain the picker value when the form is saved. Since you initially designed this view based off of the Sales Orders Header SmartObject, K2 automatically created the Sales Person control on the view and bound it to the SmartObject property.
Click Finish to complete the Sales Orders Header configurations. Check In the Sales Orders Header view. (Right-click the view and select Check In.)
The last step before you move on to building the Sales Orders Items view, is to test the Header view and confirm your configurations are correct.
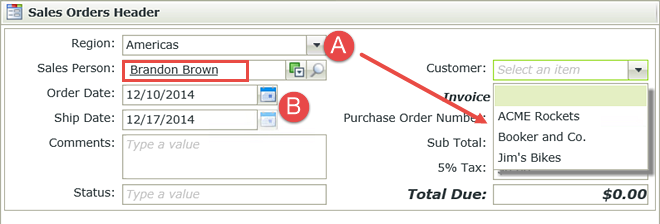
You will test the Sub Total, 5% Tax and Total Due calculations after you complete the Sales Orders Items view. These fields are dependent on the values entered in the items view, so you cannot test them until the items view has been created and configured.
Click the Sales Orders Header title once again to close the test view.
STEP 8 REVIEW
Associating one SmartObject with another is not a requirement, however it can make building your application easier in the long run. As you observed in Part 1, associating SmartObjects during the creation of SmartObjects is simply a matter of assigning one SmartObject property to another. The same concept can be quickly accomplished at the view-design stage as well as you learned in this step. You can change the control type by using the options found in the view design menu. Then, you can associate a SmartObject property with that control and even filter the results based on another control's values. Finally, using the picker control for people searches can eliminate the need to scroll through long drop-down lists, as well as enhance system performance by caching data upon the view load.
In the following step, you will create the list view for adding items to your sales order. You will leverage the Products SmartObject for populating the products drop-down list. The Products SmartObject will also come into play for automatically populating the unit price after a product is selected.
Step 9 Tasks
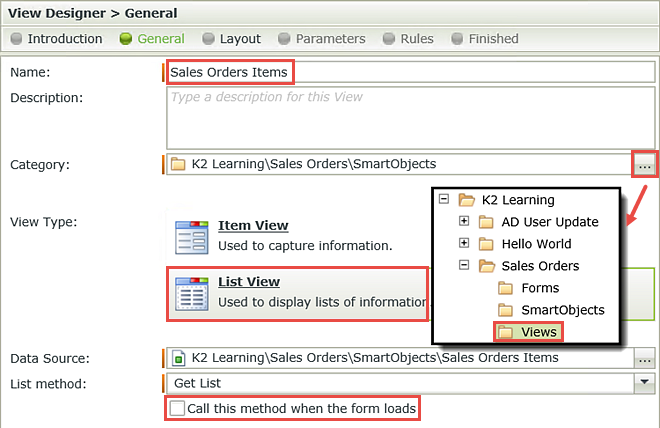
- Create a List View from the Sales Orders Items SmartObject and name it
Sales Orders Items
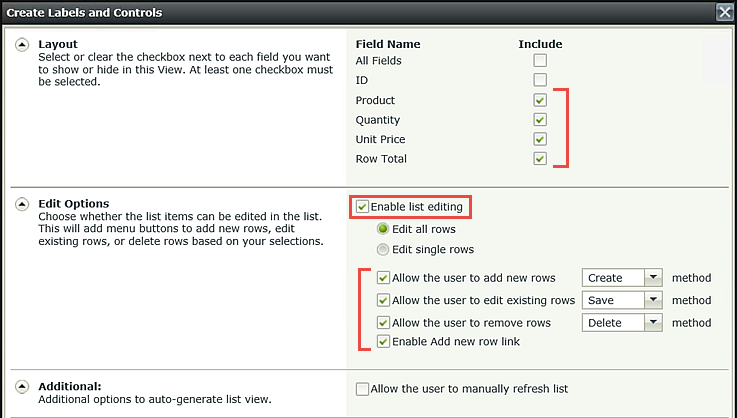
making sure the Call this method when the form loads option is UNCHECKED. - Create Labels and Controls for the following fields: Product, Quantity, Unit Price and Row Total. Enable list editing and allow users to Add, Edit and Remove rows. Enable the Add new row link.
- Add a Sum option to the Row Total column and move the Sum Label to the cell just left of the Sum Data Label cell. Rename the Sum Label Text
Items Total
Change the Sum Data Label > style format to currency. - Configure the populate drop-down list action on the View Initialize Rule so that discontinued items are not shown.
- Sort the drop-down list by the ProductName, ascending order.
- Add a rule to the Product drop-down list that populates the Unit Price with the ListPrice value from the Products SmartObject when a product is selected. (See the images in Walkthrough (k-o) for reference if needed.)
- Add an expression to the Row Total field so that its value is the quantity multiplied by the unit price. Name the expression
RowTotalCalc - Make the Save toolbar button not visible. This control needs to be hidden for this application.
- Run the view and confirm the unit price is being added and the items total value is being updated.
- Right-click the Sales Orders Items SmartObject and select Design View. Click Next on the view home screen (if necessary).
- Name the view
Sales Orders Items
and change the category from SmartObjects to Views. Select the List View option. UNCHECK the box to Call this method when the form loads. Click Next. - Click Create Labels and Controls.
- Select the following fields for the layout: Product, Quantity, Unit Price and Row Total. Enable list editing and CHECK the boxes to add, edit and remove rows and Enable Add new row link for the edit options.
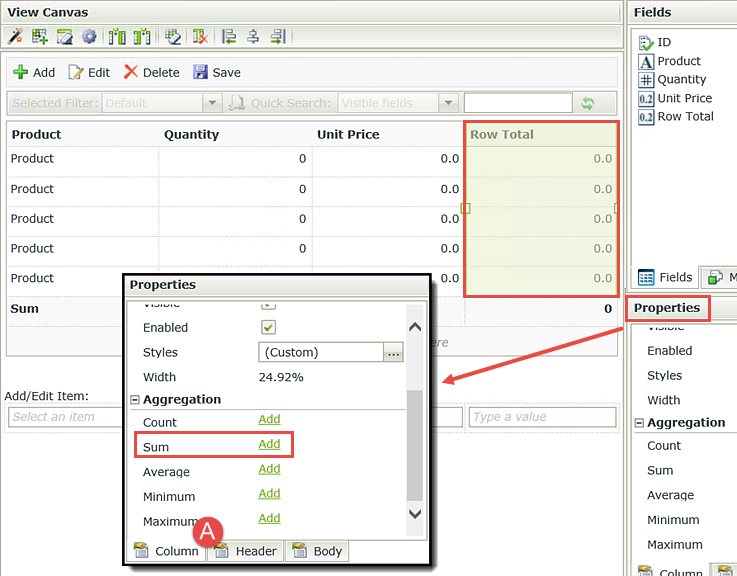
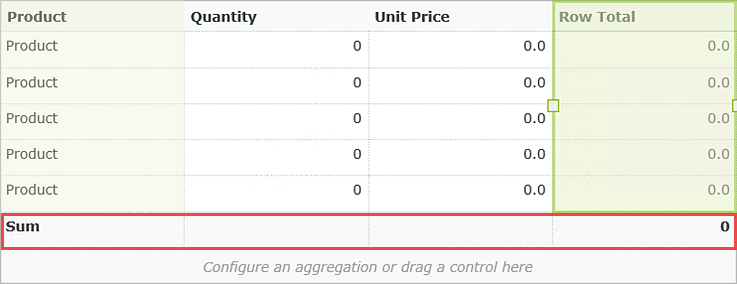
- Click the Row Total column label (at the top of that column) to highlight the column. Click the Column tab in the Properties pane. Locate the Aggregation heading, then Sum, then click Add.
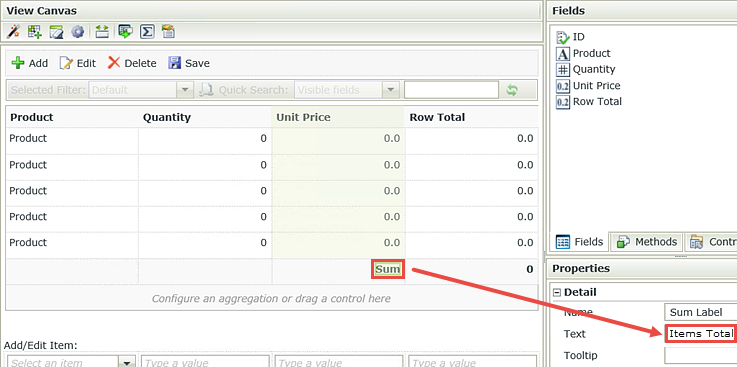
- To tidy things up a bit, click the Sum Label and drag it to the column just left of the Sum Data Label. (The Sum Data Label is shown as the "0" above.) In the Sum Label Properties, change the Text to
Items Total
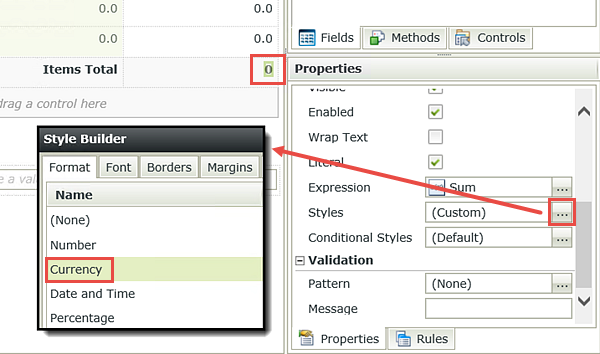
(You may have to click to highlight the Sum Label to see its properties.) - Now you are going to format the Sum Data Label as currency. Click the Sum Data Label to highlight it. Open the styles editor in the Properties pane. Change the format to currency.
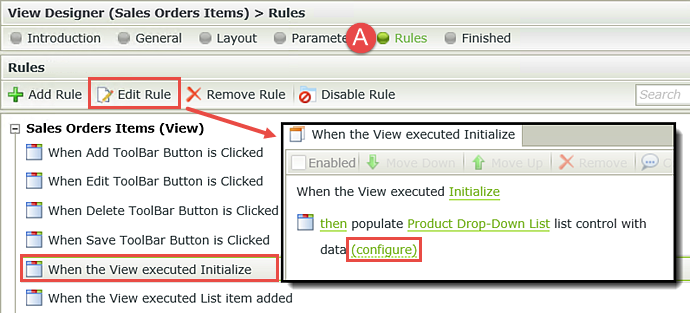
- Click the Rules button in the breadcrumb bar. Click the rule View executed Initialize, then click Edit Rule. Notice in the rule definition pane, there is already an action that populates the product drop-down list. K2 added this action when you associated the Products and Sales Orders Items SmartObjects in Part 1. You want to edit this action to ignore discontinued items, so click (configure).
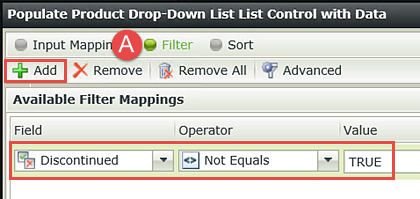
- Click the Filter button at the top of the screen then click Add. Select the Discontinued field. Select Not Equals for the operator and for the Value enter
TRUE
(You are saying if the discontinued value is 'yes or true', don't show this item.) - Now click the Sort button at the top of the screen then click Add. Sort the list by the ProductName, Ascending order.
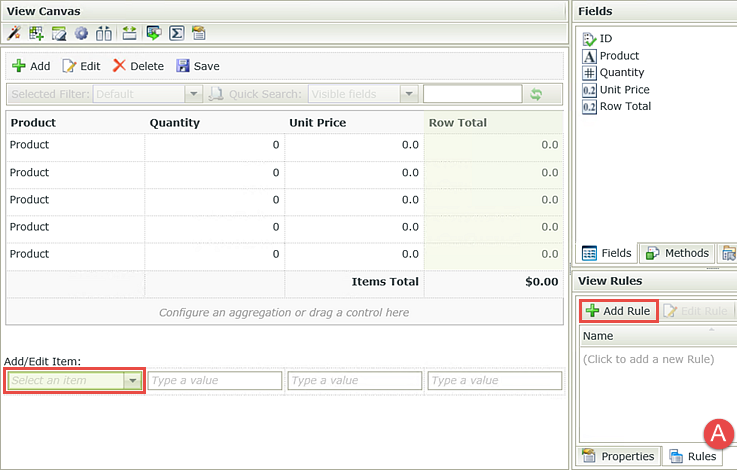
- In the Add/Edit Item table, click the Product field to highlight it. Click the product control’s Rules tab found in the lower right corner of the screen (just below the Properties pane). Click Add Rule.
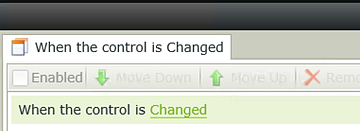
- Notice that K2 has started the rule by adding a control event, When the control is (select event). Click the select event link and select Changed.
- Click the Actions tab. Add the Execute a SmartObject method action found under the SmartObject Interaction heading. Click the select SmartObject link and select the Products SmartObject.
- Click the (configure) link.
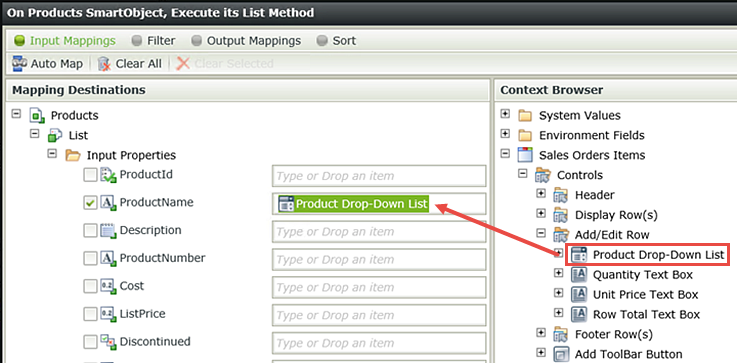
- On the Input Mappings screen, expand the Sales Order Items view > Controls node (in the context browser). Expand the Add/Edit Row node and drag the Product Drop-Down List control into the ProductName input property.
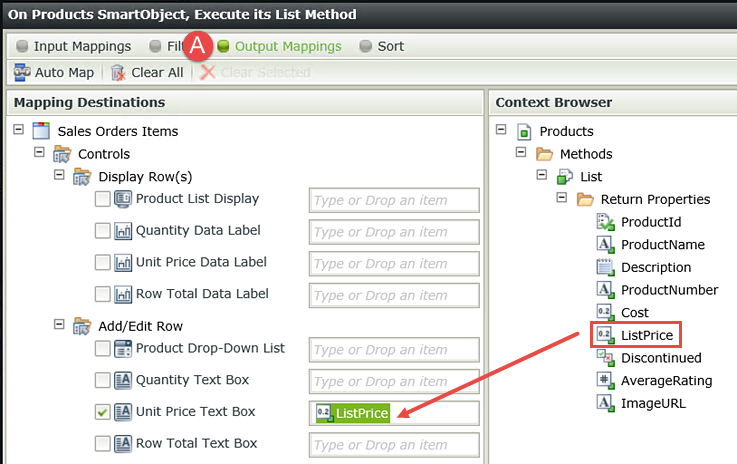
- Click the Output Mappings button at the top of the screen. Drag the ListPrice return property into the Add/Edit Row > Unit Price text box. Click Finish, then OK to save this rule.
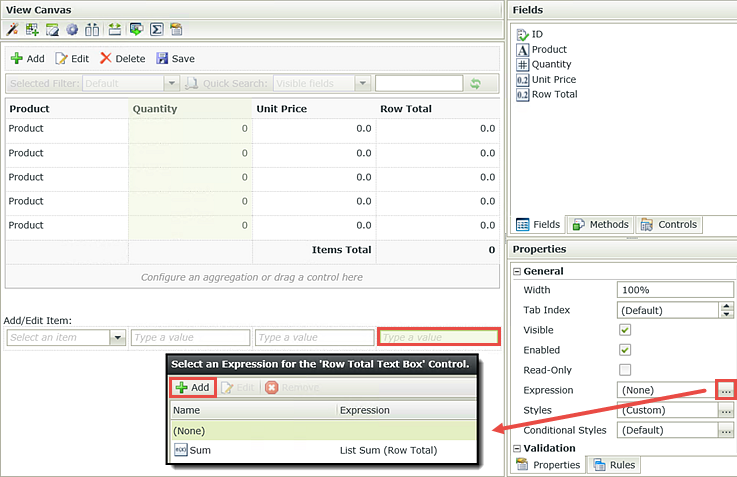
- In the Add/Edit Item table, click the Row Total field to highlight it. In the Properties pane, open the Expression builder, then click Add.
- Name the expression
RowTotalCalc
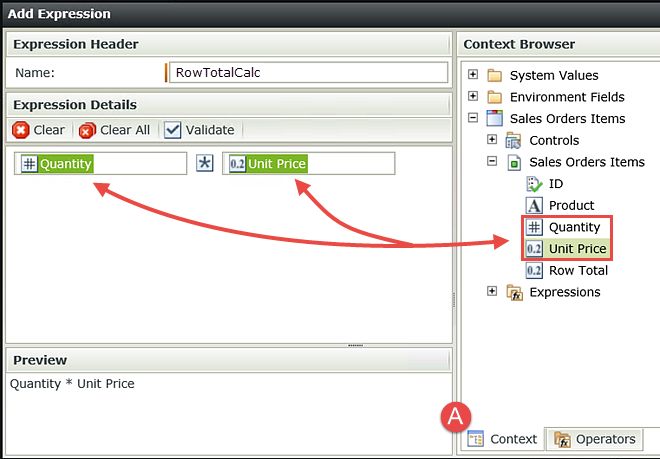
then click the Operators tab in the lower right corner of the screen. Expand the Operators node and drag the Multiply operator to the left of the blank placeholder on the canvas. A new placeholder will appear. Drop the multiply operator into the new placeholder. - Click the Context tab and expand the Sales Orders Items > Sales Orders Items SmartObject nodes. Drag the Quantity property into the first placeholder on the canvas and then drag the Unit Price property into the second placeholder. Click OK twice to close out of the expression builder screens.
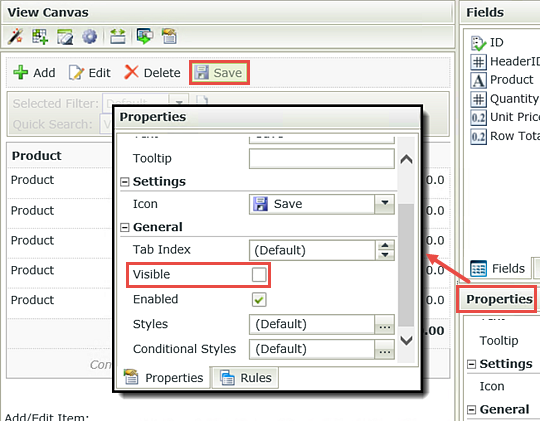
- The last configuration is to hide the Save toolbar button as it is not needed for your application. Highlight the Save toolbar button, then UNCHECK the Visible option in the Properties pane. Click Finish to complete the Sales Orders Items view configurations.
- In the category browser, highlight the Sales Orders Items view, then click Run (in the Properties pane).
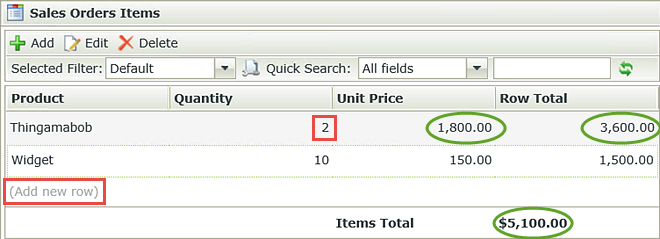
- Click the (Add new row) link. Select an item from the Product drop-down list. Confirm that the Unit Price is populated with a value. Enter a Quantity and click (Add new row). Confirm the Row Total field and the Items Total data label are updated with the correct value. Add a second item and confirm the Items Total data label added in the new amount. (You will need to click the (Add new row link) or click in an existing row to force the Items Total field to update.)
- Click the Sales Orders Items title in the category browser to close the view. Right-click and Check In the Sales Orders Items view.
Here, you are simply making your list editable and selecting how the user can edit it. Depending on your application needs, you can disable list editing, or just enable one or two options. When you enable list editing, K2 will add a button toolbar at the top of the list with controls that match the edit options you have selected. The add new row link adds convenience by putting a new row control at the bottom of the list.
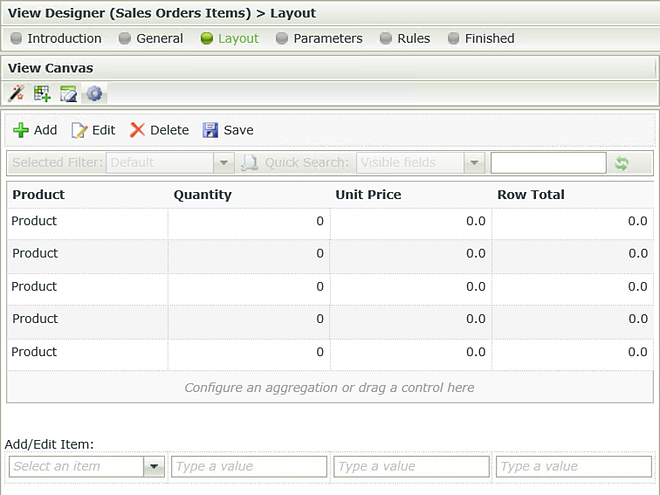
Your screen should now look like the image below. If you are new to K2 Designer, your screen layout may be somewhat confusing. The Add, Edit, Delete and Save button toolbar is shown just below the view canvas menu. Below that is a spreadsheet of sorts. In reality, this is just a placeholder for the list view. When the view is loaded, this section will not actually be visible. Below the spreadsheet are the new row controls that you selected to include in your list.
There are a few configurations you need to apply to the Sales Orders Items view for it to communicate with the Sales Orders Header view. First, you will add a column total to the Row Total column. Next, you will add a rule to the product field that will retrieve the item price (from the Products SmartObject) and send it to the unit price field when a product is selected. Last, you will hide the Save button as it is not required. For this application, you will add a rule that executes the SmartObject create method. This action creates the new records in the two SmartBox SmartObjects (the header content and the items ordered content). The Save button would simply save the items ordered content only. On the other hand, the create rule that fires will create both the header record and the items ordered records at the same time in the two SmartObjects (binding the header and items ordered content via the ID and HeaderID).
The first step will be to add a column total data label to the Row Total column. You will add a rule so that this column total will update whenever the list changes. You will transfer this column total value in later steps to the Sub Total field in the Header view. This in turn, will drive the 5% Tax and Total Due values in the Header view.
In the next few steps, you will edit a rule so that discontinued items do not show up in the product drop-down list. Then, you will sort the product drop-list by product name. These steps are intended to give you an example of filtering and sorting drop-down lists that are based off of SmartObjects.

Click Finish, then OK. Click the Layout button in the breadcrumb bar to return to the design canvas.

In the next few steps, you will add a rule to populate the unit price when a product is selected. Then you will add an expression to the Row Total text box so that it equals the quantity multiplied by the unit price.
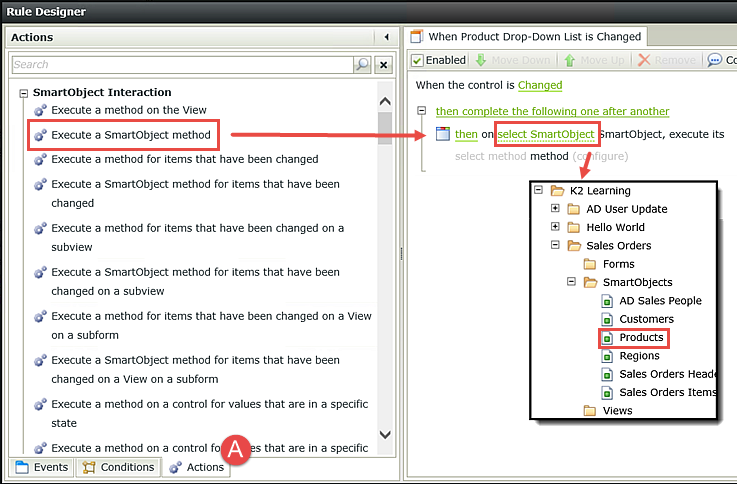
K2 automatically configures the method as list. This is because when you were creating the Products SmartObject, you only mapped the list method. Had you mapped additional methods (create, etc.), you would see a drop-down list of methods to choose from. Because there is only one method, K2 knows which to specify.
Notice the Input Properties. These are the properties that were returned in the Products SmartObject. In this step, you will map the Product drop-down control with the ProductName (SmartObject) property. This will tell K2 to search the Products SmartObject for the product selected, then return the unit price associated with that record.
Here, you are reversing the process and telling K2 to output the list price (from the Products SmartObject record) back to the Unit Price field on the view.
Now that you have the unit price configured, you can set the last expression which will populate the Row Total field with the unit price multiplied by the quantity (the quantity is manually entered by the user).
As a reminder, in a later step, you will configure a rule that will save the Header view content to one SmartBox SmartObject and the Items view content to another SmartBox SmartObject. Since the Save button in the toolbar might be confusing (and you don't need it) you simply hide it.
Before you start building your form, test the Sales Orders Items view and confirm the configurations you just made are working properly.
STEP 9 REVIEW
In this step, you created the list view that will serve as your user interface for items ordered. You based your list view off of the Sales Orders Items SmartObject and enabled row editing. This allows your users to add, edit and remove items as they need to. You customized your Product drop-down list by setting a filter to remove discontinued items as well as sort the items. By adding a SmartObject method action to the view initialize rule, the unit price field is now automatically updated when a product is selected. Finally, you added an expression to the Row Total field that will calculate that value based on the quantity multiplied by the unit price.
This concludes Part 2: Views. In Part 3: Forms, you will build the main form for your Sales Orders application. You will add the two views created in this part, then expand on the form construction by adding a sub-view, tabbed view and additional controls.