Part 1: Data
In this section, you will explore K2 SmartObjects and how you can define SmartObjects that interact with other systems or that store data internally in K2. Remember that SmartObjects are essentially a "middle layer" that allows consumers of data (such as forms and workflows) to interact with providers of data (such as SQL databases, Active Directory or SharePoint lists, among others).
You will begin by registering a new service instance in the K2 Management site. This service instance will provide the connection string to a SQL Server database. You will then create three SmartObjects from that service instance, which will become the form field values for the regions, customers and products drop-down lists. The next SmartObject will provide connection to Active Directory, which you will use to search for your sales person value. The final two SmartObjects will be SmartBox-based that will house the submitted form content for the customer/invoice details and the items ordered.
The first step in your application is to create the categories that will house your form, views and SmartObjects. You can think of categories as “folders”. While it is not necessary to group elements into categories like you will here, it does help to keep the similar elements together, especially for larger applications that may contain several SmartObjects, views, forms and workflows.
Step 1 Tasks
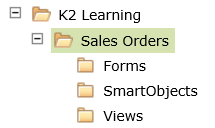
- Launch K2 Designer and create a new category under All Items. Name it
K2 Learning
(If you have worked through previous tutorials, this category may already exist.) - Create a new category under K2 Learning and name it
Sales Orders - Create three new categories under Sales Orders and name them
Forms
SmartObjects
Views
- Launch K2 Designer (Start > All Programs > K2 blackpearl > K2 Designer)
(If you do not have the K2 Designer link in your start menu, check with your K2 administrator to determine what the URL is for your K2 Designer environment.) - Right-click All Items and select New Category. Name the new category
K2 Learning
(If you have worked through previous tutorials, this category may already exist. If so, skip to the next step.) - Right-click K2 Learning and create a new category. Name it
Sales Orders - Create three new categories under Sales Orders. Name them
Forms
SmartObjects
Views
Your categories should look like the image below:
In Step 2 you will create a service instance of the SQL Server Service from the K2 Management site. The Azure SQL database you will use is an external data source that contains three tables from which you will create SmartObjects to be implemented as data sources in your Sales Orders form. You will create the actual SmartObjects (Regions, Customers and Products) using K2 Designer in the next step.
Step 2 Tasks
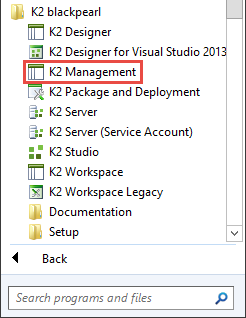
- Launch the K2 Management site. (Start > All Programs > K2 blackpearl > K2 Management)
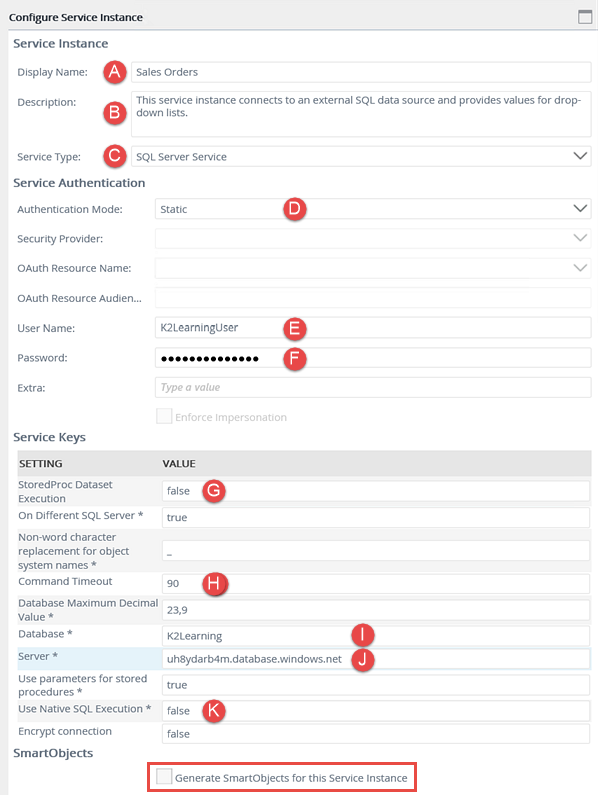
- Add a new service instance of the SQL Server Service type using the table below as a guide for the necessary properties. If a property is not shown in the table below, then assume the default value.
- Confirm the new Sales Orders service instance is displayed in the Service Instances pane.
| Field Name | Setting | |
|---|---|---|
| A | Display Name | Sales Orders |
| B | Description | This service instance connects to an external SQL data source and provides values for drop-down lists. |
| C | Service Type | SQL Server Service (default) |
| D | Authentication Mode | Static |
| E | User Name |
K2LearningUser
|
| F | Password | K2LearningPass |
| G | On Different SQL Server | true |
| H | Command Timeout | 90 |
| I | Database | K2Learning
|
| J | Server | uh8ydarb4m.database.windows.net |
| K | Use Native SQL Execution | false |
| Generate SmartObjects for this Service Instance | NOT CHECKED (You will manually created the SmartObjects in the next step.) |
- Launch the K2 Management site. (Start > All Programs > K2 blackpearl > K2 Management)
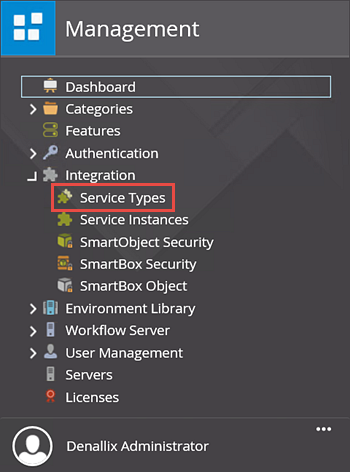
- In the Management menu, expand the Integration category, then click Service Types.
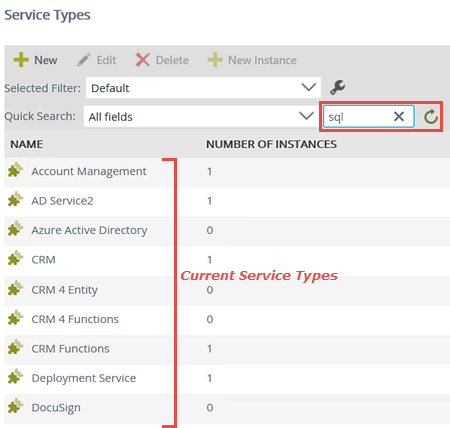
- The available service types are displayed in the Service Types central pane. You will be adding a service instance of the SQL Server Service type for this step. To help you locate the correct service type, enter
sql
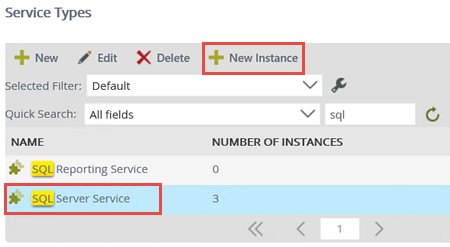
into the search text box, then click the green refresh icon. - At least two service types for SQL are returned: SQL Reporting Service and SQL Server Service. (There may be additional service types depending on your environment.) Click to highlight SQL Server Service, then click the New Instance button.
- Use the table below as a guide for configuring the service instance. For additional reference, see the image below the table. Click OK after you have set the fields.
- You should see a confirmation dialog box. Click OK to close the dialog box.
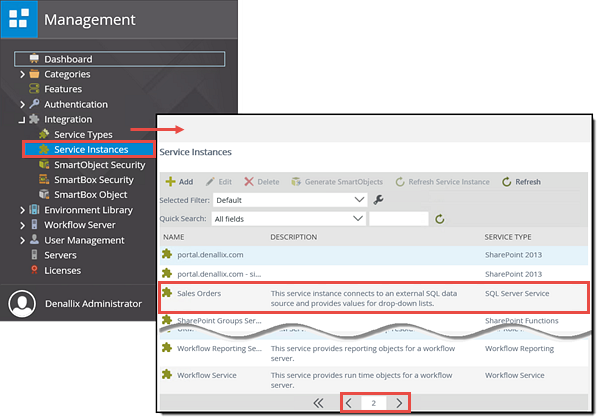
- Still in the Integration node, click Service Instances. Scroll down and locate the Sales Orders service instance. (You may need to navigate to page 2, depending on the number of service instances already created.) Notice the name, description and service type correspond to your configuration settings.
| Field Name | Setting | |
|---|---|---|
| A | Display Name | Sales Orders |
| B | Description | This service instance connects to an external SQL data source and provides values for drop-down lists. |
| C | Service Type | SQL Server Service (default) |
| D | Authentication Mode | Static |
| E | User Name |
K2LearningUser
|
| F | Password | K2LearningPass |
| G | On Different SQL Server | true |
| H | Command Timeout | 90 |
| I | Database | K2Learning
|
| J | Server | uh8ydarb4m.database.windows.net |
| K | Use Native SQL Execution | false |
| Generate SmartObjects for this Service Instance | NOT CHECKED |

Take a moment to locate the new service instance you just created using the following steps.
STEP 2 REVIEW
In Step 2 you began working with the first of the four main components for K2: Data. In the K2 Management site, you explored the available service types, then added a new service instance from the SQL Server Service type. In the next step, you will create corresponding SmartObjects which will allow you to leverage the properties and methods of the external SQL data source.
Now that you have the Sales Orders SQL Server service instance, you will create SmartObjects using K2 Designer to expose the properties and methods from that data source for use in later steps.
Step 3 Tasks
- In K2 Designer, create a new Advanced SmartObject from the SmartObjects category and name it
Regions
then allow the SmartObject to be used in workflows. - Add the List method for the Sales Orders [Denallix].[Region] table, then Create All of the input and return bindings.
- Using the same steps as above, create a new Advanced SmartObject and name it
Customers
then allow it to be used in workflows. Add the List method from the Sales Orders [Sales].[Customers] table and Create All of the input and Rrturn bindings. - Create a third Advanced SmartObject and name it
Products
then allow it to be used in workflows. Add the List method from the Sales Orders [Sales].[Product] table and Create All of the input and return bindings.
- In K2 Designer, right-click the Sales Orders SmartObjects category and select New SmartObject.
- Click Next on the home screen. Name the SmartObject
Regions
and select the Advanced SmartObject option. CHECK the box to Allow this SmartObject to be used in Workflows. Click Next when ready. - On the SmartObject Designer screen, click the Methods tab. Click Add. Locate the Sales Orders service instance you created in the previous step and expand the tree until you can select the [Denallix].[Region] List method. Click Next to continue.
- The Method Details are fine as is, so click Next. On the Default ServiceObject method bindings screen, click Create All.
- Right-click the SmartObjects Category and select New SmartObject. Click Next if you are first on the home screen. Name the SmartObject
Customers
and select the Advanced SmartObject option. CHECK the box to Allow this SmartObject to be used in Workflows. Click Next. - On the SmartObject Designer screen, click the Methods tab, then Add. Navigate to the Sales Orders Service Instance, [Sales].[Customer] table and select the List method. Click Next.
- The Method Details are fine as is, so click Next. On the Default ServiceObject method bindings screen, click Create All. Click Next. Click Finish, then Finish once again to complete the Customers SmartObject.
- Create a new Advanced SmartObject named
Products
and Allow this SmartObject to be used in Workflows. Click Next. - Click the Methods tabs and click Add. Navigate to the Sales Orders Service Instance and expand the tree until you can select the [Sales].[Product] List method. Click Next to continue.
- The Method Details are fine as is, so click Next. On the Default ServiceObject method bindings screen, click Create All. Click Next. Click Finish and then Finish once again to complete the Products SmartObject.
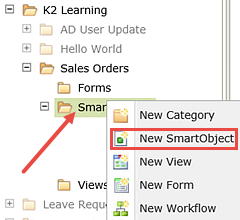
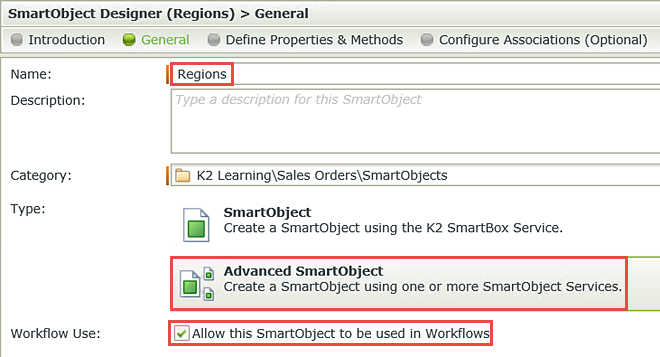
In the next step you are going to select the method type you need for your application. Thinking back to your application design, this SmartObject will be used to populate the region drop-down list on your form. To accomplish this, you only need one method (list) which lists out rows of data source content. If you were going to add a provision that allows users to create new items in this data source, you would simply repeat the steps and add another method to create a new record.
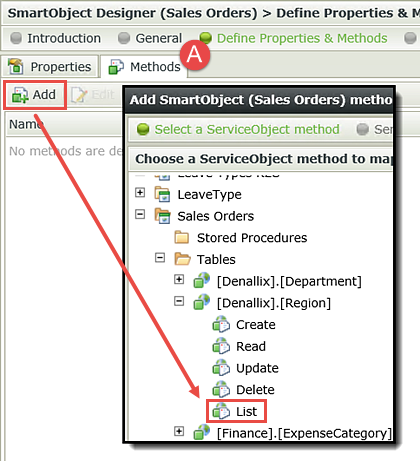
Click Next.
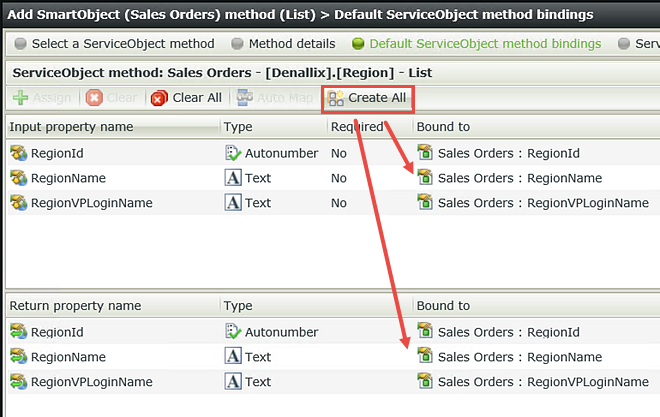
Your screen should look like the image below. You can see that the service instance for this SmartObject is the Sales Orders service instance and the method you have selected is list, based off of the Denallix.Region table. Click Finish to complete and close this SmartObject.

You have now created your Regions SmartObject which will be used to populate the region drop-down list on your form. Using the same steps as above, you will create two more SmartObjects from the Sales Orders service instance. Customers will populate your customer drop-down list based on which region is selected. Products will populate the products drop-down list.
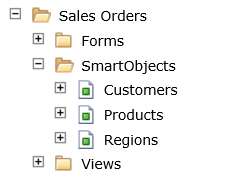
Your SmartObjects category should look like the image below.
STEP 3 REVIEW
In Step 3 you created the Regions, Customers and Products SmartObjects using the Sales Orders service instance. SmartObjects allow you to leverage the properties and methods for a specific data source. In a later step, you will associate the Regions SmartObject and the Products SmartObject with form controls, which will result in the drop-down lists being automatically populated with the appropriate data when the form loads.
Using steps similar to above, you will create a SmartObject that will connect to the Active Directory AD Users service instance. This SmartObject will be used in a picker control for selecting the sales person.
Step 4 Tasks
- From K2 Designer, create a SmartObject called
AD Sales People
and map it to the Active Directory Service2 > AD Users > GetUsers method. Create All of the methods.
- In K2 Designer, right-click the Sales Orders SmartObjects category and select New SmartObject. Click Next on the SmartObjects home screen. Name the SmartObject
AD Sales People
and select the Advanced SmartObject option. CHECK the box to Allow this SmartObject to be used in Workflows. Click Next to continue. - Click the Methods tab, then Add. Expand the Active Directory Service2 ServiceObject trees until you reach the AD User service instance. Select the GetUsers method and click Next.
- The Method Details are fine as is, so click Next. On the Default ServiceObject method bindings screen, click Create All. Click Next to continue.
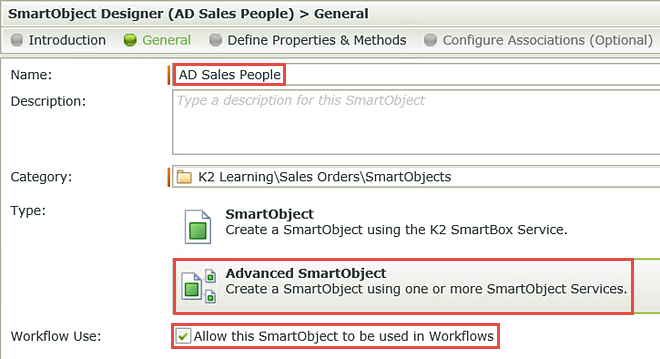
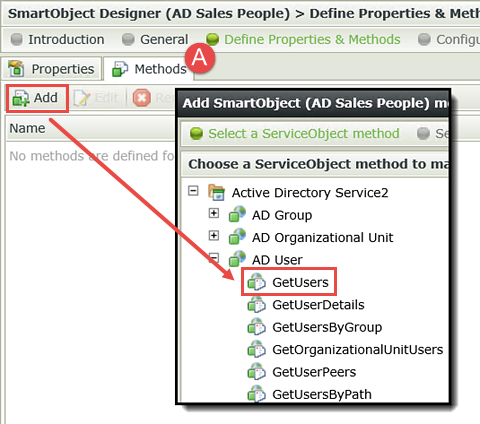
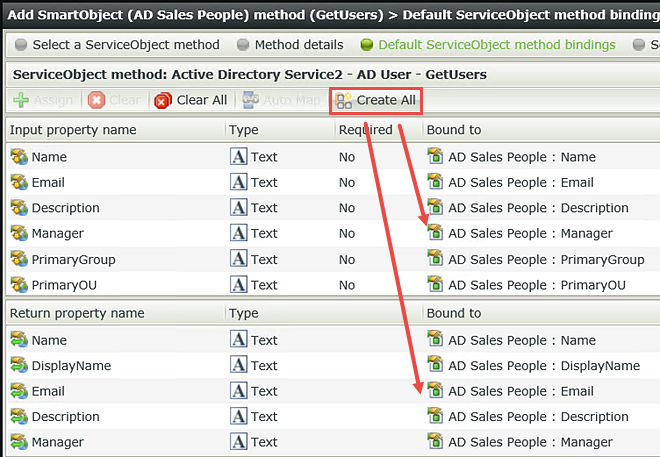
Your screen should look like the image below. Click Finish, then Finish again to complete the AD Sales People SmartObject.

STEP 4 REVIEW
In Step 4 you created a SmartObject connection to Active Directory. In later steps, you will use this SmartObject for a picker control to select the sales person assigned to the sales order. By creating all of the input and return methods, you gain access to the sales person’s Active Directory properties. One property (Manager) is populated with the employee's immediate manager name. In your workflow, you will assign a user task to the manager to approve or not approve the order.
The last two SmartObjects you need for your application are SmartBox SmartObjects. SmartBox is K2-provided storage where K2 creates a new table in the K2 database. When a new sales order is submitted, K2 will create new records in the corresponding SmartBox SmartObjects. The first SmartBox SmartObject will contain the customer and the invoice information. The second SmartBox SmartObject will contain the order items. You will bind the two records using a common property in both SmartObjects, creating a parent-child relationship.
In the previous instances where you created SmartObjects, you automatically mapped them to existing service instance methods (Create All). In Step 5 and Step 6, you are going to create the SmartBox SmartObjects from scratch. You will define your own SmartObject properties and data types (text, date, memo, etc.) then leverage K2’s default methods (create, save, etc.).
Step 5 Tasks
- From K2 Designer, create a SmartBox SmartObject and name it
Sales Orders Header
then allow it to be used workflows. - K2 has automatically added the Key Identifier: ID, property. Add the following additional properties:
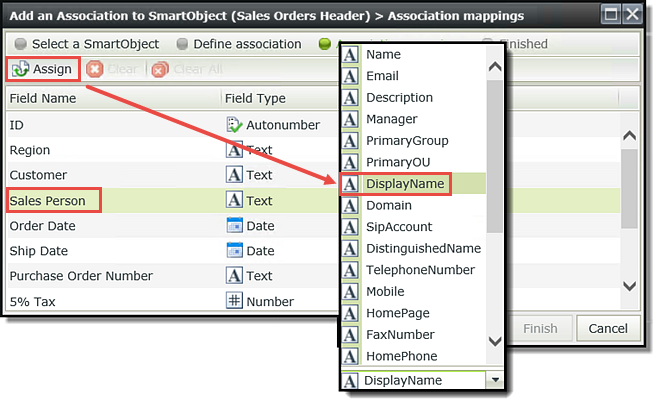
- Associate the Sales Order Header Sales Person property with the AD Sales People SmartObject, DisplayName property. Leave the define associations settings as is.
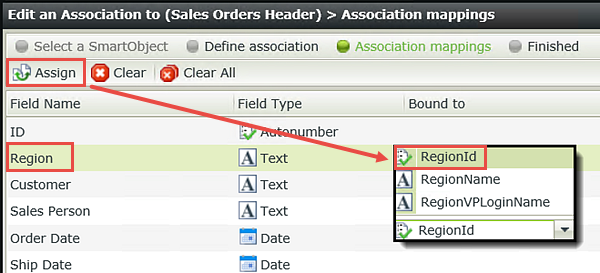
- Associate the Sales Order Header Region property with the Regions SmartObject, RegionID property. Leave the define associations settings as is.
| Name | Type | Notes |
|---|---|---|
| Region | Text | The region drop-down list will be populated with data from the Regions SmartObject. |
| Customer | Text | The customer drop-down list values will cascade from the region selected. |
| Sales Person | Text | The sales person will be a picker control that allows the user to enter just a few keystrokes before it auto-fills based on the characters entered. |
| Order Date | Date | |
| Ship Date | Date | You will configure an expression for the ship date so that it is seven days after the order date. |
| Purchase Order Number | Text | |
| 5% Tax | Decimal | You will configure an expression so that the tax amount is 5% of the sub total. |
| Sub Total | Decimal | The sub total field will get its value from the order items total for all of the orders. |
| Total Due | Decimal | You will configure an expression so that the total due is the sub total plus the tax amount. |
| Comments | Memo | |
| Status | Text | The status field will initially be set to pending, then update to processed as the workflow is completed. |
You will use K2's default methods for this SmartObject.
- In K2 Designer, right-click the Sales Orders SmartObjects category and select New SmartObject. Click Next on the SmartObjects home screen. Name the new SmartObject
Sales Orders Header
and select the SmartBox SmartObject option (it should be the default). CHECK the box to Allow this SmartObject to be used in Workflows. Click Next to continue. - Click Add. Enter the following properties: (See the image below the table for reference.) Click OK, then Next when you have finished adding the properties.
- On the Configure Associations screen, click Add. Navigate to the AD Sales People SmartObject and click Next.
- The Define association settings are fine as is, so click Next.
- On the Association mappings screen, highlight Sales Person and click Assign. Assign the DisplayName property to the Sales Person property. Click OK then Finish.
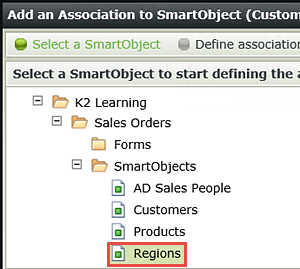
- On the Configure Associations screen, click Add. Navigate to the Regions SmartObject and click Next.
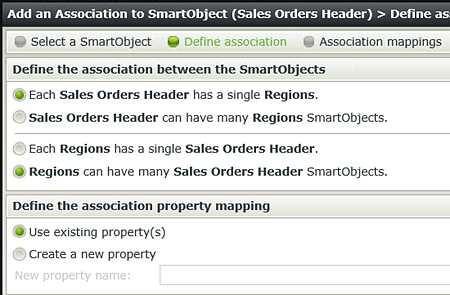
- The Define association settings are fine as is, so click Next.
- Highlight the Region property and click Assign. Assign the RegionID property to the Region property. Click OK, then Finish.
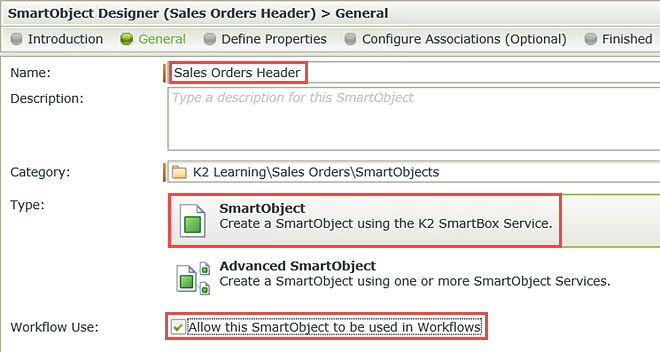
Notice that K2 has automatically generated the key identifier: ID, property. This property creates a unique identifier for each record that is added to the SmartObject. In a later step, you will associate this ID with the HeaderID that you will create in the Sales Orders Items SmartObject. This will bind the two SmartObjects together, creating a parent-child relationship.

| Name | Type | Notes |
|---|---|---|
| Region | Text | The region drop-down list will be populated with data from the Regions SmartObject. |
| Customer | Text | The customer drop-down list options will cascade from the Region selected. |
| Sales Person | Text | The sales person will be a picker control that allows the user to enter just a few keystrokes before it auto-fills based on the characters entered. |
| Order Date | Date | |
| Ship Date | Date | You will configure an expression for the ship date so that it is seven days after the order date. |
| Purchase Order Number | Text | |
| 5% Tax | Decimal | You will configure an expression so that the tax amount is 5% of the sub total. |
| Sub Total | Decimal | The sub total field will get its value from the order items total for all of the orders. |
| Total Due | Decimal | You will configure an expression so that the total due is the sub total plus the tax amount. |
| Comments | Memo | |
| Status | Text | The status field will initially be set to pending, then update to processed as the workflow is completed. |
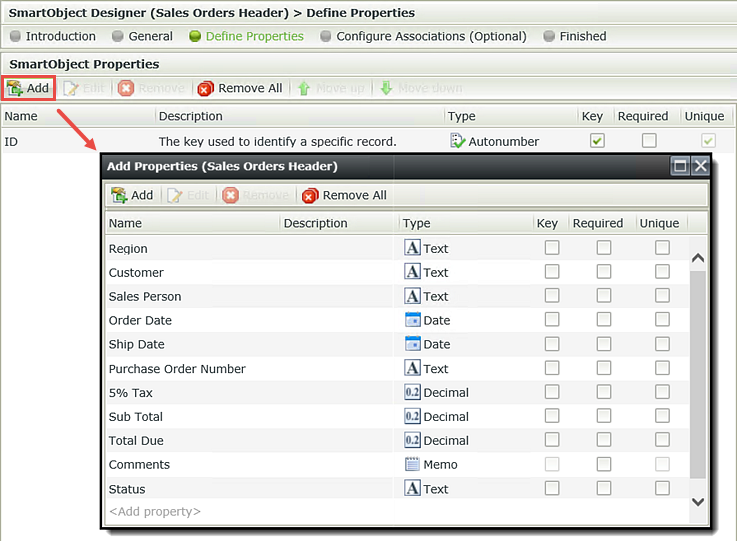
In the next few steps, you are going to associate the Sales Orders Header SmartObject with the Regions and AD Sales People SmartObjects. Associating SmartObjects creates a join statement of sorts, so that your form fields can be automatically populated with data from their corresponding SmartObject. You will first associate the AD Sales People > DisplayName property to the Sales Orders Header > Sales Person property. In a later step, you will change the Sales Person field (on your view) to a picker control so that users can actually search for the sales person they wish to add.
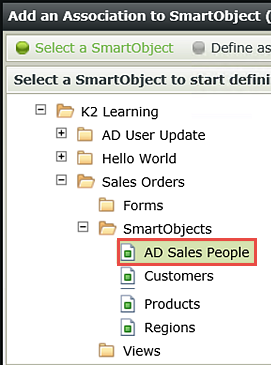
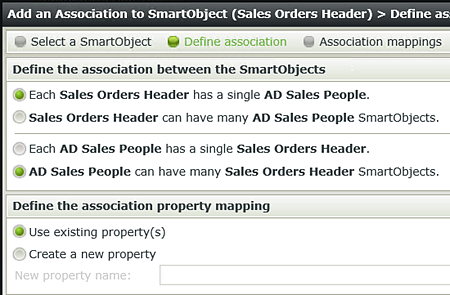
Next you are going to associate the Region SmartObject > RegionID property with the Sales Orders Header > Region property. By associating the Region property with the Regions SmartObject, the text box (data type) will automatically become a drop-down list that will be populated with content from the Regions SmartObject. (This is because you are using the list method, which returns a list of records.) In a later step, you will bind the regions field (on the Sales Orders Header view) with the customer field (on the same view) and add a filter so that when a region is selected, the customer values will be filtered based on their associated region. This is referred to as cascading drop-down lists.
Your screen should look like the image below. Notice on the right side of the screen are the properties you created for the Sales Orders Header SmartObject. In the central pane, you see the two associated SmartObjects (AD Sales People and Regions) with corresponding lines to the Sales Orders Header properties they are associated with.
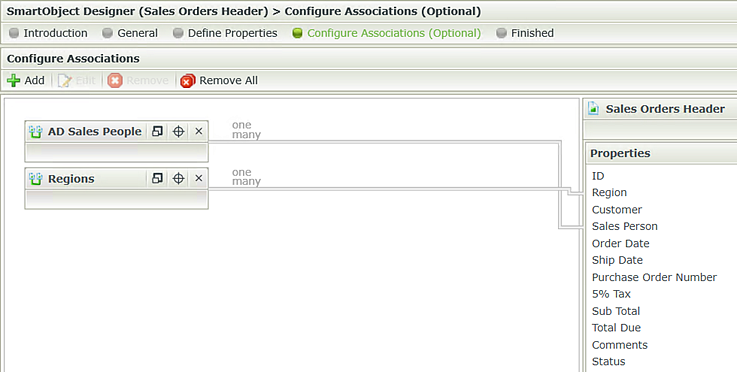
Click Finish once again to close the Sales Orders Header SmartObject designer.
STEP 5 REVIEW
In Step 5 you created the first of two SmartBox SmartObjects. SmartBox SmartObjects are K2-provided storage using a SQL server table that is automatically generated as part of the SmartBox component. K2 then provides a series of default methods (create and save, for example) that can be used in forms, views and workflows. The Sales Orders Header SmartObject will store the item view content containing your customer and invoice information.
The final SmartBox SmartObject you will create will store the data from the list view containing the items ordered. This SmartObject, called Sales Orders Items, will create a new record for each item ordered, with each record being bound to the parent record (in the Sales Orders Header SmartObject). You will add a rule in a later step that will make the value of the HeaderID property match the value of the ID property from the Sales Orders Header SmartObject. This will create a parent-child relationship between the two SmartObjects and will make it possible for you to retrieve matching records from both SmartObjects.
Step 6 Tasks
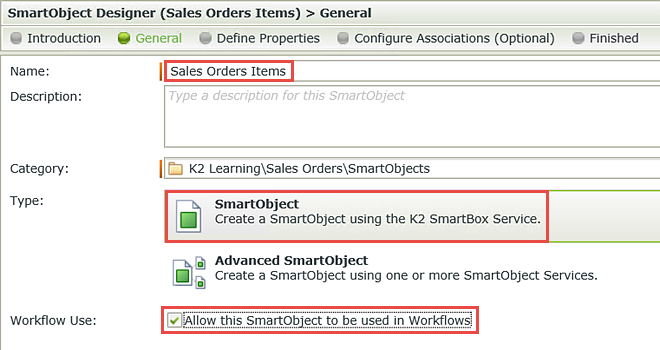
- Create a SmartBox SmartObject. Name it
Sales Orders Items
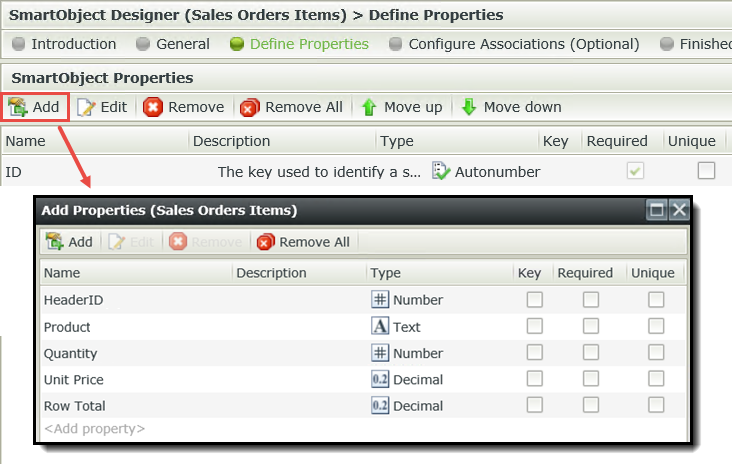
and allow it to be used in workflows. - Add the following properties:
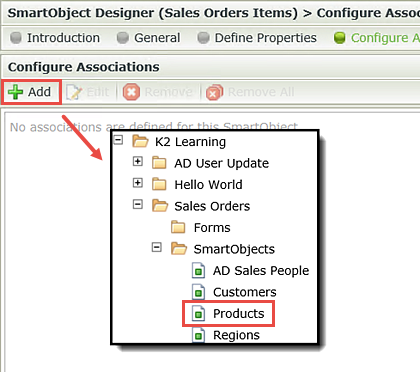
- Associate the Sales Orders Items > Product property with the Products SmartObject > ProductName property. Leave the define association settings as is.
| Name | Type | Notes |
|---|---|---|
| HeaderID | Number | This property will be the property you associate with the Sales Orders Header SmartObject > ID, property so that each Sales Orders Items record is bound to a Sales Orders Header record. You will create this association through a rule that you will add in a later step. |
| Product | Text | The product drop-down list will be populated with data from the Products SmartObject. |
| Quantity | Number | |
| Unit Price | Decimal | You will create a rule that loads the unit price when a product is selected. |
| Row Total | Decimal | You will create an expression that multiplies the unit price by the quantity for a row total. |
- Create a new SmartObject from the SmartObjects category and name it
Sales Orders Items
then select the SmartBox option. CHECK the box to Allow this SmartObject to be used in Workflows. Click Next to continue. - Click Add and enter the following properties: (See the image below the table for reference.) Click OK, then Next when you have finished adding the properties.
- On the Configure Associations screen, click Add. Navigate to and select the Products SmartObject. Click Next.
- The Define associates settings are fine as is, so click Next.
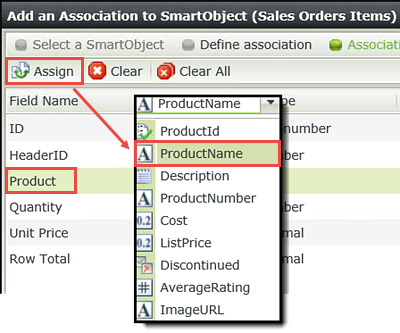
- On the Association mappings screen, highlight the Product property and click Assign. Select ProductName from the drop-down list and click OK, then Finish to complete the Sales Orders Items SmartObject. Click Finish to exit the designer.
| Name | Type | Notes |
|---|---|---|
| HeaderID | Number | This property will be the property you associate with the Sales Orders Header SmartObject > ID, property so that each Sales Orders Items record is bound to a Sales Orders Header record. You will create this association through a rule that you will add in a later step. |
| Product | Text | The product drop-down list will be populated with data from the Products SmartObject. |
| Quantity | Number | |
| Unit Price | Decimal | You will create a rule that loads the unit price when a product is selected. |
| Row Total | Decimal | You will create an expression that multiplies the unit price by the quantity for a row total. |
Recall in the previous step you associated the AD Sales People SmartObject > DisplayName property with the Sales Orders Header > Sales Person property. You will now perform the same step and associate the Sales Orders Items > Product property with the Products SmartObject > ProductName property.
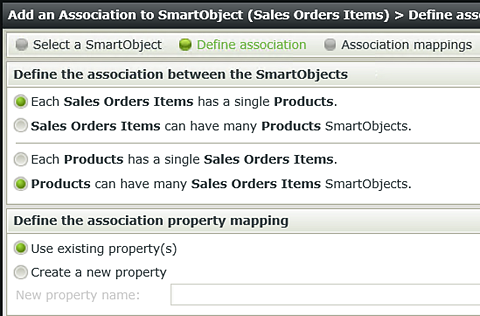
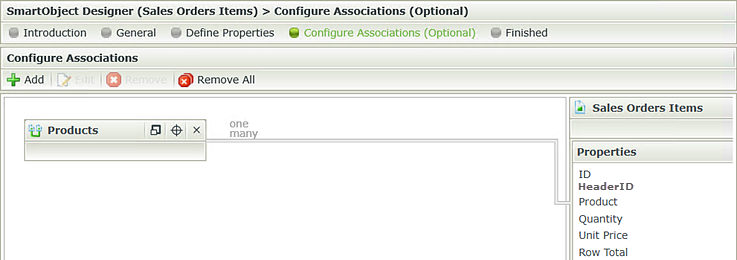
Your screen should look like the image below. Notice once again the Sales Orders Items SmartObject properties are shown on the right side of the screen with the Products association in the central pane.
STEP 6 REVIEW
In Step 6 you created the last data source required for your application, the Sales Orders Items SmartObject. You associated the Product property with the ProductName property from the Products SmartObject. You also created the HeaderID property, which will be used to bind the Sales Orders Items SmartObject with the Sales Orders Header SmartObject in later steps.
When you are ready to start building the views and forms for this application, continue on to Part 2: Views to get started.